
User manual
Page 8
... ........ 13 Step 5: Inserting batteries into the remote control 13 Using the remote control to operate the system 13 USB PC Link Quick Setup Guide 14 PC system requirement 14 Install MusicMatch software 14 Enable digital CD audio output 15 Connecting USB PC Link 15 Basic ...Clearing the program 20 Tuner Operations Tuning to radio stations 21 Presetting radio stations 21 Using the Plug and Play 21 Automatic presetting 21 Manual presetting 21 Selecting a preset radio station 21 Deleting a preset radio station 21 Timer Operations Timer setting 22 Activating/Deactivating the timer ...
... ........ 13 Step 5: Inserting batteries into the remote control 13 Using the remote control to operate the system 13 USB PC Link Quick Setup Guide 14 PC system requirement 14 Install MusicMatch software 14 Enable digital CD audio output 15 Connecting USB PC Link 15 Basic ...Clearing the program 20 Tuner Operations Tuning to radio stations 21 Presetting radio stations 21 Using the Plug and Play 21 Automatic presetting 21 Manual presetting 21 Selecting a preset radio station 21 Deleting a preset radio station 21 Timer Operations Timer setting 22 Activating/Deactivating the timer ...
User manual
Page 10
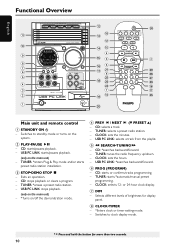
... SOUND PROG DIM CLOCK•TIMER SEARCH •TUNING PLAY• PAUSE DSC VEC MASTER VOLUME CD TUNER PREV NEXT PRESET STOP •DEMO STOP MICRO SYSTEM AUX USB PC LINK STANDBY ON @ #* @ $% 4 %3 ^5 &¡ 6 7 ($ ) º 2 Main unit and remote control 1 STANDBY ON B - ... 8 CLOCK•TIMER - *Enters clock or timer setting mode. - TUNER: *erases a preset radio station. - TUNER: starts *automatic/manual preset programming. - Selects different levels of brightness for more than two seconds. 10 Exits an operation. - CD: stops playback or clears a program. -
... SOUND PROG DIM CLOCK•TIMER SEARCH •TUNING PLAY• PAUSE DSC VEC MASTER VOLUME CD TUNER PREV NEXT PRESET STOP •DEMO STOP MICRO SYSTEM AUX USB PC LINK STANDBY ON @ #* @ $% 4 %3 ^5 &¡ 6 7 ($ ) º 2 Main unit and remote control 1 STANDBY ON B - ... 8 CLOCK•TIMER - *Enters clock or timer setting mode. - TUNER: *erases a preset radio station. - TUNER: starts *automatic/manual preset programming. - Selects different levels of brightness for more than two seconds. 10 Exits an operation. - CD: stops playback or clears a program. -

User manual
Page 15
...to "Quick Setup Guide" for this system. The display only supports English characters. For Windows ME/ 2000/ XP 1 Enter the system control panel menu and select: "SYSTEM ™ HARDWARE ™ DEVICE MANAGER ... CD-ROM DRIVES ™ ACTION-PROPERTIES ™ PROPERTIES". IMPORTANT! OR For Windows 98 Enter the system control panel menu and select: "MULTIMEDIA" and "CD MUSIC". 2 Check the 'Enable digital CD ...flashing. ➜ If "NO CONNECTION" is displayed, check the connection between your PC and micro system. 3 Press í or ë until the desired track in the playlist is selected...
...to "Quick Setup Guide" for this system. The display only supports English characters. For Windows ME/ 2000/ XP 1 Enter the system control panel menu and select: "SYSTEM ™ HARDWARE ™ DEVICE MANAGER ... CD-ROM DRIVES ™ ACTION-PROPERTIES ™ PROPERTIES". IMPORTANT! OR For Windows 98 Enter the system control panel menu and select: "MULTIMEDIA" and "CD MUSIC". 2 Check the 'Enable digital CD ...flashing. ➜ If "NO CONNECTION" is displayed, check the connection between your PC and micro system. 3 Press í or ë until the desired track in the playlist is selected...

User manual
Page 21
Tuning to radio stations 1 Press TUNER to the power supply, "AUTO INSTALL - Manual presetting You can start the automatic presetting from a selected preset number. 1 In tuner mode, press í or ë to select a preset number. 2 Press and hold..."CHECK ANTENNA" is displayed. Repeat steps 1-3 to store the radio station in the memory, starting from preset (1) and all available radio stations automatically. 1 Connect the system to enter tuner mode. For tuning to store. Deleting a preset radio station Press and hold à or á until "PRESET DELETED" is found. To select...
Tuning to radio stations 1 Press TUNER to the power supply, "AUTO INSTALL - Manual presetting You can start the automatic presetting from a selected preset number. 1 In tuner mode, press í or ë to select a preset number. 2 Press and hold..."CHECK ANTENNA" is displayed. Repeat steps 1-3 to store the radio station in the memory, starting from preset (1) and all available radio stations automatically. 1 Connect the system to enter tuner mode. For tuning to store. Deleting a preset radio station Press and hold à or á until "PRESET DELETED" is found. To select...
User manual
Page 23
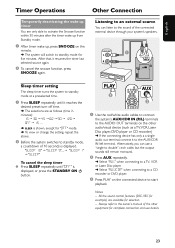
...displayed. AUDIO OUT L R 1 R L AUX/ CDR IN AC MAINS R L AUX/ CDR IN AM ANTENNA FM ANTENNA + - - + R L SPEAKERS 6Ω Sleep timer setting The sleep timer turns the system to standby mode at a preselected time. 1 Press SLEEP repeatedly until "OFF" is shown, except for selection. - "SLEEP 10" ™ "SLEEP 9".... ™ "SLEEP 1" ™ "SLEEP" To... Select "AUX/CDR" when connecting to a CD recorder or DVD player. 3 Press PLAY on the other equipment for five minutes. Always refer to the owner's manual of the connected external device through your system's speakers.
...displayed. AUDIO OUT L R 1 R L AUX/ CDR IN AC MAINS R L AUX/ CDR IN AM ANTENNA FM ANTENNA + - - + R L SPEAKERS 6Ω Sleep timer setting The sleep timer turns the system to standby mode at a preselected time. 1 Press SLEEP repeatedly until "OFF" is shown, except for selection. - "SLEEP 10" ™ "SLEEP 9".... ™ "SLEEP 1" ™ "SLEEP" To... Select "AUX/CDR" when connecting to a CD recorder or DVD player. 3 Press PLAY on the other equipment for five minutes. Always refer to the owner's manual of the connected external device through your system's speakers.

User manual
Page 26
...your sales receipt or other cause not within the control of Philips. • reception problems caused by Philips. Philips is not liable under any country other document showing that you ... warranties. VIRGIN ISLANDS... Centers may be a delay if the appropriate spare parts and technical manual(s) are expressed or implied, including any direct, indirect, special, incidental or consequential damages, ...howsoever incurred, even if notified of the possibility of purchase. LIMITED WARRANTY AUDIO SYSTEM One Year Free Labor One Year Free Service on Parts This product must be ...
...your sales receipt or other cause not within the control of Philips. • reception problems caused by Philips. Philips is not liable under any country other document showing that you ... warranties. VIRGIN ISLANDS... Centers may be a delay if the appropriate spare parts and technical manual(s) are expressed or implied, including any direct, indirect, special, incidental or consequential damages, ...howsoever incurred, even if notified of the possibility of purchase. LIMITED WARRANTY AUDIO SYSTEM One Year Free Labor One Year Free Service on Parts This product must be ...


