
User manual
Page 8
... ........ 13 Step 5: Inserting batteries into the remote control 13 Using the remote control to operate the system 13 USB PC Link Quick Setup Guide 14 PC system requirement 14 Install MusicMatch software 14 Enable digital CD audio output 15 Connecting USB PC Link 15 Basic ...Clearing the program 20 Tuner Operations Tuning to radio stations 21 Presetting radio stations 21 Using the Plug and Play 21 Automatic presetting 21 Manual presetting 21 Selecting a preset radio station 21 Deleting a preset radio station 21 Timer Operations Timer setting 22 Activating/Deactivating the timer ...
... ........ 13 Step 5: Inserting batteries into the remote control 13 Using the remote control to operate the system 13 USB PC Link Quick Setup Guide 14 PC system requirement 14 Install MusicMatch software 14 Enable digital CD audio output 15 Connecting USB PC Link 15 Basic ...Clearing the program 20 Tuner Operations Tuning to radio stations 21 Presetting radio stations 21 Using the Plug and Play 21 Automatic presetting 21 Manual presetting 21 Selecting a preset radio station 21 Deleting a preset radio station 21 Timer Operations Timer setting 22 Activating/Deactivating the timer ...
User manual
Page 10
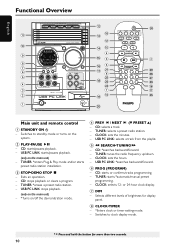
...SOUND PROG DIM CLOCK•TIMER SEARCH •TUNING PLAY• PAUSE DSC VEC MASTER VOLUME CD TUNER PREV NEXT PRESET STOP •DEMO STOP MICRO SYSTEM AUX USB PC LINK STANDBY ON @ #* @ $% 4 %3 ^5 &¡ 6 7 ($ ) º 2 Main unit and remote ...control 1 STANDBY ON B - Exits an operation. - CLOCK: sets the minutes. - CD: *searches backward/forward. - TUNER: starts *automatic/manual preset programming. - CLOCK: selects 12- Switches to clock display mode. * = Press and hold the button for display panel. 8 CLOCK•TIMER - *Enters clock...
...SOUND PROG DIM CLOCK•TIMER SEARCH •TUNING PLAY• PAUSE DSC VEC MASTER VOLUME CD TUNER PREV NEXT PRESET STOP •DEMO STOP MICRO SYSTEM AUX USB PC LINK STANDBY ON @ #* @ $% 4 %3 ^5 &¡ 6 7 ($ ) º 2 Main unit and remote ...control 1 STANDBY ON B - Exits an operation. - CLOCK: sets the minutes. - CD: *searches backward/forward. - TUNER: starts *automatic/manual preset programming. - CLOCK: selects 12- Switches to clock display mode. * = Press and hold the button for display panel. 8 CLOCK•TIMER - *Enters clock...

User manual
Page 15
For Windows ME/ 2000/ XP 1 Enter the system control panel menu and select: "SYSTEM ™ HARDWARE ™ DEVICE MANAGER ™ CD-ROM DRIVES ™ ACTION-PROPERTIES ™ PROPERTIES". During playback, - Press SHUFFLE to play all the tracks in the.... ➜ If "NO CONNECTION" is displayed, check the connection between your PC and micro system. 3 Press í or ë until the desired track in random order. - Press REPEAT to your PC's manual for this system. OR For Windows 98 Enter the system control panel menu and select: "MULTIMEDIA" and "CD MUSIC". 2 Check the 'Enable ...
For Windows ME/ 2000/ XP 1 Enter the system control panel menu and select: "SYSTEM ™ HARDWARE ™ DEVICE MANAGER ™ CD-ROM DRIVES ™ ACTION-PROPERTIES ™ PROPERTIES". During playback, - Press SHUFFLE to play all the tracks in the.... ➜ If "NO CONNECTION" is displayed, check the connection between your PC and micro system. 3 Press í or ë until the desired track in random order. - Press REPEAT to your PC's manual for this system. OR For Windows 98 Enter the system control panel menu and select: "MULTIMEDIA" and "CD MUSIC". 2 Check the 'Enable ...

User manual
Page 21
... a radio station has been stored in the memory, starting from preset (1) and all available radio stations automatically. 1 Connect the system to radio stations"). 2 Press PROGRAM (PROG). ➜ The preset number starts flashing. Manual presetting You can start installation. ➜ "INSTALL TUNER" is displayed. ➜ All previously stored radio stations will be played...
... a radio station has been stored in the memory, starting from preset (1) and all available radio stations automatically. 1 Connect the system to radio stations"). 2 Press PROGRAM (PROG). ➜ The preset number starts flashing. Manual presetting You can start installation. ➜ "INSTALL TUNER" is displayed. ➜ All previously stored radio stations will be played...
User manual
Page 23
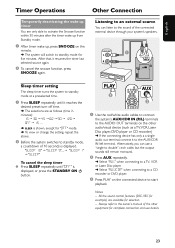
... until "OFF" is displayed, or press the STANDBY ON B button. PLAY 3 AUX 2 1 Use the red/white audio cables to connect the system's AUX/CDR IN (R/L) terminals to the AUDIO OUT terminals on the connected device to start playback. English Timer Operations Other Connection Temporarily deactivating the wake..." when connecting to a CD recorder or DVD player. 3 Press PLAY on the other equipment for five minutes. Notes: - Always refer to the owner's manual of the other audio/visual device (such as follows (time in minutes): 15 ™ 30 ™ 45 ™ 60 ™ 90 ™ ...
... until "OFF" is displayed, or press the STANDBY ON B button. PLAY 3 AUX 2 1 Use the red/white audio cables to connect the system's AUX/CDR IN (R/L) terminals to the AUDIO OUT terminals on the connected device to start playback. English Timer Operations Other Connection Temporarily deactivating the wake..." when connecting to a CD recorder or DVD player. 3 Press PLAY on the other equipment for five minutes. Notes: - Always refer to the owner's manual of the other audio/visual device (such as follows (time in minutes): 15 ™ 30 ™ 45 ™ 60 ™ 90 ™ ...

User manual
Page 26
... allow limitations on how long an implied warranty may last, this express warranty. Also, please fill out and mail your owner's manual for any direct, indirect, special, incidental or consequential damages, howsoever incurred, even if notified of the possibility of such damages.) ...or part replacement because of misuse, accident, unauthorized repair or other cause not within the control of Philips. • reception problems caused by signal conditions or cable or antenna systems outside the unit. • a product that you purchased the product is officially distributed by these ...
... allow limitations on how long an implied warranty may last, this express warranty. Also, please fill out and mail your owner's manual for any direct, indirect, special, incidental or consequential damages, howsoever incurred, even if notified of the possibility of such damages.) ...or part replacement because of misuse, accident, unauthorized repair or other cause not within the control of Philips. • reception problems caused by signal conditions or cable or antenna systems outside the unit. • a product that you purchased the product is officially distributed by these ...


