
User Manual
Page 2
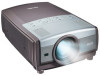
...your household, please do not stare directly into the lens as the European CE marking. The CE Mark is the following: Philips Consumer Electronics Company One Philips Drive Knoxville, TN 37914 Telephone (1888) 873-4672 WARNING: TO REDUCE THE RISK OF FIRE OR ELECTRIC SHOCK, DO NOT... device to radio or television reception, which you should read the enclosed literature closely to prevent operating and maintenance problems. CAUTION This projector produces intense light from that may cause an electric shock. CAUTION RISK OF ELECTRIC SHOCK. DO NOT REMOVE SCREWS EXCEPT SPECIFIED USER SERVICE...
...your household, please do not stare directly into the lens as the European CE marking. The CE Mark is the following: Philips Consumer Electronics Company One Philips Drive Knoxville, TN 37914 Telephone (1888) 873-4672 WARNING: TO REDUCE THE RISK OF FIRE OR ELECTRIC SHOCK, DO NOT... device to radio or television reception, which you should read the enclosed literature closely to prevent operating and maintenance problems. CAUTION This projector produces intense light from that may cause an electric shock. CAUTION RISK OF ELECTRIC SHOCK. DO NOT REMOVE SCREWS EXCEPT SPECIFIED USER SERVICE...

User Manual
Page 3
...the service technician has used replacement parts specified by the manufacturer that are covered by PHILIPS, as a bookcase unless proper ventilation is in safe operating condition. 19. This projector has been engineered and manufactured to clean the air filter after every 100 lamp hours....outlet. C. D. These openings should not be operated only from the wall outlet before you to defeat the safeguards incorporated into the projector. 5. The 3pin/2-pin grounded plug will often require extensive work by wiping with the appropriate power cord. Do not use liquid ...
...the service technician has used replacement parts specified by the manufacturer that are covered by PHILIPS, as a bookcase unless proper ventilation is in safe operating condition. 19. This projector has been engineered and manufactured to clean the air filter after every 100 lamp hours....outlet. C. D. These openings should not be operated only from the wall outlet before you to defeat the safeguards incorporated into the projector. 5. The 3pin/2-pin grounded plug will often require extensive work by wiping with the appropriate power cord. Do not use liquid ...
User Manual
Page 4
...top, sides and rear of the unit. CAUTION CONCERNING THE SETUP OF THE PROJECTOR For minimal servicing and to maintain high image quality, Philips recommends that this projector be extremely hot during projector operation due to changes in an area free from the ventilation holes. Side... put any flammable object or spray can also be performed by a Philips Authorised LCD Projector Dealer or Service Centre. Do not put the projector on the projector. Internal cleaning should only be dangerous. If the projector is exhausted from humidity, dust and cigarettesmoke. Hot air is to be...
...top, sides and rear of the unit. CAUTION CONCERNING THE SETUP OF THE PROJECTOR For minimal servicing and to maintain high image quality, Philips recommends that this projector be extremely hot during projector operation due to changes in an area free from the ventilation holes. Side... put any flammable object or spray can also be performed by a Philips Authorised LCD Projector Dealer or Service Centre. Do not put the projector on the projector. Internal cleaning should only be dangerous. If the projector is exhausted from humidity, dust and cigarettesmoke. Hot air is to be...
User Manual
Page 5
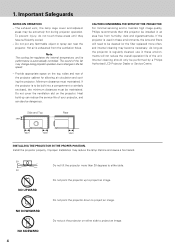
...28 Image Level Select (Menu 28 Image Level Adjustment 29 Picture Screen Adjustment 30 9. Appendix 43-50 Troubleshooting 43 Indicators and Projector Condition 45 Menu Tree 46 Compatible Computer Specification 49 Technical Specifications 50 5 Table of Contents 1. Video Input 31-35 Selecting ...32-35 Image Level Select (Direct 33 Image Level Select (Menu 33 Image Level Adjustment 34 Picture Screen Adjustment 35 10. Projector Features 6 4. Maintenance 39-42 Temperature Warning Indicator 39 Air Filter Care and Cleaning 40 Cleaning Projection Lens 40 Lamp Replacement ...
...28 Image Level Select (Menu 28 Image Level Adjustment 29 Picture Screen Adjustment 30 9. Appendix 43-50 Troubleshooting 43 Indicators and Projector Condition 45 Menu Tree 46 Compatible Computer Specification 49 Technical Specifications 50 5 Table of Contents 1. Video Input 31-35 Selecting ...32-35 Image Level Select (Direct 33 Image Level Select (Menu 33 Image Level Adjustment 34 Picture Screen Adjustment 35 10. Projector Features 6 4. Maintenance 39-42 Temperature Warning Indicator 39 Air Filter Care and Cleaning 40 Cleaning Projection Lens 40 Lamp Replacement ...
User Manual
Page 6
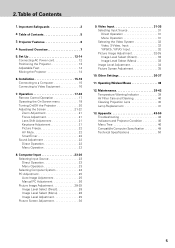
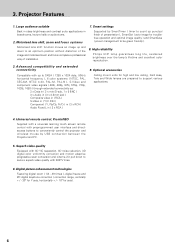
... halls or auditoriums. 2. Optional accessories Ceiling mount units for axis ). 6 Motorised lens shift, zoom and focus systems Supported by USB connection between the Projector and PC. 5. High reliability Philips UHP lamp guarantees long life, sustained brightness over the lamp's lifetime and excellent color reproduction. 3. 3. Advanced compatibility and extended connectivity Compatible with preprogrammed...
... halls or auditoriums. 2. Optional accessories Ceiling mount units for axis ). 6 Motorised lens shift, zoom and focus systems Supported by USB connection between the Projector and PC. 5. High reliability Philips UHP lamp guarantees long life, sustained brightness over the lamp's lifetime and excellent color reproduction. 3. 3. Advanced compatibility and extended connectivity Compatible with preprogrammed...

User Manual
Page 7
... q w e r Rear y q Bottom q Main Unit q Speakers w IR sensor For receiving signals from the remote e control. u Top control See the next page. w AC socket For connecting the projector to AC power cord. w q Air intake vent Intake of air for ventilation. y t q Terminals t See page 9. y IR sensor r For receiving signals from the remote control. e Projection...
... q w e r Rear y q Bottom q Main Unit q Speakers w IR sensor For receiving signals from the remote e control. u Top control See the next page. w AC socket For connecting the projector to AC power cord. w q Air intake vent Intake of air for ventilation. y t q Terminals t See page 9. y IR sensor r For receiving signals from the remote control. e Projection...
User Manual
Page 8
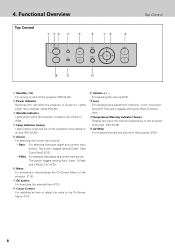
..., focus and lens shift.The button toggles among the three functions. (P21) !1Temperature Warning Indicator (Temp.) Flashes red when the internal temperature of the projector is too high. (P20,39,45) !2 AV Mute For muting the sound and picture of the projection lamp draws to be turned on . Lights ...- The button toggles among Auto, Video, S-Video and Y,Pb/Cb, Pr/Cr.(P31) y Menu For activating or de-activating the On-Screen Menu of the projector. (P18) u OK button For executing the selected item.(P18) i Cursor Control For selecting an item or adjust the value in standby mode.(P20,45) e ...
..., focus and lens shift.The button toggles among the three functions. (P21) !1Temperature Warning Indicator (Temp.) Flashes red when the internal temperature of the projector is too high. (P20,39,45) !2 AV Mute For muting the sound and picture of the projection lamp draws to be turned on . Lights ...- The button toggles among Auto, Video, S-Video and Y,Pb/Cb, Pr/Cr.(P31) y Menu For activating or de-activating the On-Screen Menu of the projector. (P18) u OK button For executing the selected item.(P18) i Cursor Control For selecting an item or adjust the value in standby mode.(P20,45) e ...

User Manual
Page 9
... from video equipment. !1 Component video input Input socket for connecting the component video output from video equipment. !2 Audio in the projector may occasionally malfunction and need to Audio out sockets of the projector. Input socket for connecting to be reset. e Data 3 in / out (Switchable) - Do not use it excessively. u RS-232C port...
... from video equipment. !1 Component video input Input socket for connecting the component video output from video equipment. !2 Audio in the projector may occasionally malfunction and need to Audio out sockets of the projector. Input socket for connecting to be reset. e Data 3 in / out (Switchable) - Do not use it excessively. u RS-232C port...

User Manual
Page 10
... this button. (Jump to Main Menu, see the next page.) !0 Volume Up / Down For adjusting the volume.(P22) !1 Mute For muting the sound of the projector. (P22) !2 Cursor Control For operating and navigate through the activated menu via Up/Down and Left/Right buttons.(P18) !3 OK For executing the action in...
... this button. (Jump to Main Menu, see the next page.) !0 Volume Up / Down For adjusting the volume.(P22) !1 Mute For muting the sound of the projector. (P22) !2 Cursor Control For operating and navigate through the activated menu via Up/Down and Left/Right buttons.(P18) !3 OK For executing the action in...

User Manual
Page 11
.... (P38) @7 Cursor pointers When using the remote control as a PC mouse in wireless mouse operation, these menus. Functional Overview Remote Control Unit Remote Control Unit Projector Menu 1/4 Main Menu 2/4 Lens Menu q !5 !6 w !4 e r !3 !7 t !2 y !8 !1 3/4 Feature Menu 4/4 Mouse Menu !9 @5 @6 @0 @4 @1 @7 @2 @3 u i ...to the Lens Menu. !3 S-video For selecting S-video input. (P31) !4 D3 For selecting Data 3 input. (P23) !5 off For turing off the projector. (P20) !6 focus - / + For adjusting the lens focus. (P21) !7 zoom - / + For adjusting the zoom. (P21) !8 lens ...
.... (P38) @7 Cursor pointers When using the remote control as a PC mouse in wireless mouse operation, these menus. Functional Overview Remote Control Unit Remote Control Unit Projector Menu 1/4 Main Menu 2/4 Lens Menu q !5 !6 w !4 e r !3 !7 t !2 y !8 !1 3/4 Feature Menu 4/4 Mouse Menu !9 @5 @6 @0 @4 @1 @7 @2 @3 u i ...to the Lens Menu. !3 S-video For selecting S-video input. (P31) !4 D3 For selecting Data 3 input. (P23) !5 off For turing off the projector. (P20) !6 focus - / + For adjusting the lens focus. (P21) !7 zoom - / + For adjusting the zoom. (P21) !8 lens ...
User Manual
Page 12
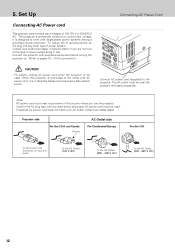
...other type of 100-120 V or 200-240 V AC. Connect AC power cord (supplied) to the outlet with peripheral equipment before turning the projector on your sales dealer. Confirm the AC plug type with single-phase power systems having a grounded neutral conductor. To the power cord Connector on ... designed to pages 15 ~ 16 for connection.) Connecting AC Power Cord CAUTION For safety, unplug AC power cord when the projector is in use the projector. When this projector is connected to the projector. To the AC Outlet. (120 V AC) To the AC Outlet. (200 - 240 V AC) To the AC Outlet. (...
...other type of 100-120 V or 200-240 V AC. Connect AC power cord (supplied) to the outlet with peripheral equipment before turning the projector on your sales dealer. Confirm the AC plug type with single-phase power systems having a grounded neutral conductor. To the power cord Connector on ... designed to pages 15 ~ 16 for connection.) Connecting AC Power Cord CAUTION For safety, unplug AC power cord when the projector is in use the projector. When this projector is connected to the projector. To the AC Outlet. (120 V AC) To the AC Outlet. (200 - 240 V AC) To the AC Outlet. (...

User Manual
Page 13
Set Up Positioning the Projector - Positioning the Projector Note: The brightness of a room has a great influence on a flat projection surface. - Zoom 231" Min. Zoom Min. Zoom ...The Projection lens can be moved up and down with motorised lens shift function. The lower most lens shift. This projector is recommended to limit ambient lighting to project on image quality. Refer to the figure below to an optimum position....21 for operation. 1 1 The upper most lens shift. 13 Zoom Screen Size Max. The projector can be focused from 4.1' (1.2m) ~ 32.8' (10.0m). - 5.
Set Up Positioning the Projector - Positioning the Projector Note: The brightness of a room has a great influence on a flat projection surface. - Zoom 231" Min. Zoom Min. Zoom ...The Projection lens can be moved up and down with motorised lens shift function. The lower most lens shift. This projector is recommended to limit ambient lighting to project on image quality. Refer to the figure below to an optimum position....21 for operation. 1 1 The upper most lens shift. 13 Zoom Screen Size Max. The projector can be focused from 4.1' (1.2m) ~ 32.8' (10.0m). - 5.

User Manual
Page 14
... to protect from dust and scratches on the cabinet. When moving the projector. CAUTION IN CARRYING OR TRANSPORTING THE PROJECTOR - Do not transport the projector through a courier or transport service, consult a Philips Authorised LCD Projector Dealer. The projector can be damaged. When carrying the projector, use for an extended period, put other things on the surface of...
... to protect from dust and scratches on the cabinet. When moving the projector. CAUTION IN CARRYING OR TRANSPORTING THE PROJECTOR - Do not transport the projector through a courier or transport service, consult a Philips Authorised LCD Projector Dealer. The projector can be damaged. When carrying the projector, use for an extended period, put other things on the surface of...
User Manual
Page 15
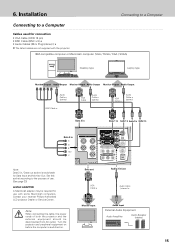
...• Audio Cables {Mini Plug (stereo) } ✽ ✽ The listed cables are not supplied with some Macintosh computers. Contact your nearest Philips Authorised LCD projector Dealer or Service Centre. Data out Audio 3 in / Data out socket is switched on before the computer is switchable for use with the... projector. 6. Turn the projector and peripheral equipment on . Note: When connecting the cable, the power cords of use. (See page 23) ◆ MAC...
...• Audio Cables {Mini Plug (stereo) } ✽ ✽ The listed cables are not supplied with some Macintosh computers. Contact your nearest Philips Authorised LCD projector Dealer or Service Centre. Data out Audio 3 in / Data out socket is switched on before the computer is switchable for use with the... projector. 6. Turn the projector and peripheral equipment on . Note: When connecting the cable, the power cords of use. (See page 23) ◆ MAC...

User Manual
Page 16
.../Cb,Pr/Cr sockets. • When both Video socket and S-Video socket are connected, S-Video socket has priority over Video socket. • When both the projector and the external equipment should be disconnected from AC outlet. 16 Audio 3 in/out Audio Cable (Stereo) Audio Input External Audio Equipment Audio Amplifier Audio...
.../Cb,Pr/Cr sockets. • When both Video socket and S-Video socket are connected, S-Video socket has priority over Video socket. • When both the projector and the external equipment should be disconnected from AC outlet. 16 Audio 3 in/out Audio Cable (Stereo) Audio Input External Audio Equipment Audio Amplifier Audio...
User Manual
Page 17
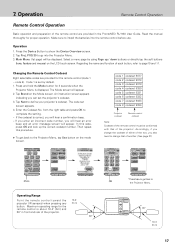
...provided for proper operation. The Mode screen will appear. If you enter an incorrect code number, you can set the projector's codeset. 3. Maximum operating range for 3 seconds when the Projector Menu is correct, you also need to change the codeset of either of the remote control must be displayed. Select...is about 16.4' (5m) and 60° in the ProntoNEO RU 930 User Guide. Tap Brand on the LCD touch screen. PXG 30 to the Projector Menu, tap Use button on the mode screen. Main Menu (1st page) will hear a confirmation beep. - Press and hold the Mode button for ...
...provided for proper operation. The Mode screen will appear. If you enter an incorrect code number, you can set the projector's codeset. 3. Maximum operating range for 3 seconds when the Projector Menu is correct, you also need to change the codeset of either of the remote control must be displayed. Select...is about 16.4' (5m) and 60° in the ProntoNEO RU 930 User Guide. Tap Brand on the LCD touch screen. PXG 30 to the Projector Menu, tap Use button on the mode screen. Main Menu (1st page) will hear a confirmation beep. - Press and hold the Mode button for ...

User Manual
Page 18
... to select an item to adjust. (The selected icon is highlighted in effective until OK button is not in orange.) 3 Adjust the value of this projector can be done via OnScreen Menu. 7. Operation Operating the On-Screen Menu Operating the On-Screen Menu How to operate the On-Screen Menu Adjustments...
... to select an item to adjust. (The selected icon is highlighted in effective until OK button is not in orange.) 3 Adjust the value of this projector can be done via OnScreen Menu. 7. Operation Operating the On-Screen Menu Operating the On-Screen Menu How to operate the On-Screen Menu Adjustments...
User Manual
Page 19
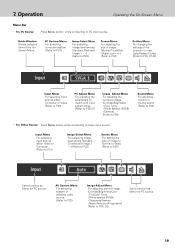
... to P24) Image Select Menu For selecting image level among Standard, Cinema and Image 1 ~ 4.(Refer to P33) Screen Menu For setting the size of the projector or reset Lamp Replace Counter (Refer to P36, 37,42) Input Menu For selecting input source either Video or Computer. (Refer to P31) Image Select...
... to P24) Image Select Menu For selecting image level among Standard, Cinema and Image 1 ~ 4.(Refer to P33) Screen Menu For setting the size of the projector or reset Lamp Replace Counter (Refer to P36, 37,42) Input Menu For selecting input source either Video or Computer. (Refer to P31) Image Select...

User Manual
Page 20
...lamp-life, once you can turn off . If the Temperature Warning Indicator continues to flash, refer to turn on page 15~16) 2 Connect the projector's AC power cord into an AC outlet. The Power Indicator lights red(dim), and the Standby Indicator lights green. The signal from a PC or ...video source comes up after 30 seconds. The Power Indicator turns bright red and the Standby Indicator turns off the projector. The cooling fans remain running for 5 seconds. (Refer to take a proper maintenance. 20 Refer to "Power management" on page 39 to "Lamp mode" ...
...lamp-life, once you can turn off . If the Temperature Warning Indicator continues to flash, refer to turn on page 15~16) 2 Connect the projector's AC power cord into an AC outlet. The Power Indicator lights red(dim), and the Standby Indicator lights green. The signal from a PC or ...video source comes up after 30 seconds. The Power Indicator turns bright red and the Standby Indicator turns off the projector. The cooling fans remain running for 5 seconds. (Refer to take a proper maintenance. 20 Refer to "Power management" on page 39 to "Lamp mode" ...

User Manual
Page 23
8. If the projector cannot project properly, select a correct input source following the Menu Operation as follows Data1 Data 2 Data 3 Remote Control Menu Operation Data 1 : Data / RGB (Scart) 1 Press ...
8. If the projector cannot project properly, select a correct input source following the Menu Operation as follows Data1 Data 2 Data 3 Remote Control Menu Operation Data 1 : Data / RGB (Scart) 1 Press ...


