Leaflet
Page 3
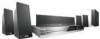
DVD home theater system Specifications HTS3544/37 Picture/Display • D/A converter: 12 bit, 108 MHz • Picture enhancement: Progressive scan, High Def (720p, 1080i) Video output, S-Video out, Composite video (CVBS... x H x D): 159.5 x 355.5 x 370 mm • Subwoofer Weight: 4.78 kg • Packaging dimensions (W x H x D): 557 x 494 x 315 mm • Weight incl. Packaging: 15.9 kg • Issue date 2010-08-01 Version: 5.0.16 12 NC: 8670 000 27745 UPC: 6 09585 12778 4 © 2010 Koninklijke Philips Electronics N.V. Trademarks are subject to noise ratio: >65 dB •...
DVD home theater system Specifications HTS3544/37 Picture/Display • D/A converter: 12 bit, 108 MHz • Picture enhancement: Progressive scan, High Def (720p, 1080i) Video output, S-Video out, Composite video (CVBS... x H x D): 159.5 x 355.5 x 370 mm • Subwoofer Weight: 4.78 kg • Packaging dimensions (W x H x D): 557 x 494 x 315 mm • Weight incl. Packaging: 15.9 kg • Issue date 2010-08-01 Version: 5.0.16 12 NC: 8670 000 27745 UPC: 6 09585 12778 4 © 2010 Koninklijke Philips Electronics N.V. Trademarks are subject to noise ratio: >65 dB •...

User manual
Page 6
... to a HDMI-compatible TV 15 Option 5: Using an accessory RF modulator 16 Step 3 : Connecting the FM and AM/MW antennas 16 Step 4 : Connecting speakers and subwoofer 17 Step 5 : Connecting the power cord ...18 Optional Connections ...19 Connecting audio from TV ...19 Connecting to cable box/satellite receiver and recorder/VCR 19...
... to a HDMI-compatible TV 15 Option 5: Using an accessory RF modulator 16 Step 3 : Connecting the FM and AM/MW antennas 16 Step 4 : Connecting speakers and subwoofer 17 Step 5 : Connecting the power cord ...18 Optional Connections ...19 Connecting audio from TV ...19 Connecting to cable box/satellite receiver and recorder/VCR 19...
User manual
Page 8
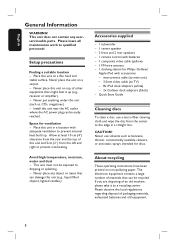
....) - English General Information WARNING! Never place this unit (e.g., liquid filled objects, lighted candles.) Accessories supplied - 1 subwoofer - 1 center speaker - 2 front and 2 rear speakers - 1 remote control with batteries - 1 composite video cable (yellow) - 1 FM wire antenna - 1 docking station for Philips GoGear/ Apple iPod with adequate ventilation to the edge in a location with accessories - Avoid high...
....) - English General Information WARNING! Never place this unit (e.g., liquid filled objects, lighted candles.) Accessories supplied - 1 subwoofer - 1 center speaker - 2 front and 2 rear speakers - 1 remote control with batteries - 1 composite video cable (yellow) - 1 FM wire antenna - 1 docking station for Philips GoGear/ Apple iPod with adequate ventilation to the edge in a location with accessories - Avoid high...
User manual
Page 13
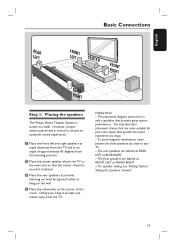
... Started Setting the speakers' channel.' 13 English Basic Connections REAR LEFT LFERFOTNT CENTER RFRIGOHNTT REAR RIGHT Step 1: Placing the speakers The Philips Home Theater System is simple to ensure an optimum sound experience. The placement diagram shown here is localized. Otherwise, keep it at... an angle of the room. D Place the subwoofer at normal listening ear level facing each other placement choices that are labeled as REAR LEFT or REAR RIGHT. - However, proper ...
... Started Setting the speakers' channel.' 13 English Basic Connections REAR LEFT LFERFOTNT CENTER RFRIGOHNTT REAR RIGHT Step 1: Placing the speakers The Philips Home Theater System is simple to ensure an optimum sound experience. The placement diagram shown here is localized. Otherwise, keep it at... an angle of the room. D Place the subwoofer at normal listening ear level facing each other placement choices that are labeled as REAR LEFT or REAR RIGHT. - However, proper ...

User manual
Page 17
REAR RIGHT 17 English FRONT RIGHT FRONT LEFT Basic Connections (continued) FRONT CENTER SUBWOOFER REAR LEFT DOCK Step 4: Connecting speakers and subwoofer Connect all the speakers and subwoofer to the main unit, subwoofer, AC power adapter, TV or any other radiation sources. To prevent unwanted noise, never place the speakers too close to the matching jacks at the rear of the plugs and jacks are matched. Helpful Hint: - Make sure that the colors of the main unit.
REAR RIGHT 17 English FRONT RIGHT FRONT LEFT Basic Connections (continued) FRONT CENTER SUBWOOFER REAR LEFT DOCK Step 4: Connecting speakers and subwoofer Connect all the speakers and subwoofer to the main unit, subwoofer, AC power adapter, TV or any other radiation sources. To prevent unwanted noise, never place the speakers too close to the matching jacks at the rear of the plugs and jacks are matched. Helpful Hint: - Make sure that the colors of the main unit.
User manual
Page 24
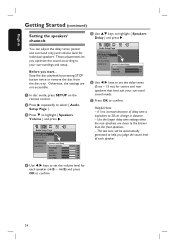
... confirm. Audio Setup Page Speakers Volume Speakers Delay HDMI Audio CD Upsampling Speakers Level Setup Audio Sync Front Left 0dB Front Right 0dB Center 0dB Subwoofer 0dB Rear Left 0dB Rear Right 0dB Audio Setup Page Speakers Volume Speakers Delay HDMI Audio CD Upsampling Audio Sync Speakers Distance Setup Center 0ms...
... confirm. Audio Setup Page Speakers Volume Speakers Delay HDMI Audio CD Upsampling Speakers Level Setup Audio Sync Front Left 0dB Front Right 0dB Center 0dB Subwoofer 0dB Rear Left 0dB Rear Right 0dB Audio Setup Page Speakers Volume Speakers Delay HDMI Audio CD Upsampling Audio Sync Speakers Distance Setup Center 0ms...
User manual
Page 49
... System: Full range satellite Impedance: 3 Ω Speaker drivers: 2 x 2.5" full range woofer, 1 x 2" tweeter Frequency response: 150 Hz - 20 kHz Dimensions: 435 x 93.5 x 67 (mm) (w x h x d) Weight: 1.26kg SUBWOOFER Impedance: 3 Ω Speaker drivers: 203 mm (8") woofer Frequency response: 40 Hz - 150 Hz Dimensions: 159.5 x 355.5 x 370 (mm) (w x h x d) Weight: 4.78 kg Specifications subject to -Noise...
... System: Full range satellite Impedance: 3 Ω Speaker drivers: 2 x 2.5" full range woofer, 1 x 2" tweeter Frequency response: 150 Hz - 20 kHz Dimensions: 435 x 93.5 x 67 (mm) (w x h x d) Weight: 1.26kg SUBWOOFER Impedance: 3 Ω Speaker drivers: 203 mm (8") woofer Frequency response: 40 Hz - 150 Hz Dimensions: 159.5 x 355.5 x 370 (mm) (w x h x d) Weight: 4.78 kg Specifications subject to -Noise...
User manual
Page 54
...) will be able to six channels of TV screens. These red and white jacks send audio through two channels, the left and right, center and subwoofer.) Dolby Surround Pro Logic II: It is an improved matrix decoding technology that provides better spatiality and directionality on Dolby Surround program material, provides a convincing...
...) will be able to six channels of TV screens. These red and white jacks send audio through two channels, the left and right, center and subwoofer.) Dolby Surround Pro Logic II: It is an improved matrix decoding technology that provides better spatiality and directionality on Dolby Surround program material, provides a convincing...
Quick start guide
Page 1
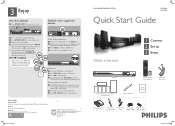
... to press . Note When you have to 'DISC' mode. Playback other supported devices DOCK DOCK Philips GoGear/Apple iPod A Connect the docking station to the USB jack. USB device A Insert your ... you press u button, - Printed in China eng_718-1 hts354x_37qsg_eng2.indd 1 DVD HOME THEATER SYSTEM HTS3544 HTS3555 Quick Start Guide What's in the menu and press OK to MP3 LINE-IN jack. z...disc label facing up 3 Enjoy Main Unit 1 center, 2 front, 2 rear speakers and subwoofer FM wire antenna Remote Control and 2 batteries Composite video cable User Manual Docking station Dock inter-...
... to press . Note When you have to 'DISC' mode. Playback other supported devices DOCK DOCK Philips GoGear/Apple iPod A Connect the docking station to the USB jack. USB device A Insert your ... you press u button, - Printed in China eng_718-1 hts354x_37qsg_eng2.indd 1 DVD HOME THEATER SYSTEM HTS3544 HTS3555 Quick Start Guide What's in the menu and press OK to MP3 LINE-IN jack. z...disc label facing up 3 Enjoy Main Unit 1 center, 2 front, 2 rear speakers and subwoofer FM wire antenna Remote Control and 2 batteries Composite video cable User Manual Docking station Dock inter-...
Quick start guide
Page 2
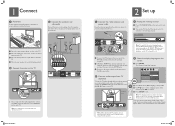
...can press TV on the main unit to select { OSD Language } and press . Note The language set the TV to the TV. B Place the subwoofer on . Push the tabs and insert the wires into the slot. SETUP General Setup Page Disc Lock Display Dim Program OSD Language Screen Saver Sleep..., use a red and white audio cables (not supplied) to connect the AUDIO IN-TV jacks on your TV. REAR LEFT LFERFOTNT CENTER RFRIGOHNTT REAR RIGHT SUBWOOFER A Place the center speaker above or close to channel 3 or 4. There are using a RF modulator, set here is only for the correct viewing channel,...
...can press TV on the main unit to select { OSD Language } and press . Note The language set the TV to the TV. B Place the subwoofer on . Push the tabs and insert the wires into the slot. SETUP General Setup Page Disc Lock Display Dim Program OSD Language Screen Saver Sleep..., use a red and white audio cables (not supplied) to connect the AUDIO IN-TV jacks on your TV. REAR LEFT LFERFOTNT CENTER RFRIGOHNTT REAR RIGHT SUBWOOFER A Place the center speaker above or close to channel 3 or 4. There are using a RF modulator, set here is only for the correct viewing channel,...


