Leaflet
Page 3
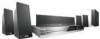
...R/-RW • Picture Enhancement: Rotate, Zoom, Slideshow with music playback Tuner/Reception/Transmission • No. www.philips.com DVD home theater system Specifications HTS3544/37 Picture/Display • D/A converter: 12 bit, 108 MHz • Picture enhancement: Progressive scan, High ...8226; Subwoofer impedance: 8 ohm • Subwoofer freq range: 40-150 Hz • Subwoofer type: Passive Accessories • Included accessories: Remote Control, 2 x AAA Batteries, CVBS video cable, FM antenna, Product Registration Card, Quick start guide, User Manual, World Wide Warranty leaflet, ...
...R/-RW • Picture Enhancement: Rotate, Zoom, Slideshow with music playback Tuner/Reception/Transmission • No. www.philips.com DVD home theater system Specifications HTS3544/37 Picture/Display • D/A converter: 12 bit, 108 MHz • Picture enhancement: Progressive scan, High ...8226; Subwoofer impedance: 8 ohm • Subwoofer freq range: 40-150 Hz • Subwoofer type: Passive Accessories • Included accessories: Remote Control, 2 x AAA Batteries, CVBS video cable, FM antenna, Product Registration Card, Quick start guide, User Manual, World Wide Warranty leaflet, ...

User manual
Page 6
... of contents General General Information ...8 Setup precautions...8 Accessories supplied ...8 Cleaning discs ...8 About recycling...8 Product Overview Main Unit ...9 Remote Control ...10-12 Using the remote control ...12 Connections Basic Connections ...13-18 Step 1 : Placing the speakers ...13 Step 2 : Connecting to TV ...14-16...the speakers' channels...24 Disc Playback Disc Operations ...25-33 Playable discs ...25 Playing a disc ...25 Basic playback controls...26 Selecting various repeat/shuffle functions 26 Programming disc tracks...27 Other playback features for video discs (DVD/VCD/SVCD...
... of contents General General Information ...8 Setup precautions...8 Accessories supplied ...8 Cleaning discs ...8 About recycling...8 Product Overview Main Unit ...9 Remote Control ...10-12 Using the remote control ...12 Connections Basic Connections ...13-18 Step 1 : Placing the speakers ...13 Step 2 : Connecting to TV ...14-16...the speakers' channels...24 Disc Playback Disc Operations ...25-33 Playable discs ...25 Playing a disc ...25 Basic playback controls...26 Selecting various repeat/shuffle functions 26 Programming disc tracks...27 Other playback features for video discs (DVD/VCD/SVCD...
User manual
Page 8
... operating instructions have been printed on a flat, hard and stable surface. Place this unit on a carpet. - Space for Philips GoGear/ Apple iPod with adequate ventilation to prevent internal heat build up (e.g., receiver or amplifier.) - Avoid high temperature, moisture... of this unit (e.g., liquid filled objects, lighted candles.) Accessories supplied - 1 subwoofer - 1 center speaker - 2 front and 2 rear speakers - 1 remote control with batteries - 1 composite video cable (yellow) - 1 FM wire antenna - 1 docking station for ventilation - Allow at least 10 cm (4") clearance from...
... operating instructions have been printed on a flat, hard and stable surface. Place this unit on a carpet. - Space for Philips GoGear/ Apple iPod with adequate ventilation to prevent internal heat build up (e.g., receiver or amplifier.) - Avoid high temperature, moisture... of this unit (e.g., liquid filled objects, lighted candles.) Accessories supplied - 1 subwoofer - 1 center speaker - 2 front and 2 rear speakers - 1 remote control with batteries - 1 composite video cable (yellow) - 1 FM wire antenna - 1 docking station for ventilation - Allow at least 10 cm (4") clearance from...
User manual
Page 10
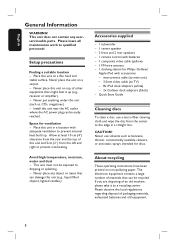
Remote Control English 1 2 3 4 5 6 7 8 9 10 11 12 a 2 - TV: switches to the docking station. DOCK: switches to the GoGear/iPod that is slower than the audio output. c OPEN/CLOSE ç - Opens/closes the disc tray. e SETUP - Enters or exits the system setup menu. RADIO: starts auto radio installation for Philips TVs or compatible brands only.) j AUDIO...
Remote Control English 1 2 3 4 5 6 7 8 9 10 11 12 a 2 - TV: switches to the docking station. DOCK: switches to the GoGear/iPod that is slower than the audio output. c OPEN/CLOSE ç - Opens/closes the disc tray. e SETUP - Enters or exits the system setup menu. RADIO: starts auto radio installation for Philips TVs or compatible brands only.) j AUDIO...

User manual
Page 11
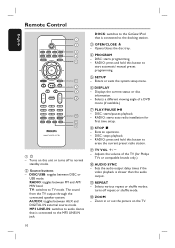
English Remote Control (continued) m DISC MENU - n OK - p TITLE - q PREVí / NEXT ë - DISC: skips to the previous menu. - Mutes or restores the volume. t SURROUND - RADIO: press left or ...
English Remote Control (continued) m DISC MENU - n OK - p TITLE - q PREVí / NEXT ë - DISC: skips to the previous menu. - Mutes or restores the volume. t SURROUND - RADIO: press left or ...

User manual
Page 12
...batteries if they should be used for example í, ë.) 12 Batteries contain chemical substances, they are exhausted or if the remote control is not to control by pressing the DISC/USB, RADIO, AUX/DI, MP3 LINE-IN, DOCK or TV button on the front panel. A Open... the battery compartment. C Close the cover. D Point the remote control directly at the remote sensor (iR) on the remote control. English Remote Control (continued) Using the remote control CAUTION! - Never mix batteries (old and new or carbon and alkaline, etc.). - E Select the source...
...batteries if they should be used for example í, ë.) 12 Batteries contain chemical substances, they are exhausted or if the remote control is not to control by pressing the DISC/USB, RADIO, AUX/DI, MP3 LINE-IN, DOCK or TV button on the front panel. A Open... the battery compartment. C Close the cover. D Point the remote control directly at the remote sensor (iR) on the remote control. English Remote Control (continued) Using the remote control CAUTION! - Never mix batteries (old and new or carbon and alkaline, etc.). - E Select the source...
User manual
Page 14
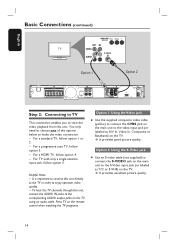
... as A/V In, Video In, Composite or Baseband) on the TV. For a HDMI TV, follow option 5. It provides excellent picture quality. 14 Press TV on the remote control when watching the TV programs. Option 1: Using the Video jack Use the supplied composite video cable (yellow) to connect the CVBS jack on the main...
... as A/V In, Video In, Composite or Baseband) on the TV. For a HDMI TV, follow option 5. It provides excellent picture quality. 14 Press TV on the remote control when watching the TV programs. Option 1: Using the Video jack Use the supplied composite video cable (yellow) to connect the CVBS jack on the main...
User manual
Page 19
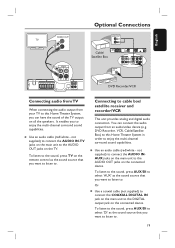
To listen to the sound, press TV on the remote control as the sound source that you want to listen to. Connecting to enjoy the multi-channel surround sound capabilities. not supplied) to connect the AUDIO ...
To listen to the sound, press TV on the remote control as the sound source that you want to listen to. Connecting to enjoy the multi-channel surround sound capabilities. not supplied) to connect the AUDIO ...
User manual
Page 20
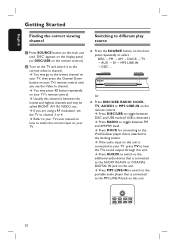
... and AM/MW band. Press DOCK for connecting to the iPod/GoGear player that is connected to the MP3 LINE-IN jack on your TV's remote control. Press MP3 LINE-IN to switch to the portable audio player that is detected.) Press RADIO to toggle between the lowest and highest channels and..., TV, AUX/DI or MP3 LINE-IN on your TV. Refer to your TVs user manual on how to select the correct input on the remote control. If the audio input on the TV and switch it to the correct video-in channel. English Getting Started Finding the correct viewing channel A Press...
... and AM/MW band. Press DOCK for connecting to the iPod/GoGear player that is connected to the MP3 LINE-IN jack on your TV's remote control. Press MP3 LINE-IN to switch to the portable audio player that is detected.) Press RADIO to toggle between the lowest and highest channels and..., TV, AUX/DI or MP3 LINE-IN on your TV. Refer to your TVs user manual on how to select the correct input on the remote control. If the audio input on the TV and switch it to the correct video-in channel. English Getting Started Finding the correct viewing channel A Press...
User manual
Page 21
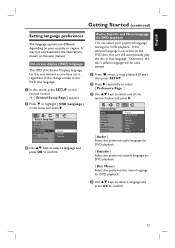
... B Press repeatedly to select { Preference Page. } C Use keys to select one of the changes made to confirm. If the selected language is recorded on the remote control. { General Setup Page } appears. Audio, Subtitle and Menu language for DVD playback You can select your country or region. D Use keys to select a language and...
... B Press repeatedly to select { Preference Page. } C Use keys to select one of the changes made to confirm. If the selected language is recorded on the remote control. { General Setup Page } appears. Audio, Subtitle and Menu language for DVD playback You can select your country or region. D Use keys to select a language and...
User manual
Page 22
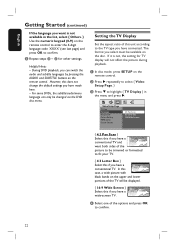
... B Press repeatedly to select { Video Setup Page. } C Press to highlight { TV Display } in the list, select { Others. } Use the numeric keypad (0-9) on the remote control to enter the 4-digit language code 'XXXX' (see last page) and press OK to the TV type you have connected. In this case, a wide picture... TV and want is not, the setting for other settings. During DVD playback, you select must be trimmed or formatted to be available on the remote control. A In disc mode, press SETUP on the disc. D Select one of the picture to fit your TV. { 4:3 Letter Box } Select this does...
... B Press repeatedly to select { Video Setup Page. } C Press to highlight { TV Display } in the list, select { Others. } Use the numeric keypad (0-9) on the remote control to enter the 4-digit language code 'XXXX' (see last page) and press OK to the TV type you have connected. In this case, a wide picture... TV and want is not, the setting for other settings. During DVD playback, you select must be trimmed or formatted to be available on the remote control. A In disc mode, press SETUP on the disc. D Select one of the picture to fit your TV. { 4:3 Letter Box } Select this does...

User manual
Page 23
D Press repeatedly to enjoy the high quality picture. B Press on the remote control. B Turn on the remote control. H Confirm your action by selecting the in the progressive scan mode. C Press AUDIO on the remote control. There are some progressive scan TVs that are not fully compatible with this unit and ... that the TVs progressive scan mode is turned off the progressive scan feature on the TV to your TVs user manual. A message appears on the remote control. Helpful Hints: - E Move to { Progressive } > { On } in the menu and press OK. G Turn on your TV. If no ...
D Press repeatedly to enjoy the high quality picture. B Press on the remote control. B Turn on the remote control. H Confirm your action by selecting the in the progressive scan mode. C Press AUDIO on the remote control. There are some progressive scan TVs that are not fully compatible with this unit and ... that the TVs progressive scan mode is turned off the progressive scan feature on the TV to your TVs user manual. A message appears on the remote control. Helpful Hints: - E Move to { Progressive } > { On } in the menu and press OK. G Turn on your TV. If no ...
User manual
Page 24
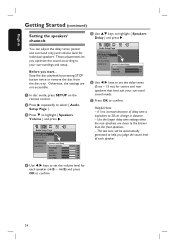
... keys to help you start... Use the longer delay time settings when the rear speakers are not accessible. A In disc mode, press SETUP on the remote control. Before you judge the sound level of delay time is equivalent to the listener than the front speakers. - Otherwise, the settings are closer to 30...
... keys to help you start... Use the longer delay time settings when the rear speakers are not accessible. A In disc mode, press SETUP on the remote control. Before you judge the sound level of delay time is equivalent to the listener than the front speakers. - Otherwise, the settings are closer to 30...

User manual
Page 25
... discs on the TV. Video CDs (VCDs) - Playing a disc A Press SOURCE repeatedly until 'DISC' appears on the display panel (or press DISC/USB on the remote control.) B Turn on the current disc or at the rear or bottom panel. Doing so may cause the disc player to open the disc tray. MP3...
... discs on the TV. Video CDs (VCDs) - Playing a disc A Press SOURCE repeatedly until 'DISC' appears on the display panel (or press DISC/USB on the remote control.) B Turn on the current disc or at the rear or bottom panel. Doing so may cause the disc player to open the disc tray. MP3...
User manual
Page 26
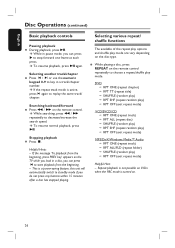
...repeat/ shuffle functions The available of the repeat play options and shuffle play mode are vary depending on the remote control repeatedly to choose a repeat/shuffle play ) RPT OFF (exit repeat mode) Helpful Hint: - While playing... a disc, press REPEAT on the disc type. English Disc Operations (continued) Basic playback controls Pausing playback During playback, press u. While searching, press m / M repeatedly to replay the same track/ chapter. Searching backward/forward ... track/chapter number. This is turned on the remote control.
...repeat/ shuffle functions The available of the repeat play options and shuffle play mode are vary depending on the remote control repeatedly to choose a repeat/shuffle play ) RPT OFF (exit repeat mode) Helpful Hint: - While playing... a disc, press REPEAT on the disc type. English Disc Operations (continued) Basic playback controls Pausing playback During playback, press u. While searching, press m / M repeatedly to replay the same track/ chapter. Searching backward/forward ... track/chapter number. This is turned on the remote control.
User manual
Page 27
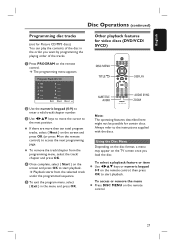
... select a playback feature or item Use keys or numeric keypad 0-9 on the screen and press OK to start playback. A Press PROGRAM on the remote control. 27 Other playback features for video discs (DVD/VCD/ SVCD) Note: The operating features described here might not be possible for Picture CD/MP3 ...discs) You can play the contents of the tracks. To access or remove the menu Press DISC MENU on the remote control. Program: Track (01-16) 2 12 6 7 8 9 10 Exit Start Next B Use the numeric keypad (0-9) to the next position. To remove the track/chapter...
... select a playback feature or item Use keys or numeric keypad 0-9 on the screen and press OK to start playback. A Press PROGRAM on the remote control. 27 Other playback features for video discs (DVD/VCD/ SVCD) Note: The operating features described here might not be possible for Picture CD/MP3 ...discs) You can play the contents of the tracks. To access or remove the menu Press DISC MENU on the remote control. Program: Track (01-16) 2 12 6 7 8 9 10 Exit Start Next B Use the numeric keypad (0-9) to the next position. To remove the track/chapter...

User manual
Page 33
... time entered. C Press OK to perform fast reverse/forward search. During playback; A Insert a DivX disc. Use m / M keys on the remote control to start playback. Press DISPLAY repeatedly until the Time Search menu appears, key in the menu and press u to change the subtitle language. The subtitle...SUBTITLE on the file navigation menu. - See 'Setup Menu Options - { General Setup Page - The subtitle can press AUDIO on the remote control to start playback. The picture files will be repeated if reaches the end of the folder. If the DivX title has different audio tracks...
... time entered. C Press OK to perform fast reverse/forward search. During playback; A Insert a DivX disc. Use m / M keys on the remote control to start playback. Press DISPLAY repeatedly until the Time Search menu appears, key in the menu and press u to change the subtitle language. The subtitle...SUBTITLE on the file navigation menu. - See 'Setup Menu Options - { General Setup Page - The subtitle can press AUDIO on the remote control to start playback. The picture files will be repeated if reaches the end of the folder. If the DivX title has different audio tracks...
User manual
Page 34
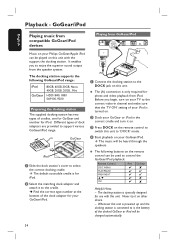
B Dock your Philips GoGear/Apple iPod can be played on this unit with this unit to the correct...your GoGear or iPod in the correct cradle and turn on . It enables you begin, turn it on the remote control to the cradle. The docking station supports the following buttons on this unit is powered up and the docking station... docking station The supplied docking station has two types of dock adaptors are provided to select the correct docking cradle. Remote Control iPod GoGear DISC MENU PLAY/PAUSE PREV/NEXT OK Helpful Hints: - Find the correct type number at the bottom ...
B Dock your Philips GoGear/Apple iPod can be played on this unit with this unit to the correct...your GoGear or iPod in the correct cradle and turn on . It enables you begin, turn it on the remote control to the cradle. The docking station supports the following buttons on this unit is powered up and the docking station... docking station The supplied docking station has two types of dock adaptors are provided to select the correct docking cradle. Remote Control iPod GoGear DISC MENU PLAY/PAUSE PREV/NEXT OK Helpful Hints: - Find the correct type number at the bottom ...

User manual
Page 35
... USB device does not fit into the USB jack, a USB extension cable is detected. Press DISC/USB to select device C Press DISC/USB on the remote control to the USB jack on this unit (as shown in the above illustration.) B A message appears on a single card reader, only one of other USB devices...
... USB device does not fit into the USB jack, a USB extension cable is detected. Press DISC/USB to select device C Press DISC/USB on the remote control to the USB jack on this unit (as shown in the above illustration.) B A message appears on a single card reader, only one of other USB devices...

User manual
Page 36
However, controlling of the source buttons (e.g. MP3 LINE-IN A Use a MP3 LINE-IN cable (not supplied) to this unit. If you connect your portable audio player to ... MP3 LINE-IN on your portable audio player and the MP3 LINE-IN jack on the portable audio player. Helpful Hint: - C Start playback on the remote control. DISC/USB, RADIO,) press the STOP button on the portable audio player. D To stop playback, press the STOP button on the portable audio player to...
However, controlling of the source buttons (e.g. MP3 LINE-IN A Use a MP3 LINE-IN cable (not supplied) to this unit. If you connect your portable audio player to ... MP3 LINE-IN on your portable audio player and the MP3 LINE-IN jack on the portable audio player. Helpful Hint: - C Start playback on the remote control. DISC/USB, RADIO,) press the STOP button on the portable audio player. D To stop playback, press the STOP button on the portable audio player to...


