

User manual
Page 6
... your recordings in a circular motion. Confidential unpublished works. Your Philips DVD Recorder both records DVD+RWs/DVD+Rs and plays prerecorded DVDs.You can be recycled and reused if disassembled by -Step/Zoomed Play q Progressive Scan compatibility q Repeat and Repeat A-B playback q Time Search... q VCR Plus+ Programming Package Contents q DVD Recorder q Remote control with two AA batteries q AC power cord q One blank Philips DVD+RW q One RF coaxial cable (black...
... your recordings in a circular motion. Confidential unpublished works. Your Philips DVD Recorder both records DVD+RWs/DVD+Rs and plays prerecorded DVDs.You can be recycled and reused if disassembled by -Step/Zoomed Play q Progressive Scan compatibility q Repeat and Repeat A-B playback q Time Search... q VCR Plus+ Programming Package Contents q DVD Recorder q Remote control with two AA batteries q AC power cord q One blank Philips DVD+RW q One RF coaxial cable (black...
User manual
Page 9
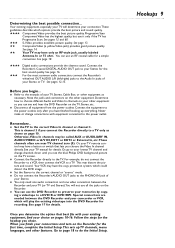
... mode. Otherwise,Video In channels may have finished hooking up TV channels, menu languages, and other equipment so you can see the blue Philips DVD background picture on page 10. q Do not connect the Recorder's AUDIO OUT jacks to the manuals of your TV, will play ... lets you connect the Recorder directly to the Audio In jacks of your connection.These guidelines describe which could distort the DVD image. Progressive Scan Component Video has the highest quality, but use all equipment from the power outlets. Special connections are near TV channel zero (0)....
... mode. Otherwise,Video In channels may have finished hooking up TV channels, menu languages, and other equipment so you can see the blue Philips DVD background picture on page 10. q Do not connect the Recorder's AUDIO OUT jacks to the manuals of your TV, will play ... lets you connect the Recorder directly to the Audio In jacks of your connection.These guidelines describe which could distort the DVD image. Progressive Scan Component Video has the highest quality, but use all equipment from the power outlets. Special connections are near TV channel zero (0)....
User manual
Page 12
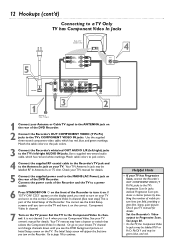
... Initial Setup screen will appear the first time you use Component Video. Go to page 18 to continue. 4 Helpful Hints • If your TV has Progressive Scan, connect the Recorder's OUT COMPONENT VIDEO (Y PB PR) jacks to the TV's COMPONENT VIDEO IN jacks. 12 Hookups (cont'd) Connecting to a TV ...the TV to a power outlet. 6 Press STANDBY-ON y on the TV. Check your TV owner's manual for details. 5 Connect the supplied power cord to Progressive Scan. Match the cable colors to the jack colors. 3 Connect the Recorder's white/red OUT AUDIO L/R (left /right AUDIO IN jacks. Or, go to ...
... Initial Setup screen will appear the first time you use Component Video. Go to page 18 to continue. 4 Helpful Hints • If your TV has Progressive Scan, connect the Recorder's OUT COMPONENT VIDEO (Y PB PR) jacks to the TV's COMPONENT VIDEO IN jacks. 12 Hookups (cont'd) Connecting to a TV ...the TV to a power outlet. 6 Press STANDBY-ON y on the TV. Check your TV owner's manual for details. 5 Connect the supplied power cord to Progressive Scan. Match the cable colors to the jack colors. 3 Connect the Recorder's white/red OUT AUDIO L/R (left /right AUDIO IN jacks. Or, go to ...
User manual
Page 17
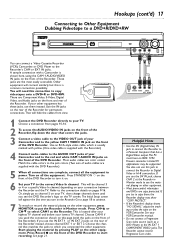
...IN jack to connect the Recorder to a Personal Computer that matches the jacks to the IN EXT 1 COMPONENT VIDEO jacks.The Recorder cannot receive Progressive Scan video. Other equipment will hide the cables from pages 10-16. 2 To access the AUDIO/VIDEO IN jacks on the front of the... front of the Recorder. Choose a connection from view. 1 Connect the DVD Recorder directly to your VCR/Camcorder manual. • Do not connect a Progressive Scan video source (such as a DVD Player) to which is usually marked with the jacks on the front of the Recorder). Most audio cables are...
...IN jack to connect the Recorder to a Personal Computer that matches the jacks to the IN EXT 1 COMPONENT VIDEO jacks.The Recorder cannot receive Progressive Scan video. Other equipment will hide the cables from pages 10-16. 2 To access the AUDIO/VIDEO IN jacks on the front of the... front of the Recorder. Choose a connection from view. 1 Connect the DVD Recorder directly to your VCR/Camcorder manual. • Do not connect a Progressive Scan video source (such as a DVD Player) to which is usually marked with the jacks on the front of the Recorder). Most audio cables are...

User manual
Page 19
...channels found. Disc preferences or defaults may override your selection in your area. If you prefer for details on the screen as the searching progresses.This will appear, along with the total number of the Disc. When the channel search finishes, "Auto ch. The Recorder will show on...being memorized.The number of channels found To exit press SYSTEM MENU 8 Press SYSTEM MENU. To change the Subtitle Language later, see a blue Philips DVD background screen and some Information Boxes. (See page 33.) The Recorder is connected, press OK. To change the TV Shape later or for...
...channels found. Disc preferences or defaults may override your selection in your area. If you prefer for details on the screen as the searching progresses.This will appear, along with the total number of the Disc. When the channel search finishes, "Auto ch. The Recorder will show on...being memorized.The number of channels found To exit press SYSTEM MENU 8 Press SYSTEM MENU. To change the Subtitle Language later, see a blue Philips DVD background screen and some Information Boxes. (See page 33.) The Recorder is connected, press OK. To change the TV Shape later or for...

User manual
Page 26
... number of channels found will take a few minutes, depending on this page to add or delete, then press ; Repeat step 6 as often as the searching progresses.This will show on the screen as necessary to add or delete all the channels you want to reset the TV channels. Press SYSTEM MENU...
... number of channels found will take a few minutes, depending on this page to add or delete, then press ; Repeat step 6 as often as the searching progresses.This will show on the screen as necessary to add or delete all the channels you want to reset the TV channels. Press SYSTEM MENU...

User manual
Page 42
42 Timer Recording 1 Press TIMER. 2 Press CH-9 to choose AM or PM. When the date is correct, press :. 6 End will be highlighted in progress. • You cannot select Timer Programming if six recordings are set. Mo-Fr/Weekly Press SELECT To store Press OK Press SELECT again. Recording will ...
42 Timer Recording 1 Press TIMER. 2 Press CH-9 to choose AM or PM. When the date is correct, press :. 6 End will be highlighted in progress. • You cannot select Timer Programming if six recordings are set. Mo-Fr/Weekly Press SELECT To store Press OK Press SELECT again. Recording will ...

User manual
Page 44
..., press the TIMER button.The Timer List will appear alone on the remote to turn off the Recorder and stop a timer recording that is in progress. "Timer Cleared" will appear at the bottom of the screen briefly, then the Timer List will reappear. (If you selected will reappear.) 6 Press TIMER repeatedly...
..., press the TIMER button.The Timer List will appear alone on the remote to turn off the Recorder and stop a timer recording that is in progress. "Timer Cleared" will appear at the bottom of the screen briefly, then the Timer List will reappear. (If you selected will reappear.) 6 Press TIMER repeatedly...

User manual
Page 46
... CH TIMER FSS TV VOLUME RETURN CLEAR PLAY I STOP AUDIO REC/OTR PAUSE I button on the side of the Recorder to put the Recorder in progress. See page 21. 2 Press TV/DVD on how you usually view the DVD Recorder. See page 23.) 4 To return to the recording, use the CH... briefly on the Recorder's display panel. 3 Use the TV remote control to select the channel you want to watch at the TV. (If you have a Philips TV, you want to record the current TV channel. The channel being recorded will encircle the Record I 1 3 Select the channel you may be able to...
... CH TIMER FSS TV VOLUME RETURN CLEAR PLAY I STOP AUDIO REC/OTR PAUSE I button on the side of the Recorder to put the Recorder in progress. See page 21. 2 Press TV/DVD on how you usually view the DVD Recorder. See page 23.) 4 To return to the recording, use the CH... briefly on the Recorder's display panel. 3 Use the TV remote control to select the channel you want to watch at the TV. (If you have a Philips TV, you want to record the current TV channel. The channel being recorded will encircle the Record I 1 3 Select the channel you may be able to...
User manual
Page 60
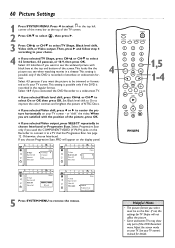
... VIDEO (Y Pb Pr) jacks on the Disc. or "shift" the video. q If you selected Black level shift, press CH+8 or CH-9 to choose Interlaced or Progressive Scan. W X YZ a ~ 1 2 1en off no off Picture TV Shape s 4:3 letterbox L G Black level shift 4:3 panscan r Video shift 16:9 Video output W X YZ a ~ ... r Video shift Off Video output Picture L MONITOR STANDBY TV / DVD T / C PLAY MODE REC. 60 Picture Settings 1 Press SYSTEM MENU. Select Progressive Scan only if you selected TV Shape, press CH+8 or CH-9 to be on the Recorder to connect it to remove the menus. If not...
... VIDEO (Y Pb Pr) jacks on the Disc. or "shift" the video. q If you selected Black level shift, press CH+8 or CH-9 to choose Interlaced or Progressive Scan. W X YZ a ~ 1 2 1en off no off Picture TV Shape s 4:3 letterbox L G Black level shift 4:3 panscan r Video shift 16:9 Video output W X YZ a ~ ... r Video shift Off Video output Picture L MONITOR STANDBY TV / DVD T / C PLAY MODE REC. 60 Picture Settings 1 Press SYSTEM MENU. Select Progressive Scan only if you selected TV Shape, press CH+8 or CH-9 to be on the Recorder to connect it to remove the menus. If not...
User manual
Page 65
... Index Picture represents each recording. VCR Plus+ System: Allows you use the Coaxial DIGITAL AUDIO OUT jack on your TV has Progressive Scan). a multi-channel digital audio compression system from Dolby Digital.The formats were developed by entering a PlusCode number found in ...letterbox format, selecting 4:3 letterbox may have a Coaxial In jack.This connection provides the 5.1 channel surround sound as used in full-width, with Progressive Scan (if your TV screen. Pan & Scan: A TV aspect ratio setting (4:3). Some movie companies refer to seeing a movie in participating...
... Index Picture represents each recording. VCR Plus+ System: Allows you use the Coaxial DIGITAL AUDIO OUT jack on your TV has Progressive Scan). a multi-channel digital audio compression system from Dolby Digital.The formats were developed by entering a PlusCode number found in ...letterbox format, selecting 4:3 letterbox may have a Coaxial In jack.This connection provides the 5.1 channel surround sound as used in full-width, with Progressive Scan (if your TV screen. Pan & Scan: A TV aspect ratio setting (4:3). Some movie companies refer to seeing a movie in participating...
User manual
Page 69
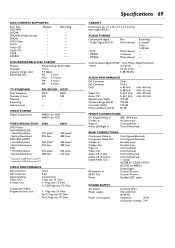
... • DTS • MPEG1 • MPEG2 Play Multi-channel Multi-channel 2-channel Multi-channel Recording 2-channel 16 bit, fs 48 kHz - - - Sony Philips Digital Interface) • PCM 2-channel - 16, 20, 24 bit fs 48, 96 kHz AUDIO PERFORMANCE DA Converter AD Converter DVD Video CD Audio CD Signal... pixels1 480 lines 360 pixels2 480 lines 352 pixels 240 lines VIDEO PERFORMANCE DA Converter AD Converter Signal handling Video Out S-Video Out Component Video/ Progressive Scan Out 10-bit 9-bit Components 1 Vpp into 75 Ohm Y: 1 Vpp into 75 Ohm C: 0.300 Vpp into 75 Ohm Y: 1 Vpp into 75 ...
... • DTS • MPEG1 • MPEG2 Play Multi-channel Multi-channel 2-channel Multi-channel Recording 2-channel 16 bit, fs 48 kHz - - - Sony Philips Digital Interface) • PCM 2-channel - 16, 20, 24 bit fs 48, 96 kHz AUDIO PERFORMANCE DA Converter AD Converter DVD Video CD Audio CD Signal... pixels1 480 lines 360 pixels2 480 lines 352 pixels 240 lines VIDEO PERFORMANCE DA Converter AD Converter Signal handling Video Out S-Video Out Component Video/ Progressive Scan Out 10-bit 9-bit Components 1 Vpp into 75 Ohm Y: 1 Vpp into 75 Ohm C: 0.300 Vpp into 75 Ohm Y: 1 Vpp into 75 ...
User manual
Page 71
... audio 63 playback control 53 playing a disc 20 pluscode 43, 45 power cord 10-16, 25 preserving memories 17 previous j button 23, 24, 34, 38 progressive scan 12, 60 protection 50 quick disc playback 20 quick recording 21 rear panel 25 rec/otr I button . . . . .21-22, 41 rec mode button 23...
... audio 63 playback control 53 playing a disc 20 pluscode 43, 45 power cord 10-16, 25 preserving memories 17 previous j button 23, 24, 34, 38 progressive scan 12, 60 protection 50 quick disc playback 20 quick recording 21 rear panel 25 rec/otr I button . . . . .21-22, 41 rec mode button 23...