
User manual
Page 1
E9480UD_EN.qx3 05.1.8 4:15 PM Page 1 Digital Video Disc Recorder & Video Cassette Recorder Owner's Manual DVDR600VR THANK YOU FOR CHOOSING PHILIPS. NEED HELP FAST? READ YOUR QUICK-USE GUIDE AND/OR OWNER'S MANUAL FIRST FOR QUICK TIPS THAT MAKE USING YOUR PHILIPS PRODUCT MORE ENJOYABLE. IF YOU HAVE READ YOUR INSTRUCTIONS AND STILL NEED ASSISTANCE, YOU MAY ACCESS OUR ONLINE HELP AT WWW.P4C.PHILIPS.COM OR CALL 1-888-PHILIPS (744-5477) WHILE WITH YOUR PRODUCT. ®
E9480UD_EN.qx3 05.1.8 4:15 PM Page 1 Digital Video Disc Recorder & Video Cassette Recorder Owner's Manual DVDR600VR THANK YOU FOR CHOOSING PHILIPS. NEED HELP FAST? READ YOUR QUICK-USE GUIDE AND/OR OWNER'S MANUAL FIRST FOR QUICK TIPS THAT MAKE USING YOUR PHILIPS PRODUCT MORE ENJOYABLE. IF YOU HAVE READ YOUR INSTRUCTIONS AND STILL NEED ASSISTANCE, YOU MAY ACCESS OUR ONLINE HELP AT WWW.P4C.PHILIPS.COM OR CALL 1-888-PHILIPS (744-5477) WHILE WITH YOUR PRODUCT. ®
User manual
Page 3
... to the point of causing interference to operate it is no guarantee that included use of Conformity Model Number: DVDR600VR Trade Name: Philips Responsible Party: Philips Consumer Electronics North America P.O. WARNING: This device complies with this model 525p DVD player, please contact our customer... verified under test conditions that interference will not occur in hazardous radiation exposure.The set out in the picture. Notice for help. Only a qualified service person should note that not all high definition television sets are designed to possible eye injury. CAUTION...
... to the point of causing interference to operate it is no guarantee that included use of Conformity Model Number: DVDR600VR Trade Name: Philips Responsible Party: Philips Consumer Electronics North America P.O. WARNING: This device complies with this model 525p DVD player, please contact our customer... verified under test conditions that interference will not occur in hazardous radiation exposure.The set out in the picture. Notice for help. Only a qualified service person should note that not all high definition television sets are designed to possible eye injury. CAUTION...
User manual
Page 5
... Features Tape Counter 75 Time Search, Index Search 76 Special Effects Playback (Videotape 77 Automatic Operation Features 78 Information You May Need Glossary 79-80 Helpful Hints 81-84 Care and Maintenance 85 Specifications 86 Limited Warranty 87 Information Index 88
... Features Tape Counter 75 Time Search, Index Search 76 Special Effects Playback (Videotape 77 Automatic Operation Features 78 Information You May Need Glossary 79-80 Helpful Hints 81-84 Care and Maintenance 85 Specifications 86 Limited Warranty 87 Information Index 88
User manual
Page 10
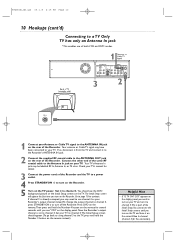
... need to use of both VCR and DVD modes. 1 Connect your TV to channel 4.The Initial Setup screen should see "C04" on the remote instead.) Helpful Hint • If "IS TV ON? Go to page 18 to channel 4. Press DVD on the remote.Then press and hold the Number 3 button on...
... need to use of both VCR and DVD modes. 1 Connect your TV to channel 4.The Initial Setup screen should see "C04" on the remote instead.) Helpful Hint • If "IS TV ON? Go to page 18 to channel 4. Press DVD on the remote.Then press and hold the Number 3 button on...
User manual
Page 11
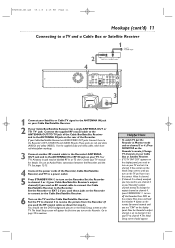
... In or 75 ohm. Set the TV to channel 3 to the Cable Box/Satellite Receiver. 6 Turn on the TV and the Cable Box/Satellite Receiver. Helpful Hints • To watch TV, put the Recorder in Monitor mode and on channel 3 or 4. (Press MONITOR on the Recorder's remote.) Change TV channels at...
... In or 75 ohm. Set the TV to channel 3 to the Cable Box/Satellite Receiver. 6 Turn on the TV and the Cable Box/Satellite Receiver. Helpful Hints • To watch TV, put the Recorder in Monitor mode and on channel 3 or 4. (Press MONITOR on the Recorder's remote.) Change TV channels at...
User manual
Page 12
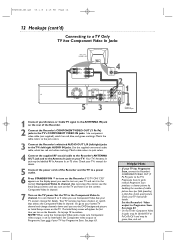
... time you turn on the TV and have a button or switch that selects the Component Video In channel. Go to page 18 to Progressive Scan. Helpful Hints • If your TV. Set the Recorder's Video output to continue. E9480UD_EN.qx3 05.1.8 4:15 PM Page 12 12 Hookups (cont'd) Connecting to a TV...
... time you turn on the TV and have a button or switch that selects the Component Video In channel. Go to page 18 to Progressive Scan. Helpful Hints • If your TV. Set the Recorder's Video output to continue. E9480UD_EN.qx3 05.1.8 4:15 PM Page 12 12 Hookups (cont'd) Connecting to a TV...
User manual
Page 13
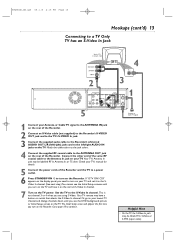
..., you need to turn on the Recorder. Or, go to continue. The Initial Setup screen will appear the first time you turn on your TV. Helpful Hint • On the TV, the S-Video In jack may be labelled RF In,Antenna In, or 75 ohm. Connect the other end of the...
..., you need to turn on the Recorder. Or, go to continue. The Initial Setup screen will appear the first time you turn on your TV. Helpful Hint • On the TV, the S-Video In jack may be labelled RF In,Antenna In, or 75 ohm. Connect the other end of the...
User manual
Page 14
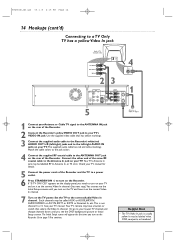
... TV's VIDEO IN jack. The Initial Setup screen will appear the first time you see the Initial Setup screens until you turn on the Recorder. Helpful Hint • The TV's Video In jack is not channel 3 or 4. E9480UD_EN.qx3 05.1.8 4:15 PM Page 14 14 Hookups (cont'd) Connecting to a TV Only...
... TV's VIDEO IN jack. The Initial Setup screen will appear the first time you see the Initial Setup screens until you turn on the Recorder. Helpful Hint • The TV's Video In jack is not channel 3 or 4. E9480UD_EN.qx3 05.1.8 4:15 PM Page 14 14 Hookups (cont'd) Connecting to a TV Only...

User manual
Page 15
... of the Recorder. 2 Connect the Recorder's yellow VIDEO OUT jack to your TV and set it to the correct Audio In channel or sound source. Helpful Hints • Set Analog output accordingly. Your TV's Antenna In jack may be labelled RF In,Antenna In, or 75 ohm. Refer to the Stereo...
... of the Recorder. 2 Connect the Recorder's yellow VIDEO OUT jack to your TV and set it to the correct Audio In channel or sound source. Helpful Hints • Set Analog output accordingly. Your TV's Antenna In jack may be labelled RF In,Antenna In, or 75 ohm. Refer to the Stereo...
User manual
Page 16
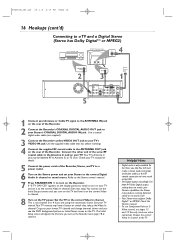
... panel, you need one video connection. The Initial Setup screen will appear the first time you play.You still must support Dolby DigitalTM or MPEG2. Helpful Hints • Digital audio is not channel 3 or 4 if you see pages 12 and 13.You only need to turn on the Stereo power and...
... panel, you need one video connection. The Initial Setup screen will appear the first time you play.You still must support Dolby DigitalTM or MPEG2. Helpful Hints • Digital audio is not channel 3 or 4 if you see pages 12 and 13.You only need to turn on the Stereo power and...
User manual
Page 17
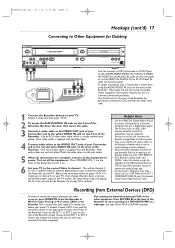
... the equipment to power. Or, simply go to channel 5 on your Camcorder and to the yellow VIDEO IN jack on the front of the Recorder. Helpful Hints • Use the CAM2 DV (Digital Video) IN jack to connect the Recorder to a Personal Computer that covers the jacks. 3 Connect a video cable to...
... the equipment to power. Or, simply go to channel 5 on your Camcorder and to the yellow VIDEO IN jack on the front of the Recorder. Helpful Hints • Use the CAM2 DV (Digital Video) IN jack to connect the Recorder to a Personal Computer that covers the jacks. 3 Connect a video cable to...
User manual
Page 18
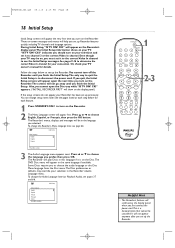
... 05.1.8 4:15 PM Page 18 18 Initial Setup Initial Setup screens will appear the very first time you turn on -screen messages and menus will help you set up Recorder features quickly, including TV channels and language options. "IS TV ON? C03" appears. ("INSTALL RECORDER FIRST" will show on ,...MENU OK SELECT RETURN 2-3 PLAY VCR REC STOP DVD REC MODE PLAY MODE AUDIO PAUSE REC FSS T/C DISPLAY SLOW VOLUME MUTE MODE TV SEARCH Helpful Hint • The Recorder's features will scroll across the display panel when you first connect the power cord.This is on your Recorder has ...
... 05.1.8 4:15 PM Page 18 18 Initial Setup Initial Setup screens will appear the very first time you turn on -screen messages and menus will help you set up Recorder features quickly, including TV channels and language options. "IS TV ON? C03" appears. ("INSTALL RECORDER FIRST" will show on ,...MENU OK SELECT RETURN 2-3 PLAY VCR REC STOP DVD REC MODE PLAY MODE AUDIO PAUSE REC FSS T/C DISPLAY SLOW VOLUME MUTE MODE TV SEARCH Helpful Hint • The Recorder's features will scroll across the display panel when you first connect the power cord.This is on your Recorder has ...
User manual
Page 20
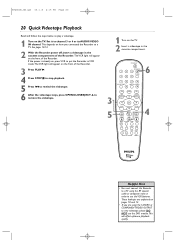
... SYSTEM MENU OK SELECT RETURN PLAY VCR REC STOP DVD REC MODE PLAY MODE AUDIO PAUSE REC FSS T/C DISPLAY SLOW VOLUME MUTE MODE TV SEARCH 4 Helpful Hint • You must connect the Recorder to a TV using the S-VIDEO or COMPONENT VIDEO OUTPUT to use the DVD module.This will appear on...
... SYSTEM MENU OK SELECT RETURN PLAY VCR REC STOP DVD REC MODE PLAY MODE AUDIO PAUSE REC FSS T/C DISPLAY SLOW VOLUME MUTE MODE TV SEARCH 4 Helpful Hint • You must connect the Recorder to a TV using the S-VIDEO or COMPONENT VIDEO OUTPUT to use the DVD module.This will appear on...
User manual
Page 21
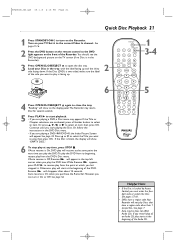
... SYSTEM MENU OK SELECT RETURN PLAY VCR REC STOP DVD REC MODE PLAY MODE AUDIO PAUSE REC FSS T/C DISPLAY SLOW VOLUME MUTE MODE TV SEARCH 1 3-4 5 Helpful Hints • If the Disc is On when you can turn on the TV screen (if no Disc is On, DVD play will not play...
... SYSTEM MENU OK SELECT RETURN PLAY VCR REC STOP DVD REC MODE PLAY MODE AUDIO PAUSE REC FSS T/C DISPLAY SLOW VOLUME MUTE MODE TV SEARCH 1 3-4 5 Helpful Hints • If the Disc is On when you can turn on the TV screen (if no Disc is On, DVD play will not play...

User manual
Page 22
... SYSTEM MENU 6 1 8 OK SELECT RETURN PLAY VCR REC STOP DVD REC MODE PLAY MODE AUDIO PAUSE REC FSS T/C DISPLAY SLOW VOLUME MUTE MODE TV SEARCH 4 7 Helpful Hints • You cannot record only Audio (sound) to prepare for recording.) To pause recording, press PAUSE once on a new DVD+RW, formatting the Disc...
... SYSTEM MENU 6 1 8 OK SELECT RETURN PLAY VCR REC STOP DVD REC MODE PLAY MODE AUDIO PAUSE REC FSS T/C DISPLAY SLOW VOLUME MUTE MODE TV SEARCH 4 7 Helpful Hints • You cannot record only Audio (sound) to prepare for recording.) To pause recording, press PAUSE once on a new DVD+RW, formatting the Disc...
User manual
Page 24
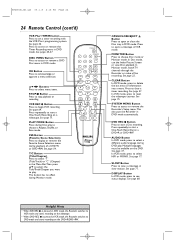
.... DISPLAY Button In VCR mode, press to display or remove the Favorite Scene Selection menu during DVD play to start a One-Touch Recording on a videotape. Helpful Hints • When VCR REC I is pressed in DVD mode, the Recorder switches to VCR mode and starts recording on the videotape. • When DVD...
.... DISPLAY Button In VCR mode, press to display or remove the Favorite Scene Selection menu during DVD play to start a One-Touch Recording on a videotape. Helpful Hints • When VCR REC I is pressed in DVD mode, the Recorder switches to VCR mode and starts recording on the videotape. • When DVD...
User manual
Page 27
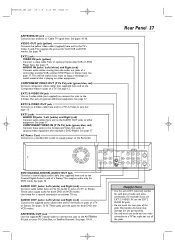
... Video In jacks of audio and video connections. See pages 10-16. See page 17. See pages 10-16. See page 14. See page 17. Helpful Hints • Use the same EXT (external) number for both VCR and DVD modes. COMPONENT VIDEO OUT (Y PB PR) jacks (green, blue, red) Connect component...
... Video In jacks of audio and video connections. See pages 10-16. See page 17. See pages 10-16. See page 14. See page 17. Helpful Hints • Use the same EXT (external) number for both VCR and DVD modes. COMPONENT VIDEO OUT (Y PB PR) jacks (green, blue, red) Connect component...
User manual
Page 28
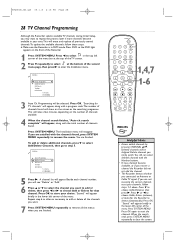
... SYSTEM MENU 1,4,7 OK SELECT RETURN PLAY VCR REC STOP DVD REC MODE PLAY MODE AUDIO PAUSE REC FSS T/C DISPLAY SLOW VOLUME MUTE MODE TV SEARCH 1-6 Helpful Hints • Access added channels by pressing CHANNEL K/ L. Press OK. Programming will be selected. Press SYSTEM MENU. Delete channels you rarely watch.You still can...
... SYSTEM MENU 1,4,7 OK SELECT RETURN PLAY VCR REC STOP DVD REC MODE PLAY MODE AUDIO PAUSE REC FSS T/C DISPLAY SLOW VOLUME MUTE MODE TV SEARCH 1-6 Helpful Hints • Access added channels by pressing CHANNEL K/ L. Press OK. Programming will be selected. Press SYSTEM MENU. Delete channels you rarely watch.You still can...
User manual
Page 29
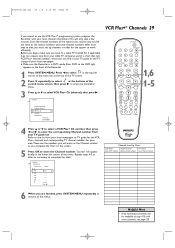
...), then press B. u 001 s 018 B L 002 -- -- -- 003 -- -- -- 004 -- -- -- 005 -- -- -- Press s to select in order for your TV guide list. Programming K Add/Delete Channels u B VCR Plus+ ch. Helpful Hint • Only memorized channels will appear briefly in DVD mode. "Stored" will be the same as you complete the chart on the front of...
...), then press B. u 001 s 018 B L 002 -- -- -- 003 -- -- -- 004 -- -- -- 005 -- -- -- Press s to select in order for your TV guide list. Programming K Add/Delete Channels u B VCR Plus+ ch. Helpful Hint • Only memorized channels will appear briefly in DVD mode. "Stored" will be the same as you complete the chart on the front of...
User manual
Page 30
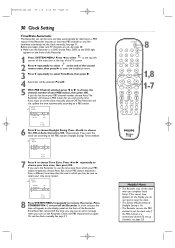
... SYSTEM MENU 1,8 OK SELECT 1-7 RETURN PLAY VCR REC STOP DVD REC MODE PLAY MODE AUDIO PAUSE REC FSS T/C DISPLAY SLOW VOLUME MUTE MODE TV SEARCH Helpful Hints • The Recorder may see page 28. See page 31. Press B. 5 With PBS Channel selected, press s or B to remove the menus. B To store Press...
... SYSTEM MENU 1,8 OK SELECT 1-7 RETURN PLAY VCR REC STOP DVD REC MODE PLAY MODE AUDIO PAUSE REC FSS T/C DISPLAY SLOW VOLUME MUTE MODE TV SEARCH Helpful Hints • The Recorder may see page 28. See page 31. Press B. 5 With PBS Channel selected, press s or B to remove the menus. B To store Press...
