User manual
Page 8
...the mode other than +VR is rewritable repeatedly and DVD+R/DVD-R, which you do not find the part you want to watch using the search function. Daily or weekly program recordings are recorded on CD-RW/-R. Every time [RECORD] or [REC I] is applicable to all contents in the disc... (refer to page 82). * DVD-R recorded in the DVD+VR mode. Automatic chapter mark setting: Chapter marks will be put the following features are not...
...the mode other than +VR is rewritable repeatedly and DVD+R/DVD-R, which you do not find the part you want to watch using the search function. Daily or weekly program recordings are recorded on CD-RW/-R. Every time [RECORD] or [REC I] is applicable to all contents in the disc... (refer to page 82). * DVD-R recorded in the DVD+VR mode. Automatic chapter mark setting: Chapter marks will be put the following features are not...

User manual
Page 11
.../ L/ { / B buttons Press to start a recording. • Press repeatedly to select items or settings. 8. REC I button • Press once to start the one-touch timer recording. 14. CLEAR button Press to clear the password ...marker number, etc. 18. SETUP button • Press to display the main menu. • During DVD playback, press and hold for CD or to the interlace mode. 25. FFW D button • ...in the main menu. • Press to play back in pause, press repeatedly to the Philips brand TV products, you can adjust the TV volume with these buttons. 1. BACK button Press ...
.../ L/ { / B buttons Press to start a recording. • Press repeatedly to select items or settings. 8. REC I button • Press once to start the one-touch timer recording. 14. CLEAR button Press to clear the password ...marker number, etc. 18. SETUP button • Press to display the main menu. • During DVD playback, press and hold for CD or to the interlace mode. 25. FFW D button • ...in the main menu. • Press to play back in pause, press repeatedly to the Philips brand TV products, you can adjust the TV volume with these buttons. 1. BACK button Press ...
User manual
Page 35
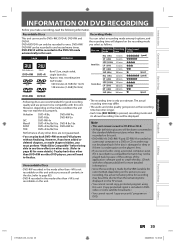
... max. Verbatim JVC Maxell SONY TDK DVD+R 8x, DVD+RW 4x, DVD-R 8x, DVD-RW 2x DVD-RW 4x DVD+R 4x/8x/16x, DVD-R 8x/16x DVD+R 4x/8x/16x, DVD+RW 4x DVD+R 4x/8x/16x Performance of the application...(Copy-protected signal is pressed, recording mode and its allowed recording time will be recorded in the DVD+VR mode automatically in a compatible format it may not be a little shorter than +VR is made... select as the recording time becomes longer. • Each time [REC MODE] is included in the mode other DVD players, you will be down converted to finalize. The actual recording ...
... max. Verbatim JVC Maxell SONY TDK DVD+R 8x, DVD+RW 4x, DVD-R 8x, DVD-RW 2x DVD-RW 4x DVD+R 4x/8x/16x, DVD-R 8x/16x DVD+R 4x/8x/16x, DVD+RW 4x DVD+R 4x/8x/16x Performance of the application...(Copy-protected signal is pressed, recording mode and its allowed recording time will be recorded in the DVD+VR mode automatically in a compatible format it may not be a little shorter than +VR is made... select as the recording time becomes longer. • Each time [REC MODE] is included in the mode other DVD players, you will be down converted to finalize. The actual recording ...
User manual
Page 37
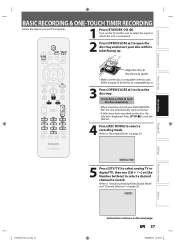
...label facing up. CH 12 Others Instructions continue on page 35. It may take a while to load the disc completely. • When inserting a brand-new DVD+RW/DVDRW, the unit automatically starts to format. • If titles have been recorded on page 29. Press [STOP C] to exit the title list. ...4 Press [REC MODE] to record TV programs. 1 Press [STANDBY-ON y]. EN 37 2008/06/02 14:49:47 Introduction Connections Basic Setup BASIC RECORDING & ONE-TOUCH ...
...label facing up. CH 12 Others Instructions continue on page 35. It may take a while to load the disc completely. • When inserting a brand-new DVD+RW/DVDRW, the unit automatically starts to format. • If titles have been recorded on page 29. Press [STOP C] to exit the title list. ...4 Press [REC MODE] to record TV programs. 1 Press [STANDBY-ON y]. EN 37 2008/06/02 14:49:47 Introduction Connections Basic Setup BASIC RECORDING & ONE-TOUCH ...

User manual
Page 38
...cannot record images as 4:3. • When the unit clock has not been set the recording time in blocks of 16:9. Press [PAUSE F]] or [REC I " will be recorded. Only the selected channel audio will appear in both stereo and SAP (secondary audio program) at the same time. •... . The recorded title will be blank. • When you record a TV program, you press [REC I], recording starts immediately and continues until the desired recording time (30 minutes to 6 hours) appears on page 71.) e.g.) DVD+R I 0:30 0:30 (normal recording) 1:00 6:00 5:30 • To cancel one -touch ...
...cannot record images as 4:3. • When the unit clock has not been set the recording time in blocks of 16:9. Press [PAUSE F]] or [REC I " will be recorded. Only the selected channel audio will appear in both stereo and SAP (secondary audio program) at the same time. •... . The recorded title will be blank. • When you record a TV program, you press [REC I], recording starts immediately and continues until the desired recording time (30 minutes to 6 hours) appears on page 71.) e.g.) DVD+R I 0:30 0:30 (normal recording) 1:00 6:00 5:30 • To cancel one -touch ...
User manual
Page 43
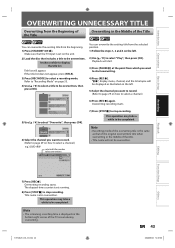
... starts. Title name is set on the bottom right corner of the TV screen during overwriting. This operation may take a while to start overwriting. 4) Press [REC I ] again. Title list will appear. Playback will start. 3) Press [PAUSE F] at the point from which you want to be completed. Note • ...CH 12 You can overwrite the existing title from the beginning. 1) Press [STANDBY-ON y]. Refer to "Recording Mode" on how to select a channel.) e.g.) DVD+RW selected title number to be overwritten, then press [OK]. 1 SP (2Hr) NOV/21/07 11:00AM CH12 SP NOV/21/07 0:20:44 2 NOV...
... starts. Title name is set on the bottom right corner of the TV screen during overwriting. This operation may take a while to start overwriting. 4) Press [REC I ] again. Title list will appear. Playback will start. 3) Press [PAUSE F] at the point from which you want to be completed. Note • ...CH 12 You can overwrite the existing title from the beginning. 1) Press [STANDBY-ON y]. Refer to "Recording Mode" on how to select a channel.) e.g.) DVD+RW selected title number to be overwritten, then press [OK]. 1 SP (2Hr) NOV/21/07 11:00AM CH12 SP NOV/21/07 0:20:44 2 NOV...
User manual
Page 47
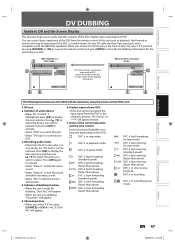
...and stop mode, the "DV Audio" can control basic operations of DVC. Indicator of this unit. 1. DVC is ready for dubbing, "Start Rec" will appear. 5. Introduction Connections Basic Setup Recording DV DUBBING Guide to DV and On-Screen Display This function helps you wish to output. ...DV cable that has 4-pin input jack and is in 1 video mode... 1/ 1 1/ 1 2 Control DV Audio Start Rec DVD Stereo1 +RW E3 (DV-IN) AB-1234 0:12:34 The menu changes according to DVD. Press [OK] again to activate. • Select "Stereo1" to dub the stereo sound. • Select "Stereo2" ...
...and stop mode, the "DV Audio" can control basic operations of DVC. Indicator of this unit. 1. DVC is ready for dubbing, "Start Rec" will appear. 5. Introduction Connections Basic Setup Recording DV DUBBING Guide to DV and On-Screen Display This function helps you wish to output. ...DV cable that has 4-pin input jack and is in 1 video mode... 1/ 1 1/ 1 2 Control DV Audio Start Rec DVD Stereo1 +RW E3 (DV-IN) AB-1234 0:12:34 The menu changes according to DVD. Press [OK] again to activate. • Select "Stereo1" to dub the stereo sound. • Select "Stereo2" ...

User manual
Page 48
Use [K / L] to page 45 for connection instructions. DV DUBBING DVC to DVD Dubbing Before recording from DVC, refer to select "DV Input", then press [OK]. 1/ 1 1/ 1 Control DV Audio Start Rec DVD Stereo1 +RW E3 (DV-IN) AB-1234 0:00:00 SP(2Hr) 2:00 48 EN E7H40UD_EN_v5.indd 48 2008/06/02 14:50:02 Insert a recordable media and make sure your DV camcorder is in video mode. 1 Use [SOURCE] or [CH / ] to display the item selection. E3 (DV-IN) AB-1234 0:00:00 2 Press [REC MODE] to select a recording mode. (Refer to page 35.) 3 Press [INFO]. 4 Press [OK] to select "E3 (DV-IN)".
Use [K / L] to page 45 for connection instructions. DV DUBBING DVC to DVD Dubbing Before recording from DVC, refer to select "DV Input", then press [OK]. 1/ 1 1/ 1 Control DV Audio Start Rec DVD Stereo1 +RW E3 (DV-IN) AB-1234 0:00:00 SP(2Hr) 2:00 48 EN E7H40UD_EN_v5.indd 48 2008/06/02 14:50:02 Insert a recordable media and make sure your DV camcorder is in video mode. 1 Use [SOURCE] or [CH / ] to display the item selection. E3 (DV-IN) AB-1234 0:00:00 2 Press [REC MODE] to select a recording mode. (Refer to page 35.) 3 Press [INFO]. 4 Press [OK] to select "E3 (DV-IN)".

User manual
Page 49
...device such as cable/satellite box or D-VHS VCR cannot be recognized. • If no video signal is detected from DVC during DVC to DVD dubbing, the recording will flash on the TV screen. Recording Playback Editing Function Setup Others E7H40UD_EN_v5.indd 49 EN 49 2008/06/02 14:..."Guide to start dubbing. 6 Use [K / L] to select "Control", then press [OK]. Then, press [STOP C] where you wish to start dubbing. Use [K / L] to select "Start Rec", then press [OK]. Do not connect this unit and DVC via any other unit. • Do not connect more than 1 DVC. • The unit can...
...device such as cable/satellite box or D-VHS VCR cannot be recognized. • If no video signal is detected from DVC during DVC to DVD dubbing, the recording will flash on the TV screen. Recording Playback Editing Function Setup Others E7H40UD_EN_v5.indd 49 EN 49 2008/06/02 14:..."Guide to start dubbing. 6 Use [K / L] to select "Control", then press [OK]. Then, press [STOP C] where you wish to start dubbing. Use [K / L] to select "Start Rec", then press [OK]. Do not connect this unit and DVC via any other unit. • Do not connect more than 1 DVC. • The unit can...
User manual
Page 52
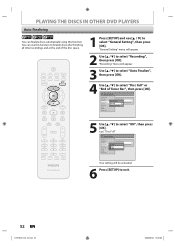
... Setting" menu will be activated. 6 Press [SETUP] to exit. 52 EN E7H40UD_EN_v5.indd 52 2008/06/02 14:50:06 PLAYING THE DISCS IN OTHER DVD PLAYERS Auto Finalizing You can use [K / L] to select "General Setting", then press [OK]. "Recording" menu will appear. 3 Use [K / L] to... select "Auto Finalize", then press [OK]. 4 Use [K / L] to select "Disc Full" or "End of Timer Rec 5 Use [K / L] to select "ON", then press [OK]. e.g.) "Disc Full" General Setting Playback Display Video Recording Clock Channel DivX HDMI Reset All Auto Chapter Auto FinalizAeuto...
... Setting" menu will be activated. 6 Press [SETUP] to exit. 52 EN E7H40UD_EN_v5.indd 52 2008/06/02 14:50:06 PLAYING THE DISCS IN OTHER DVD PLAYERS Auto Finalizing You can use [K / L] to select "General Setting", then press [OK]. "Recording" menu will appear. 3 Use [K / L] to... select "Auto Finalize", then press [OK]. 4 Use [K / L] to select "Disc Full" or "End of Timer Rec 5 Use [K / L] to select "ON", then press [OK]. e.g.) "Disc Full" General Setting Playback Display Video Recording Clock Channel DivX HDMI Reset All Auto Chapter Auto FinalizAeuto...
Quick start guide
Page 2
... the desired recording time (30 minutes to set a timer programming. 2 Initial Setting You need to finalize DVD+R, DVD-RW or DVD-R to play them back on other DVD players (see page 51 in the user manual). The unit will start getting channels available in China E7H40UD_EN_QG_v2....the unit is completed. 4 Channel Selection Select channels by using [CH / ] or [the Number buttons] found on the TV screen. Press [REC I] repeatedly until the digital channel selection is connected. Playback 2 3 Insert your preference, then press [OK]. Clock Setting Use [{ / B] to ...
... the desired recording time (30 minutes to set a timer programming. 2 Initial Setting You need to finalize DVD+R, DVD-RW or DVD-R to play them back on other DVD players (see page 51 in the user manual). The unit will start getting channels available in China E7H40UD_EN_QG_v2....the unit is completed. 4 Channel Selection Select channels by using [CH / ] or [the Number buttons] found on the TV screen. Press [REC I] repeatedly until the digital channel selection is connected. Playback 2 3 Insert your preference, then press [OK]. Clock Setting Use [{ / B] to ...


