

Leaflet
Page 1
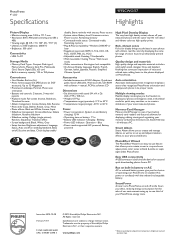
... add effects to display your PC • Operate on AC power or cordlessly with Philips PhotoFrame™, the easiest way to your photos Simple intuitive operation and great convenience • USB connector for power saving without a PC. Philips PhotoFrame 9" LCD 9FF2CWO Every picture tells your story How many digital pictures are hidden on /off at...
... add effects to display your PC • Operate on AC power or cordlessly with Philips PhotoFrame™, the easiest way to your photos Simple intuitive operation and great convenience • USB connector for power saving without a PC. Philips PhotoFrame 9" LCD 9FF2CWO Every picture tells your story How many digital pictures are hidden on /off at...
Leaflet
Page 2
PhotoFrame 9" LCD Specifications 9FF2CWO/37 Highlights Picture/Display • Effective viewing area: 169.6 x 111.7 mm • ...white or sepia right within PhotoFrame. all without notice. Issue date 2010-12-08 Version: 4.1.9 12 NC: 8670 000 26531 UPC: 6 09585 12548 3 © 2010 Koninklijke Philips Electronics N.V. www.philips.com * Battery operating time...Power • Power consumption: (System on and battery charging) 12 W • Operating time on PhotoFrame. Quality design and materials High quality design and exquisite materials include a solid stylish stand, designer frame...
PhotoFrame 9" LCD Specifications 9FF2CWO/37 Highlights Picture/Display • Effective viewing area: 169.6 x 111.7 mm • ...white or sepia right within PhotoFrame. all without notice. Issue date 2010-12-08 Version: 4.1.9 12 NC: 8670 000 26531 UPC: 6 09585 12548 3 © 2010 Koninklijke Philips Electronics N.V. www.philips.com * Battery operating time...Power • Power consumption: (System on and battery charging) 12 W • Operating time on PhotoFrame. Quality design and materials High quality design and exquisite materials include a solid stylish stand, designer frame...

User manual
Page 1
... Gebruikershandleiding Användar-handbok | Benutzerhandbuch | Manuale per l'utent PhotoFrame™ | Manual del usuario | Manual do usuário 9FF2 Modern Classic 9FF2M4 One Year Limited Warranty (for US and Canada only) Philips warrants that shows the product name and the date of purchase. ... Spanish speaking) in accordance with the specifications and warnings, for a period of purchase.This warranty extends only to state. 9FF2CWO 9FF2CMI 9FF2CME Philips liability is not transferable.To exercise your rights under this warranty, you must provide proof of purchase in the form of...
... Gebruikershandleiding Användar-handbok | Benutzerhandbuch | Manuale per l'utent PhotoFrame™ | Manual del usuario | Manual do usuário 9FF2 Modern Classic 9FF2M4 One Year Limited Warranty (for US and Canada only) Philips warrants that shows the product name and the date of purchase. ... Spanish speaking) in accordance with the specifications and warnings, for a period of purchase.This warranty extends only to state. 9FF2CWO 9FF2CMI 9FF2CME Philips liability is not transferable.To exercise your rights under this warranty, you must provide proof of purchase in the form of...

User manual
Page 3
Its internal rechargeable battery provides you can be placed either vertically or horizontally to the mains power supply. -2 - Introduction Philips digital PhotoFrame™ can place it somewhere in a room for a continuous display by connecting it around and show photos without the power cord. Philips Electronics Or, you with the freedom to pass it to fit the photos on display.
Its internal rechargeable battery provides you can be placed either vertically or horizontally to the mains power supply. -2 - Introduction Philips digital PhotoFrame™ can place it somewhere in a room for a continuous display by connecting it around and show photos without the power cord. Philips Electronics Or, you with the freedom to pass it to fit the photos on display.
User manual
Page 4
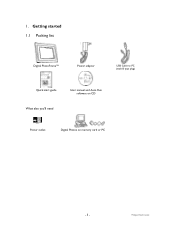
Philips Electronics Getting started 1.1 Packing list Digital PhotoFrame™ Power adaptor USB Cable to PC (male B type plug) Quick start guide What else you'll need User manual and Auto Run software on CD Power outlet Digital Photos on memory card or PC -3 - 1.
Philips Electronics Getting started 1.1 Packing list Digital PhotoFrame™ Power adaptor USB Cable to PC (male B type plug) Quick start guide What else you'll need User manual and Auto Run software on CD Power outlet Digital Photos on memory card or PC -3 - 1.
User manual
Page 5
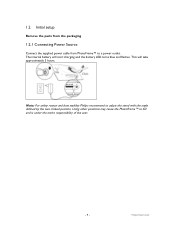
Philips Electronics Note: For safety reason and best stability Philips recommend to fall and is under the entire responsibility of the user. -4 - Using other positions may cause the PhotoFrame™ to adjust the stand with the angle defined by the two clicked position. The internal battery will take approximately 3 hours. This will start charging and the battery LED turns blue and flashes. 1.2 Initial setup Remove the parts from the packaging 1.2.1 Connecting Power Source Connect the supplied power cable from PhotoFrame™ to a power outlet.
Philips Electronics Note: For safety reason and best stability Philips recommend to fall and is under the entire responsibility of the user. -4 - Using other positions may cause the PhotoFrame™ to adjust the stand with the angle defined by the two clicked position. The internal battery will take approximately 3 hours. This will start charging and the battery LED turns blue and flashes. 1.2 Initial setup Remove the parts from the packaging 1.2.1 Connecting Power Source Connect the supplied power cable from PhotoFrame™ to a power outlet.

User manual
Page 6
1.2.2 Locate Control Buttons Play/Stop Slideshow Navigation controller/ OK Menu Rest Button Power ON/OFF • Use your PhotoFrame™ by pressing the control buttons in the back. • The control buttons and instructions are shown at the bottom of the menu screen. Navigation Controller -5 - Philips Electronics
1.2.2 Locate Control Buttons Play/Stop Slideshow Navigation controller/ OK Menu Rest Button Power ON/OFF • Use your PhotoFrame™ by pressing the control buttons in the back. • The control buttons and instructions are shown at the bottom of the menu screen. Navigation Controller -5 - Philips Electronics

User manual
Page 7
The power LED will be blue and a slide show will play -6 - 1.2.3 Turning on PhotoFrame™ Press the power ON/OFF button. Philips Electronics
The power LED will be blue and a slide show will play -6 - 1.2.3 Turning on PhotoFrame™ Press the power ON/OFF button. Philips Electronics

User manual
Page 9
Navigate down to confirm selection. Press the OK button to highlight the setup icon. Show Clock: If you want to use the PhotoFrame™ as a clock Navigate up and down to select Show clock Navigate right then up and down to confirm selection. 1.2.5 Setting Time, Date and Clock ... Both Press the OK button to access the setup menu. Press the OK button to Clock. Philips Electronics Navigate left and right to set before the Event Reminder and Auto on the top of the PhotoFrame™. Navigate right to select the time. Time: Navigate up and down to access the Time...
Navigate down to confirm selection. Press the OK button to highlight the setup icon. Show Clock: If you want to use the PhotoFrame™ as a clock Navigate up and down to select Show clock Navigate right then up and down to confirm selection. 1.2.5 Setting Time, Date and Clock ... Both Press the OK button to access the setup menu. Press the OK button to Clock. Philips Electronics Navigate left and right to set before the Event Reminder and Auto on the top of the PhotoFrame™. Navigate right to select the time. Time: Navigate up and down to access the Time...
User manual
Page 10
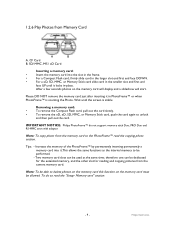
... photo from the memory card to unlock and then pull out the card. Memory card" section. -9 - Increase the memory of the PhotoFrame™ by permanently inserting permanently a memory card into the slot in the frame. • For a Compact Flash card, firmly slide ... other slot for reading and copying pictures from Memory Card A B A. IMPORTANT NOTICE: Philips PhotoFrame™ do so read the copying photo section. Two memory card slots can be performed. - Philips Electronics CF Card B. Wait until it .This allows the same functions as the internal memory...
... photo from the memory card to unlock and then pull out the card. Memory card" section. -9 - Increase the memory of the PhotoFrame™ by permanently inserting permanently a memory card into the slot in the frame. • For a Compact Flash card, firmly slide ... other slot for reading and copying pictures from Memory Card A B A. IMPORTANT NOTICE: Philips PhotoFrame™ do so read the copying photo section. Two memory card slots can be performed. - Philips Electronics CF Card B. Wait until it .This allows the same functions as the internal memory...

User manual
Page 11
...8226; For installation and more details about his application, follow instrustions in user manual on CD For Mac System: (OS X or later): • Connect PhotoFrame™ to the Mac via USB cable . (it will be recognized as a mass storage device.) • Select photos to be transferred and copy them ...directly under the root directory of PhotoFrame™. (Only JPEG format supported) • Disconnect the USB cable • After a few seconds, all photos will be copied to default album in...
...8226; For installation and more details about his application, follow instrustions in user manual on CD For Mac System: (OS X or later): • Connect PhotoFrame™ to the Mac via USB cable . (it will be recognized as a mass storage device.) • Select photos to be transferred and copy them ...directly under the root directory of PhotoFrame™. (Only JPEG format supported) • Disconnect the USB cable • After a few seconds, all photos will be copied to default album in...

User manual
Page 12
... "Creating and managing slideshow" Note 3: Photos are easily editable from slideshow mode by pressing the OK button. 2. Enjoying Photos 2.1 Browse Mode - Navigate left and right. - Philips Electronics Note 2: For slideshow creation and management read the photo menu section. - 11 - To restart the slideshow Press the Play slideshow stop button. 2.2 Slide Show... Browse mode you turn on the Play/Stop button. - Note 1: The frequency of the slideshow can be in Slideshow mode and click once on the PhotoFrame™.
... "Creating and managing slideshow" Note 3: Photos are easily editable from slideshow mode by pressing the OK button. 2. Enjoying Photos 2.1 Browse Mode - Navigate left and right. - Philips Electronics Note 2: For slideshow creation and management read the photo menu section. - 11 - To restart the slideshow Press the Play slideshow stop button. 2.2 Slide Show... Browse mode you turn on the Play/Stop button. - Note 1: The frequency of the slideshow can be in Slideshow mode and click once on the PhotoFrame™.
User manual
Page 15
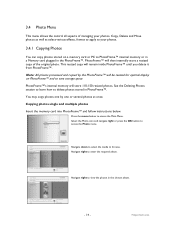
...;. This resized copy will then internally store a resized copy of managing your photos. 3.4.1 Copying Photos You can copy photos stored on PhotoFrame™ and to save storage space PhotoFrame™'s internal memory will store 110-150 resized photos. Copy, Delete and Move photos as well as select various effects, frames to apply... Photo icon and navigate right or press the OK button to enter the required album. You may copy photos one or several photos at once. Philips Electronics
...;. This resized copy will then internally store a resized copy of managing your photos. 3.4.1 Copying Photos You can copy photos stored on PhotoFrame™ and to save storage space PhotoFrame™'s internal memory will store 110-150 resized photos. Copy, Delete and Move photos as well as select various effects, frames to apply... Photo icon and navigate right or press the OK button to enter the required album. You may copy photos one or several photos at once. Philips Electronics

User manual
Page 16
... the selected album. SD card, two folders (PC Folder and Camera Folder) may move between photos. NOTE: Only JPEG format photos are not supported. - 15 - Philips Electronics Navigate up indicating no free space for 3 seconds to begin copying. Press the OK button to select all the pictures created from a camera. The... which album to copy to select individual images. PC Folder: is stored inside the selected album. Press OK to . You may be displayed in the PhotoFrame™.
... the selected album. SD card, two folders (PC Folder and Camera Folder) may move between photos. NOTE: Only JPEG format photos are not supported. - 15 - Philips Electronics Navigate up indicating no free space for 3 seconds to begin copying. Press the OK button to select all the pictures created from a camera. The... which album to copy to select individual images. PC Folder: is stored inside the selected album. Press OK to . You may be displayed in the PhotoFrame™.

User manual
Page 17
...the photos on a memory card and copy the photos to PhotoFrame™ from PhotoFrame™ to PC • Copy the photos on PhotoFrame™ to PC the same way you transfer the contents of... to PC. All photos are stored in the root directory will be automatically added to PhotoFrame™ and the root directory will be limited due to safely remove hardware before disconnection ...all photos in the sub-directories of the \DCIM\on PhotoFrame™. For Windows 2000 systems, remember to limited internal memory on the PhotoFrame™ drive. - 16 - The number of photos accepted...
...the photos on a memory card and copy the photos to PhotoFrame™ from PhotoFrame™ to PC • Copy the photos on PhotoFrame™ to PC the same way you transfer the contents of... to PC. All photos are stored in the root directory will be automatically added to PhotoFrame™ and the root directory will be limited due to safely remove hardware before disconnection ...all photos in the sub-directories of the \DCIM\on PhotoFrame™. For Windows 2000 systems, remember to limited internal memory on the PhotoFrame™ drive. - 16 - The number of photos accepted...

User manual
Page 18
... press the OK button to select individual images. Press the OK button to access the slideshow menu. Philips Electronics Navigate down to select Yes delete. Press the navigation buttons to free up space on the PhotoFrame™ or a memory card you can delete photos. 3.4.2 Deleting Photos2 If you need to move between...
... press the OK button to select individual images. Press the OK button to access the slideshow menu. Philips Electronics Navigate down to select Yes delete. Press the navigation buttons to free up space on the PhotoFrame™ or a memory card you can delete photos. 3.4.2 Deleting Photos2 If you need to move between...

User manual
Page 19
Philips Electronics Memory card" section. - 18 - When you delete a photo, PhotoFrame™ will be able to delete photos on the memory card this menu and play the slideshow Or navigate left to move back through the ...
Philips Electronics Memory card" section. - 18 - When you delete a photo, PhotoFrame™ will be able to delete photos on the memory card this menu and play the slideshow Or navigate left to move back through the ...

User manual
Page 20
... the photo menu. Navigate down to go to access the slideshow menu. Press the menu button to access the Main Menu. 3.4.3 Rotating, Zooming and Cropping3 PhotoFrame™ can change the orientation of photos and change the framing of photos. Navigate right to crop your photos press the play slideshow button. - 19... the OK button to the orientation. Navigate down to select the media to enter the required album. Navigate right to go to Rotate and Crop. Philips Electronics Press OK to select the rotation. Navigate down to confirm rotation. Navigate right to browse.
... the photo menu. Navigate down to go to access the slideshow menu. Press the menu button to access the Main Menu. 3.4.3 Rotating, Zooming and Cropping3 PhotoFrame™ can change the orientation of photos and change the framing of photos. Navigate right to crop your photos press the play slideshow button. - 19... the OK button to the orientation. Navigate down to select the media to enter the required album. Navigate right to go to Rotate and Crop. Philips Electronics Press OK to select the rotation. Navigate down to confirm rotation. Navigate right to browse.

User manual
Page 22
... to view the photos in an album. Philips Electronics Press the menu button to enter the required album. Navigate right to access the Main Menu. This function only applies to original photos not those processed by the PhotoFrame™ will be resized for optimal display on PhotoFrame™ and to move the frame... around the image. - 21 - Note: All photos processed and copied by the PhotoFrame™. Navigate right or press the OK button to browse. Navigate down to select the media to access the Photo menu. Use the Navigation button ...
... to view the photos in an album. Philips Electronics Press the menu button to enter the required album. Navigate right to access the Main Menu. This function only applies to original photos not those processed by the PhotoFrame™ will be resized for optimal display on PhotoFrame™ and to move the frame... around the image. - 21 - Note: All photos processed and copied by the PhotoFrame™. Navigate right or press the OK button to browse. Navigate down to select the media to access the Photo menu. Use the Navigation button ...

User manual
Page 24
...menu button. Press OK button for 3 seconds to Album. - 23 - Navigate down to select the media to move between albums created by PhotoFrame™ on internal memory or external memory card. Navigate right or press the OK button to access the Photo Menu. Navigate right to enter ...all visible thumbnails. 3.4.4 Moving Photos4 Photos can only be moved between photos. Navigate right to view the photos in the chosen album. Philips Electronics Press the navigation buttons to browse. Press the OK button to access the Main Menu. Press the menu button to select individual images....
...menu button. Press OK button for 3 seconds to Album. - 23 - Navigate down to select the media to move between albums created by PhotoFrame™ on internal memory or external memory card. Navigate right or press the OK button to access the Photo Menu. Navigate right to enter ...all visible thumbnails. 3.4.4 Moving Photos4 Photos can only be moved between photos. Navigate right to view the photos in the chosen album. Philips Electronics Press the navigation buttons to browse. Press the OK button to access the Main Menu. Press the menu button to select individual images....


