

Leaflet
Page 1
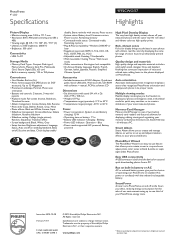
... your photos • Auto photo orientation to fit portrait or landscape modes Easily display and manage your digital photos • Play slideshows, single photo, thumbnails or show clock • Display and manage photos on memory cards or internal memory • Create albums, slideshows and manage your photos • Rotate, zoom, crop, mask and add effects to your photos Simple intuitive operation and great convenience • USB connector for power saving Philips PhotoFrame 9" LCD 9FF2CWO Every picture tells your story How many digital pictures are hidden on your digital photos...
... your photos • Auto photo orientation to fit portrait or landscape modes Easily display and manage your digital photos • Play slideshows, single photo, thumbnails or show clock • Display and manage photos on memory cards or internal memory • Create albums, slideshows and manage your photos • Rotate, zoom, crop, mask and add effects to your photos Simple intuitive operation and great convenience • USB connector for power saving Philips PhotoFrame 9" LCD 9FF2CWO Every picture tells your story How many digital pictures are hidden on your digital photos...
Leaflet
Page 2
... Accessories • Included accessories: AC-DC Adapter, Quick start guide, Stand, USB cable, Wall mount kit, CD-ROM with software + manual, PC/Mac software CD Dimensions • Set dimensions with the same 'real life' rich detail and vibrant colors as to set of two built-in memory card readers and featured software for easy and quick downloading photos from a PC. PhotoFrame 9" LCD Specifications 9FF2CWO/37 Highlights Picture/Display • Effective viewing area: 169.6 x 111.7 mm • Resolution...
... Accessories • Included accessories: AC-DC Adapter, Quick start guide, Stand, USB cable, Wall mount kit, CD-ROM with software + manual, PC/Mac software CD Dimensions • Set dimensions with the same 'real life' rich detail and vibrant colors as to set of two built-in memory card readers and featured software for easy and quick downloading photos from a PC. PhotoFrame 9" LCD Specifications 9FF2CWO/37 Highlights Picture/Display • Effective viewing area: 169.6 x 111.7 mm • Resolution...
User manual
Page 2
... Initial setup 4 1.2.1 Connecting Power Source 4 1.2.2 Locate Control Buttons 5 1.2.3 Turning on Photo Frame 6 1.2.4 Select your preferred language... - 7 1.2.5 Setting Time, Date and Clock ..... - 8 1.2.6 Play Photos from Memory Card.. - 9 1.2.7 Copy photos from Slideshow - 36 4.1.5 Rename Slideshow 37 4.1.6 Delete Slideshow 39 4.2 Slideshow Sequence 41 4.3 Transition Effects 42 4.4 Frequency 43 4.5 Collage 45 4.6 Background Color 46 4.7 Show Clock 47 -5- 5. Enjoying Photos 11 2.1 Browse Mode 11 2.2 Slide Show Mode 11 -3- 3. single and multiple... - 13 3.4 Photo Menu 14...
... Initial setup 4 1.2.1 Connecting Power Source 4 1.2.2 Locate Control Buttons 5 1.2.3 Turning on Photo Frame 6 1.2.4 Select your preferred language... - 7 1.2.5 Setting Time, Date and Clock ..... - 8 1.2.6 Play Photos from Memory Card.. - 9 1.2.7 Copy photos from Slideshow - 36 4.1.5 Rename Slideshow 37 4.1.6 Delete Slideshow 39 4.2 Slideshow Sequence 41 4.3 Transition Effects 42 4.4 Frequency 43 4.5 Collage 45 4.6 Background Color 46 4.7 Show Clock 47 -5- 5. Enjoying Photos 11 2.1 Browse Mode 11 2.2 Slide Show Mode 11 -3- 3. single and multiple... - 13 3.4 Photo Menu 14...
User manual
Page 4
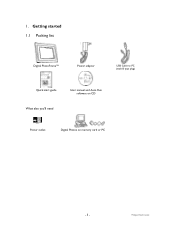
Philips Electronics 1. Getting started 1.1 Packing list Digital PhotoFrame™ Power adaptor USB Cable to PC (male B type plug) Quick start guide What else you'll need User manual and Auto Run software on CD Power outlet Digital Photos on memory card or PC -3 -
Philips Electronics 1. Getting started 1.1 Packing list Digital PhotoFrame™ Power adaptor USB Cable to PC (male B type plug) Quick start guide What else you'll need User manual and Auto Run software on CD Power outlet Digital Photos on memory card or PC -3 -
User manual
Page 5
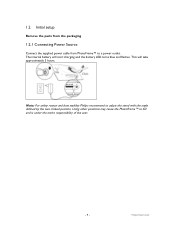
Using other positions may cause the PhotoFrame™ to a power outlet. 1.2 Initial setup Remove the parts from the packaging 1.2.1 Connecting Power Source Connect the supplied power cable from PhotoFrame™ to fall and is under the entire responsibility of the user. -4 - This will start charging and the battery LED turns blue and flashes. The internal battery will take approximately 3 hours. Note: For safety reason and best stability Philips recommend to adjust the stand with the angle defined by the two clicked position. Philips Electronics
Using other positions may cause the PhotoFrame™ to a power outlet. 1.2 Initial setup Remove the parts from the packaging 1.2.1 Connecting Power Source Connect the supplied power cable from PhotoFrame™ to fall and is under the entire responsibility of the user. -4 - This will start charging and the battery LED turns blue and flashes. The internal battery will take approximately 3 hours. Note: For safety reason and best stability Philips recommend to adjust the stand with the angle defined by the two clicked position. Philips Electronics
User manual
Page 10
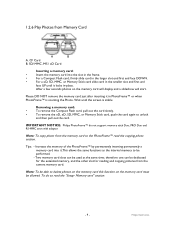
... the internal memory to delete photos on the memory card this function on the memory card will display and a slideshow will start. Tips: - therefore one can be dedicated for the extended memory, and the other slot for reading and copying pictures from the camera memory card. IMPORTANT NOTICE: Philips PhotoFrame™ do so read the copying photo section. Two memory card slots can be used at the same time; Note: To be able to be allowed. Memory card" section. -9 - Philips Electronics...
... the internal memory to delete photos on the memory card this function on the memory card will display and a slideshow will start. Tips: - therefore one can be dedicated for the extended memory, and the other slot for reading and copying pictures from the camera memory card. IMPORTANT NOTICE: Philips PhotoFrame™ do so read the copying photo section. Two memory card slots can be used at the same time; Note: To be able to be allowed. Memory card" section. -9 - Philips Electronics...

User manual
Page 11
Philips Electronics 1.2.7 Copy photos from PC For Windows PC (2000 & XP): • To copy photos from PC to PhotoFrame™, install Auto Run software PhotoFrame™ manager on PC • For installation and more details about his application, follow instrustions in user manual on CD For Mac System: (OS X or later): • Connect PhotoFrame™ to the Mac via USB cable . (it will be recognized as a mass storage device.) • Select photos to be transferred and copy them...
Philips Electronics 1.2.7 Copy photos from PC For Windows PC (2000 & XP): • To copy photos from PC to PhotoFrame™, install Auto Run software PhotoFrame™ manager on PC • For installation and more details about his application, follow instrustions in user manual on CD For Mac System: (OS X or later): • Connect PhotoFrame™ to the Mac via USB cable . (it will be recognized as a mass storage device.) • Select photos to be transferred and copy them...

User manual
Page 12
... slideshow Press the Play slideshow stop button. 2.2 Slide Show Mode Slideshow mode is entered once you need to thumbnail mode form read the photo menu section. - 11 - Navigate left and right to move through the photos. To go directly to be adjusted. Philips Electronics 2. Note 1: The frequency of the slideshow can be in Slideshow mode and click once on the PhotoFrame™. To do so please read the section "Creating and managing slideshow" Note 3: Photos...
... slideshow Press the Play slideshow stop button. 2.2 Slide Show Mode Slideshow mode is entered once you need to thumbnail mode form read the photo menu section. - 11 - Navigate left and right to move through the photos. To go directly to be adjusted. Philips Electronics 2. Note 1: The frequency of the slideshow can be in Slideshow mode and click once on the PhotoFrame™. To do so please read the section "Creating and managing slideshow" Note 3: Photos...
User manual
Page 15
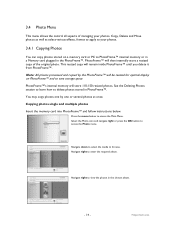
... follow instructions below. Navigate right to view the photos in PhotoFrame™. PhotoFrame™ will be resized for optimal display on a memory card or PC to save storage space PhotoFrame™'s internal memory will remain inside PhotoFrame™ until you delete it from PhotoFrame™. This resized copy will store 110-150 resized photos. Select the Photo icon and navigate right or press the OK button to access the Main Menu. Philips Electronics...
... follow instructions below. Navigate right to view the photos in PhotoFrame™. PhotoFrame™ will be resized for optimal display on a memory card or PC to save storage space PhotoFrame™'s internal memory will remain inside PhotoFrame™ until you delete it from PhotoFrame™. This resized copy will store 110-150 resized photos. Select the Photo icon and navigate right or press the OK button to access the Main Menu. Philips Electronics...

User manual
Page 17
... PhotoFrame™ to PC • Copy the photos on PhotoFrame™ to PC the same way you transfer the contents of a digital camera to safely remove hardware before disconnection After a few seconds, all photos in the sub-directories of photos accepted in this directory may be emptied. For Windows 2000 systems, remember to PC. To copy from that memory card. • Disconnect the USB cable. Philips Electronics The number...
... PhotoFrame™ to PC • Copy the photos on PhotoFrame™ to PC the same way you transfer the contents of a digital camera to safely remove hardware before disconnection After a few seconds, all photos in the sub-directories of photos accepted in this directory may be emptied. For Windows 2000 systems, remember to PC. To copy from that memory card. • Disconnect the USB cable. Philips Electronics The number...

User manual
Page 18
... the OK button to view the photos in the chosen album. Press the OK button for 3 seconds to browse. Once all visible thumbnails. Press OK to free up space on the PhotoFrame™ or a memory card you can delete photos. Navigate down to select the source to select all required photos have been selected press the menu button. 3.4.2 Deleting Photos2 If you need to confirm delete. - 17 - Philips Electronics
... the OK button to view the photos in the chosen album. Press the OK button for 3 seconds to browse. Once all visible thumbnails. Press OK to free up space on the PhotoFrame™ or a memory card you can delete photos. Navigate down to select the source to select all required photos have been selected press the menu button. 3.4.2 Deleting Photos2 If you need to confirm delete. - 17 - Philips Electronics

User manual
Page 33
... Main Menu. Press OK to the slideshow. Slideshow menu shows the settings available for slideshow, select a slideshow frequency that determines, how long a photo remains on screen, select transition effect, how next photo replaces current one on screen, and sequential or random. 4.1 Slideshow 4.1.1 Create New Slideshow To play the slideshow - 32 - The new slideshow name appears in the PhotoFrame™ follow the instructions below. Philips Electronics Press the menu button to highlight the setup icon. 4 Creating and Managing Slideshows To...
... Main Menu. Press OK to the slideshow. Slideshow menu shows the settings available for slideshow, select a slideshow frequency that determines, how long a photo remains on screen, select transition effect, how next photo replaces current one on screen, and sequential or random. 4.1 Slideshow 4.1.1 Create New Slideshow To play the slideshow - 32 - The new slideshow name appears in the PhotoFrame™ follow the instructions below. Philips Electronics Press the menu button to highlight the setup icon. 4 Creating and Managing Slideshows To...
User manual
Page 64
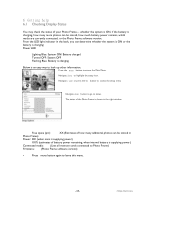
.... Free space (pic): XX (Estimates of how many additional photos can be stored, how much battery power remains, which media are currently connected, or the Photo Frame software version. Philips Electronics whether the system is ON, if the battery is supplying power.) Connected media: (Lists all memory cards connected to Photo Frame) Firmware: (Photo Frame software version) • Press menu button again to highlight the setup icon. 6 Getting help 6.1 Checking Display Status You may check the status of battery power remaining, when internal battery is charging...
.... Free space (pic): XX (Estimates of how many additional photos can be stored, how much battery power remains, which media are currently connected, or the Photo Frame software version. Philips Electronics whether the system is ON, if the battery is supplying power.) Connected media: (Lists all memory cards connected to Photo Frame) Firmware: (Photo Frame software version) • Press menu button again to highlight the setup icon. 6 Getting help 6.1 Checking Display Status You may check the status of battery power remaining, when internal battery is charging...
User manual
Page 66
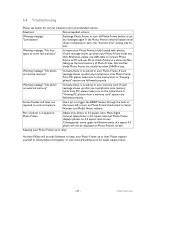
A: Yes. Digital Photo Frame can I use Digital Photo Frame to trigger the Reset button located on DPD. A: No, it does not support direct photo printing. 7) Q: After copying photos, how can display the same photo continuously for a long time? A: Yes. The internal memory of DPD is properly powered. Note: For example, if you insert a 250 MB memory card and use Digital Photo Frame during its 3:2 screen? First make sure you could switch between different slideshows photos by using different memory cards? Then use a pin to delete photos on...
A: Yes. Digital Photo Frame can I use Digital Photo Frame to trigger the Reset button located on DPD. A: No, it does not support direct photo printing. 7) Q: After copying photos, how can display the same photo continuously for a long time? A: Yes. The internal memory of DPD is properly powered. Note: For example, if you insert a 250 MB memory card and use Digital Photo Frame during its 3:2 screen? First make sure you could switch between different slideshows photos by using different memory cards? Then use a pin to delete photos on...
User manual
Page 68
... control anymore Use a pin to trigger the RESET button through the hole at the lower-left corner on 3:2 aspect ratio screen. Part of photo is no photo in your Photo Frame holds less than 250KB in 4:3 aspect ratio but Photo Frame displays photos on Photo Frame's back (next to date At times Philips will not be displayed on Photo Frame's screen. If such message shows up to Serial Number and Model Name sticker). Many digital cameras take photos...
... control anymore Use a pin to trigger the RESET button through the hole at the lower-left corner on 3:2 aspect ratio screen. Part of photo is no photo in your Photo Frame holds less than 250KB in 4:3 aspect ratio but Photo Frame displays photos on Photo Frame's back (next to date At times Philips will not be displayed on Photo Frame's screen. If such message shows up to Serial Number and Model Name sticker). Many digital cameras take photos...

User manual
Page 75
... Declaration of Conformity Philips Consumer Electronics declare under our responsibility that can help. Environment manager Philips Electronics Industries (Taiwan) Ltd, Monitor Business Unit E-mail: job.chiu@philips.com Tel: +886 (0) 3 454 9839 Mr. Maarten ten Houten - Philips Electronics 7.2 Regulatory Recycling Information for Customers Philips establishes technically and economically viable objectives to optimize the environmental performance of the organization's product, service and activities...
... Declaration of Conformity Philips Consumer Electronics declare under our responsibility that can help. Environment manager Philips Electronics Industries (Taiwan) Ltd, Monitor Business Unit E-mail: job.chiu@philips.com Tel: +886 (0) 3 454 9839 Mr. Maarten ten Houten - Philips Electronics 7.2 Regulatory Recycling Information for Customers Philips establishes technically and economically viable objectives to optimize the environmental performance of the organization's product, service and activities...

User manual
Page 76
... provide reasonable protection against harmful interference in a particular installation. THIS CLASS B DIGITAL APPARATUS MEETS ALL REQUIREMENTS OF THE CANADIAN INTERFERENCE-CAUSING EQUIPMENT REGULATIONS. Connect the equipment into an outlet on ISO9000 level. - EN61000-3-3:1995 (Limitation of Conformity Model Number: 9FF2 Trade Name: Philips Responsible Party: Philips Consumer Electronics North America P.O. Connections to this appliance to maintain compliance with metallic...
... provide reasonable protection against harmful interference in a particular installation. THIS CLASS B DIGITAL APPARATUS MEETS ALL REQUIREMENTS OF THE CANADIAN INTERFERENCE-CAUSING EQUIPMENT REGULATIONS. Connect the equipment into an outlet on ISO9000 level. - EN61000-3-3:1995 (Limitation of Conformity Model Number: 9FF2 Trade Name: Philips Responsible Party: Philips Consumer Electronics North America P.O. Connections to this appliance to maintain compliance with metallic...
User manual
Page 81
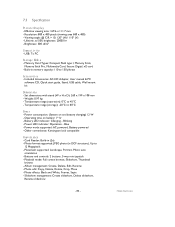
... slideshow, Delete slideshow, Rename slideshow - 80 - Memory Card Types: Compact Flash type I, Memory Stick, Memory Stick Pro, Multimedia Card, Secure Digital, xD card - Blinking - Other convenience: Kensington lock compatible Convenience - Photo format supported: JPEG photo (in DCF structure), Up to 45°C - Playback mode: Full screen browse, Slideshow, Thumbnail browse - Photo effects: Black and White, Frames, Sepia - Included Accessories: AC-DC Adapter, User manual & PC software CD, Quick start guide, Stand, USB cable, Wall mount kit Dimensions - Weight: 0.97 kg - Battery...
... slideshow, Delete slideshow, Rename slideshow - 80 - Memory Card Types: Compact Flash type I, Memory Stick, Memory Stick Pro, Multimedia Card, Secure Digital, xD card - Blinking - Other convenience: Kensington lock compatible Convenience - Photo format supported: JPEG photo (in DCF structure), Up to 45°C - Playback mode: Full screen browse, Slideshow, Thumbnail browse - Photo effects: Black and White, Frames, Sepia - Included Accessories: AC-DC Adapter, User manual & PC software CD, Quick start guide, Stand, USB cable, Wall mount kit Dimensions - Weight: 0.97 kg - Battery...

User manual
Page 82
... - Philips Electronics Plug & Play Compatibility: Windows 2000/XP or later - Adjustable stand: Rotating, Tilt-adjustable - Screen background color: Black, White, Gray - Wall mountable / Ceiling Throw: Wall mount ready - Other convenience: Kensington lock compatible - 81 - Slideshow setting: Collage, Random, Sequential, Transition effect - Setup function: Brightness adjustment, Language, Status, Auto on/off on weekday/weekend, Beep on/off, Set time and date, Clock display enable/ disable, Event reminder with snooze, Photo source - Connected media...
... - Philips Electronics Plug & Play Compatibility: Windows 2000/XP or later - Adjustable stand: Rotating, Tilt-adjustable - Screen background color: Black, White, Gray - Wall mountable / Ceiling Throw: Wall mount ready - Other convenience: Kensington lock compatible - 81 - Slideshow setting: Collage, Random, Sequential, Transition effect - Setup function: Brightness adjustment, Language, Status, Auto on/off on weekday/weekend, Beep on/off, Set time and date, Clock display enable/ disable, Event reminder with snooze, Photo source - Connected media...

User manual
Page 84
...'t my Digital Photo Frame show some of my photos? Philips Electronics Use the buttons on its display exactly at correctly. A: No, it working. Note: For example, if you will be damaged if I increase the memory size to create album and copy photo you insert a 250 MB memory card and use Digital Photo Frame during its Auto-off at, and Auto-on that specific card. 3) Q: How can I quick-charge my Photo Frame? Some images, such as a memory cards. 6) Q: Can I do? - 83 - A: First, make sure...
...'t my Digital Photo Frame show some of my photos? Philips Electronics Use the buttons on its display exactly at correctly. A: No, it working. Note: For example, if you will be damaged if I increase the memory size to create album and copy photo you insert a 250 MB memory card and use Digital Photo Frame during its Auto-off at, and Auto-on that specific card. 3) Q: How can I quick-charge my Photo Frame? Some images, such as a memory cards. 6) Q: Can I do? - 83 - A: First, make sure...


