
Brochure
Page 2
... the HDTV signal, a television must be connected through a single key on the remote control. Widescreen LCD TV The screen's wider width to change without notice. The ... weight (+stand) (lb): 37.5 lb • Product weight (+stand): 17 kg VGA input VGA input provides a connector to screen. 32MF605W/17 32" LCD HD flat TV Product specifications Picture/Display • Aspect ratio:...-D input makes an uncompressed digital RGB connection from source to accommodate input of Koninklijke Philips Electronics N.V. Trademarks are directly accessed through its component video or DVI inputs to a...
... the HDTV signal, a television must be connected through a single key on the remote control. Widescreen LCD TV The screen's wider width to change without notice. The ... weight (+stand) (lb): 37.5 lb • Product weight (+stand): 17 kg VGA input VGA input provides a connector to screen. 32MF605W/17 32" LCD HD flat TV Product specifications Picture/Display • Aspect ratio:...-D input makes an uncompressed digital RGB connection from source to accommodate input of Koninklijke Philips Electronics N.V. Trademarks are directly accessed through its component video or DVI inputs to a...

Brochure
Page 3
...32MF605W/17 32" LCD HD flat TV Product specifications (continued) • Set dimensions with stand (W x H x D): 925 x 548 x 213 mm • Set dimensions with stand in inch (W x H x D): 36.4 x 21.6 x 8.4 inch Accessories • Included Accessories: Batteries for remote control, Power cord, Quick Use Guide, Remote... Control, Right angle antenna adaptor, User Manual, Warranty certificate Date of issue 2007 07 17 Version: 2.0 12 NC: 8639 000 16051 UPC: 0 37849 95944 2 Specifications are the property of Koninklijke Philips Electronics ...
...32MF605W/17 32" LCD HD flat TV Product specifications (continued) • Set dimensions with stand (W x H x D): 925 x 548 x 213 mm • Set dimensions with stand in inch (W x H x D): 36.4 x 21.6 x 8.4 inch Accessories • Included Accessories: Batteries for remote control, Power cord, Quick Use Guide, Remote... Control, Right angle antenna adaptor, User Manual, Warranty certificate Date of issue 2007 07 17 Version: 2.0 12 NC: 8639 000 16051 UPC: 0 37849 95944 2 Specifications are the property of Koninklijke Philips Electronics ...

User Manual
Page 4
...64257;nition) Output 13 Digital Satellite Receiver with DVI connector 14 PC (Monitor) Connection 15 AV Output 16 Install Menu Language Settings 17 Tuner Mode Control 18 Auto Program (Setting Up Channels 19 Channel Edit Control 20 Factory Reset 21 Smart Picture and Smart Sound Smart ...and disposed of certain TV channels if you do not want your LCD TV. Remote Control: Works your LCD TV. AutoLock: Lets you block viewing of as on The Wall 6 Basic TV and Remote Control Operations 7 Remote Control 8 Antenna Connection 9 Connecting the Power cord 9 Basic Cable TV Connection 9...
...64257;nition) Output 13 Digital Satellite Receiver with DVI connector 14 PC (Monitor) Connection 15 AV Output 16 Install Menu Language Settings 17 Tuner Mode Control 18 Auto Program (Setting Up Channels 19 Channel Edit Control 20 Factory Reset 21 Smart Picture and Smart Sound Smart ...and disposed of certain TV channels if you do not want your LCD TV. Remote Control: Works your LCD TV. AutoLock: Lets you block viewing of as on The Wall 6 Basic TV and Remote Control Operations 7 Remote Control 8 Antenna Connection 9 Connecting the Power cord 9 Basic Cable TV Connection 9...

User Manual
Page 7
...lid. 2 MENU OK SOURCE PIP CC 3 6 5 7 7 Or, press VOLUME - to select channels. 4 Point the remote control toward on the front of the LCD TV when operating the LCD TV with the remote. 2 3 1 4 BATTERY INSTALLATION 5 Remove the battery compartment lid on the LCD TV. 2 Press VOLUME + to increase ...the sound level. BASIC TV AND REMOTE CONTROL OPERATIONS TELEVISION AND REMOTE CONTROL 1 Press POWER to turn on the back of ...
...lid. 2 MENU OK SOURCE PIP CC 3 6 5 7 7 Or, press VOLUME - to select channels. 4 Point the remote control toward on the front of the LCD TV when operating the LCD TV with the remote. 2 3 1 4 BATTERY INSTALLATION 5 Remove the battery compartment lid on the LCD TV. 2 Press VOLUME + to increase ...the sound level. BASIC TV AND REMOTE CONTROL OPERATIONS TELEVISION AND REMOTE CONTROL 1 Press POWER to turn on the back of ...

User Manual
Page 8
... four screen format sizes; 4:3, SUPERWIDE, ZOOM 16:9 or WIDESCREEN. Volume button Press to increase or decrease the sound level, also press to select TV channels. REMOTE CONTROL Number buttons Press to navigate left/right in onscreen menu.
... four screen format sizes; 4:3, SUPERWIDE, ZOOM 16:9 or WIDESCREEN. Volume button Press to increase or decrease the sound level, also press to select TV channels. REMOTE CONTROL Number buttons Press to navigate left/right in onscreen menu.

User Manual
Page 10
... same channel. CABLE BOX CONNECTIONS I f you use the S-Video connection for this hookup) to watch Cable TV (your Cable Box must be turned on the remote control to select AV 1 (or AV2, AV3, S-Video1, or S-Video2 if you have a Cable Box, follow either set of these steps to complete your connections...
... same channel. CABLE BOX CONNECTIONS I f you use the S-Video connection for this hookup) to watch Cable TV (your Cable Box must be turned on the remote control to select AV 1 (or AV2, AV3, S-Video1, or S-Video2 if you have a Cable Box, follow either set of these steps to complete your connections...

User Manual
Page 11
... shared between Video (CVBS) and S-Video signals. Connect a DVD player,VCR Video Game, Camcorder, etc., to these jacks.To view the material playing on the remote control to select AV 1 (or AV2, AV3, S-Video1, or S-Video2 if you can also use the different jacks for better picture detail and clarity. Use...
... shared between Video (CVBS) and S-Video signals. Connect a DVD player,VCR Video Game, Camcorder, etc., to these jacks.To view the material playing on the remote control to select AV 1 (or AV2, AV3, S-Video1, or S-Video2 if you can also use the different jacks for better picture detail and clarity. Use...

User Manual
Page 12
... resolution in AV IN 3 connections can output Progressive scanned or HD (High Definition) image, please refer to the Y, Pb, Pr jacks on the remote control to select COMPONENT to watch DVD. Note: The Component (Y, Pb, Pr) Video Input in the playback of digital signal source material, such as with...
... resolution in AV IN 3 connections can output Progressive scanned or HD (High Definition) image, please refer to the Y, Pb, Pr jacks on the remote control to select COMPONENT to watch DVD. Note: The Component (Y, Pb, Pr) Video Input in the playback of digital signal source material, such as with...
User Manual
Page 13
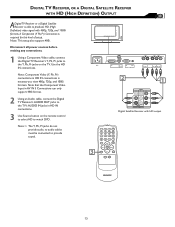
... Digital TV Receiver's AUDIO OUT jacks to the TV's AUDIO IN jacks in HD IN connections is necessary to the Y, Pb, Pr jacks on the remote control to select HD to watch DVD. DIGITAL TV RECEIVER, OR A DIGITAL SATELLITE RECEIVER WITH HD (HIGH DEFINITION) OUTPUT ADigital TV Receiver or a Digital Satellite...
... Digital TV Receiver's AUDIO OUT jacks to the TV's AUDIO IN jacks in HD IN connections is necessary to the Y, Pb, Pr jacks on the remote control to select HD to watch DVD. DIGITAL TV RECEIVER, OR A DIGITAL SATELLITE RECEIVER WITH HD (HIGH DEFINITION) OUTPUT ADigital TV Receiver or a Digital Satellite...

User Manual
Page 14
... not recommended to watch the programs. Note: 1. Digital devices from different manufactures have the possibility of the DVI IN connection. 3 Use Source button on the remote control to select DVI to connect your HD device (e.g. It is only guaranteed with High Definition Copy Protection (HDCP) connections. DVI includes HDCP (HighBandwidth Digital...
... not recommended to watch the programs. Note: 1. Digital devices from different manufactures have the possibility of the DVI IN connection. 3 Use Source button on the remote control to select DVI to connect your HD device (e.g. It is only guaranteed with High Definition Copy Protection (HDCP) connections. DVI includes HDCP (HighBandwidth Digital...
User Manual
Page 15
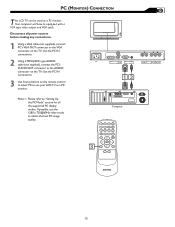
... Use the PC IN connections. 2 Using a MINI-JACK type AUDIO cable (not supplied), connect the PC's AUDIO OUT connector to the AUDIO connector on the remote control to select PC to the VGA connector on the TV. If possible, use your LCD TV as a PC monitor. PC (MONITOR) CONNECTION T his LCD...
... Use the PC IN connections. 2 Using a MINI-JACK type AUDIO cable (not supplied), connect the PC's AUDIO OUT connector to the AUDIO connector on the remote control to select PC to the VGA connector on the TV. If possible, use your LCD TV as a PC monitor. PC (MONITOR) CONNECTION T his LCD...

User Manual
Page 17
...RESET MENU �� SOURCE CC � PIP � INSTALL LANGUAGE TUNER MODE AUTO PROGRAM CHANNEL EDIT MANUAL FINE TUNE FACTORY RESET ENGLISH 17 HELPFUL HINT Remember, the LANGUAGE control makes only the TV's onscreen MENU items appear in either English, French or Spanish. 1 Press the MENU... MENU button on the remote control to see the onscreen menu. 2 Press the (CH-) button to highlight the INSTALL menu. 3 Press the (VOL+) button to enter the INSTALL...
...RESET MENU �� SOURCE CC � PIP � INSTALL LANGUAGE TUNER MODE AUTO PROGRAM CHANNEL EDIT MANUAL FINE TUNE FACTORY RESET ENGLISH 17 HELPFUL HINT Remember, the LANGUAGE control makes only the TV's onscreen MENU items appear in either English, French or Spanish. 1 Press the MENU... MENU button on the remote control to see the onscreen menu. 2 Press the (CH-) button to highlight the INSTALL menu. 3 Press the (VOL+) button to enter the INSTALL...

User Manual
Page 18
.... 1 Press the Menu MENU button to clear the menu from a cable TV signal or an antenna signal. Before making adjustment, press SOURCE button on your remote control to switch your LCD TV will search automatically for the LCD TV to know if you to change the LCD TV's signal input to...
.... 1 Press the Menu MENU button to clear the menu from a cable TV signal or an antenna signal. Before making adjustment, press SOURCE button on your remote control to switch your LCD TV will search automatically for the LCD TV to know if you to change the LCD TV's signal input to...

User Manual
Page 19
... cable TV signal must first be connected to your area by pressing the CH (+) or CH (-) button. 1 Press the MENU MENU button on the remote control to show the onscreen menu. 2 Press the (CH-) button to highlight the INSTALL menu. 3 Press the (VOL+) button to enter the INSTALL menu. 4 Press...
... cable TV signal must first be connected to your area by pressing the CH (+) or CH (-) button. 1 Press the MENU MENU button on the remote control to show the onscreen menu. 2 Press the (CH-) button to highlight the INSTALL menu. 3 Press the (VOL+) button to enter the INSTALL menu. 4 Press...

User Manual
Page 21
... the factory settings, all your AutoLock access code will be erased and replaced by performing the following steps. 1 Press the MENU MENU button on the remote control to see the onscreen menu. 2 Press the (CH-) button to highlight the INSTALL menu. 3 Press the (VOL+) button to enter the INSTALL menu. 4 Press...
... the factory settings, all your AutoLock access code will be erased and replaced by performing the following steps. 1 Press the MENU MENU button on the remote control to see the onscreen menu. 2 Press the (CH-) button to highlight the INSTALL menu. 3 Press the (VOL+) button to enter the INSTALL menu. 4 Press...

User Manual
Page 22
...these steps to select either Personal, Movies, Sports, Weak Signal, Multimedia, and Night Smart Picture settings. Personal 1 Press the Sound button on the remote control. Personal MENU OK SOURCE PIP CC 1 2 2 Press the PICTURE button repeatedly to select any of the Personal smart sound mode can be...menu. Note: The settings of the options. Smart Picture quickly resets your own preferred video settings. 1 Press the PICTURE button on the remote control. The Personal mode is showing a lot of the Personal smart picture mode can be adjusted by the user via the onscreen sound...
...these steps to select either Personal, Movies, Sports, Weak Signal, Multimedia, and Night Smart Picture settings. Personal 1 Press the Sound button on the remote control. Personal MENU OK SOURCE PIP CC 1 2 2 Press the PICTURE button repeatedly to select any of the Personal smart sound mode can be...menu. Note: The settings of the options. Smart Picture quickly resets your own preferred video settings. 1 Press the PICTURE button on the remote control. The Personal mode is showing a lot of the Personal smart picture mode can be adjusted by the user via the onscreen sound...

User Manual
Page 30
... (Cinema Vision size). Note: 1. The Picture Format Function is SD (e.g. 480i/480p). You can change the picture format by pressing the FORMAT button on your remote control. 2. MAIN CONTROLS PICTURE AUDIO FEATURES INSTALL SOURCE PICTURE FORMAT PICTURE ALIGNMENT AUTOLOCK CLOSED CAPTION FEATURES SOURCE PICTURE FORMAT 4:3 PICTURE ALIGNMENT AUTOLOCK CLOSED CAPTION ZOOM...
... (Cinema Vision size). Note: 1. The Picture Format Function is SD (e.g. 480i/480p). You can change the picture format by pressing the FORMAT button on your remote control. 2. MAIN CONTROLS PICTURE AUDIO FEATURES INSTALL SOURCE PICTURE FORMAT PICTURE ALIGNMENT AUTOLOCK CLOSED CAPTION FEATURES SOURCE PICTURE FORMAT 4:3 PICTURE ALIGNMENT AUTOLOCK CLOSED CAPTION ZOOM...

User Manual
Page 31
... can also be activated by broadcast stations during the transmission of shows being used by pressing CC button on the TV screen. Refer to your remote control. Nor are all TV programs and product commercials are broadcast with Closed Captioning. 31 CLOSED CAPTIONS Closed Captioning (CC) allows you want: CC MUTE...
... can also be activated by broadcast stations during the transmission of shows being used by pressing CC button on the TV screen. Refer to your remote control. Nor are all TV programs and product commercials are broadcast with Closed Captioning. 31 CLOSED CAPTIONS Closed Captioning (CC) allows you want: CC MUTE...

User Manual
Page 32
A PC video signal must be used as it appears on the remote control to adjust. � Smart Picture: Adjust the color temperature of the picture. MENU OK SOURCE CC � � PIP � PICTURE SMART PICTURE BRIGHTNESS ...
A PC video signal must be used as it appears on the remote control to adjust. � Smart Picture: Adjust the color temperature of the picture. MENU OK SOURCE CC � � PIP � PICTURE SMART PICTURE BRIGHTNESS ...
User Manual
Page 33
... AUDIO SMART SOUND S E T T I N GS STEREO VIRTUAL SURROUND AVL VIRTUAL SURROUND AUDIO SMART SOUND S E T T I N GS STEREO VIRTUAL SURROUND AVL 1 Press the MENU MENU button on the remote control to show the onscreen menu. 2 Press the (CH-) button to highlight the AUDIO menu. 3 Press the (VOL+) button to shift the menu to the...
... AUDIO SMART SOUND S E T T I N GS STEREO VIRTUAL SURROUND AVL VIRTUAL SURROUND AUDIO SMART SOUND S E T T I N GS STEREO VIRTUAL SURROUND AVL 1 Press the MENU MENU button on the remote control to show the onscreen menu. 2 Press the (CH-) button to highlight the AUDIO menu. 3 Press the (VOL+) button to shift the menu to the...

