
Leaflet (English)
Page 1
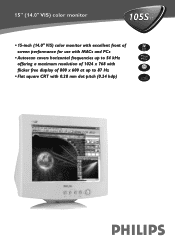
15" (14.0" VIS) color monitor 105S51 • 15-inch (14.0" VIS) color monitor with excellent front of screen performance for use with MACs and PCs • Autoscan covers horizontal frequencies up to 54 kHz offering a maximum resolution of 1024 x 768 with flicker free display of 800 x 600 at up to 87 Hz • Flat square CRT with 0.28 mm dot pitch (0.24 hdp)
15" (14.0" VIS) color monitor 105S51 • 15-inch (14.0" VIS) color monitor with excellent front of screen performance for use with MACs and PCs • Autoscan covers horizontal frequencies up to 54 kHz offering a maximum resolution of 1024 x 768 with flicker free display of 800 x 600 at up to 87 Hz • Flat square CRT with 0.28 mm dot pitch (0.24 hdp)
Leaflet (English)
Page 2
... 75 W (typical) • Off mode/Deep Sleep < 8W Low-emission characteristics • Complies with MPR-II specifications Monitor controls and functions • Front Power on/off Contrast Brightness • On Screen Display Language (English, Spanish, French, German, Italian, Russian), Contrast, Brightness, H-center. Copyright 2001 Koninklijke Philips Electronics N.V. incl. base (WxHxD)(mm) 360 x 321 x 389 • Dim. excl. 15" (14.0" VIS) color monitor Technical Specifications CRT panel • Size (inch/cm) • Deflection angle...
... 75 W (typical) • Off mode/Deep Sleep < 8W Low-emission characteristics • Complies with MPR-II specifications Monitor controls and functions • Front Power on/off Contrast Brightness • On Screen Display Language (English, Spanish, French, German, Italian, Russian), Contrast, Brightness, H-center. Copyright 2001 Koninklijke Philips Electronics N.V. incl. base (WxHxD)(mm) 360 x 321 x 389 • Dim. excl. 15" (14.0" VIS) color monitor Technical Specifications CRT panel • Size (inch/cm) • Deflection angle...
User manual
Page 2
Before operating the monitor please read this manual thoroughly. Owner's Manual 3. Specifications 11-12 Appendix B - This manual should include the following items: 1. Contents Packing list 1 Precautions 2 Installation Instructions 3 Swivel Base 3 Power cord 3 Video cable 4 Operating Instructions 5 General Instructions 5 Front panel control 6 How to adjust a setting 6 Adjusting the picture 7-8 Plug and play 9 Technical Support (FAQ 10 Appendix A - Swivel Base 1 Power Cord 4. Monitor 2. Factory Preset Timing Table 13 Your International Guarantee 14 PACKING...
Before operating the monitor please read this manual thoroughly. Owner's Manual 3. Specifications 11-12 Appendix B - This manual should include the following items: 1. Contents Packing list 1 Precautions 2 Installation Instructions 3 Swivel Base 3 Power cord 3 Video cable 4 Operating Instructions 5 General Instructions 5 Front panel control 6 How to adjust a setting 6 Adjusting the picture 7-8 Plug and play 9 Technical Support (FAQ 10 Appendix A - Swivel Base 1 Power Cord 4. Monitor 2. Factory Preset Timing Table 13 Your International Guarantee 14 PACKING...
User manual
Page 3
... push any object into a grounded power outlet as a safety feature. Use only a cart or stand recommended by the manufacturer and follow the kit instructions. z Do not attempt to dangerous voltages and other hazards. opening or removing covers can expose you are not sure of the type of the grounded plug. PRECAUTIONS z Do not use the monitor near a bathtub, washbowl, kitchen...
... push any object into a grounded power outlet as a safety feature. Use only a cart or stand recommended by the manufacturer and follow the kit instructions. z Do not attempt to dangerous voltages and other hazards. opening or removing covers can expose you are not sure of the type of the grounded plug. PRECAUTIONS z Do not use the monitor near a bathtub, washbowl, kitchen...
User manual
Page 4
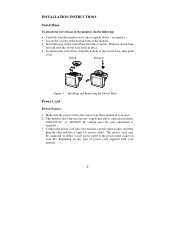
INSTALLATION INSTRUCTIONS Swivel Base To attach the swivel base to either 100/120V AC or 220/240V AC voltage area ( No user adjustment is the correct type that allows operation in place. • To remove the swivel base, hold the bottom of power cord supplied with your monitor. 3 Make sure the power cord is required. ) 3. The power cord may be connected to the monitor, do the following: • Carefully turn the...
INSTALLATION INSTRUCTIONS Swivel Base To attach the swivel base to either 100/120V AC or 220/240V AC voltage area ( No user adjustment is the correct type that allows operation in place. • To remove the swivel base, hold the bottom of power cord supplied with your monitor. 3 Make sure the power cord is required. ) 3. The power cord may be connected to the monitor, do the following: • Carefully turn the...
User manual
Page 5
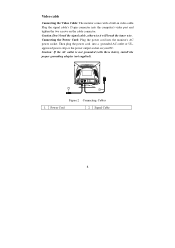
... signal cable, otherwise it will break the inner wire. Connecting the Power Cord: Plug the power cord into a grounded AC outlet or ULapproved power strip or the power output socket on the cable connector. Then plug the power cord into the monitor's AC power socket. Signal Cable 4 Caution: If the AC outlet is not grounded (with a built-in video cable. Video cable Connecting the Video Cable: The monitor comes with three holes), install the proper grounding adapter (not supplied). 1 2 Figure 2 Connecting Cables 1. Power Cord...
... signal cable, otherwise it will break the inner wire. Connecting the Power Cord: Plug the power cord into a grounded AC outlet or ULapproved power strip or the power output socket on the cable connector. Then plug the power cord into the monitor's AC power socket. Signal Cable 4 Caution: If the AC outlet is not grounded (with a built-in video cable. Video cable Connecting the Video Cable: The monitor comes with three holes), install the proper grounding adapter (not supplied). 1 2 Figure 2 Connecting Cables 1. Power Cord...

User manual
Page 6
...; Connect the video cable from the monitor to the video card. • To turn the monitor on or off. CONTRAST/ 5. The power indicator will damage the cabinet. Never use strong solvents such as it was originally packed at the factory. • To keep the monitor looking new, periodically clean it . 5 As a safety precaution, always unplug the monitor before cleaning it with a mild detergent solution. OPERATING INSTRUCTIONS General Instructions The power switch...
...; Connect the video cable from the monitor to the video card. • To turn the monitor on or off. CONTRAST/ 5. The power indicator will damage the cabinet. Never use strong solvents such as it was originally packed at the factory. • To keep the monitor looking new, periodically clean it . 5 As a safety precaution, always unplug the monitor before cleaning it with a mild detergent solution. OPERATING INSTRUCTIONS General Instructions The power switch...
User manual
Page 7
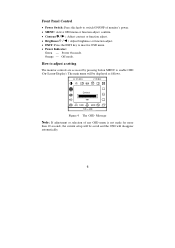
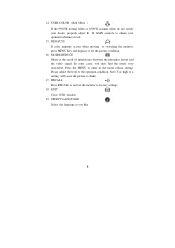
... OSD Message Note: If adjustment or selection of monitor's power. • MENU: Active OSD menu or function adjust confirm. • Contrast / : Adiust contrast or function adjust. • Brightness / : Adjust brightness or function adjust. • EXIT: Press the EXIT key to inactive OSD menu. • Power Indicator: Green - How to adjust a setting The monitor controls are accessed by pressing button MENU to enable OSD (On-Screen-Display). The main menu will be saved and the OSD will be displayed as follows. Front Panel Control • Power Switch...
... OSD Message Note: If adjustment or selection of monitor's power. • MENU: Active OSD menu or function adjust confirm. • Contrast / : Adiust contrast or function adjust. • Brightness / : Adjust brightness or function adjust. • EXIT: Press the EXIT key to inactive OSD menu. • Power Indicator: Green - How to adjust a setting The monitor controls are accessed by pressing button MENU to enable OSD (On-Screen-Display). The main menu will be saved and the OSD will be displayed as follows. Front Panel Control • Power Switch...
User manual
Page 8
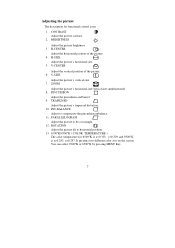
...°K by pressing MENU Key. 7 H-CENTER : Adjust the horizontal position of the picture. 6. H-SIZE : Adjust the picture's horizontal size. 5. V-SIZE : Adjust the picture's vertical size. 7. PIN-BALANCE : Adjust to be a rectangle. 12. TRAPEZOID : Adjust the picture's trapezoid distortion. 10. PARALLELOGRAM : Adjust the picture to compensate the pincushion unbalance. 11. It presents two different color sets on the screen. BRIGHTNESS : Adjust the picture brightness. 3. ZOOM : Adjust the picture's horizontal and vertical size simultaneously. 8. V-CENTER...
...°K by pressing MENU Key. 7 H-CENTER : Adjust the horizontal position of the picture. 6. H-SIZE : Adjust the picture's horizontal size. 5. V-SIZE : Adjust the picture's vertical size. 7. PIN-BALANCE : Adjust to be a rectangle. 12. TRAPEZOID : Adjust the picture's trapezoid distortion. 10. PARALLELOGRAM : Adjust the picture to compensate the pincushion unbalance. 11. It presents two different color sets on the screen. BRIGHTNESS : Adjust the picture brightness. 3. ZOOM : Adjust the picture's horizontal and vertical size simultaneously. 8. V-CENTER...
User manual
Page 9
... degauss to factory settings. 18. MOIRE REDUCE : Moire is the result of a setting will cause the picture to obtain your desire, properly adjust R . Note: Too high of interference between the phosphor layout and the video signal. In some cases, you like. 8 RECALL : Press RECALL to restore the monitor to fix the picture condition. 16. B GAIN controls to shake. 17. 14. USER COLOR ( Red / Blue ) : If...
... degauss to factory settings. 18. MOIRE REDUCE : Moire is the result of a setting will cause the picture to obtain your desire, properly adjust R . Note: Too high of interference between the phosphor layout and the video signal. In some cases, you like. 8 RECALL : Press RECALL to restore the monitor to fix the picture condition. 16. B GAIN controls to shake. 17. 14. USER COLOR ( Red / Blue ) : If...
User manual
Page 10
... no video input signal this monitor, following a time-out period, will automatically switch to a "Screen Saver" feature except the display is no video input signal present. Video Cable Pin Assignments: 1. Blue 4. H-sync 6. sync / * VCLK 7. B-Ground 12. Ground 9. Ground 14. This reduces the monitor's internal power supply consumption. NC 13. R-Ground 10. When there is completely off. The host can request EDID information over the DDC2B channel. Green 3. The appearance...
... no video input signal this monitor, following a time-out period, will automatically switch to a "Screen Saver" feature except the display is no video input signal present. Video Cable Pin Assignments: 1. Blue 4. H-sync 6. sync / * VCLK 7. B-Ground 12. Ground 9. Ground 14. This reduces the monitor's internal power supply consumption. NC 13. R-Ground 10. When there is completely off. The host can request EDID information over the DDC2B channel. Green 3. The appearance...
User manual
Page 11
... SUPPORT (FAQ) Problem & Question Power LED is not on No Plug & Play Picture is fuzzy Picture bounces or a wave pattern is present in the picture The power LED is ON (orange) but there's no video or no picture Missing one of the primary colors (RED, GREEN, or BLUE) Possible Solution *Check if the Power Switch is in the ON position *Power Cord should be snugly seated in its slot *Make sure monitor's video cable is properly connected...
... SUPPORT (FAQ) Problem & Question Power LED is not on No Plug & Play Picture is fuzzy Picture bounces or a wave pattern is present in the picture The power LED is ON (orange) but there's no video or no picture Missing one of the primary colors (RED, GREEN, or BLUE) Possible Solution *Check if the Power Switch is in the ON position *Power Cord should be snugly seated in its slot *Make sure monitor's video cable is properly connected...
User manual
Page 12
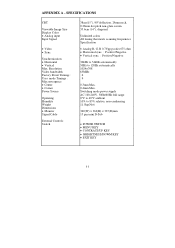
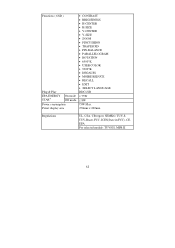
...Max. SPECIFICATIONS CRT Viewable Image Size Display Color • Analog input Input Signal • Video • Sync. Resolution Video bandwidth Factory Preset Timings : User mode Timings : Misconvergence • Center • Corner Power Source Operating Humidity Weight Dimensions • Monitor Signal Cable External Controls: Switch 38cm(15"), 90º deflection, 29mm neck, 0.28mm dot pitch non-glare screen. 35.6cm (14"), diagonal Unlimited colors All timing that meets scanning frequencies Specification • Analog R, G, B 0.7Vpp positive/75 ohm • Horizontal sync. : Positive...
...Max. SPECIFICATIONS CRT Viewable Image Size Display Color • Analog input Input Signal • Video • Sync. Resolution Video bandwidth Factory Preset Timings : User mode Timings : Misconvergence • Center • Corner Power Source Operating Humidity Weight Dimensions • Monitor Signal Cable External Controls: Switch 38cm(15"), 90º deflection, 29mm neck, 0.28mm dot pitch non-glare screen. 35.6cm (14"), diagonal Unlimited colors All timing that meets scanning frequencies Specification • Analog R, G, B 0.7Vpp positive/75 ohm • Horizontal sync. : Positive...
User manual
Page 13
Functions ( OSD ) Plug & Play EPA ENERGY On mode STAR® Off mode Power consumption Preset display area • CONTRAST • BRIGHTNESS • H-CENTER • H-SIZE • V-CENTER • V-SIZE • ZOOM • PINCUSHION • TRAPEZOID • PIN-BALANCE • PARALLELOGRAM • ROTATION • 6500°K • USER COLOR • 9300°K • DEGAUSS • MOIRE REDUCE • RECALL • EXIT • SELECT LANGUAGE DDC1...
Functions ( OSD ) Plug & Play EPA ENERGY On mode STAR® Off mode Power consumption Preset display area • CONTRAST • BRIGHTNESS • H-CENTER • H-SIZE • V-CENTER • V-SIZE • ZOOM • PINCUSHION • TRAPEZOID • PIN-BALANCE • PARALLELOGRAM • ROTATION • 6500°K • USER COLOR • 9300°K • DEGAUSS • MOIRE REDUCE • RECALL • EXIT • SELECT LANGUAGE DDC1...

User manual
Page 14
APPENDIX B - FACTORY PRESET TIMING TABLE STANDARD IBM VGA VESA/85 VESA/85 VESA/85 VESA/60 RESOLUTION 720×400 640×480 640×480 800×600 800×600 1024×768 HORIZONTAL FREQUENCY 31.5kHz 31.5kHz 37.5kHz 46.9kHz 53.6kHz 48.4kHz VERTICAL FREQUENCY 70Hz 60Hz 75Hz 75Hz 85Hz 60Hz 13
APPENDIX B - FACTORY PRESET TIMING TABLE STANDARD IBM VGA VESA/85 VESA/85 VESA/85 VESA/60 RESOLUTION 720×400 640×480 640×480 800×600 800×600 1024×768 HORIZONTAL FREQUENCY 31.5kHz 31.5kHz 37.5kHz 46.9kHz 53.6kHz 48.4kHz VERTICAL FREQUENCY 70Hz 60Hz 75Hz 75Hz 85Hz 60Hz 13
User manual
Page 15
... executed by unauthorized service organizations or persons; • damage is caused by the Philips Consumer Help Desk in the country of purchase and does not affect your dealer cannot answer or any way or made illegible; • the model or production number on the product has been altered, deleted, removed or made illegible; • repairs or product...
... executed by unauthorized service organizations or persons; • damage is caused by the Philips Consumer Help Desk in the country of purchase and does not affect your dealer cannot answer or any way or made illegible; • the model or production number on the product has been altered, deleted, removed or made illegible; • repairs or product...

User manual
Page 100
Consumer Information Centers Western Europe Telephone numbers: Austria Belgium Cyprus Denmark France Germany Greece Finland Ireland Italy Luxembourg The Netherlands Norway Portugal Sweden Switzerland Spain United Kingdom U.S.A. Phone: (01) 546 575 603 ...
Consumer Information Centers Western Europe Telephone numbers: Austria Belgium Cyprus Denmark France Germany Greece Finland Ireland Italy Luxembourg The Netherlands Norway Portugal Sweden Switzerland Spain United Kingdom U.S.A. Phone: (01) 546 575 603 ...


