

Owner's Manual
Page 4
To reduce the risk of burns, fire, electric shock, or injury to persons: • This sewing machine is not intended for use by persons (including children) with reduced physical, sensory or mental capabilities, or lack of experience and knowledge, unless they have been given supervision or instruction concerning use of the sewing machine by a person responsible for their safety. • Children should be supervised to ensure that they do not play with IEC/EN 60335-2-28 and UL1594 IMPORTANT SAFETY INSTRUCTIONS When using this household sewing machine. Special care is 70dB(A). To ...
To reduce the risk of burns, fire, electric shock, or injury to persons: • This sewing machine is not intended for use by persons (including children) with reduced physical, sensory or mental capabilities, or lack of experience and knowledge, unless they have been given supervision or instruction concerning use of the sewing machine by a person responsible for their safety. • Children should be supervised to ensure that they do not play with IEC/EN 60335-2-28 and UL1594 IMPORTANT SAFETY INSTRUCTIONS When using this household sewing machine. Special care is 70dB(A). To ...

Owner's Manual
Page 5
Socket for foot control 3. Needle clamp holder 5. Cloth presser height adjusting screw 9. Needle plate 6. Connection socket NOTE: Laundering rules of the machine 1. Clear fabric cover with needle guard 10. Flat Bed Extension 7. English Table of Contents Table of Contents 3 Overview of the machine 3 Accessories 4 Setting Up 4 Attaching the power cord and foot control4 Machine speed 4 For the USA and Canada 4 Cloth Presser 5 Getting Started 6 Fabric and trims that can be used 6 Laundering embellished projects 6 Overview of "pre-washing 6 Start Embellishing 7 ...
Socket for foot control 3. Needle clamp holder 5. Cloth presser height adjusting screw 9. Needle plate 6. Connection socket NOTE: Laundering rules of the machine 1. Clear fabric cover with needle guard 10. Flat Bed Extension 7. English Table of Contents Table of Contents 3 Overview of the machine 3 Accessories 4 Setting Up 4 Attaching the power cord and foot control4 Machine speed 4 For the USA and Canada 4 Cloth Presser 5 Getting Started 6 Fabric and trims that can be used 6 Laundering embellished projects 6 Overview of "pre-washing 6 Start Embellishing 7 ...
Owner's Manual
Page 6
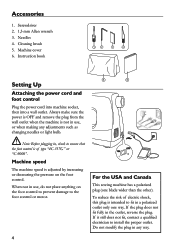
To reduce the risk of type "4C-337G" or "C-9000". When not in a polarized outlet only one blade wider than the other). Needles 4. Do not modify the plug in use , do not place anything on the foot control. Cleaning brush 5. Instruction book Setting Up Attaching the power cord and foot control Plug the power cord into machine socket, then into a wall outlet. For the USA and Canada This sewing machine has a polarized plug (one way. If it still does not fit, contact a qualified electrician to ensure that the foot control is adjusted by increasing or decreasing ...
To reduce the risk of type "4C-337G" or "C-9000". When not in a polarized outlet only one blade wider than the other). Needles 4. Do not modify the plug in use , do not place anything on the foot control. Cleaning brush 5. Instruction book Setting Up Attaching the power cord and foot control Plug the power cord into machine socket, then into a wall outlet. For the USA and Canada This sewing machine has a polarized plug (one way. If it still does not fit, contact a qualified electrician to ensure that the foot control is adjusted by increasing or decreasing ...

Owner's Manual
Page 7
H= high position for thin or medium fabrics. Tighten the clear fabric cover height adjusting screw. L= low position for heavy or thick fabrics. 4. Move the clear fabric cover with needle guard up or down until the red indicator on the needle plate and under the clear fabric cover with the correct height for medium weight fabrics. Note: The fabric and felting material must move freely under the cloth presser. 2. M= medium position for the thickness of the cloth presser. 3. Place the cloth/fabric/materials on the presser bar aligns with needle guard without any ...
H= high position for thin or medium fabrics. Tighten the clear fabric cover height adjusting screw. L= low position for heavy or thick fabrics. 4. Move the clear fabric cover with needle guard up or down until the red indicator on the needle plate and under the clear fabric cover with the correct height for medium weight fabrics. Note: The fabric and felting material must move freely under the cloth presser. 2. M= medium position for the thickness of the cloth presser. 3. Place the cloth/fabric/materials on the presser bar aligns with needle guard without any ...

Owner's Manual
Page 8
A napped surface will stay meshed. Wash the finished sample the same way you plan on your garments, arts and crafts, home decorating, quilting, sewing, scrap booking and much more. Do not "pamper" unless you will wash it after the project is a natural fiber, to allow for shrinkage. Be sure to have a smooth surface. With this needle felting machine! The recommended fabrics and trims are those made from the fabrics you plan on washing the completed project with a load of jeans and then put it is a napped or textured surface. Laundering embellished ...
A napped surface will stay meshed. Wash the finished sample the same way you plan on your garments, arts and crafts, home decorating, quilting, sewing, scrap booking and much more. Do not "pamper" unless you will wash it after the project is a natural fiber, to allow for shrinkage. Be sure to have a smooth surface. With this needle felting machine! The recommended fabrics and trims are those made from the fabrics you plan on washing the completed project with a load of jeans and then put it is a napped or textured surface. Laundering embellished ...
Owner's Manual
Page 9
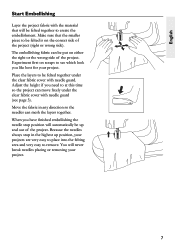
When you have finished embellishing the needle stop in any direction so the needles can mesh the layers together. You will automatically be put on either the right or the wrong side of the project (right or wrong side). The embellishing fabric can move freely under the clear fabric cover with the material that the smaller piece to be felted together to see page 3). Experiment first on the correct side of the project. English Start Embellishing Layer the project fabric with needle guard. Adjust the height if you like best for your projects are very easy...
When you have finished embellishing the needle stop in any direction so the needles can mesh the layers together. You will automatically be put on either the right or the wrong side of the project (right or wrong side). The embellishing fabric can move freely under the clear fabric cover with the material that the smaller piece to be felted together to see page 3). Experiment first on the correct side of the project. English Start Embellishing Layer the project fabric with needle guard. Adjust the height if you like best for your projects are very easy...

Owner's Manual
Page 10
This will also give you to a free arm. Accessory Storage Open the accessory storage compartment by sliding it to the left and the machine will convert to embellish sleeves, pant legs, and small areas that has accumulated from felting. This will allow you access to the free arm door to clean out the lint that are sewn in the round. Flat Bed Extension / Free Arm Remove the flat bed extension by pulling the drawer forward. 8
This will also give you to a free arm. Accessory Storage Open the accessory storage compartment by sliding it to the left and the machine will convert to embellish sleeves, pant legs, and small areas that has accumulated from felting. This will allow you access to the free arm door to clean out the lint that are sewn in the round. Flat Bed Extension / Free Arm Remove the flat bed extension by pulling the drawer forward. 8

Owner's Manual
Page 11
Purchase these needles at the highest position. 2. Loosen the front needle clamp holder fixing screw by turning the Allen wrench clockwise. Insert the new needle(s) until the needle bar is exclusive for the needle felting machine. English Maintenance Changing the needle(s) Use #S1037 needles for the needle felting machine. Turn the handwheel until the top of the needle touches the top of needles. Remove the presser height adjusting screw and carefully remove the clear fabric cover with 1.5mm hexagon wrench by turning the 1.5mm Allen wrench counter-clockwise. 4. ...
Purchase these needles at the highest position. 2. Loosen the front needle clamp holder fixing screw by turning the Allen wrench clockwise. Insert the new needle(s) until the needle bar is exclusive for the needle felting machine. English Maintenance Changing the needle(s) Use #S1037 needles for the needle felting machine. Turn the handwheel until the top of the needle touches the top of needles. Remove the presser height adjusting screw and carefully remove the clear fabric cover with 1.5mm hexagon wrench by turning the 1.5mm Allen wrench counter-clockwise. 4. ...

Owner's Manual
Page 12
Make sure that the light bulb is in its highest position. Clean the lint out after each project. Note: Replace the clear fabric cover with the same type rated, MAX 15W. Grasp the lint box by the ridged finger grips in the box or under the stitch plate may cause needle breakage. Insert the needle clamp into the needlebar, rotate and lightly push upward till the pin seats into the machine. 10 Remove the light bulb and replace new one with needle guard and presser height adjusting screw before removing it from the machine. 2. Groove (inside holder) Cleaning the lint...
Make sure that the light bulb is in its highest position. Clean the lint out after each project. Note: Replace the clear fabric cover with the same type rated, MAX 15W. Grasp the lint box by the ridged finger grips in the box or under the stitch plate may cause needle breakage. Insert the needle clamp into the needlebar, rotate and lightly push upward till the pin seats into the machine. 10 Remove the light bulb and replace new one with needle guard and presser height adjusting screw before removing it from the machine. 2. Groove (inside holder) Cleaning the lint...
Owner's Manual
Page 13
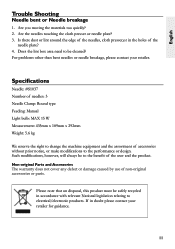
Are the needles touching the cloth presser or needle plate? 3. Does the lint box area need to be safely recycled in accordance with relevant National legislation relating to the performance or design. Are you moving the materials too quickly? 2. For problems other than bent needles or needle breakage, please contact your retailer for guidance. 11 Is there dust or lint around the edge of the needles, cloth presser,or in doubt please contact your retailer. Specifications Needle: #S1037 Number of needles: 5 Needle Clamp: Round type Feeding: Manual Light bulb: MAX 15 W ...
Are the needles touching the cloth presser or needle plate? 3. Does the lint box area need to be safely recycled in accordance with relevant National legislation relating to the performance or design. Are you moving the materials too quickly? 2. For problems other than bent needles or needle breakage, please contact your retailer for guidance. 11 Is there dust or lint around the edge of the needles, cloth presser,or in doubt please contact your retailer. Specifications Needle: #S1037 Number of needles: 5 Needle Clamp: Round type Feeding: Manual Light bulb: MAX 15 W ...

Owner's Manual
Page 55
Intellectual property PFAFF and HOBBY are used under license by VSM Group AB. All trademarks are trademarks of KSIN Luxembourg II, S.ar.l.
Intellectual property PFAFF and HOBBY are used under license by VSM Group AB. All trademarks are trademarks of KSIN Luxembourg II, S.ar.l.

Owner's Manual
Page 56
VSM Group AB • SE-561 84 Huskvarna, Sverige www.pfaff.com 413 15 96-91D • Inhouse production • © 2009 KSIN Luxembourg II, S.ar.l. • All statements valid at time of printing • Printed in Taiwan on environmentally-friendly paper
VSM Group AB • SE-561 84 Huskvarna, Sverige www.pfaff.com 413 15 96-91D • Inhouse production • © 2009 KSIN Luxembourg II, S.ar.l. • All statements valid at time of printing • Printed in Taiwan on environmentally-friendly paper