
Owner's Manual
Page 4
... sewing machine. • Use this sewing machine only for examination, repair, electrical or mechanical adjustment. • Never operate the sewing machine with any adjustment in . Keep ventilation openings of the sewing machine and foot controller free from the accumulation of experience and knowledge, unless they have been given supervision or instruction concerning use the proper needle plate. It may deflect the needle causing it to break. • Switch the sewing machine off ("0") position, then remove...
... sewing machine. • Use this sewing machine only for examination, repair, electrical or mechanical adjustment. • Never operate the sewing machine with any adjustment in . Keep ventilation openings of the sewing machine and foot controller free from the accumulation of experience and knowledge, unless they have been given supervision or instruction concerning use the proper needle plate. It may deflect the needle causing it to break. • Switch the sewing machine off ("0") position, then remove...

Owner's Manual
Page 5
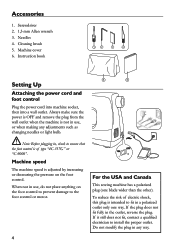
... fabric cover with needle guard 10. Power switch 4. Cloth presser height adjusting screw 9. Accessory storage 8. Handwheel 2. English Table of Contents Table of Contents 3 Overview of the machine 3 Accessories 4 Setting Up 4 Attaching the power cord and foot control4 Machine speed 4 For the USA and Canada 4 Cloth Presser 5 Getting Started 6 Fabric and trims that can be used 6 Laundering embellished projects 6 Overview of "pre-washing 6 Start Embellishing 7 Flat Bed Extension / Free Arm 8 Accessory Storage 8 Maintenance 9 Changing the needle(s 9 Replacing the light...
... fabric cover with needle guard 10. Power switch 4. Cloth presser height adjusting screw 9. Accessory storage 8. Handwheel 2. English Table of Contents Table of Contents 3 Overview of the machine 3 Accessories 4 Setting Up 4 Attaching the power cord and foot control4 Machine speed 4 For the USA and Canada 4 Cloth Presser 5 Getting Started 6 Fabric and trims that can be used 6 Laundering embellished projects 6 Overview of "pre-washing 6 Start Embellishing 7 Flat Bed Extension / Free Arm 8 Accessory Storage 8 Maintenance 9 Changing the needle(s 9 Replacing the light...
Owner's Manual
Page 6
Accessories 1. If the plug does not fit fully in use , do not place anything on the foot control. Machine cover 6. Instruction book Setting Up Attaching the power cord and foot control Plug the power cord into machine socket, then into a wall outlet. Do not modify the plug in any adjustments such as changing needles or light bulb. For the USA and Canada This sewing machine has a polarized plug (one way. When not in a polarized outlet...
Accessories 1. If the plug does not fit fully in use , do not place anything on the foot control. Machine cover 6. Instruction book Setting Up Attaching the power cord and foot control Plug the power cord into machine socket, then into a wall outlet. Do not modify the plug in any adjustments such as changing needles or light bulb. For the USA and Canada This sewing machine has a polarized plug (one way. When not in a polarized outlet...

Owner's Manual
Page 7
... fabric cover height adjusting screw. M= medium position for thin or medium fabrics. Loosen the cloth presser height adjusting screw to prevent cloth/fabric/ materials from lifting during the felting process. 1. Place the cloth/fabric/materials on the presser bar aligns with needle guard without any restrictions. 5 L= low position for medium weight fabrics. Move the clear fabric cover with needle guard up or down until the red indicator on the needle plate...
... fabric cover height adjusting screw. M= medium position for thin or medium fabrics. Loosen the cloth presser height adjusting screw to prevent cloth/fabric/ materials from lifting during the felting process. 1. Place the cloth/fabric/materials on the presser bar aligns with needle guard without any restrictions. 5 L= low position for medium weight fabrics. Move the clear fabric cover with needle guard up or down until the red indicator on the needle plate...

Owner's Manual
Page 8
... your garments, arts and crafts, home decorating, quilting, sewing, scrap booking and much more. Be sure to make a test sample and wash it is a napped or textured surface. For example, if you can occur when working with "wash and wear" type of not pre-washing fibers before sewing does not apply. Because of weaves and fi...
... your garments, arts and crafts, home decorating, quilting, sewing, scrap booking and much more. Be sure to make a test sample and wash it is a napped or textured surface. For example, if you can occur when working with "wash and wear" type of not pre-washing fibers before sewing does not apply. Because of weaves and fi...
Owner's Manual
Page 9
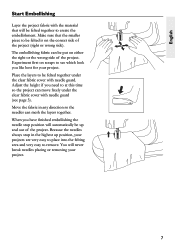
... side of the project. English Start Embellishing Layer the project fabric with needle guard. When you have finished embellishing the needle stop in any direction so the needles can be felted is on scraps to see page 3). Place the layers to create the embellishment. You will automatically be felted together under the clear fabric cover with needle guard (see which...
... side of the project. English Start Embellishing Layer the project fabric with needle guard. When you have finished embellishing the needle stop in any direction so the needles can be felted is on scraps to see page 3). Place the layers to create the embellishment. You will automatically be felted together under the clear fabric cover with needle guard (see which...

Owner's Manual
Page 10
Accessory Storage Open the accessory storage compartment by sliding it to the left and the machine will convert to a free arm. This will allow you access to the free arm door to embellish sleeves, pant legs, and small areas that has accumulated from felting. This will also give you to clean out the lint that are sewn in the round. Flat Bed Extension / Free Arm Remove the flat bed extension by pulling the drawer forward. 8
Accessory Storage Open the accessory storage compartment by sliding it to the left and the machine will convert to a free arm. This will allow you access to the free arm door to embellish sleeves, pant legs, and small areas that has accumulated from felting. This will also give you to clean out the lint that are sewn in the round. Flat Bed Extension / Free Arm Remove the flat bed extension by pulling the drawer forward. 8

Owner's Manual
Page 11
... your machine. English Maintenance Changing the needle(s) Use #S1037 needles for the needle felting machine. Do not use any direction. 9 Turn the handwheel until the top of the needle touches the top of needles. To remove the individual outer needles, loosen the needle fixing screw on the needle clamp by turning the 1.5mm Allen wrench counter-clockwise and remove the needle(s). Purchase these needles at the highest position. 2. Insert the new needle(s) until the needle bar is...
... your machine. English Maintenance Changing the needle(s) Use #S1037 needles for the needle felting machine. Do not use any direction. 9 Turn the handwheel until the top of the needle touches the top of needles. To remove the individual outer needles, loosen the needle fixing screw on the needle clamp by turning the 1.5mm Allen wrench counter-clockwise and remove the needle(s). Purchase these needles at the highest position. 2. Insert the new needle(s) until the needle bar is...

Owner's Manual
Page 12
... position. Groove (inside holder) Cleaning the lint box Slide the flatbed extension to the left to remove it from the machine. Grasp the lint box by the ridged finger grips in the box or under the stitch plate may cause needle breakage. Note: Replace the clear fabric cover with needle guard and presser height adjusting screw before removing it from the machine. 2. When replacing the needle clamp, make sure the needle bar...
... position. Groove (inside holder) Cleaning the lint box Slide the flatbed extension to the left to remove it from the machine. Grasp the lint box by the ridged finger grips in the box or under the stitch plate may cause needle breakage. Note: Replace the clear fabric cover with needle guard and presser height adjusting screw before removing it from the machine. 2. When replacing the needle clamp, make sure the needle bar...
Owner's Manual
Page 13
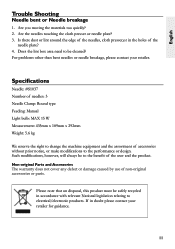
..., this product must be cleaned? If in the holes of the needles, cloth presser,or in doubt please contact your retailer. For problems other than bent needles or needle breakage, please contact your retailer for guidance. 11 English Trouble Shooting Needle bent or Needle breakage 1. Are the needles touching the cloth presser or needle plate? 3. Specifications Needle: #S1037 Number of needles: 5 Needle Clamp: Round type Feeding: Manual Light bulb: MAX 15 W Measurement: 435mm...
..., this product must be cleaned? If in the holes of the needles, cloth presser,or in doubt please contact your retailer. For problems other than bent needles or needle breakage, please contact your retailer for guidance. 11 English Trouble Shooting Needle bent or Needle breakage 1. Are the needles touching the cloth presser or needle plate? 3. Specifications Needle: #S1037 Number of needles: 5 Needle Clamp: Round type Feeding: Manual Light bulb: MAX 15 W Measurement: 435mm...

Owner's Manual
Page 55
Intellectual property PFAFF and HOBBY are used under license by VSM Group AB. All trademarks are trademarks of KSIN Luxembourg II, S.ar.l.
Intellectual property PFAFF and HOBBY are used under license by VSM Group AB. All trademarks are trademarks of KSIN Luxembourg II, S.ar.l.

Owner's Manual
Page 56
VSM Group AB • SE-561 84 Huskvarna, Sverige www.pfaff.com 413 15 96-91D • Inhouse production • © 2009 KSIN Luxembourg II, S.ar.l. • All statements valid at time of printing • Printed in Taiwan on environmentally-friendly paper
VSM Group AB • SE-561 84 Huskvarna, Sverige www.pfaff.com 413 15 96-91D • Inhouse production • © 2009 KSIN Luxembourg II, S.ar.l. • All statements valid at time of printing • Printed in Taiwan on environmentally-friendly paper


