

Owner's Manual
Page 2
.... • Always use as described in this manual. • Never operate this household Sewing machine. Always unplug this sewing machine only for examination, repair, electrical or mechanical adjustment. • Never operate the sewing machine with same type rated 5 Watt. To reduce the risk of burns, fire, electric ... parts. The wrong plate can cause the needle to break. DANGER - Replace bulb with any air openings blocked. Return the sewing machine to the nearest authorized dealer or service center for its intended use the proper needle plate. This houshold sewing...
.... • Always use as described in this manual. • Never operate this household Sewing machine. Always unplug this sewing machine only for examination, repair, electrical or mechanical adjustment. • Never operate the sewing machine with same type rated 5 Watt. To reduce the risk of burns, fire, electric ... parts. The wrong plate can cause the needle to break. DANGER - Replace bulb with any air openings blocked. Return the sewing machine to the nearest authorized dealer or service center for its intended use the proper needle plate. This houshold sewing...

Owner's Manual
Page 3
...in the needle area, such as threading needle, changing needle, threading bobbin, or changing presser foot, etc. • Always unplug Sewing machine from outlet. • Do not unplug by qualified service personnel. No ground means is provided on cord. Replacement parts for ...DOUBLE INSULATED PRODUCTS In a double-insulated product, two systems of the system, and should be identical to break. • Switch the Sewing machine off ("0") position, then remove plug from the electrical outlet when removing covers, lubricating, or when making any object into cord reel. See ...
...in the needle area, such as threading needle, changing needle, threading bobbin, or changing presser foot, etc. • Always unplug Sewing machine from outlet. • Do not unplug by qualified service personnel. No ground means is provided on cord. Replacement parts for ...DOUBLE INSULATED PRODUCTS In a double-insulated product, two systems of the system, and should be identical to break. • Switch the Sewing machine off ("0") position, then remove plug from the electrical outlet when removing covers, lubricating, or when making any object into cord reel. See ...

Owner's Manual
Page 4
To make modifications to the performance or design. Such modifications, however, will always be to change the machine equipment and the assortment of the user and the product. INTRODUCTION CONGRATULATIONS ON CHOOSING YOUR NEW MACHINE Your new machine is an advanced computerized household embroidery machine. To fully enjoy all the features, we reserve the right to the benefit of accessories without prior notice, or make sure that you are always provided with the latest sewing capabilities, we suggest that you study this user's guide before using the machine.
To make modifications to the performance or design. Such modifications, however, will always be to change the machine equipment and the assortment of the user and the product. INTRODUCTION CONGRATULATIONS ON CHOOSING YOUR NEW MACHINE Your new machine is an advanced computerized household embroidery machine. To fully enjoy all the features, we reserve the right to the benefit of accessories without prior notice, or make sure that you are always provided with the latest sewing capabilities, we suggest that you study this user's guide before using the machine.

Owner's Manual
Page 5
...Rotate 90° 22 Stitching a Design 39 Power Switch and Center design button 22 Power Connections Connecting the machine Turning the Machine On 6 7 7 Select design button Machine Mode Indicators Directional buttons 22 MAINTENANCE AND 23 TROUBLESHOOTING 24 Changing the light bulb Cleaning 42 43 Turning the... COMPUTER 25 Troubleshooting Guide 45 Winding the Bobbin 11 How to transfer designs to the machine 26 Place Bobbin in Machine 13 Send 27 Top Threading 14 Using the machine without being Needle Threader 15 connecting to the computer 28 Top Tension 16 Navigator module...
...Rotate 90° 22 Stitching a Design 39 Power Switch and Center design button 22 Power Connections Connecting the machine Turning the Machine On 6 7 7 Select design button Machine Mode Indicators Directional buttons 22 MAINTENANCE AND 23 TROUBLESHOOTING 24 Changing the light bulb Cleaning 42 43 Turning the... COMPUTER 25 Troubleshooting Guide 45 Winding the Bobbin 11 How to transfer designs to the machine 26 Place Bobbin in Machine 13 Send 27 Top Threading 14 Using the machine without being Needle Threader 15 connecting to the computer 28 Top Tension 16 Navigator module...

Owner's Manual
Page 6
Needle plate 8. This will help you in learning its operation. Handwheel 3. USB connection 5. Needle threader 11. Start/Stop button 12. Upper thread tension 15. Spool cap 16. User's Guide 1. Main power switch and connectors 4. Presser foot 10. Bobbin winding guide 14. Spool felt 4 Overview Familiarize yourself with the names of the parts of your machine. Control Panel 6. Embroidery hoop holder 7. Bobbin winder 2. Bobbin cover 9. Presser foot lever 13.
Needle plate 8. This will help you in learning its operation. Handwheel 3. USB connection 5. Needle threader 11. Start/Stop button 12. Upper thread tension 15. Spool cap 16. User's Guide 1. Main power switch and connectors 4. Presser foot 10. Bobbin winding guide 14. Spool felt 4 Overview Familiarize yourself with the names of the parts of your machine. Control Panel 6. Embroidery hoop holder 7. Bobbin winder 2. Bobbin cover 9. Presser foot lever 13.

Owner's Manual
Page 7
Bobbins 11. Thread Snips 4. Large spool cap 8. Oiler 10. Screwdriver tool 5. Vertical spool pin 7. Accessory storage envelope (not in picture) 12. INTRODUCTION Your machine comes with your machine lubricated. 1. Seam Ripper 3. Small spool cap 9. Needles 2. Brush (not in picture) 14 Thread stand 5 Accessories These are standard accessories included with clear sewing machine oil that should be used to keep your embroidery machine. 14 5. 1. 4. 2. 3. 6. 7. 8. 9. 10. USB cable (not in picture) 13. Hoop 6.
Bobbins 11. Thread Snips 4. Large spool cap 8. Oiler 10. Screwdriver tool 5. Vertical spool pin 7. Accessory storage envelope (not in picture) 12. INTRODUCTION Your machine comes with your machine lubricated. 1. Seam Ripper 3. Small spool cap 9. Needles 2. Brush (not in picture) 14 Thread stand 5 Accessories These are standard accessories included with clear sewing machine oil that should be used to keep your embroidery machine. 14 5. 1. 4. 2. 3. 6. 7. 8. 9. 10. USB cable (not in picture) 13. Hoop 6.

Owner's Manual
Page 8
The sewing machine is intended to install the proper outlet. To reduce the risk of electric shock, this plug is now ready to OFF position before unplugging cord ...
The sewing machine is intended to install the proper outlet. To reduce the risk of electric shock, this plug is now ready to OFF position before unplugging cord ...
Owner's Manual
Page 9
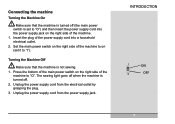
... of the power supply cord into the power supply jack on the right side of the machine to on the right side of the machine. 1. Turning the Machine Off Make sure that the machine is turned off . 2. Unplug the power supply cord from the electrical outlet by grasping the... plug. 3. Insert the plug of the machine to "I"). Connecting the machine Turning the Machine On Make sure that the machine is not sewing....
... of the power supply cord into the power supply jack on the right side of the machine to on the right side of the machine. 1. Turning the Machine Off Make sure that the machine is turned off . 2. Unplug the power supply cord from the electrical outlet by grasping the... plug. 3. Insert the plug of the machine to "I"). Connecting the machine Turning the Machine On Make sure that the machine is not sewing....

Owner's Manual
Page 11
Please read this chapter to the fullest. You will enjoy your embroidery machine. GET READY TO EMBROIDER The following pages show how to operate your machine to assure that you will have many hours of pleasure creating with your machine, and it is important to take a few minutes to read all these pages before embroidering.
Please read this chapter to the fullest. You will enjoy your embroidery machine. GET READY TO EMBROIDER The following pages show how to operate your machine to assure that you will have many hours of pleasure creating with your machine, and it is important to take a few minutes to read all these pages before embroidering.

Owner's Manual
Page 12
Place the spool cap on the thread stand are facing to the front and thread the machine as usual. To attach the thread stand, follow the steps below. 1. Place a spool of thread on the spool pin leaving a small space between the thread ...
Place the spool cap on the thread stand are facing to the front and thread the machine as usual. To attach the thread stand, follow the steps below. 1. Place a spool of thread on the spool pin leaving a small space between the thread ...

Owner's Manual
Page 13
... back (b). Place a spool of the thread spool. 3. GET READY TO EMBROIDER 111 Bring thread from inside the bobbin to the pin on . 2. Plug in the machine and turn it on the bobbin winder spindel and push the bobbin onto the spindel. Match the slot on the bobbin to out. Pass the...
... back (b). Place a spool of the thread spool. 3. GET READY TO EMBROIDER 111 Bring thread from inside the bobbin to the pin on . 2. Plug in the machine and turn it on the bobbin winder spindel and push the bobbin onto the spindel. Match the slot on the bobbin to out. Pass the...

Owner's Manual
Page 15
... right. C. GET READY TO EMBROIDER Visually check the level of the bobbin thread periodically as you remove your bobbin runs out and the machine doesn't stop, you can easily navigate to the point where you . Place Bobbin in Machine A. Open cover to the bobbin area by the indicator under the bobbin cover. B.
... right. C. GET READY TO EMBROIDER Visually check the level of the bobbin thread periodically as you remove your bobbin runs out and the machine doesn't stop, you can easily navigate to the point where you . Place Bobbin in Machine A. Open cover to the bobbin area by the indicator under the bobbin cover. B.
Owner's Manual
Page 16
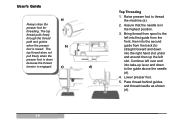
Raise presser foot to the left into first guide from the front, then into the second guide from spool to thread the machine (a). 2. Lower presser foot. 5. Pass thread behind guides and thread needle as shown (d). The top thread does not pull freely when the presser foot is down ...
Raise presser foot to the left into first guide from the front, then into the second guide from spool to thread the machine (a). 2. Lower presser foot. 5. Pass thread behind guides and thread needle as shown (d). The top thread does not pull freely when the presser foot is down ...

Owner's Manual
Page 18
... Fig. Move the dial to a higher number. 3. The tension adjustment for the top tension is too much top thread pulled to the underside of the machine. Move the dial to a lower number. T-3, there is marked with a darker section behind the numbers. In Fig. Adjust by tightening the top thread tension. If...
... Fig. Move the dial to a higher number. 3. The tension adjustment for the top tension is too much top thread pulled to the underside of the machine. Move the dial to a lower number. T-3, there is marked with a darker section behind the numbers. In Fig. Adjust by tightening the top thread tension. If...

Owner's Manual
Page 19
... through the same needle. It is not necessary to use a spool cap when using the vertical spool pin. It is sometimes helpful to use your machine to make it easier to work with your vertical spool pin when you wish to use two threads at the same time, such as a 90... both threads. 17 GET READY TO EMBROIDER Vertical Spool Pin A vertical spool pin is placed into the small round hole on the top of the machine.
... through the same needle. It is not necessary to use a spool cap when using the vertical spool pin. It is sometimes helpful to use your machine to make it easier to work with your vertical spool pin when you wish to use two threads at the same time, such as a 90... both threads. 17 GET READY TO EMBROIDER Vertical Spool Pin A vertical spool pin is placed into the small round hole on the top of the machine.

Owner's Manual
Page 20
... of your needles using these tests. The condition of the needle is bad, remove it and replace with a new needle. Remove the needle from the machine and glide all sides of the needle point across your embroidery. The needle shaft should be parallel to the flat surface. Different types of... should not be bent or damaged in an old pill bottle with the flat surface with a child safety cap. Remove the needle from the machine and place it should change the needle. You can develop rough spots called burrs. To discard needles safely, place them in any way you should...
... of your needles using these tests. The condition of the needle is bad, remove it and replace with a new needle. Remove the needle from the machine and glide all sides of the needle point across your embroidery. The needle shaft should be parallel to the flat surface. Different types of... should not be bent or damaged in an old pill bottle with the flat surface with a child safety cap. Remove the needle from the machine and place it should change the needle. You can develop rough spots called burrs. To discard needles safely, place them in any way you should...

Owner's Manual
Page 21
Loosen the needle screw using the screwdriver tool. Insert the new needle as far as it will be facing towards the back. Lower the presser foot. 3. Tighten the needle screw using the screwdriver tool supplied with the machine, or with a fresh one can help your outlines stitch more cleanly. 19 Loosen only enough to the machine. 2. Remove needle. 5. The flat side of the needle will go. GET READY TO EMBROIDER Replacing a needle with any suitable screwdriver. Replace the Needle 1. Turn off the power to remove the needle. 4.
Loosen the needle screw using the screwdriver tool. Insert the new needle as far as it will be facing towards the back. Lower the presser foot. 3. Tighten the needle screw using the screwdriver tool supplied with the machine, or with a fresh one can help your outlines stitch more cleanly. 19 Loosen only enough to the machine. 2. Remove needle. 5. The flat side of the needle will go. GET READY TO EMBROIDER Replacing a needle with any suitable screwdriver. Replace the Needle 1. Turn off the power to remove the needle. 4.

Owner's Manual
Page 22
Presser foot Lift The presser foot is raised and lowered with the presser foot lift. Press it again to be down. When embroidering the presser foot must be embroidered under the needle. Note: Before pressing the start button, check to be sure that the hoop has sufficient space to move freely. 20 Start/Stop Button Press this button once to start button to assure that there are no objects other than the fabric to stop the machine. User's Guide Look at your work space before pressing the start the machine. This engages the top tension.
Presser foot Lift The presser foot is raised and lowered with the presser foot lift. Press it again to be down. When embroidering the presser foot must be embroidered under the needle. Note: Before pressing the start button, check to be sure that the hoop has sufficient space to move freely. 20 Start/Stop Button Press this button once to start button to assure that there are no objects other than the fabric to stop the machine. User's Guide Look at your work space before pressing the start the machine. This engages the top tension.

Owner's Manual
Page 23
GET READY TO EMBROIDER Design perimeter button Mirror horizontally button Mirror vertically button Rotate 90° button Center design button Select design button LED light showing the current machine mode Directional buttons 2211 Control Panel The following section explains the functions on the control panel of the machine.
GET READY TO EMBROIDER Design perimeter button Mirror horizontally button Mirror vertically button Rotate 90° button Center design button Select design button LED light showing the current machine mode Directional buttons 2211 Control Panel The following section explains the functions on the control panel of the machine.

Owner's Manual
Page 25
The select LED light show that you have stopped your machine's display. This LED light is lit when the machine is displayed after design selection. Sewing - The following are descriptions of the active mode when the LED lamp is lit, you temporarily have patterns to a ... lit. 23 The Directional buttons move forward and backward by the arrow. If you may position the hoop to embroider. GET READY TO EMBROIDER Select - Machine Mode Indicators The machine has modes for specific operations. Up and down Directional buttons move the hoop in memory.
The select LED light show that you have stopped your machine's display. This LED light is lit when the machine is displayed after design selection. Sewing - The following are descriptions of the active mode when the LED lamp is lit, you temporarily have patterns to a ... lit. 23 The Directional buttons move forward and backward by the arrow. If you may position the hoop to embroider. GET READY TO EMBROIDER Select - Machine Mode Indicators The machine has modes for specific operations. Up and down Directional buttons move the hoop in memory.


