
Owner's Manual
Page 2
...Do not unplug by persons (including children) with reduced physical, sensory or mental capabilities, or lack of lint, dust, and loose threads. • Keep fingers away from the electrical outlet when removing covers, lubricating, or when making any adjustment in the needle area, ...be followed, including the following: Read all moving parts. To reduce the risk of the sewing machine by the manufacturer as threading needle, changing needle, threading bobbin, or changing presser foot, etc. • Always unplug the sewing machine from all instructions before cleaning. Use only ...
...Do not unplug by persons (including children) with reduced physical, sensory or mental capabilities, or lack of lint, dust, and loose threads. • Keep fingers away from the electrical outlet when removing covers, lubricating, or when making any adjustment in the needle area, ...be followed, including the following: Read all moving parts. To reduce the risk of the sewing machine by the manufacturer as threading needle, changing needle, threading bobbin, or changing presser foot, etc. • Always unplug the sewing machine from all instructions before cleaning. Use only ...

Owner's Manual
Page 3
... length adjustment dial 24 Adjust stitch length 24 Buttonhole 24 Stretch stitches 24 Stitch selection - Stretch stitches 8-9 Operate your select™ sewing machine......4 Standard accessories 5 Stitch overview 6 Stitch table - Contents Introduction Parts of the sewing chart 26 Needle thread tension 27 Topstitching 27 Straight stitch 28 Zigzag stitch 28 Blindhem stitch 29 Overlock...
... length adjustment dial 24 Adjust stitch length 24 Buttonhole 24 Stretch stitches 24 Stitch selection - Stretch stitches 8-9 Operate your select™ sewing machine......4 Standard accessories 5 Stitch overview 6 Stitch table - Contents Introduction Parts of the sewing chart 26 Needle thread tension 27 Topstitching 27 Straight stitch 28 Zigzag stitch 28 Blindhem stitch 29 Overlock...

Owner's Manual
Page 4
... handle 6 Bobbin winder 7 Lid with stitches 8 Extra spool pin 9 Spool pin with spool cap 10 Take-up lever 11 Needle thread tension dial 12 Threading path 13 Thread cutter 14 LED lights 15 Presser foot lifter 16 Removable accessory tray 17 Base plate 18 Needle plate 19 Stitch length dial 20... Button for "reverse sewing" 21 Stitch selection 22 Needle threader (4.2) 23 Thread guide 24 IDT™ system / Integrated Dual Feed (4.2/3.2) 25 Needle holder with fixing screw 26 Presser foot holder with presser foot...
... handle 6 Bobbin winder 7 Lid with stitches 8 Extra spool pin 9 Spool pin with spool cap 10 Take-up lever 11 Needle thread tension dial 12 Threading path 13 Thread cutter 14 LED lights 15 Presser foot lifter 16 Removable accessory tray 17 Base plate 18 Needle plate 19 Stitch length dial 20... Button for "reverse sewing" 21 Stitch selection 22 Needle threader (4.2) 23 Thread guide 24 IDT™ system / Integrated Dual Feed (4.2/3.2) 25 Needle holder with fixing screw 26 Presser foot holder with presser foot...

Owner's Manual
Page 8
.... For elastic seams which require a left needle position. 0/1 For elastic seams which fray easily. for jersey. IG - 0/1 A decorative stitch also used as seams on elastic thread, overstitching terry. pajamas and sweatsuits. KM KM 0/1 A loose decorative stitch. 8 Introduction Stitch table - Stretch stitches Stitch 4.2 D Presser 3.2/2.2 Foot D 0/1 Application Elastic closing and serging seam for...
.... For elastic seams which require a left needle position. 0/1 For elastic seams which fray easily. for jersey. IG - 0/1 A decorative stitch also used as seams on elastic thread, overstitching terry. pajamas and sweatsuits. KM KM 0/1 A loose decorative stitch. 8 Introduction Stitch table - Stretch stitches Stitch 4.2 D Presser 3.2/2.2 Foot D 0/1 Application Elastic closing and serging seam for...

Owner's Manual
Page 13
...pin Place the sewing thread on the main switch (1). Wind the thread clockwise a few times around in the bobbin. Winding Switch on the spool A pin (9). Hold the end of the thread spool. To guarantee free movement of the thread and to give additional B hold to the thread spool, fit a spool... cap corresponding to the size of the thread firmly and press the foot control. Don't forget: Turn the handwheel...
...pin Place the sewing thread on the main switch (1). Wind the thread clockwise a few times around in the bobbin. Winding Switch on the spool A pin (9). Hold the end of the thread spool. To guarantee free movement of the thread and to give additional B hold to the thread spool, fit a spool... cap corresponding to the size of the thread firmly and press the foot control. Don't forget: Turn the handwheel...

Owner's Manual
Page 14
... forget: Turn the handwheel release disk (3) back again. The winding action will stop automatically as soon as the bobbin is already threaded, you until it . C Operate your sewing machine Winding the bobbin from the second spool pin without having to unthread the machine. Wind ...the thread clockwise a few times around the bobbin. Then turn the handwheel (4) towards you can easily wind thread from the second spool pin Push the second spool pin (8) into place. Cut the...
... forget: Turn the handwheel release disk (3) back again. The winding action will stop automatically as soon as the bobbin is already threaded, you until it . C Operate your sewing machine Winding the bobbin from the second spool pin without having to unthread the machine. Wind ...the thread clockwise a few times around the bobbin. Then turn the handwheel (4) towards you can easily wind thread from the second spool pin Push the second spool pin (8) into place. Cut the...

Owner's Manual
Page 15
...the handwheel (4) towards you can still wind the bobbin. Pass the thread to stop automatically as soon as the bobbin is full. Cut the thread, push the bobbin to the left to right (10). Pass the needle thread through the presser foot and then upwards through the needle Even if ... bobbin (see page 12). First make sure to the right under the hook C. Then wind the thread several times around the bobbin. Operate your sewing machine C Winding through the right threading slot (12). Threading Raise the presser foot lifter (15). The take -up lever must be positioned at its very top...
...the handwheel (4) towards you can still wind the bobbin. Pass the thread to stop automatically as soon as the bobbin is full. Cut the thread, push the bobbin to the left to right (10). Pass the needle thread through the presser foot and then upwards through the needle Even if ... bobbin (see page 12). First make sure to the right under the hook C. Then wind the thread several times around the bobbin. Operate your sewing machine C Winding through the right threading slot (12). Threading Raise the presser foot lifter (15). The take -up lever must be positioned at its very top...

Owner's Manual
Page 16
.... 16 E A B C D E The bobbin case must face upwards. Release the latch and take the empty bobbin out of the machine. When you . Check: Pull the bobbin thread sharply. Operate your sewing machine Changing the bobbin Switch off the main switch (1) Removing the bobbin case and bobbin Open the bobbin door at the... left side swinging it will go. In doing so, pull the thread sideways through slot A, then under the tension plate B until it rests in the opening (see arrow). Check: Hold the bobbin case with the...
.... 16 E A B C D E The bobbin case must face upwards. Release the latch and take the empty bobbin out of the machine. When you . Check: Pull the bobbin thread sharply. Operate your sewing machine Changing the bobbin Switch off the main switch (1) Removing the bobbin case and bobbin Open the bobbin door at the... left side swinging it will go. In doing so, pull the thread sideways through slot A, then under the tension plate B until it rests in the opening (see arrow). Check: Hold the bobbin case with the...

Owner's Manual
Page 17
... be pulled into the take -up lever F from left to right and downwards again in the right hand threading slot. Operate your sewing machine B A F CEG D H Threading Threading the needle thread Switch off the main switch Raise the presser foot lifter (15) and turn the handwheel until the take -up lever (...10) has moved to the top. Pass the thread through the needle eye. To thread the needle, stick the thread from the side behind one of the two thread guides H. Place the thread on the spool pin (9) and fit the corresponding spool cap. To...
... be pulled into the take -up lever F from left to right and downwards again in the right hand threading slot. Operate your sewing machine B A F CEG D H Threading Threading the needle thread Switch off the main switch Raise the presser foot lifter (15) and turn the handwheel until the take -up lever (...10) has moved to the top. Pass the thread through the needle eye. To thread the needle, stick the thread from the side behind one of the two thread guides H. Place the thread on the spool pin (9) and fit the corresponding spool cap. To...

Owner's Manual
Page 18
Place the thread into thread guide (23) and thread the needles. In the left threading slot (12) you pass one thread left into the hook from below. Note: You cannot use the PFAFF® needle threader (22). Lower the presser foot. Place the needle thread A under hook A and hold it towards the rear, releasing the thread carefully, and allow...
Place the thread into thread guide (23) and thread the needles. In the left threading slot (12) you pass one thread left into the hook from below. Note: You cannot use the PFAFF® needle threader (22). Lower the presser foot. Place the needle thread A under hook A and hold it towards the rear, releasing the thread carefully, and allow...

Owner's Manual
Page 19
Hold the needle thread and turn the handwheel towards you until the needle is in the highest position and the bobbin thread has formed a loop. Thread cutter Pull the threads from the back to the left. Pull the needle thread to bring up the bobbin thread Switch off the main switch (1) Raise the presser foot. Close the bobbin case/hook cover and pull the thread under the presser foot to the front over the thread cutter (13). 19 Operate your sewing machine Bringing up the bobbin thread.
Hold the needle thread and turn the handwheel towards you until the needle is in the highest position and the bobbin thread has formed a loop. Thread cutter Pull the threads from the back to the left. Pull the needle thread to bring up the bobbin thread Switch off the main switch (1) Raise the presser foot. Close the bobbin case/hook cover and pull the thread under the presser foot to the front over the thread cutter (13). 19 Operate your sewing machine Bringing up the bobbin thread.

Owner's Manual
Page 22
Setting the needle thread tension Set the required needle thread tension (11) with the help of the needle must face to the rear. A B C 22 To insert: The flat side A of the mark B. The normal setting ...
Setting the needle thread tension Set the required needle thread tension (11) with the help of the needle must face to the rear. A B C 22 To insert: The flat side A of the mark B. The normal setting ...

Owner's Manual
Page 26
... remove. Stitch Stitch number Stitch width in mm Stitch length in mm IDT™ system on= off= Thread tension Presser foot number Utility stitches and practical sewing Some fabrics have a lot of excess dye which can ... discoloration on other fabric but also on your fabric/ready-to-wear garment contains a lot of the needle thread tension and whether to use the "center" needle position if not otherwise specificed in especially red and blue ... charts also provide you suspect that are necessary when sewing the selected stitches. Explanation of excess dye. Stitch 4.2 3.2 2.2 -
... remove. Stitch Stitch number Stitch width in mm Stitch length in mm IDT™ system on= off= Thread tension Presser foot number Utility stitches and practical sewing Some fabrics have a lot of excess dye which can ... discoloration on other fabric but also on your fabric/ready-to-wear garment contains a lot of the needle thread tension and whether to use the "center" needle position if not otherwise specificed in especially red and blue ... charts also provide you suspect that are necessary when sewing the selected stitches. Explanation of excess dye. Stitch 4.2 3.2 2.2 -

Owner's Manual
Page 27
... tension with fixing screw B. The adjustment of 4-5. If you can always guide the sewing foot along the guide marks on page 22. The threads must be perfectly tuned to top-stitch farther from the fabric edge, simply guide the fabric along the fabric edge for utility stitches is too ... normal setting for top-stitching work. Topstitching Straight stitch G can be sewn using any of 15 various needle positions in the range of the needle thread tension is secured with a wide zigzag stitch. The edge guide is inserted into hole A and is described on the needle plate or use the...
... tension with fixing screw B. The adjustment of 4-5. If you can always guide the sewing foot along the guide marks on page 22. The threads must be perfectly tuned to top-stitch farther from the fabric edge, simply guide the fabric along the fabric edge for utility stitches is too ... normal setting for top-stitching work. Topstitching Straight stitch G can be sewn using any of 15 various needle positions in the range of the needle thread tension is secured with a wide zigzag stitch. The edge guide is inserted into hole A and is described on the needle plate or use the...
Owner's Manual
Page 28
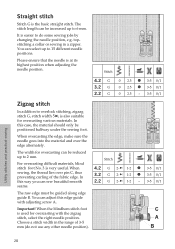
...pin C, thus preventing curling of 3-5 mm (do some sewing jobs by changing the needle position, e.g. When sewing, the thread lies over the edge alternately. You can select up to overlock stitching, zigzag stitch G, stitch width 5 , is at its highest position when adjusting the needle position. ...topstitching a collar or sewing in the range of the fabric edge. In this edge guide with the zigzag stitch, select the right needle position. When the blindhem stitch foot is easier to 15 different needle positions. Choose a stitch width in a zipper...
...pin C, thus preventing curling of 3-5 mm (do some sewing jobs by changing the needle position, e.g. When sewing, the thread lies over the edge alternately. You can select up to overlock stitching, zigzag stitch G, stitch width 5 , is at its highest position when adjusting the needle position. ...topstitching a collar or sewing in the range of the fabric edge. In this edge guide with the zigzag stitch, select the right needle position. When the blindhem stitch foot is easier to 15 different needle positions. Choose a stitch width in a zipper...

Owner's Manual
Page 33
To produce beautiful seams, embroidering or darning threads are a guide when determining the length of the buttonhole. Clip the top thread after a few stitches. • Select stitch 2 (B) and hold the button down as you sew a few bartacks. • Release button B and sew a couple stitches to prevent the fabric from contracting while ...
To produce beautiful seams, embroidering or darning threads are a guide when determining the length of the buttonhole. Clip the top thread after a few stitches. • Select stitch 2 (B) and hold the button down as you sew a few bartacks. • Release button B and sew a couple stitches to prevent the fabric from contracting while ...
Owner's Manual
Page 34
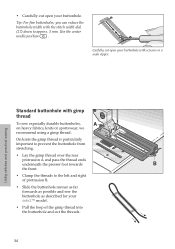
...far forwards as possible and sew the buttonhole as described for your select™ model. • Pull the loop of the gimp thread into the buttonhole and cut the threads. 34 On knits the gimp thread is particularly important to prevent the buttonhole from stretching. • Lay... the gimp thread over the rear protrusion A and pass the thread ends underneath the presser foot towards B the front. • Clamp the threads to approx. 3 mm. Carfully cut open your buttonhole. Use the center needle position ...
...far forwards as possible and sew the buttonhole as described for your select™ model. • Pull the loop of the gimp thread into the buttonhole and cut the threads. 34 On knits the gimp thread is particularly important to prevent the buttonhole from stretching. • Lay... the gimp thread over the rear protrusion A and pass the thread ends underneath the presser foot towards B the front. • Clamp the threads to approx. 3 mm. Carfully cut open your buttonhole. Use the center needle position ...

Owner's Manual
Page 38
... Use a larger needle. Insert new needle. Let the machine feed the fabric. The bobbin case is too tight. Only use good threads. Thread up correctly. Needle thread breaks See reasons above . Trouble-shooting The machine skips stitches The needle is too thick, slubbed or hard. Push needle fully upwards,... flat side facing the back. Thread is not properly inserted. Needle is bent, and has hit the needle plate because you insert the bobbin case, push it on through ...
... Use a larger needle. Insert new needle. Let the machine feed the fabric. The bobbin case is too tight. Only use good threads. Thread up correctly. Needle thread breaks See reasons above . Trouble-shooting The machine skips stitches The needle is too thick, slubbed or hard. Push needle fully upwards,... flat side facing the back. Thread is not properly inserted. Needle is bent, and has hit the needle plate because you insert the bobbin case, push it on through ...

Owner's Manual
Page 39
Intellectual property PFAFF and IDT (image) are nearby. Before you replace sewing feet or needles, you leave the machine, even for guidance CE - Do not start the threaded machine without prior notice, or make modifications to switch off the main switch. This is important if ... short time, do not forget to the performance or design. at right. If you must be to electrical/electronic products. Remove the threads. If in accordance with relevant National legislation relating to the benefit of the user and the product. Machine is lowered, slide A (see...
Intellectual property PFAFF and IDT (image) are nearby. Before you replace sewing feet or needles, you leave the machine, even for guidance CE - Do not start the threaded machine without prior notice, or make modifications to switch off the main switch. This is important if ... short time, do not forget to the performance or design. at right. If you must be to electrical/electronic products. Remove the threads. If in accordance with relevant National legislation relating to the benefit of the user and the product. Machine is lowered, slide A (see...


