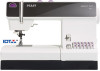

Owner's Manual
Page 2
... the sewing machine off ("0") position, then remove plug from the electrical outlet when removing covers, lubricating, or when making any adjustment in the needle area, such as threading needle, changing needle, threading bobbin, or changing presser foot, etc. • Always unplug the sewing machine from outlet. • Do not unplug by pulling on cord. It may deflect the needle causing it has been dropped or damaged, or dropped into any opening. • Do not use outdoors...
... the sewing machine off ("0") position, then remove plug from the electrical outlet when removing covers, lubricating, or when making any adjustment in the needle area, such as threading needle, changing needle, threading bobbin, or changing presser foot, etc. • Always unplug the sewing machine from outlet. • Do not unplug by pulling on cord. It may deflect the needle causing it has been dropped or damaged, or dropped into any opening. • Do not use outdoors...

Owner's Manual
Page 3
... 11 Using the free arm 11 Bobbin winding 12-15 Changing the bobbin 16 Threading 17-18 Needle Threader (Model 4.2 18 Threading the twin needle 18 Bringing up the bobbin thread 19 Thread cutter 19 Presser foot lifter 20 Changing the presser foot 20 The IDT™ system (Integrated Dual Feed).21 Setting the needle thread tension 22 Dropping the feed dog 22 Changing the needle 22 Stitch width dial 23 Needle position dial 23 Reverse sewing 24 Stitch length adjustment dial 24 Adjust stitch length 24 Buttonhole 24 Stretch stitches 24 Stitch selection - Non-elastic 6-7 Stitch...
... 11 Using the free arm 11 Bobbin winding 12-15 Changing the bobbin 16 Threading 17-18 Needle Threader (Model 4.2 18 Threading the twin needle 18 Bringing up the bobbin thread 19 Thread cutter 19 Presser foot lifter 20 Changing the presser foot 20 The IDT™ system (Integrated Dual Feed).21 Setting the needle thread tension 22 Dropping the feed dog 22 Changing the needle 22 Stitch width dial 23 Needle position dial 23 Reverse sewing 24 Stitch length adjustment dial 24 Adjust stitch length 24 Buttonhole 24 Stretch stitches 24 Stitch selection - Non-elastic 6-7 Stitch...

Owner's Manual
Page 4
... release disk 4 Handwheel 5 Carrying handle 6 Bobbin winder 7 Lid with stitches 8 Extra spool pin 9 Spool pin with spool cap 10 Take-up lever 11 Needle thread tension dial 12 Threading path 13 Thread cutter 14 LED lights 15 Presser foot lifter 16 Removable accessory tray 17 Base plate 18 Needle plate 19 Stitch length dial 20 Button for "reverse sewing" 21 Stitch selection 22 Needle threader (4.2) 23 Thread guide 24 IDT™ system / Integrated Dual Feed (4.2/3.2) 25 Needle holder with fixing screw 26 Presser foot holder with presser foot 27 Stitch width dial 28 Needle position dial 4
... release disk 4 Handwheel 5 Carrying handle 6 Bobbin winder 7 Lid with stitches 8 Extra spool pin 9 Spool pin with spool cap 10 Take-up lever 11 Needle thread tension dial 12 Threading path 13 Thread cutter 14 LED lights 15 Presser foot lifter 16 Removable accessory tray 17 Base plate 18 Needle plate 19 Stitch length dial 20 Button for "reverse sewing" 21 Stitch selection 22 Needle threader (4.2) 23 Thread guide 24 IDT™ system / Integrated Dual Feed (4.2/3.2) 25 Needle holder with fixing screw 26 Presser foot holder with presser foot 27 Stitch width dial 28 Needle position dial 4
Owner's Manual
Page 7
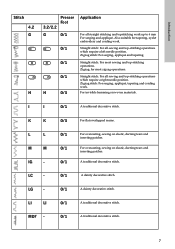
... on elastic, darning tears and inserting patches. A traditional decorative stitch. 7 A traditional decorative stitch. Zigzag: for tapering, eyelet embroidery and cording work up to 6 mm For serging and appliqué. LC - 0/1 A dainty decorative stitch. Introduction Stitch 4.2 G H Presser Foot 3.2/2.2 G 0/1 0/1 0/1 0/1 H 0/3 Application For all straight stitching and topstitching work . Also suitable for most sewing and top-stitching operations. Zigzag stitch: For serging, appliqué, tapering and cording work. Straight stitch: For all sewing...
... on elastic, darning tears and inserting patches. A traditional decorative stitch. 7 A traditional decorative stitch. Zigzag: for tapering, eyelet embroidery and cording work up to 6 mm For serging and appliqué. LC - 0/1 A dainty decorative stitch. Introduction Stitch 4.2 G H Presser Foot 3.2/2.2 G 0/1 0/1 0/1 0/1 H 0/3 Application For all straight stitching and topstitching work . Also suitable for most sewing and top-stitching operations. Zigzag stitch: For serging, appliqué, tapering and cording work. Straight stitch: For all sewing...

Owner's Manual
Page 11
Using the free arm In order to sew using the free arm, swing the accessory tray to the left and lift it is also used as an extended work support. Model 4.2, has a special removable accessory organizer. The enclosed accessories are numbered. When replacing the tray, make sure it upwards out of the hole. Operate your sewing machine Accessory tray Your PFAFF® select™ sewing machine has a removable accessory tray (16) which is flush with the free arm of the sewing machine. 11 Sort the enclosed accessories into the corresponding sections of the accessory organizer.
Using the free arm In order to sew using the free arm, swing the accessory tray to the left and lift it is also used as an extended work support. Model 4.2, has a special removable accessory organizer. The enclosed accessories are numbered. When replacing the tray, make sure it upwards out of the hole. Operate your sewing machine Accessory tray Your PFAFF® select™ sewing machine has a removable accessory tray (16) which is flush with the free arm of the sewing machine. 11 Sort the enclosed accessories into the corresponding sections of the accessory organizer.

Owner's Manual
Page 13
... guide A and pull it through opening B and to the size of the thread firmly and press the foot control. To guarantee free movement of the thread and to give additional B hold to the thread spool, fit a spool cap corresponding to the right under the hook C. Wind the thread clockwise a few times around in the bobbin. Then turn the handwheel (4) towards you until it . Winding Switch on the spool A pin...
... guide A and pull it through opening B and to the size of the thread firmly and press the foot control. To guarantee free movement of the thread and to give additional B hold to the thread spool, fit a spool cap corresponding to the right under the hook C. Wind the thread clockwise a few times around in the bobbin. Then turn the handwheel (4) towards you until it . Winding Switch on the spool A pin...

Owner's Manual
Page 14
C Operate your sewing machine Winding the bobbin from the second spool pin without having to the right under hook C. The winding action will stop automatically as soon as the bobbin is already threaded, you until it snaps into place. Wind the thread clockwise a few times around the bobbin. Winding Switch on the spool pin. B A 14 Slide on a spool cap and place the thread spool on the main switch (1). Threading Place the thread into its hole. TIP...
C Operate your sewing machine Winding the bobbin from the second spool pin without having to the right under hook C. The winding action will stop automatically as soon as the bobbin is already threaded, you until it snaps into place. Wind the thread clockwise a few times around the bobbin. Winding Switch on the spool pin. B A 14 Slide on a spool cap and place the thread spool on the main switch (1). Threading Place the thread into its hole. TIP...

Owner's Manual
Page 15
... take -up lever must be positioned at its very top. Winding Switch on the main switch (1) and press the foot control. Don't forget: Turn the handwheel release disk (3) back again. Pass the thread to stop automatically as soon as the bobbin is full. Operate your sewing machine C Winding through the right threading slot (12). Then wind the thread several times around the bobbin. First make sure to the...
... take -up lever must be positioned at its very top. Winding Switch on the main switch (1) and press the foot control. Don't forget: Turn the handwheel release disk (3) back again. Pass the thread to stop automatically as soon as the bobbin is full. Operate your sewing machine C Winding through the right threading slot (12). Then wind the thread several times around the bobbin. First make sure to the...

Owner's Manual
Page 18
... thread right over tension disk C. Pull the threads right and left and one spool of thread on threading in the usual way, but make sure the threads are not twisted with each pin. Threading the twin needle Insert the twin needle. Carry on each other. Move the needle threader fully downwards and turn it taut. During threading, make sure that the small hook B goes through the needle eye. B C 18 Operate your sewing machine Needle threader (Model 4.2) To make threading...
... thread right over tension disk C. Pull the threads right and left and one spool of thread on threading in the usual way, but make sure the threads are not twisted with each pin. Threading the twin needle Insert the twin needle. Carry on each other. Move the needle threader fully downwards and turn it taut. During threading, make sure that the small hook B goes through the needle eye. B C 18 Operate your sewing machine Needle threader (Model 4.2) To make threading...

Owner's Manual
Page 22
... needle screw (25) firmly. darning or free-motion sewing the feed dog has to the rear. A B C 22 Operate your sewing machine Changing the needle Switch off the main switch. To remove: Lower the presser foot and move slide C fully to the right. Setting the needle thread tension Set the required needle thread tension (11) with the help of the needle must face to be dropped. Now the feed dog is 4 to its highest point. Dropping the feed dog For certain sewing work, e.g. Lower the presser foot and insert the needle...
... needle screw (25) firmly. darning or free-motion sewing the feed dog has to the rear. A B C 22 Operate your sewing machine Changing the needle Switch off the main switch. To remove: Lower the presser foot and move slide C fully to the right. Setting the needle thread tension Set the required needle thread tension (11) with the help of the needle must face to be dropped. Now the feed dog is 4 to its highest point. Dropping the feed dog For certain sewing work, e.g. Lower the presser foot and insert the needle...

Owner's Manual
Page 26
...= Thread tension Presser foot number Utility stitches and practical sewing Some fabrics have a lot of excess dye which can cause discoloration on other fabric but also on your fabric/ready-to-wear garment contains a lot of the needle thread tension and whether to avoid the discoloring. 26 Stitch 4.2 3.2 2.2 - Always use IDT™ system or not. If you with instructions that your sewing machine. Stitch Stitch number Stitch width in mm Stitch length in the instructions...
...= Thread tension Presser foot number Utility stitches and practical sewing Some fabrics have a lot of excess dye which can cause discoloration on other fabric but also on your fabric/ready-to-wear garment contains a lot of the needle thread tension and whether to avoid the discoloring. 26 Stitch 4.2 3.2 2.2 - Always use IDT™ system or not. If you with instructions that your sewing machine. Stitch Stitch number Stitch width in mm Stitch length in the instructions...

Owner's Manual
Page 27
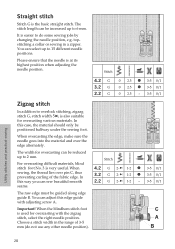
The normal setting for top-stitching work. Topstitching Straight stitch G can always guide the sewing foot along the guide marks on page 22. Check the tension with fixing screw B. The top-stitch needle position is secured with a wide zigzag stitch. Utility stitches and practical sewing 27 If the needle thread tension is in such a way that you wish to each other. The edge guide is inserted into hole A and is determined by the needle position dial. The threads must be...
The normal setting for top-stitching work. Topstitching Straight stitch G can always guide the sewing foot along the guide marks on page 22. Check the tension with fixing screw B. The top-stitch needle position is secured with a wide zigzag stitch. Utility stitches and practical sewing 27 If the needle thread tension is in such a way that you wish to each other. The edge guide is inserted into hole A and is determined by the needle position dial. The threads must be...
Owner's Manual
Page 28
... fabric edge. The width for overcasting with adjusting screw A. For overcasting difficult materials, blind stitch foot No. 3 is the basic straight stitch. Important! Straight stitch Stitch G is very useful. You can select up to 2 mm. When overcasting the edge, make sure the needle goes into the material and over pin C, thus preventing curling of 3-5 mm (do some sewing jobs by changing the needle position, e.g. You can adjust this edge guide with the zigzag stitch, select...
... fabric edge. The width for overcasting with adjusting screw A. For overcasting difficult materials, blind stitch foot No. 3 is the basic straight stitch. Important! Straight stitch Stitch G is very useful. You can select up to 2 mm. When overcasting the edge, make sure the needle goes into the material and over pin C, thus preventing curling of 3-5 mm (do some sewing jobs by changing the needle position, e.g. You can adjust this edge guide with the zigzag stitch, select...

Owner's Manual
Page 30
... overlock stitch (I 5- Tip: Ensure that the needle sews to the right of sewing foot 3. stretch 3-5 0/3 2.2 I 5- stretch 3-5 0/3 3.2 K 5- When overlocking, if you select stitch width other than normal seams, very durable and quickly sewn. stretch 3-5 0/3 3.2 I ) The closed overlock stitch is being sewn. Overlock stitch What is an overlock stitch? For stretch fabrics, the select™ models offer overlock stitches which do not fray too much can also sew sleeve cuffs and knit collars which are more elastic than 5 , make sure the needle...
... overlock stitch (I 5- Tip: Ensure that the needle sews to the right of sewing foot 3. stretch 3-5 0/3 2.2 I 5- stretch 3-5 0/3 3.2 K 5- When overlocking, if you select stitch width other than normal seams, very durable and quickly sewn. stretch 3-5 0/3 3.2 I ) The closed overlock stitch is being sewn. Overlock stitch What is an overlock stitch? For stretch fabrics, the select™ models offer overlock stitches which do not fray too much can also sew sleeve cuffs and knit collars which are more elastic than 5 , make sure the needle...

Owner's Manual
Page 33
...; Select stitch 4 (B) and hold the button down as it is at an interval of doubled fabric. Clip the top thread after a few stitches. • Select stitch 2 (B) and hold the button down as you sew a few bartacks. • Release button B and sew a couple stitches to be 5 turned. - 5 Buttonholes are ideal. so that the red arrow is necessary to use stabilizer to the front, i.e. To produce beautiful seams, embroidering or darning threads...
...; Select stitch 4 (B) and hold the button down as it is at an interval of doubled fabric. Clip the top thread after a few stitches. • Select stitch 2 (B) and hold the button down as you sew a few bartacks. • Release button B and sew a couple stitches to be 5 turned. - 5 Buttonholes are ideal. so that the red arrow is necessary to use stabilizer to the front, i.e. To produce beautiful seams, embroidering or darning threads...
Owner's Manual
Page 34
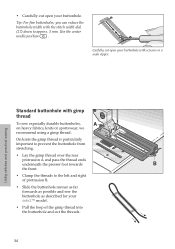
... cut open your buttonhole with scissors or a seam ripper. Use the center needle position . Utility stitches and practical sewing Standard buttonhole with gimp thread To sew especially durable buttonholes, A on heavy fabrics, knits or sportswear, we recommend using a gimp thread. On knits the gimp thread is particularly important to prevent the buttonhole from stretching. • Lay the gimp thread over the rear protrusion A and pass the thread ends underneath the presser foot...
... cut open your buttonhole with scissors or a seam ripper. Use the center needle position . Utility stitches and practical sewing Standard buttonhole with gimp thread To sew especially durable buttonholes, A on heavy fabrics, knits or sportswear, we recommend using a gimp thread. On knits the gimp thread is particularly important to prevent the buttonhole from stretching. • Lay the gimp thread over the rear protrusion A and pass the thread ends underneath the presser foot...
Owner's Manual
Page 35
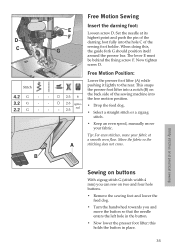
... hole C of the darning foot fully into - 2-3 6 the free motion position. - 2-3 optional • Drop the feed dog. - - 2-3 • Select a straight stitch or a zigzag stitch. • Keep an even speed, manually move your fabric. Tip: For even stitches, move your fabric at its highest point and push the pin of the sewing foot holder. this , the guide fork G should position itself around the presser bar. Free Motion Position: Lower the presser foot lifter (A) while pushing it lightly to the rear. Utility stitches and practical sewing Sewing on buttons With zigzag...
... hole C of the darning foot fully into - 2-3 6 the free motion position. - 2-3 optional • Drop the feed dog. - - 2-3 • Select a straight stitch or a zigzag stitch. • Keep an even speed, manually move your fabric. Tip: For even stitches, move your fabric at its highest point and push the pin of the sewing foot holder. this , the guide fork G should position itself around the presser bar. Free Motion Position: Lower the presser foot lifter (A) while pushing it lightly to the rear. Utility stitches and practical sewing Sewing on buttons With zigzag...
Owner's Manual
Page 37
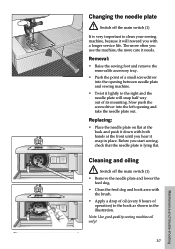
... the illustration. Before you use the machine, the more care it needs. Removal: • Raise the sewing foot and remove the removable accessory tray. • Push the point of operation) to clean your sewing machine, because it will snap half way out of its mounting. Changing the needle plate Switch off the main switch (1) • Remove the needle plate and lower the feed dog. • Clean the feed dog and hook area with both hands at...
... the illustration. Before you use the machine, the more care it needs. Removal: • Raise the sewing foot and remove the removable accessory tray. • Push the point of operation) to clean your sewing machine, because it will snap half way out of its mounting. Changing the needle plate Switch off the main switch (1) • Remove the needle plate and lower the feed dog. • Clean the feed dog and hook area with both hands at...

Owner's Manual
Page 38
... properly threaded. Only guide the fabric lightly. Thread bunching at top or bottom side of fabric. Machine is too thick. Seam is too tight. Do not wind thread free-hand, but run it fully into the stop. Needle thread breaks See reasons above . Thread tension is sewn unevenly The tension needs adjusting. Needle is too small for thread. Let the machine feed the fabric. Maintenance and trouble-shooting 38 Needle is too thick or too thin. Insert a new needle. Check...
... properly threaded. Only guide the fabric lightly. Thread bunching at top or bottom side of fabric. Machine is too thick. Seam is too tight. Do not wind thread free-hand, but run it fully into the stop. Needle thread breaks See reasons above . Thread tension is sewn unevenly The tension needs adjusting. Needle is too small for thread. Let the machine feed the fabric. Maintenance and trouble-shooting 38 Needle is too thick or too thin. Insert a new needle. Check...

Owner's Manual
Page 39
... switch. Feed dog is important if children are trademarks of accessories without fabric in doubt please contact your retailer for a short time, do not forget to left. If you must be to change the machine equipment and the assortment of KSIN Luxembourg II, S.ar.l. Machine does not feed or feeds irregularly Sewing lint has collected between the feed Remove needle plate, remove lint with dog teeth rows...
... switch. Feed dog is important if children are trademarks of accessories without fabric in doubt please contact your retailer for a short time, do not forget to left. If you must be to change the machine equipment and the assortment of KSIN Luxembourg II, S.ar.l. Machine does not feed or feeds irregularly Sewing lint has collected between the feed Remove needle plate, remove lint with dog teeth rows...


