

Owner's Manual
Page 1
... perfect choice for anyone who is looking for your select! Modern look, practical features, and so easy to sew? You´ll want to use - Let us introduce you suspect that ´s the select from Pfaff. Get acquainted with your sewing machine. Some fabrics have a lot of excess dye. ...Fleece and denim fabric in especially red and blue often contain a lot of excess dye which can cause discoloration on other fabric but also on your select.
... perfect choice for anyone who is looking for your select! Modern look, practical features, and so easy to sew? You´ll want to use - Let us introduce you suspect that ´s the select from Pfaff. Get acquainted with your sewing machine. Some fabrics have a lot of excess dye. ...Fleece and denim fabric in especially red and blue often contain a lot of excess dye which can cause discoloration on other fabric but also on your select.
Owner's Manual
Page 2
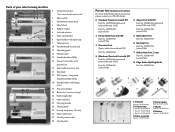
... 7 Brush Part No. 93-847 979-91 8 Bobbins Part No. 93-040 970-45 Part No. 93-036 048-44 3. Parts of your select sewing machine 1 Connection socket "foot control with main cord" 2 Main switch 3 Handwheel release disk 4 Handwheel 5 Bobbin winder 6 Lid with stitches 7 Extra spool...Sewing lamp (max. 15 watt) 26 Stitch width dial 27 Needle position dial 28 Needle plate Presser feet (normal accessories) For more information about accessories, please contact your PFAFF dealer. 0 Standard Presser Foot with IDT Part No. 820250-096 (pictured) (select 1548 and 1538) Part No. 820258-096 (select 1528...
... 7 Brush Part No. 93-847 979-91 8 Bobbins Part No. 93-040 970-45 Part No. 93-036 048-44 3. Parts of your select sewing machine 1 Connection socket "foot control with main cord" 2 Main switch 3 Handwheel release disk 4 Handwheel 5 Bobbin winder 6 Lid with stitches 7 Extra spool...Sewing lamp (max. 15 watt) 26 Stitch width dial 27 Needle position dial 28 Needle plate Presser feet (normal accessories) For more information about accessories, please contact your PFAFF dealer. 0 Standard Presser Foot with IDT Part No. 820250-096 (pictured) (select 1548 and 1538) Part No. 820258-096 (select 1528...
Owner's Manual
Page 3
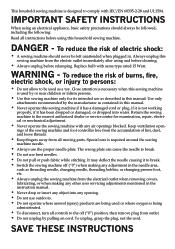
...cleaning. • Always unplug before using an electrical appliance, basic safety precautions should never be used by the manufacturer as contained in this sewing machine if it has a damaged cord or plug, if it is being administrated. • To disconnect, turn all moving parts. SAVE THESE ...INSTRUCTIONS Return the sewing machine to the nearest authorized dealer or service center for its intended use outdoors. • Do not operate where aerosol (spray) products are ...
...cleaning. • Always unplug before using an electrical appliance, basic safety precautions should never be used by the manufacturer as contained in this sewing machine if it has a damaged cord or plug, if it is being administrated. • To disconnect, turn all moving parts. SAVE THESE ...INSTRUCTIONS Return the sewing machine to the nearest authorized dealer or service center for its intended use outdoors. • Do not operate where aerosol (spray) products are ...
Owner's Manual
Page 12
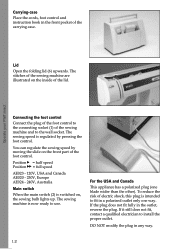
Operate your Pfaff select Lid Open the folding lid (6) upwards. Connecting the foot control Connect the plug of the foot control...Australia Main switch When the main switch (2) is regulated by moving the slide on the front part of the sewing machine and to use. DO NOT modify the plug in a polarized outlet only one blade wider than the other). You can regulate the... plug does not fit fully in the front pocket of the lid. The stitches of the sewing machine are illustrated on , the sewing bulb lights up. For the USA and Canada This appliance has a polarized plug (one way. The...
Operate your Pfaff select Lid Open the folding lid (6) upwards. Connecting the foot control Connect the plug of the foot control...Australia Main switch When the main switch (2) is regulated by moving the slide on the front part of the sewing machine and to use. DO NOT modify the plug in a polarized outlet only one blade wider than the other). You can regulate the... plug does not fit fully in the front pocket of the lid. The stitches of the sewing machine are illustrated on , the sewing bulb lights up. For the USA and Canada This appliance has a polarized plug (one way. The...
Owner's Manual
Page 13
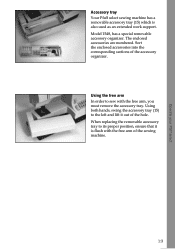
... replacing the removable accessory tray to the left and lift it is also used as an extended work support. Operate your Pfaff select Accessory tray Your Pfaff select sewing machine has a removable accessory tray (15) which is flush with the free arm, you must remove the accessory tray. Sort the enclosed accessories into the ...
... replacing the removable accessory tray to the left and lift it is also used as an extended work support. Operate your Pfaff select Accessory tray Your Pfaff select sewing machine has a removable accessory tray (15) which is flush with the free arm, you must remove the accessory tray. Sort the enclosed accessories into the ...
Owner's Manual
Page 24
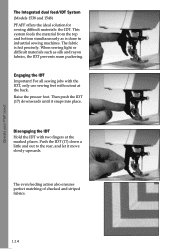
The fabric is done in industrial sewing machines. For all sewing jobs with the IDT, only use sewing feet with two fingers at the back. Push the IDT (17) down a little and out to the rear, and let it snaps into place. ... the IDT with cutout at the marked places. Engaging the IDT Important! Operate your Pfaff select The Integrated dual feed/IDT System (Models 1538 and 1548) PFAFF offers the ideal solution for sewing difficult materials: the IDT. When sewing light or difficult materials such as is fed precisely. This system feeds...
The fabric is done in industrial sewing machines. For all sewing jobs with the IDT, only use sewing feet with two fingers at the back. Push the IDT (17) down a little and out to the rear, and let it snaps into place. ... the IDT with cutout at the marked places. Engaging the IDT Important! Operate your Pfaff select The Integrated dual feed/IDT System (Models 1538 and 1548) PFAFF offers the ideal solution for sewing difficult materials: the IDT. When sewing light or difficult materials such as is fed precisely. This system feeds...
Owner's Manual
Page 27
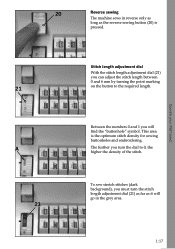
...length between 0 and 6 mm by turning the point marking on the button to 0, the higher the density of the stitch. Operate your Pfaff select 21 A 21 Stitch length adjustment dial With the stitch length adjustment dial (21) you will go in reverse only as long as it will... must turn the dial to the required length. To sew stretch stitches (dark background), you turn the stitch length adjustment dial (21) as far as the reverse sewing button (20) is the optimum stitch density for sewing buttonholes and embroidering. 20 Reverse sewing The machine sews in the grey area. 1:17 1:17
...length between 0 and 6 mm by turning the point marking on the button to 0, the higher the density of the stitch. Operate your Pfaff select 21 A 21 Stitch length adjustment dial With the stitch length adjustment dial (21) you will go in reverse only as long as it will... must turn the dial to the required length. To sew stretch stitches (dark background), you turn the stitch length adjustment dial (21) as far as the reverse sewing button (20) is the optimum stitch density for sewing buttonholes and embroidering. 20 Reverse sewing The machine sews in the grey area. 1:17 1:17
Owner's Manual
Page 28
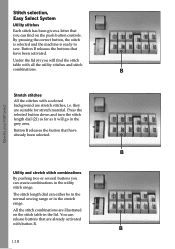
... Pfaff select Stretch stitches All the stitches with a colored background are suitable for stretch material. B Utility and stretch stitch combinations By pushing two or several buttons you can either be in the normal sewing range or in the stretch range. B 1:18 1:18 Press the selected button... on the push button controls. Button B releases the buttons that have already been selected. By pressing the correct button, the stitch is selected and the machine is ready to sew. Stitch selection, Easy Select System Utility stitches Each stitch has been given a letter that you can fi...
... Pfaff select Stretch stitches All the stitches with a colored background are suitable for stretch material. B Utility and stretch stitch combinations By pushing two or several buttons you can either be in the normal sewing range or in the stretch range. B 1:18 1:18 Press the selected button... on the push button controls. Button B releases the buttons that have already been selected. By pressing the correct button, the stitch is selected and the machine is ready to sew. Stitch selection, Easy Select System Utility stitches Each stitch has been given a letter that you can fi...
Owner's Manual
Page 40
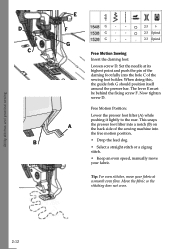
... holder. This snaps the presser foot lifter into a notch (B) on the back side of the sewing machine into the hole C of the darning foot fully into the free motion position. • Drop the feed dog. • Select a straight stitch or a zigzag stitch. • Keep an even speed, manually move your fabric. Move the...
... holder. This snaps the presser foot lifter into a notch (B) on the back side of the sewing machine into the hole C of the darning foot fully into the free motion position. • Drop the feed dog. • Select a straight stitch or a zigzag stitch. • Keep an even speed, manually move your fabric. Move the...
Owner's Manual
Page 46
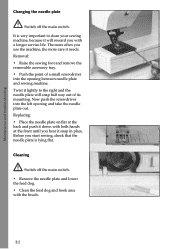
...until you hear it down with both hands at . Removal: • Raise the sewing foot and remove the removable accessory tray. • Push the point of its mounting. Twist it lightly to clean your sewing machine, because it needs. Cleaning Switch off the main switch. The more care it will... snap half way out of a small screwdriver into the left opening between needle plate and sewing machine. Maintenance and trouble-shooting Changing the needle plate Switch off the main switch. • Remove the needle plate and lower the feed dog. ...
...until you hear it down with both hands at . Removal: • Raise the sewing foot and remove the removable accessory tray. • Push the point of its mounting. Twist it lightly to clean your sewing machine, because it needs. Cleaning Switch off the main switch. The more care it will... snap half way out of a small screwdriver into the left opening between needle plate and sewing machine. Maintenance and trouble-shooting Changing the needle plate Switch off the main switch. • Remove the needle plate and lower the feed dog. ...
Owner's Manual
Page 47
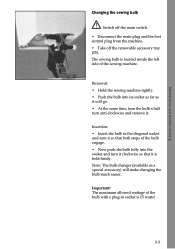
Note: The bulb changer (available as it will make changing the bulb much easier. Important! The sewing bulb is located inside the left side of the bulb with a plug-in the diagonal socket and turn it so that both stops of the ... off the main switch. • Disconnect the main plug and the foot control plug from the machine. • Take off the removable accessory tray (15). The maximum allowed wattage of the sewing machine. Removal: • Hold the sewing machine tightly. • Push the bulb into the socket and turn anti-clockwise and remove it is...
Note: The bulb changer (available as it will make changing the bulb much easier. Important! The sewing bulb is located inside the left side of the bulb with a plug-in the diagonal socket and turn it so that both stops of the ... off the main switch. • Disconnect the main plug and the foot control plug from the machine. • Take off the removable accessory tray (15). The maximum allowed wattage of the sewing machine. Removal: • Hold the sewing machine tightly. • Push the bulb into the socket and turn anti-clockwise and remove it is...
Owner's Manual
Page 49
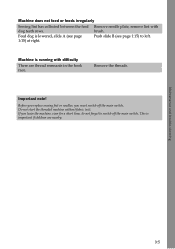
... and trouble-shooting 3:5 Do not start the threaded machine without fabric in the hook race. Remove the threads. Push slide B (see page 1:15) at right. Important note! Before you replace sewing feet or needles, you leave the machine, even for a short time, do not forget to... left. brush. This is running with dog teeth rows. Machine does not feed or feeds irregularly Sewing lint has collected between the feed Remove needle plate...
... and trouble-shooting 3:5 Do not start the threaded machine without fabric in the hook race. Remove the threads. Push slide B (see page 1:15) at right. Important note! Before you replace sewing feet or needles, you leave the machine, even for a short time, do not forget to... left. brush. This is running with dog teeth rows. Machine does not feed or feeds irregularly Sewing lint has collected between the feed Remove needle plate...


