Owner's Manual
Page 3
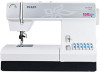
... the needle plate 39 Cleaning and oiling 39 Changing the light bulb 40 Trouble-shooting 41-42 Non-elastic 6-7 Stitch table - Stretch stitches 7-8 Operate your select™ sewing machine ....4 Standard accessories 5 Stitch overview 6 Stitch table - Easy Select System .......24 Utility stitches 24 Stretch stitches 24 Utility and stretch stitch combinations..24 Utility stitches and practical...
... the needle plate 39 Cleaning and oiling 39 Changing the light bulb 40 Trouble-shooting 41-42 Non-elastic 6-7 Stitch table - Stretch stitches 7-8 Operate your select™ sewing machine ....4 Standard accessories 5 Stitch overview 6 Stitch table - Easy Select System .......24 Utility stitches 24 Stretch stitches 24 Utility and stretch stitch combinations..24 Utility stitches and practical...
Owner's Manual
Page 4
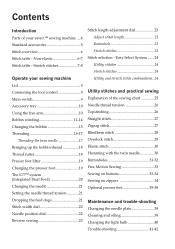
Parts of your select™ sewing machine 9 8 22 25 23 24 10 11 12 26 27 13 14 16 15 18 20 21 19 7 6 5 4 3 2 1 17 1 Main switch 2 Connection socket "foot control with ... Needle thread tension dial 12 Threading path 13 Thread cutter 14 Sewing lamp (max. 15 watt) 15 Presser foot lifter 4 Introduction 16 Removable accessory tray 17 Base plate 18 Needle plate 19 Stitch length dial 20 Button for "reverse sewing" 21 Stitch selection 22 Thread guide 23 IDT™ System / Integrated Dual Feed 24...
Parts of your select™ sewing machine 9 8 22 25 23 24 10 11 12 26 27 13 14 16 15 18 20 21 19 7 6 5 4 3 2 1 17 1 Main switch 2 Connection socket "foot control with ... Needle thread tension dial 12 Threading path 13 Thread cutter 14 Sewing lamp (max. 15 watt) 15 Presser foot lifter 4 Introduction 16 Removable accessory tray 17 Base plate 18 Needle plate 19 Stitch length dial 20 Button for "reverse sewing" 21 Stitch selection 22 Thread guide 23 IDT™ System / Integrated Dual Feed 24...
Owner's Manual
Page 10
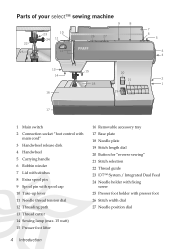
Using the free arm In order to sew using the free arm, swing the accessory tray to the left and lift it is also used as an extended work support. When replacing the tray, make sure it upwards out of the sewing machine. 10 Operate your sewing machine Accessory tray Your PFAFF® select™ sewing machine has a removable accessory tray (16) which is Áush with the free arm of the hole.
Using the free arm In order to sew using the free arm, swing the accessory tray to the left and lift it is also used as an extended work support. When replacing the tray, make sure it upwards out of the sewing machine. 10 Operate your sewing machine Accessory tray Your PFAFF® select™ sewing machine has a removable accessory tray (16) which is Áush with the free arm of the hole.

Owner's Manual
Page 35
...sew random lines and waves for a decorative textured effect. Optional presser feet The limited edition accessory foot package is packed in place with this special foot. The package contains the following the pre-marked design lines. To attach cords, use the Couching/Braiding Foot and your machine...hole, underneath and to sew over yarn, cords, narrow satin ribbon, soutache braid, etc. 1. Sew the design by following optional presser feet: Couching/Braiding foot You can sew up to 2 inches (4 - 5 cm) at the back. Cut your PFAFF® select™ sewing machine. Leave the thread ...
...sew random lines and waves for a decorative textured effect. Optional presser feet The limited edition accessory foot package is packed in place with this special foot. The package contains the following the pre-marked design lines. To attach cords, use the Couching/Braiding Foot and your machine...hole, underneath and to sew over yarn, cords, narrow satin ribbon, soutache braid, etc. 1. Sew the design by following optional presser feet: Couching/Braiding foot You can sew up to 2 inches (4 - 5 cm) at the back. Cut your PFAFF® select™ sewing machine. Leave the thread ...

Owner's Manual
Page 39
... down with a longer service life. Note: Use good quality sewing machine oil only! Maintenance and trouble-shooting 39 Before you start sewing, check that the needle plate is very important to clean your sewing machine, because it snap in the illustration. Now push the screwdriver...machine, the more care it lightly to the hook as shown in place. The more often you with both hands at . Removal: • Raise the presser foot and remove the removable accessory tray. • Push the point of a small screwdriver into the left opening between needle plate and sewing machine...
... down with a longer service life. Note: Use good quality sewing machine oil only! Maintenance and trouble-shooting 39 Before you start sewing, check that the needle plate is very important to clean your sewing machine, because it snap in the illustration. Now push the screwdriver...machine, the more care it lightly to the hook as shown in place. The more often you with both hands at . Removal: • Raise the presser foot and remove the removable accessory tray. • Push the point of a small screwdriver into the left opening between needle plate and sewing machine...
Owner's Manual
Page 40
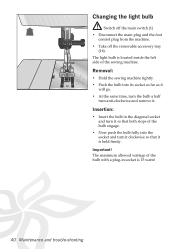
... the bulb in socket is 15 watts! 40 Maintenance and trouble-shooting Important! The light bulb is held Àrmly. Removal: • Hold the sewing machine tightly. • Push the bulb into its socket as far as it will go. • At the same time, turn the bulb a half turn... both stops of the sewing machine. The maximum allowed wattage of the bulb with a plug-in the diagonal socket and turn it . Changing the light bulb Switch off the main switch (1) • Disconnect the main plug and the foot control plug from the machine. • Take off the removable accessory tray (16).
... the bulb in socket is 15 watts! 40 Maintenance and trouble-shooting Important! The light bulb is held Àrmly. Removal: • Hold the sewing machine tightly. • Push the bulb into its socket as far as it will go. • At the same time, turn the bulb a half turn... both stops of the sewing machine. The maximum allowed wattage of the bulb with a plug-in the diagonal socket and turn it . Changing the light bulb Switch off the main switch (1) • Disconnect the main plug and the foot control plug from the machine. • Take off the removable accessory tray (16).


