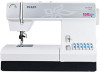

Owner's Manual
Page 2
... loose threads. • Keep Àngers away from all moving parts. Return the sewing machine to break. • Wear safety glasses. • Switch the sewing machine off ("0") position, then remove plug from the electric outlet immediately after using this household sewing machine. Keep ventilation openings of the sewing machine and foot controller free from the electrical outlet when removing covers, lubricating, or when making any other user servicing adjustments mentioned in the instruction manual. • Never drop or insert...
... loose threads. • Keep Àngers away from all moving parts. Return the sewing machine to break. • Wear safety glasses. • Switch the sewing machine off ("0") position, then remove plug from the electric outlet immediately after using this household sewing machine. Keep ventilation openings of the sewing machine and foot controller free from the electrical outlet when removing covers, lubricating, or when making any other user servicing adjustments mentioned in the instruction manual. • Never drop or insert...
Owner's Manual
Page 3
... 16-17 Threading the twin needle 17 Bringing up the bobbin thread 18 Thread cutter 18 Presser foot lifter 19 Changing the presser foot 19 The IDT™ system (Integrated Dual Feed 20 Changing the needle 21 Setting the needle thread tension 21 Dropping the feed dogs 21 Stitch width dial 22 Needle position dial 22 Reverse sewing 23 Stitch length adjustment dial 23 Adjust stitch length 23 Buttonhole 23 Stretch stitches 23 Stitch selection - Stretch stitches 7-8 Operate your select™ sewing machine ....4 Standard accessories 5 Stitch overview 6 Stitch table -
... 16-17 Threading the twin needle 17 Bringing up the bobbin thread 18 Thread cutter 18 Presser foot lifter 19 Changing the presser foot 19 The IDT™ system (Integrated Dual Feed 20 Changing the needle 21 Setting the needle thread tension 21 Dropping the feed dogs 21 Stitch width dial 22 Needle position dial 22 Reverse sewing 23 Stitch length adjustment dial 23 Adjust stitch length 23 Buttonhole 23 Stretch stitches 23 Stitch selection - Stretch stitches 7-8 Operate your select™ sewing machine ....4 Standard accessories 5 Stitch overview 6 Stitch table -
Owner's Manual
Page 4
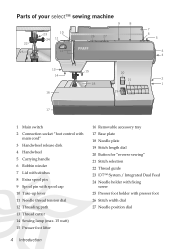
... release disk 4 Handwheel 5 Carrying handle 6 Bobbin winder 7 Lid with stitches 8 Extra spool pin 9 Spool pin with spool cap 10 Take-up lever 11 Needle thread tension dial 12 Threading path 13 Thread cutter 14 Sewing lamp (max. 15 watt) 15 Presser foot lifter 4 Introduction 16 Removable accessory tray 17 Base plate 18 Needle plate 19 Stitch length dial 20 Button for "reverse sewing" 21 Stitch selection 22 Thread guide 23 IDT™ System / Integrated Dual Feed 24 Needle holder with Àxing screw 25 Presser foot holder with presser foot 26 Stitch width dial 27 Needle position dial
... release disk 4 Handwheel 5 Carrying handle 6 Bobbin winder 7 Lid with stitches 8 Extra spool pin 9 Spool pin with spool cap 10 Take-up lever 11 Needle thread tension dial 12 Threading path 13 Thread cutter 14 Sewing lamp (max. 15 watt) 15 Presser foot lifter 4 Introduction 16 Removable accessory tray 17 Base plate 18 Needle plate 19 Stitch length dial 20 Button for "reverse sewing" 21 Stitch selection 22 Thread guide 23 IDT™ System / Integrated Dual Feed 24 Needle holder with Àxing screw 25 Presser foot holder with presser foot 26 Stitch width dial 27 Needle position dial
Owner's Manual
Page 10
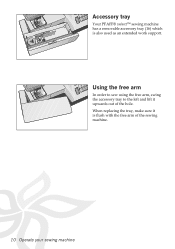
Accessory tray Your PFAFF® select™ sewing machine has a removable accessory tray (16) which is Áush with the free arm of the hole. Using the free arm In order to sew using the free arm, swing the accessory tray to the left and lift it is also used as an extended work support. When replacing the tray, make sure it upwards out of the sewing machine. 10 Operate your sewing machine
Accessory tray Your PFAFF® select™ sewing machine has a removable accessory tray (16) which is Áush with the free arm of the hole. Using the free arm In order to sew using the free arm, swing the accessory tray to the left and lift it is also used as an extended work support. When replacing the tray, make sure it upwards out of the sewing machine. 10 Operate your sewing machine
Owner's Manual
Page 12
... pull it through opening B and to the size of the thread spool. Don't forget: Turn the handwheel release disk (3) fully back again. Wind the thread clockwise a few times around in the bobbin. The winding action will stop automatically as soon as the bobbin is full. Threading Place the thread into place. 12 Operate your sewing machine To guarantee free movement of the thread Àrmly and press the foot control.
... pull it through opening B and to the size of the thread spool. Don't forget: Turn the handwheel release disk (3) fully back again. Wind the thread clockwise a few times around in the bobbin. The winding action will stop automatically as soon as the bobbin is full. Threading Place the thread into place. 12 Operate your sewing machine To guarantee free movement of the thread Àrmly and press the foot control.

Owner's Manual
Page 13
... spool pin. Cut the thread, push the bobbin to the right under hook C. C Winding the bobbin from the second spool pin without having to unthread the machine. Wind the thread clockwise a few times around the bobbin. Then turn the handwheel (4) towards you can easily wind thread from the second spool pin Push the second spool pin (8) into place. B A Operate your sewing machine 13 Hold the end of thread Àrmly and press the the foot control...
... spool pin. Cut the thread, push the bobbin to the right under hook C. C Winding the bobbin from the second spool pin without having to unthread the machine. Wind the thread clockwise a few times around the bobbin. Then turn the handwheel (4) towards you can easily wind thread from the second spool pin Push the second spool pin (8) into place. B A Operate your sewing machine 13 Hold the end of thread Àrmly and press the the foot control...

Owner's Manual
Page 14
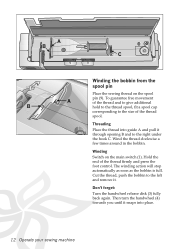
... full. Then wind the thread several times around the bobbin. The winding action will stop the needle from left and remove it snaps into the take -up lever from moving while winding the bobbin (see page 11). Now, pull the thread into place. C 14 Operate your sewing machine Winding through the right threading slot (12). First make sure to the right under the hook C. Threading Raise the presser foot lifter (15...
... full. Then wind the thread several times around the bobbin. The winding action will stop the needle from left and remove it snaps into the take -up lever from moving while winding the bobbin (see page 11). Now, pull the thread into place. C 14 Operate your sewing machine Winding through the right threading slot (12). First make sure to the right under the hook C. Threading Raise the presser foot lifter (15...
Owner's Manual
Page 15
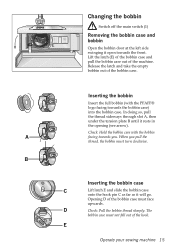
... so, pull the thread sideways through slot A, then under the tension plate B until it will go. E Operate your sewing machine 15 The bobbin case must not fall out of the machine. Release the latch and take the empty bobbin out of the bobbin case must turn clockwise. When you . Opening D of the bobbin case. B Inserting the bobbin case C Lift latch E and slide the bobbin case onto the hook pin C as far as...
... so, pull the thread sideways through slot A, then under the tension plate B until it will go. E Operate your sewing machine 15 The bobbin case must not fall out of the machine. Release the latch and take the empty bobbin out of the bobbin case must turn clockwise. When you . Opening D of the bobbin case. B Inserting the bobbin case C Lift latch E and slide the bobbin case onto the hook pin C as far as...
Owner's Manual
Page 21
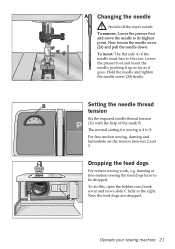
... needle down. B Setting the needle thread tension Set the required needle thread tension (11) with the help of the needle must face to 5. For free-motion sewing, darning and buttonhole set the tension between 2 and 3. To do this, open the bobbin case/hook cover and move the needle to its highest point. darning or free-motion sewing the feed dogs have to the right. Hold the needle and tighten the needle screw (24) Àrmly. To remove: Lower the presser foot and move slide C fully to be dropped. A Changing...
... needle down. B Setting the needle thread tension Set the required needle thread tension (11) with the help of the needle must face to 5. For free-motion sewing, darning and buttonhole set the tension between 2 and 3. To do this, open the bobbin case/hook cover and move the needle to its highest point. darning or free-motion sewing the feed dogs have to the right. Hold the needle and tighten the needle screw (24) Àrmly. To remove: Lower the presser foot and move slide C fully to be dropped. A Changing...
Owner's Manual
Page 22
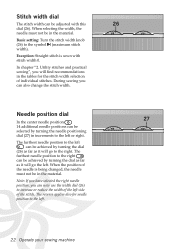
... be adjusted with stitch width 0. Note: If you have selected the right needle position, you will go the left . 22 Operate your sewing machine The furthest needle position to the right can now use the width dial (26) to the left . The furthest needle position to the left side of the stitch. Exception: Straight stitch is being changed, the needle must not be in the material. Needle position dial In the center needle position...
... be adjusted with stitch width 0. Note: If you have selected the right needle position, you will go the left . 22 Operate your sewing machine The furthest needle position to the right can now use the width dial (26) to the left . The furthest needle position to the left side of the stitch. Exception: Straight stitch is being changed, the needle must not be in the material. Needle position dial In the center needle position...
Owner's Manual
Page 25
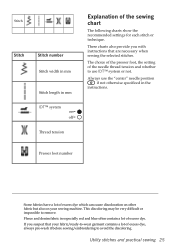
...-wash it before sewing/embroidering to avoid the discoloring. Always use IDT™ system or not. If you with instructions that your sewing machine. Stitch Stitch Stitch number Stitch width in mm Stitch length in mm Explanation of excess dye. Utility stitches and practical sewing 25 These charts also provide you suspect that are necessary when sewing the selected stitches. IDT™ system on= off= Thread tension Presser foot number Some fabrics have a lot...
...-wash it before sewing/embroidering to avoid the discoloring. Always use IDT™ system or not. If you with instructions that your sewing machine. Stitch Stitch Stitch number Stitch width in mm Stitch length in mm Explanation of excess dye. Utility stitches and practical sewing 25 These charts also provide you suspect that are necessary when sewing the selected stitches. IDT™ system on= off= Thread tension Presser foot number Some fabrics have a lot...
Owner's Manual
Page 26
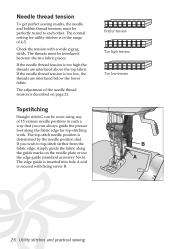
...;xing screw B. The edge guide is inserted into hole A and is described on the needle plate or use the edge guide (standard accessory No.6). Perfect tension Too high tension Too low tension B A 26 Utility stitches and practical sewing If the needle thread tension is too low, the threads are interlaced above the top fabric. The adjustment of the needle thread tension is secured with a wide zigzag stitch. If you can always guide the presser foot along the guide marks...
...;xing screw B. The edge guide is inserted into hole A and is described on the needle plate or use the edge guide (standard accessory No.6). Perfect tension Too high tension Too low tension B A 26 Utility stitches and practical sewing If the needle thread tension is too low, the threads are interlaced above the top fabric. The adjustment of the needle thread tension is secured with a wide zigzag stitch. If you can always guide the presser foot along the guide marks...
Owner's Manual
Page 27
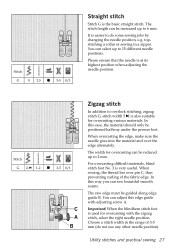
... materials, blind stitch foot No. 3 is at its highest position when adjusting the needle position. In this case, the material should only be reduced up to 6 mm. topstitching a collar or sewing in the range of the fabric edge. You can adjust this way you can be guided along edge guide B. The stitch length can sew beautiful smooth seams. The raw edge must be increased up to overlock stitching, zigzag stitch G, stitch width...
... materials, blind stitch foot No. 3 is at its highest position when adjusting the needle position. In this case, the material should only be reduced up to 6 mm. topstitching a collar or sewing in the range of the fabric edge. You can adjust this way you can be guided along edge guide B. The stitch length can sew beautiful smooth seams. The raw edge must be increased up to overlock stitching, zigzag stitch G, stitch width...
Owner's Manual
Page 29
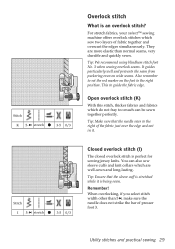
... set the red marker on the foot to guide the fabric edge. Closed overlock stitch (I 5- When overlocking, if you select stitch width other than normal seams, very durable and quickly sewn. Utility stitches and practical sewing 29 Stitch K 5- stretch 3-5 0/3 Stitch I ) The closed overlock stitch is perfect for sewing jersey knits. For stretch fabrics, your select™ sewing machine offers overlock stitches which are more elastic than 5 , make sure the needle does not strike the bar of presser foot 3. Open overlock stitch (K) With this stitch, thicker fabrics and fabrics...
... set the red marker on the foot to guide the fabric edge. Closed overlock stitch (I 5- When overlocking, if you select stitch width other than normal seams, very durable and quickly sewn. Utility stitches and practical sewing 29 Stitch K 5- stretch 3-5 0/3 Stitch I ) The closed overlock stitch is perfect for sewing jersey knits. For stretch fabrics, your select™ sewing machine offers overlock stitches which are more elastic than 5 , make sure the needle does not strike the bar of presser foot 3. Open overlock stitch (K) With this stitch, thicker fabrics and fabrics...

Owner's Manual
Page 30
... as T-shirts, knitted articles or cycling shorts both quickly and easily. Elastic stitch Because of the presser foot. Use only a stretch needle when sewing stretch fabric! M 5- 1-2.5 3-5 0/1 Hemming with the twin needle Use the twin needle to make beatiful topstitch seams. Using the twin needle you can be used for sewing elastic on stretch fabrics such as ribbed knitwear it is 4 mm. To prevent the needle from striking the needle plate, you select the center needle position . • First fold and iron the width...
... as T-shirts, knitted articles or cycling shorts both quickly and easily. Elastic stitch Because of the presser foot. Use only a stretch needle when sewing stretch fabric! M 5- 1-2.5 3-5 0/1 Hemming with the twin needle Use the twin needle to make beatiful topstitch seams. Using the twin needle you can be used for sewing elastic on stretch fabrics such as ribbed knitwear it is 4 mm. To prevent the needle from striking the needle plate, you select the center needle position . • First fold and iron the width...
Owner's Manual
Page 31
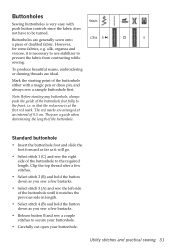
... cut open your buttonhole. Utility stitches and practical sewing 31 To produce beautiful seams, embroidering or darning threads are arranged at the Àrst red mark. Standard buttonhole • Insert the buttonhole foot and slide the foot forward as far as you sew a few bartacks. • Release button B and sew a couple stitches to prevent the fabric from contracting while sewing. Mark the starting any buttonhole, always push the guide of the buttonhole to...
... cut open your buttonhole. Utility stitches and practical sewing 31 To produce beautiful seams, embroidering or darning threads are arranged at the Àrst red mark. Standard buttonhole • Insert the buttonhole foot and slide the foot forward as far as you sew a few bartacks. • Release button B and sew a couple stitches to prevent the fabric from contracting while sewing. Mark the starting any buttonhole, always push the guide of the buttonhole to...
Owner's Manual
Page 36
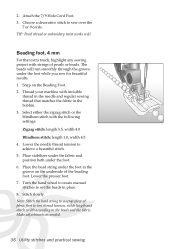
... fabric and position both under the foot while you sew for beautiful results. 1. TIP: Pearl thread or embroidery twist works well. Lower the needle thread tension to set the beads in the bobbin. 3. Make adjustments as needed. 36 Utility stitches and practical sewing Thread your machine with invisible thread in the groove on the Beading Foot. 2. Lower the presser foot. 7. Note: Stitch the bead string to sew over the 7 or 9 cords. Attach the 7/9 Hole Cord Foot. 3. Turn the hand wheel to create manual stitches...
... fabric and position both under the foot while you sew for beautiful results. 1. TIP: Pearl thread or embroidery twist works well. Lower the needle thread tension to set the beads in the bobbin. 3. Make adjustments as needed. 36 Utility stitches and practical sewing Thread your machine with invisible thread in the groove on the Beading Foot. 2. Lower the presser foot. 7. Note: Stitch the bead string to sew over the 7 or 9 cords. Attach the 7/9 Hole Cord Foot. 3. Turn the hand wheel to create manual stitches...
Owner's Manual
Page 38
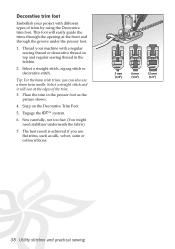
... trim in the bobbin. 2. Sew carefully, not too fast. (You might need stabilizer underneath the fabric) 7. Select a straight stitch, zigzag stitch or decorative stitch. Tip: For the 6mm wide trims, you use a 6mm twin needle. Engage the IDT™ system. 6. Thread your project with a regular sewing thread or decorative thread on the Decorative Trim Foot. 5. Select a straight stitch and it will easily guide the trims through the groove under the presser foot. 1. The best...
... trim in the bobbin. 2. Sew carefully, not too fast. (You might need stabilizer underneath the fabric) 7. Select a straight stitch, zigzag stitch or decorative stitch. Tip: For the 6mm wide trims, you use a 6mm twin needle. Engage the IDT™ system. 6. Thread your project with a regular sewing thread or decorative thread on the Decorative Trim Foot. 5. Select a straight stitch and it will easily guide the trims through the groove under the presser foot. 1. The best...

Owner's Manual
Page 39
... and the needle plate will reward you use the machine, the more care it will snap half way out of operation) to 20 hours of its mounting. Changing the needle plate Switch off the main switch (1) • Remove the needle plate and lower the feed dogs. • Clean the feed dogs and hook area with a longer service life. The more often you with the brush. • Apply a drop of oil (every...
... and the needle plate will reward you use the machine, the more care it will snap half way out of operation) to 20 hours of its mounting. Changing the needle plate Switch off the main switch (1) • Remove the needle plate and lower the feed dogs. • Clean the feed dogs and hook area with a longer service life. The more often you with the brush. • Apply a drop of oil (every...
Owner's Manual
Page 41
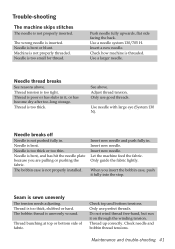
.... Let the machine feed the fabric. Seam is bent or blunt. Maintenance and trouble-shooting 41 Needle is sewn unevenly The tension needs adjusting. Thread is bent, and has hit the needle plate because you insert the bobbin case, push it on through the winding tension. Thread is not properly threaded. Insert new needle and push fully in. Do not wind thread free-hand, but run it fully into the stop. Check needle and bobbin thread tensions. Machine is too thick...
.... Let the machine feed the fabric. Seam is bent or blunt. Maintenance and trouble-shooting 41 Needle is sewn unevenly The tension needs adjusting. Thread is bent, and has hit the needle plate because you insert the bobbin case, push it on through the winding tension. Thread is not properly threaded. Insert new needle and push fully in. Do not wind thread free-hand, but run it fully into the stop. Check needle and bobbin thread tensions. Machine is too thick...


