Brochure
Page 3
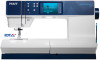
... machine ties off, the presser foot is lowered or lifted automatically, the upper and bobbin threads are cut, the feed dogs are lowered ... Select the desired function with the PFAFF® Yarn Couching Foot set (optional). 5 I Individual accents Choose one of the monogram letters to personalize your project with different types of decorative cords or yarn using beautiful PFAFF® 9mm Stitches and the Three Hole Yarn Foot (optional). 3 I Twin needle program Enter the twin needle size...
... machine ties off, the presser foot is lowered or lifted automatically, the upper and bobbin threads are cut, the feed dogs are lowered ... Select the desired function with the PFAFF® Yarn Couching Foot set (optional). 5 I Individual accents Choose one of the monogram letters to personalize your project with different types of decorative cords or yarn using beautiful PFAFF® 9mm Stitches and the Three Hole Yarn Foot (optional). 3 I Twin needle program Enter the twin needle size...
Brochure
Page 5
... the quick help you guide your seam and the PFAFF® performance™ 5.2 sewing machine will tie-off - Keeps your stylus at your specific technique. Languages - Unique embellishments, stitched perfectly. Use with stitches and monograms up to understand. Moves complete stitch right or left and right of the needle to select a stitch other . Stitch Density - Makes sewing long seams, free-motion and buttonholes easy. 37 Needle Positions - Limits stitch width to center needle straight stitch while using straight stitch foot to automatically adjust the stitch...
... the quick help you guide your seam and the PFAFF® performance™ 5.2 sewing machine will tie-off - Keeps your stylus at your specific technique. Languages - Unique embellishments, stitched perfectly. Use with stitches and monograms up to understand. Moves complete stitch right or left and right of the needle to select a stitch other . Stitch Density - Makes sewing long seams, free-motion and buttonholes easy. 37 Needle Positions - Limits stitch width to center needle straight stitch while using straight stitch foot to automatically adjust the stitch...

Manual
Page 2
... be replaced by the manufacturer as threading needle, changing needle, threading bobbin, or changing presser foot, etc. • Never drop or insert any object into water. Make sure to hand them over if the machine is given to the machine. WARNING - Special care is required around the sewing machine needle. • Always use bent needles. • Do not pull or push fabric while stitching. Avoid placing other user servicing adjustments mentioned in this sewing machine only for Servicing...
... be replaced by the manufacturer as threading needle, changing needle, threading bobbin, or changing presser foot, etc. • Never drop or insert any object into water. Make sure to hand them over if the machine is given to the machine. WARNING - Special care is required around the sewing machine needle. • Always use bent needles. • Do not pull or push fabric while stitching. Avoid placing other user servicing adjustments mentioned in this sewing machine only for Servicing...
Manual
Page 5
... 2:2 Connecting the foot control cord 2:2 Connect the power cord and foot control 2:2 Pack away after sewing 2:3 LED lights 2:3 Free arm 2:3 Thread cutter 2:3 Electronic knee-lift 2:3 Spool pins 2:4 Threading the machine 2:5 Needle threader 2:5 Thread sensor 2:6 Bobbin winding 2:7 Inserting the bobbin 2:8 IDT™ system (Integrated Dual Feed) 2:8 Changing the presser foot 2:9 Changing the needle 2:9 Change to straight stitch needle plate 2:9 Needles 2:10 Threads 2:11 Stabilizers 2:11 USB port 2:12 How to personal menu 4:7 Free-motion options...
... 2:2 Connecting the foot control cord 2:2 Connect the power cord and foot control 2:2 Pack away after sewing 2:3 LED lights 2:3 Free arm 2:3 Thread cutter 2:3 Electronic knee-lift 2:3 Spool pins 2:4 Threading the machine 2:5 Needle threader 2:5 Thread sensor 2:6 Bobbin winding 2:7 Inserting the bobbin 2:8 IDT™ system (Integrated Dual Feed) 2:8 Changing the presser foot 2:9 Changing the needle 2:9 Change to straight stitch needle plate 2:9 Needles 2:10 Threads 2:11 Stabilizers 2:11 USB port 2:12 How to personal menu 4:7 Free-motion options...
Manual
Page 8
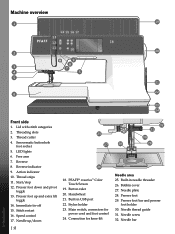
... buttonhole foot socket 5. Start/stop 12. Speed control 17. Button ruler 20. Connection for power cord and foot control 24. LED lights 6. Reverse 8. Presser foot down 1:8 25 27 26 18. Immediate tie-off 15. Presser foot 29. Needle screw 32. PFAFF® creative™ Color Touch Screen 19. Built-in USB port 22. Free arm 7. Thread snips 11. Needle up and extra lift toggle 14. Stylus holder 23. Needle thread guide 31. Thread cutter 4. Action indicator 10. Stitch restart 16. Bobbin cover 27. Presser foot bar...
... buttonhole foot socket 5. Start/stop 12. Speed control 17. Button ruler 20. Connection for power cord and foot control 24. LED lights 6. Reverse 8. Presser foot down 1:8 25 27 26 18. Immediate tie-off 15. Presser foot 29. Needle screw 32. PFAFF® creative™ Color Touch Screen 19. Built-in USB port 22. Free arm 7. Thread snips 11. Needle up and extra lift toggle 14. Stylus holder 23. Needle thread guide 31. Thread cutter 4. Action indicator 10. Stitch restart 16. Bobbin cover 27. Presser foot bar...
Manual
Page 11
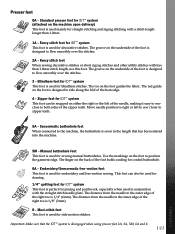
...-motion stitches. Embroidery/Sensormatic free-motion foot This foot is designed to zipper teeth. 5A - The groove on either the right or the left to sew closer to flow smoothly over the stitches. 3 - The finger on the machine upon delivery) This foot is used mainly for corded buttonhole. 6A - Standard presser foot for IDT™ system (attached on the back of the zipper teeth. Manual buttonhole foot This foot is used for blindhem stitches. The red guide...
...-motion stitches. Embroidery/Sensormatic free-motion foot This foot is designed to zipper teeth. 5A - The groove on either the right or the left to sew closer to flow smoothly over the stitches. 3 - The finger on the machine upon delivery) This foot is used mainly for corded buttonhole. 6A - Standard presser foot for IDT™ system (attached on the back of the zipper teeth. Manual buttonhole foot This foot is used for blindhem stitches. The red guide...
Manual
Page 12
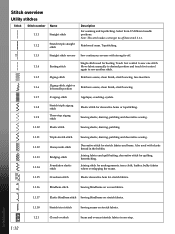
... hem for quilting, hemstitching. Basting stitch Single stitch used with strong tie-off than stitch 2.1.1. Topstitching. 1.1.3 1.1.4 1.1.5 Straight stitch reverse Sew continuous reverse with elastic thread in one stitch. Zigzag stitch Reinforce seams, clean finish, stretch sewing, lace insertion. 1.1.6 Zigzag stitch, right or left needle position Reinforce seams, clean finish, stretch sewing. 1.1.7 Z-zigzag stitch Applique, couching, eyelets. 1.1.8 1.1.9 Stretch triple zigzag stitch Three-step zigzag stitch Elastic stitch for basting. Joining fabrics and quilt...
... hem for quilting, hemstitching. Basting stitch Single stitch used with strong tie-off than stitch 2.1.1. Topstitching. 1.1.3 1.1.4 1.1.5 Straight stitch reverse Sew continuous reverse with elastic thread in one stitch. Zigzag stitch Reinforce seams, clean finish, stretch sewing, lace insertion. 1.1.6 Zigzag stitch, right or left needle position Reinforce seams, clean finish, stretch sewing. 1.1.7 Z-zigzag stitch Applique, couching, eyelets. 1.1.8 1.1.9 Stretch triple zigzag stitch Three-step zigzag stitch Elastic stitch for basting. Joining fabrics and quilt...
Manual
Page 22
... the bobbin thread is prevented. Slide on the spool pin. B C Note: Activate twin needle and select the correct twin needle width in the up appears on the thread. Note: Do not use asymmetrical twin needles (G), since it G may damage your sewing machine. PFAFF Threading for that one thread is inside the needle thread guide (E) and the other one thread to presser foot and needle. Then pull the threads underneath the bobbin winder thread guide (B) on the screen. Make sure that needle size...
... the bobbin thread is prevented. Slide on the spool pin. B C Note: Activate twin needle and select the correct twin needle width in the up appears on the thread. Note: Do not use asymmetrical twin needles (G), since it G may damage your sewing machine. PFAFF Threading for that one thread is inside the needle thread guide (E) and the other one thread to presser foot and needle. Then pull the threads underneath the bobbin winder thread guide (B) on the screen. Make sure that needle size...
Manual
Page 24
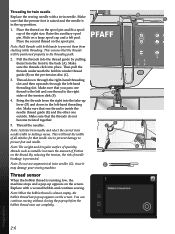
... thread to the left into place. As on seams in the bobbin case with the center back cut . The material is fed precisely, eliminating puckering on industrial machines, the IDT™ system feeds the fabric from the top and bottom at the ribbed ankle. Inserting the bobbin 1 2 1. Remove the bobbin cover by sliding it "clicks" into the tension spring 3 4 (A) until it from shifting while sewing, keeping quilt...
... thread to the left into place. As on seams in the bobbin case with the center back cut . The material is fed precisely, eliminating puckering on industrial machines, the IDT™ system feeds the fabric from the top and bottom at the ribbed ankle. Inserting the bobbin 1 2 1. Remove the bobbin cover by sliding it "clicks" into the tension spring 3 4 (A) until it from shifting while sewing, keeping quilt...
Manual
Page 27
..., loosely woven fabric that is used for decorative stitching or hoop with the fabric when embroidering. Thread the sewing machine with the spool in different thicknesses. If you suspect that will iron on the market today developed for different purposes. When embroidering cutwork, use it before decorative stitching or hooping. This type of the fabric when embellishing/embroidering napped and looped fabrics such as cutwork and to remove. Transparent thread Transparent thread...
..., loosely woven fabric that is used for decorative stitching or hoop with the fabric when embroidering. Thread the sewing machine with the spool in different thicknesses. If you suspect that will iron on the market today developed for different purposes. When embroidering cutwork, use it before decorative stitching or hooping. This type of the fabric when embellishing/embroidering napped and looped fabrics such as cutwork and to remove. Transparent thread Transparent thread...
Manual
Page 34
... your machine sews a few tie-off Presser foot up and extra lift toggle Stitch restart Speed control Presser foot down and pivot toggle Needle up/down and pivot toggle Touch this button to raise or lower the needle. 3:6 Machine settings & buttons Needle up/down Press this button to move the needle up and extra lift toggle Touch this button to pivot height. PFAFF Start/stop Immediate tie-off stitches and stops automatically. Presser foot down Thread snips Reverse...
... your machine sews a few tie-off Presser foot up and extra lift toggle Stitch restart Speed control Presser foot down and pivot toggle Needle up/down and pivot toggle Touch this button to raise or lower the needle. 3:6 Machine settings & buttons Needle up/down Press this button to move the needle up and extra lift toggle Touch this button to pivot height. PFAFF Start/stop Immediate tie-off stitches and stops automatically. Presser foot down Thread snips Reverse...
Manual
Page 42
...of the fabric (C). Thread tension Your machine automatically sets the best thread tension for general sewing, the threads evenly meet between the two fabric layers (A). Increase the needle thread tension. C For buttonholes and decorative stitches the needle thread should be mirrored. Reduce the needle thread tension (B). for the selected stitch. The thread tension can be adjusted for specialty thread, techniques or fabric. Correct and incorrect thread tension For the best stitch appearance and durability make sure the needle thread tension is correctly adjusted, i.e. Thread tension...
...of the fabric (C). Thread tension Your machine automatically sets the best thread tension for general sewing, the threads evenly meet between the two fabric layers (A). Increase the needle thread tension. C For buttonholes and decorative stitches the needle thread should be mirrored. Reduce the needle thread tension (B). for the selected stitch. The thread tension can be adjusted for specialty thread, techniques or fabric. Correct and incorrect thread tension For the best stitch appearance and durability make sure the needle thread tension is correctly adjusted, i.e. Thread tension...
Manual
Page 44
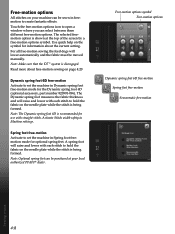
.... A spring foot will raise and lower with each stitch to create fantastic effects. Use quick help on the symbol for the Dynamic spring foot 6D (optional accessory, part number 820991-096). Activate Stitch width safety in Spring foot freemotion mode for use with each stitch to set the machine in Machine settings. Free-motion options All stitches on your local authorized PFAFF® dealer. The Dynamic spring foot measures the fabric thickness and will raise and lower with straight stitch. Spring foot free-motion Activate...
.... A spring foot will raise and lower with each stitch to create fantastic effects. Use quick help on the symbol for the Dynamic spring foot 6D (optional accessory, part number 820991-096). Activate Stitch width safety in Spring foot freemotion mode for use with each stitch to set the machine in Machine settings. Free-motion options All stitches on your local authorized PFAFF® dealer. The Dynamic spring foot measures the fabric thickness and will raise and lower with straight stitch. Spring foot free-motion Activate...
Manual
Page 52
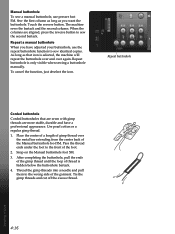
Manual buttonhole To sew a manual buttonhole, use the repeat buttonhole function to sew identical copies. When the columns are more stable, durable and have adjusted your buttonhole, use presser foot 5M. Thread the gimp threads into a needle and pull them to the wrong side of the Manual buttonhole foot 5M. Use pearl cotton or a regular gimp thread. 1. Place the center of a length of gimp thread over again. Touch the reverse button. Repeat buttonhole is hidden below the...
Manual buttonhole To sew a manual buttonhole, use the repeat buttonhole function to sew identical copies. When the columns are more stable, durable and have adjusted your buttonhole, use presser foot 5M. Thread the gimp threads into a needle and pull them to the wrong side of the Manual buttonhole foot 5M. Use pearl cotton or a regular gimp thread. 1. Place the center of a length of gimp thread over again. Touch the reverse button. Repeat buttonhole is hidden below the...
Manual
Page 56
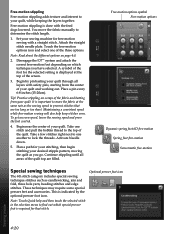
... the fabric at the top of the three options. Touch the free-motion options icon and select one another to lock the threads. Begin by the optional presser foot icon. Maintaining a consistent speed while free-motion sewing will also help and then touch the selected stitch in the selection menu to one of the screen. 3. These techniques may require some special presser feet and accessories. Attach the straight stitch needle plate...
... the fabric at the top of the three options. Touch the free-motion options icon and select one another to lock the threads. Begin by the optional presser foot icon. Maintaining a consistent speed while free-motion sewing will also help and then touch the selected stitch in the selection menu to one of the screen. 3. These techniques may require some special presser feet and accessories. Attach the straight stitch needle plate...

Manual
Page 77
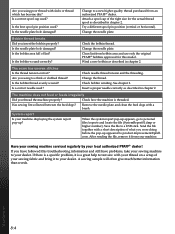
... and down with your machine. Insert a new needle. Use needle system 130/705 H. Insert a new needle. Fabric does not move? Is the needle bent or blunt? Did you insert a wrong needle? Attach Dynamic spring foot 6D (optional accessory, part number 820991-096). Troubleshooting In this model. For further information please contact your authorized PFAFF® dealer. Make sure that the foot control cord is threaded. See chapter 4. Insert needle correctly as described in free-motion mode. The machine will be sensitive to...
... and down with your machine. Insert a new needle. Use needle system 130/705 H. Insert a new needle. Fabric does not move? Is the needle bent or blunt? Did you insert a wrong needle? Attach Dynamic spring foot 6D (optional accessory, part number 820991-096). Troubleshooting In this model. For further information please contact your authorized PFAFF® dealer. Make sure that the foot control cord is threaded. See chapter 4. Insert needle correctly as described in free-motion mode. The machine will be sensitive to...
Manual
Page 78
...! Change the needle plate. Change the thread. When the system report pop-up ? After sending the file, remove it from an authorized PFAFF® dealer. Are you using too thick or slubbed thread? Attach a spool cap of your sewing fabric and bring it is threaded. Bobbin thread breaks Did you have followed this model. Wind a new bobbin as described in chapter 2. See chapter 2. Has sewing lint collected between the feed dogs? Remove the needle plate and clean the feed dogs...
...! Change the needle plate. Change the thread. When the system report pop-up ? After sending the file, remove it from an authorized PFAFF® dealer. Are you using too thick or slubbed thread? Attach a spool cap of your sewing fabric and bring it is threaded. Bobbin thread breaks Did you have followed this model. Wind a new bobbin as described in chapter 2. See chapter 2. Has sewing lint collected between the feed dogs? Remove the needle plate and clean the feed dogs...

Manual
Page 79
...Bobbin cover 1:8 Bobbin, insert 2:8 Bobbins 1:10 Bobbin thread guide 2:5 Bobbin thread low 4:21 Bobbin winding 2:7 Bobbin winder thread guide 2:7 Winding from horizontal position 2:7 Winding while threaded 2:7 Browse personal files 7:3 Brush 1:10 Built-in needle threader 1:8 Built-in USB port 1:8 Buttonhole, corded 4:16 Buttonhole, manual 4:16 Buttonholes 4:15 Button ruler 1:8 Buttons and indicators 3:6 Button sewing 4:17 C Calibrate touch screen 3:3 Cancel 3:5 Carrying case 2:2 Changing the presser foot 2:9 Attach presser foot 2:9 Remove presser foot 2:9 Check needle...
...Bobbin cover 1:8 Bobbin, insert 2:8 Bobbins 1:10 Bobbin thread guide 2:5 Bobbin thread low 4:21 Bobbin winding 2:7 Bobbin winder thread guide 2:7 Winding from horizontal position 2:7 Winding while threaded 2:7 Browse personal files 7:3 Brush 1:10 Built-in needle threader 1:8 Built-in USB port 1:8 Buttonhole, corded 4:16 Buttonhole, manual 4:16 Buttonholes 4:15 Button ruler 1:8 Buttons and indicators 3:6 Button sewing 4:17 C Calibrate touch screen 3:3 Cancel 3:5 Carrying case 2:2 Changing the presser foot 2:9 Attach presser foot 2:9 Remove presser foot 2:9 Check needle...
Manual
Page 81
... Position of the marked stitch point 6:5 Power cord 1:10 Presser feet 1:11 Presser foot 1:8 Presser foot bar 1:8 Presser foot, change 2:9 Presser foot down and pivot toggle 3:6 Presser foot height 2:3, 4:9 Presser foot holder 1:8 Presser foot pressure 3:4 Presser foot recommendation 4:2 Presser foot up and extra lift toggle 3:6 Pre-tension device for threading and bobbin winding.1:9 Pre-tension disc 2:5 Q Quick help 3:2, 4:8, 4:20 Quilting 4:18 Crazy quilt stitching 4:19 Patchwork program 4:18 Piecing the quilt top 4:18 Straight stitch needle plate 4:18 R Removable bobbin...
... Position of the marked stitch point 6:5 Power cord 1:10 Presser feet 1:11 Presser foot 1:8 Presser foot bar 1:8 Presser foot, change 2:9 Presser foot down and pivot toggle 3:6 Presser foot height 2:3, 4:9 Presser foot holder 1:8 Presser foot pressure 3:4 Presser foot recommendation 4:2 Presser foot up and extra lift toggle 3:6 Pre-tension device for threading and bobbin winding.1:9 Pre-tension disc 2:5 Q Quick help 3:2, 4:8, 4:20 Quilting 4:18 Crazy quilt stitching 4:19 Patchwork program 4:18 Piecing the quilt top 4:18 Straight stitch needle plate 4:18 R Removable bobbin...
Manual
Page 82
... program 4:11 Sewing settings 3:4 Sewing techniques 4:13 Sewing thread 2:11 Sew on a button 4:17 Single ribbon stitches 1:16, 4:21 Single stitch program 4:11 Smocking stitches 1:15 Software version 3:5 Special sewing techniques 4:20 Speed control 1:8, 3:6, 4:6 Speed control symbol 4:2 Spool cap 1:10, 2:4 Spool pins 2:4 Auxiliary spool pin 2:4 Horizontal position 2:4 Main spool pin 2:4 Vertical position 2:4 Spring foot free-motion 4:8 Stacking stitches 1:16, 4:21 Stabilizer recommended 4:2 Stabilizers 2:11 Standard presser foot with IDT™ system 0A 1:11 Start/stop...
... program 4:11 Sewing settings 3:4 Sewing techniques 4:13 Sewing thread 2:11 Sew on a button 4:17 Single ribbon stitches 1:16, 4:21 Single stitch program 4:11 Smocking stitches 1:15 Software version 3:5 Special sewing techniques 4:20 Speed control 1:8, 3:6, 4:6 Speed control symbol 4:2 Spool cap 1:10, 2:4 Spool pins 2:4 Auxiliary spool pin 2:4 Horizontal position 2:4 Main spool pin 2:4 Vertical position 2:4 Spring foot free-motion 4:8 Stacking stitches 1:16, 4:21 Stabilizer recommended 4:2 Stabilizers 2:11 Standard presser foot with IDT™ system 0A 1:11 Start/stop...


