

Owner's Manual
Page 1
A Hobbymatic 800., 801, 802, 803, 806, 807 instruction book
A Hobbymatic 800., 801, 802, 803, 806, 807 instruction book

Owner's Manual
Page 5
On models 800, 802 and 806 place it on the bed plate, and on both sides of the hinge catches properly in its original position. Removing the carrying case cover Open the hinges on models 801, 803 and 807 push it into the free arm. 7 -/ 800,802,806 4/- J 1 Foot control receptacle Remove this proce dure, making sure the bottom of the cover (G), move them back up (H) and then remove the cover (I). Before putting the machine away after sewing replace the receptacle in the slot. To replace the cover, reverse this receptacle from the machine for sewing.
On models 800, 802 and 806 place it on the bed plate, and on both sides of the hinge catches properly in its original position. Removing the carrying case cover Open the hinges on models 801, 803 and 807 push it into the free arm. 7 -/ 800,802,806 4/- J 1 Foot control receptacle Remove this proce dure, making sure the bottom of the cover (G), move them back up (H) and then remove the cover (I). Before putting the machine away after sewing replace the receptacle in the slot. To replace the cover, reverse this receptacle from the machine for sewing.

Owner's Manual
Page 15
Utility stitches, models 802-807 A Straight stitch B Zigzag stitch C Elastic stItch D Blindstitch E Elastic decorative stitch F Shell-edge stitch Models 802 and 803 have utility stitches A to D. Stretch stitches, models 806, 807 A Elastic triple straight stitch B Elastic triple zigzag stitch C Honeycomb stitch D Pullover stitch E Feather stitq\h F Overlock stitch 4 A A B AAAAAAA/ C i)\/\i\i\I\/\i I V V V VU V V AAA B AVAVN C E F F I 11
Utility stitches, models 802-807 A Straight stitch B Zigzag stitch C Elastic stItch D Blindstitch E Elastic decorative stitch F Shell-edge stitch Models 802 and 803 have utility stitches A to D. Stretch stitches, models 806, 807 A Elastic triple straight stitch B Elastic triple zigzag stitch C Honeycomb stitch D Pullover stitch E Feather stitq\h F Overlock stitch 4 A A B AAAAAAA/ C i)\/\i\i\I\/\i I V V V VU V V AAA B AVAVN C E F F I 11
Owner's Manual
Page 22
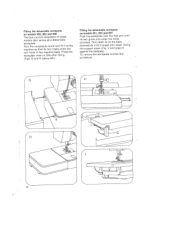
... in the machine base. I) and press it to the machine so that its two guide pins enter the holes provided. Turn catch G on models 601, 803 and 807 Push the workplate over the free arm until it snaps into place. Swing the support down a little after fitting. (Figs. Fitting the detachable...
... in the machine base. I) and press it to the machine so that its two guide pins enter the holes provided. Turn catch G on models 601, 803 and 807 Push the workplate over the free arm until it snaps into place. Swing the support down a little after fitting. (Figs. Fitting the detachable...
Owner's Manual
Page 23
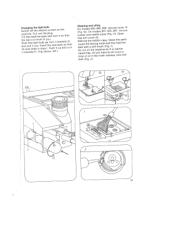
... electric current to the machine. Insert the new its pins slide in front of you. H>. On models 801, screws and needle plate remove cover 15 803, 807: remove (Fig. Tilt the machine back and turn it so that turn it and pull it towards H. (Fig. Push it out. J). 19 Clean round...
... electric current to the machine. Insert the new its pins slide in front of you. H>. On models 801, screws and needle plate remove cover 15 803, 807: remove (Fig. Tilt the machine back and turn it so that turn it and pull it towards H. (Fig. Push it out. J). 19 Clean round...
