
Owner's Manual
Page 4
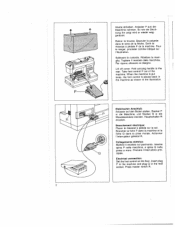
... die Wandsteckdose stecken. Insert plug P in the machine and plug 0 in the wall socket. Press master switch R. 2 Sollevare Ia custodia. Per riporre attenersi al disegno. Hauptschalter R drücken. Inserire spina P nella macchina, e spina 0 nella presa a muro. Electrical connection: Set the foot control on the floor. Take foot control P out of the machine. Lift off cover. Retirer Ia housse...
... die Wandsteckdose stecken. Insert plug P in the machine and plug 0 in the wall socket. Press master switch R. 2 Sollevare Ia custodia. Per riporre attenersi al disegno. Hauptschalter R drücken. Inserire spina P nella macchina, e spina 0 nella presa a muro. Electrical connection: Set the foot control on the floor. Take foot control P out of the machine. Lift off cover. Retirer Ia housse...

Owner's Manual
Page 10
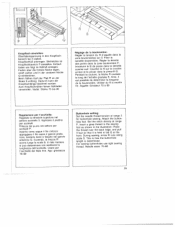
...;gères saccades ascendantes. Checking the bobbin thread tension: With a brief, sharp upward movement of your hand, the bobbin must gradually slip downwards. (Turn screw P counter clockwise for a weaker tension, or clock wise for a tighter tension.) • Spulenkapsel einsetzen: Hauptschal ter 8 ausschalten. L'aper tura S deve essere rivolta verso l'alto. • Inserting the bobbin case: Switch off master switch 8. Deve abbassarsi...
...;gères saccades ascendantes. Checking the bobbin thread tension: With a brief, sharp upward movement of your hand, the bobbin must gradually slip downwards. (Turn screw P counter clockwise for a weaker tension, or clock wise for a tighter tension.) • Spulenkapsel einsetzen: Hauptschal ter 8 ausschalten. L'aper tura S deve essere rivolta verso l'alto. • Inserting the bobbin case: Switch off master switch 8. Deve abbassarsi...

Owner's Manual
Page 12
Girare it fib inferiore in posizione superiore. Turn the hand wheel towards the right under the sewing foot (approx 10 cm). Les taisser dépasser d'environ 10cm. Fermer be pied presseur. Unterfaden heraufholen: Oberfaden ...free-arm cover 19. 10 a Remonter le fit de canette 'aide du fit d'aiguille. Ober- Mit dem Oberfaden den Unterfaden nach oben ziehen. und Unterfaden nach rechts unter den Nähfub3 tegen (etwa 10cm). Place both threads towards you and sew a stitch until both needle and take-up lever are posi tioned up the bobbin thread: Hold the needle thread...
Girare it fib inferiore in posizione superiore. Turn the hand wheel towards the right under the sewing foot (approx 10 cm). Les taisser dépasser d'environ 10cm. Fermer be pied presseur. Unterfaden heraufholen: Oberfaden ...free-arm cover 19. 10 a Remonter le fit de canette 'aide du fit d'aiguille. Ober- Mit dem Oberfaden den Unterfaden nach oben ziehen. und Unterfaden nach rechts unter den Nähfub3 tegen (etwa 10cm). Place both threads towards you and sew a stitch until both needle and take-up lever are posi tioned up the bobbin thread: Hold the needle thread...

Owner's Manual
Page 17
As long as you hold this button the machine sews back wards. 15 La cucitura iridietro Premere ii tasto 23. La machine coud en arrière aussi longtemps que a touche est maintenue en bas. Reverse sewing Press button 23. RUckwärtsnähen Die Taste 23 niederdrücken. Couture en marche arrière Abaisser Ia touche 23. Finchè II tasto rimane premuto Ia macchina cuce indietro. Solange die Taste gedruckt wird, nãht die Maschine rückwärts.
As long as you hold this button the machine sews back wards. 15 La cucitura iridietro Premere ii tasto 23. La machine coud en arrière aussi longtemps que a touche est maintenue en bas. Reverse sewing Press button 23. RUckwärtsnähen Die Taste 23 niederdrücken. Couture en marche arrière Abaisser Ia touche 23. Finchè II tasto rimane premuto Ia macchina cuce indietro. Solange die Taste gedruckt wird, nãht die Maschine rückwärts.

Owner's Manual
Page 22
... lago nuovo (parte piatta del fusto verso dietro) completamente in sü. le déplacer vers Q pour a couture. Push the dropfeed control toward R (feed dog dropped) or toward 0 (sewing position). 20 Take out the needle. Tighten the screw. Dropping the feed dog Open free arm cover 19. Push the needle (with its flat...ganz nach oben schieben. Sostituzione dell'ago • (sistema 130/705 H): Disinserire l'interruttore principale 8. Changing the needle • (System 130/705 H): Switch off master switch 8. Fissare a vite. Remplacement de I'aiguille • (système...
... lago nuovo (parte piatta del fusto verso dietro) completamente in sü. le déplacer vers Q pour a couture. Push the dropfeed control toward R (feed dog dropped) or toward 0 (sewing position). 20 Take out the needle. Tighten the screw. Dropping the feed dog Open free arm cover 19. Push the needle (with its flat...ganz nach oben schieben. Sostituzione dell'ago • (sistema 130/705 H): Disinserire l'interruttore principale 8. Changing the needle • (System 130/705 H): Switch off master switch 8. Fissare a vite. Remplacement de I'aiguille • (système...
Owner's Manual
Page 30
...the terminal which is marked with the letter N or coloured black. Please note When a 13-ampere plug is used a 3-ampere fuse has to be fitted. 28 Safety rules valid for the united Kingdom only The wires in ...this mains lead are coloured according to the following code: Blue: Neutral Brown: Live As the colours of the wires in the mains lead of this appliance ...may not corre spond with the colour coding of the ter minals in your plug, proceed as follows: the wire which is coloured blue must ...
...the terminal which is marked with the letter N or coloured black. Please note When a 13-ampere plug is used a 3-ampere fuse has to be fitted. 28 Safety rules valid for the united Kingdom only The wires in ...this mains lead are coloured according to the following code: Blue: Neutral Brown: Live As the colours of the wires in the mains lead of this appliance ...may not corre spond with the colour coding of the ter minals in your plug, proceed as follows: the wire which is coloured blue must ...
Owner's Manual
Page 31
... filato fine. Set the stitch density at range 3 for buttonhole sewing. During sewing, arrow R runs along scale S. This is how the buttonhole length is held in den Knopfloch bereich bei 3 stellen. Needle sizes: 70-80 29 Fixer Ia semelle boutonniere. In tale rnaniera si puo deterrninare con esattezza Ia lunghezza delI'occhielbo. Usare per occhielti P. Insert a girnp thread in the sewing toot as...
... filato fine. Set the stitch density at range 3 for buttonhole sewing. During sewing, arrow R runs along scale S. This is how the buttonhole length is held in den Knopfloch bereich bei 3 stellen. Needle sizes: 70-80 29 Fixer Ia semelle boutonniere. In tale rnaniera si puo deterrninare con esattezza Ia lunghezza delI'occhielbo. Usare per occhielti P. Insert a girnp thread in the sewing toot as...

Owner's Manual
Page 35
... su F. Sewing on buttons Sewing foot: Without sewing foot or with stems (for large buttons in the location marked beforehand and push it under the sewing foot holder. Set stitch pattern thumb wheel 22 at D and sew a number of securing stitches (1). Set stitch pattern thumb wheel at F. Lower the sewing foot (2). Pull the needle and bobbin threads through (3). Far penetrare 'ago nel foro a destra. Abbassare il piedino (2). Lower the needle into the right hole of the button when the...
... su F. Sewing on buttons Sewing foot: Without sewing foot or with stems (for large buttons in the location marked beforehand and push it under the sewing foot holder. Set stitch pattern thumb wheel 22 at D and sew a number of securing stitches (1). Set stitch pattern thumb wheel at F. Lower the sewing foot (2). Pull the needle and bobbin threads through (3). Far penetrare 'ago nel foro a destra. Abbassare il piedino (2). Lower the needle into the right hole of the button when the...

Owner's Manual
Page 39
Changing the bulb • Pull out the mains plug. Fuhrungslineal etwas schrag in giü il porta lampade e tenerlo fermo. Die Glühlampe hoch drücken, ... testa della macchina. Insert the new bulb so that the pins enter slots R, push the bulb upwards and turn it fast. GlUhlampe auswechseln • Netzstecker ziehen. Descendre et maintenir le bol tier de Ia lampe. Placer le guide-bord de facon oblique dans louverture S sur Ia tête de Ia machine. Spingere Ia lampadina in direction P and pull...
Changing the bulb • Pull out the mains plug. Fuhrungslineal etwas schrag in giü il porta lampade e tenerlo fermo. Die Glühlampe hoch drücken, ... testa della macchina. Insert the new bulb so that the pins enter slots R, push the bulb upwards and turn it fast. GlUhlampe auswechseln • Netzstecker ziehen. Descendre et maintenir le bol tier de Ia lampe. Placer le guide-bord de facon oblique dans louverture S sur Ia tête de Ia machine. Spingere Ia lampadina in direction P and pull...

Owner's Manual
Page 42
...Pin the overlapping edge along the edge of the fabric (Fig. Attach the edge guide and position it for the desired seam margin so that its teeth are still visible. Aprire a cerniera. Shortly before the end of the seam leave the needle down in the fabric, raise the zipper foot and close the zip. Close the zip. R). Lower the zipper foot and finish sewing the seam... direzione della cucitura. Baste the closed zip to the underside and stitch it down in the fabric, raise the zipper foot, open the zip, lower the zipper foot again and finish sewing the seam. Fissare ii bordo ...
...Pin the overlapping edge along the edge of the fabric (Fig. Attach the edge guide and position it for the desired seam margin so that its teeth are still visible. Aprire a cerniera. Shortly before the end of the seam leave the needle down in the fabric, raise the zipper foot and close the zip. Close the zip. R). Lower the zipper foot and finish sewing the seam... direzione della cucitura. Baste the closed zip to the underside and stitch it down in the fabric, raise the zipper foot, open the zip, lower the zipper foot again and finish sewing the seam. Fissare ii bordo ...

Owner's Manual
Page 54
... point Universal needle for delicate stretch and knitted fabrics. Particularly suitable for fine-meshed synthetics, fine linen, chiffon, batiste, organdy, woolens, velvet, fancy seams and embroidery work. Hemstitching point Attractive hemstitching on heavily dressed materials, organdy and glass cambric. Narrow wedge point with buttonhole silk or No. 30/3 synthetic thread. .- -( - Coarse knitted fabrics, Lastex, double jersey fabrics, Quiana and Simplex. -- Light ball...
... point Universal needle for delicate stretch and knitted fabrics. Particularly suitable for fine-meshed synthetics, fine linen, chiffon, batiste, organdy, woolens, velvet, fancy seams and embroidery work. Hemstitching point Attractive hemstitching on heavily dressed materials, organdy and glass cambric. Narrow wedge point with buttonhole silk or No. 30/3 synthetic thread. .- -( - Coarse knitted fabrics, Lastex, double jersey fabrics, Quiana and Simplex. -- Light ball...

Owner's Manual
Page 55
... Medium-wide cording Wide cording Extra wide cording Extra-wide cording Decorative designs sewn with twin needles Before you start sewing, turn the handwheel and check to make sure the needles stitch into the fabric properly. In this way, needle breakage can be largely prevented. Stitch length 130/705 H-ZWI 80 130/705 H-ZWI 80 90 100 2.5mm 2.5mm 2.5 mm 2.5 mm 3.0mm Stitch width - - - - - Decorative and zigzag patterns 130...
... Medium-wide cording Wide cording Extra wide cording Extra-wide cording Decorative designs sewn with twin needles Before you start sewing, turn the handwheel and check to make sure the needles stitch into the fabric properly. In this way, needle breakage can be largely prevented. Stitch length 130/705 H-ZWI 80 130/705 H-ZWI 80 90 100 2.5mm 2.5mm 2.5 mm 2.5 mm 3.0mm Stitch width - - - - - Decorative and zigzag patterns 130...
Owner's Manual
Page 62
Machine skips stitches Needle not inserted correctly. Needle bent or blunt. Needle too thin for thread used . Needle too thin or too thick. Bobbin case improperly inserted. 4. Seam is pushed or pulled. Thread too thick, knotty or hard. Use thicker needle. Only guide the material lightly. Thread machine properly and check both tensions. 60 Needle bent and strikes needle plate because work alone. See Needle Chart. Kinks appear on top and bottom of the above . Remedy: Push...
Machine skips stitches Needle not inserted correctly. Needle bent or blunt. Needle too thin for thread used . Needle too thin or too thick. Bobbin case improperly inserted. 4. Seam is pushed or pulled. Thread too thick, knotty or hard. Use thicker needle. Only guide the material lightly. Thread machine properly and check both tensions. 60 Needle bent and strikes needle plate because work alone. See Needle Chart. Kinks appear on top and bottom of the above . Remedy: Push...

Owner's Manual
Page 63
... children are around. 61 This is a piece of fabric under the sewing foot. Remove thread ends and put a drop of feed dog. Machine runs with difficulty Thread ends in hook raceway. Remove needle plate and clean out lint. If you leave the machine, even for a short while, be sure to the left. 6. Cause: Remedy: 5. Feed dog dropped. (Drop-feed control is at all Lint has accumulated between tooth rows of oil into hook raceway. 7.
... children are around. 61 This is a piece of fabric under the sewing foot. Remove thread ends and put a drop of feed dog. Machine runs with difficulty Thread ends in hook raceway. Remove needle plate and clean out lint. If you leave the machine, even for a short while, be sure to the left. 6. Cause: Remedy: 5. Feed dog dropped. (Drop-feed control is at all Lint has accumulated between tooth rows of oil into hook raceway. 7.
Owner's Manual
Page 70
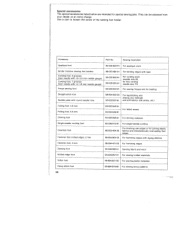
... screw of the sewing foot holder. Accessory Part No. Sewing Operation Appliqué toot 93-035920-91 For appliqué work j Binder (remove sewing toot holder) 98-053484-91 For binding edges with tape Cording toot, 5 grooves (twin needle with 1,8-2.5 mm needle gauge) Cording toot, 7 grooves (twin needle with 1.4-1.8 mm needle gauge) 93-035950-91 303595391 For cording work (needle size 80, for fine cording needle size 70) Fringe sewing foot 93-035943-91 For sewing tringes and for basting Straight-stitch toot Needle plate with round needle hole...
... screw of the sewing foot holder. Accessory Part No. Sewing Operation Appliqué toot 93-035920-91 For appliqué work j Binder (remove sewing toot holder) 98-053484-91 For binding edges with tape Cording toot, 5 grooves (twin needle with 1,8-2.5 mm needle gauge) Cording toot, 7 grooves (twin needle with 1.4-1.8 mm needle gauge) 93-035950-91 303595391 For cording work (needle size 80, for fine cording needle size 70) Fringe sewing foot 93-035943-91 For sewing tringes and for basting Straight-stitch toot Needle plate with round needle hole...


