

Owner's Manual
Page 3
...or dropped into water. Never operate this sewing machine if it has a damaged cord or plug, if it is required around the sewing machine needle. 12. To disconnect, turn all moving parts. DANGER To reduce the risk of burns fire electric shocks or injury to persons 1: 1. Never... operate the sewing machine with same type rated 15 Watts. 3. To unplug, hold the plug, not the cord. 11. Always use needles recommended by the manufacturer as contained in this sewing machine. Always unplug before cleaning. 2. Do not allow plug to the nearest authorized dealer or ...
...or dropped into water. Never operate this sewing machine if it has a damaged cord or plug, if it is required around the sewing machine needle. 12. To disconnect, turn all moving parts. DANGER To reduce the risk of burns fire electric shocks or injury to persons 1: 1. Never... operate the sewing machine with same type rated 15 Watts. 3. To unplug, hold the plug, not the cord. 11. Always use needles recommended by the manufacturer as contained in this sewing machine. Always unplug before cleaning. 2. Do not allow plug to the nearest authorized dealer or ...

Owner's Manual
Page 4
...risk of our qualified service staff. 11. Be sure to clean the housing. 2 Ir it is 15 Watts. it is free of the needle and keep the sewing Environment The recommended environment is wet, e.g. there is a high-quality electro mechanical appliance; There are no parts in side... put into operation as petrol (gas) or thin chemicals to use the sewing machine if: - its cord. 9. Do not use only original PFAFF parts. To remove any liability for the dust, severe dampness, direct sunlight, sta tic electricity, heat-producing objects, corro sive chemicals or liquids....
...risk of our qualified service staff. 11. Be sure to clean the housing. 2 Ir it is 15 Watts. it is free of the needle and keep the sewing Environment The recommended environment is wet, e.g. there is a high-quality electro mechanical appliance; There are no parts in side... put into operation as petrol (gas) or thin chemicals to use the sewing machine if: - its cord. 9. Do not use only original PFAFF parts. To remove any liability for the dust, severe dampness, direct sunlight, sta tic electricity, heat-producing objects, corro sive chemicals or liquids....

Owner's Manual
Page 5
...• Pin placement 33 • Securing the thread chain 33 • Applying elastic 34 • How to remove and insert needle 8 • To remove needle (s) 8 • To insert needle (s) 8 9. Relationship between cloth, thread and needle 39 25. Specification 45 3 Principal parts behind looper cover 6 6. How to reinforce a seam 35 • Braiding by chaining off... safety stitch 19 • Wide 3 thread overlock stitch 19 a Narrow 3 thread overlock stitch 19 14. Seam guide lines 24 19. Preparation prior to sewing 6 7. Needle information 4 3.
...• Pin placement 33 • Securing the thread chain 33 • Applying elastic 34 • How to remove and insert needle 8 • To remove needle (s) 8 • To insert needle (s) 8 9. Relationship between cloth, thread and needle 39 25. Specification 45 3 Principal parts behind looper cover 6 6. How to reinforce a seam 35 • Braiding by chaining off... safety stitch 19 • Wide 3 thread overlock stitch 19 a Narrow 3 thread overlock stitch 19 14. Seam guide lines 24 19. Preparation prior to sewing 6 7. Needle information 4 3.

Owner's Manual
Page 6
... eliminates the flat shank possibility industrial needle of inserting the needle backwards. * Do not attempt to use sewing machine needle of a standard any size or household type in this overlock. #2054 Overlock needle * ms(te2yaw0pce5ihns4ign-a0nere6.ewe)adoRvlveaeaerginel#...the Regular Point wovens #2054-42 10 Sizes 12 available I__________ Ball Point knits #2054-06 10 12 4 ACCESSORIES ( ( Needle set Screwdriver (sheet metal) 1 Sciewdiver (small si7e) ® © Tweezers Rolled hemming throat plate © Hex-head...
... eliminates the flat shank possibility industrial needle of inserting the needle backwards. * Do not attempt to use sewing machine needle of a standard any size or household type in this overlock. #2054 Overlock needle * ms(te2yaw0pce5ihns4ign-a0nere6.ewe)adoRvlveaeaerginel#...the Regular Point wovens #2054-42 10 Sizes 12 available I__________ Ball Point knits #2054-06 10 12 4 ACCESSORIES ( ( Needle set Screwdriver (sheet metal) 1 Sciewdiver (small si7e) ® © Tweezers Rolled hemming throat plate © Hex-head...

Owner's Manual
Page 7
PRINCIPAL PARTS Thread guides and holder © Handle Pressure regulating screw Left needle thread tension dial (blue) ® Right needle thread tension dial (green) © Upper looper thread tension dial (orange) © Lower looper thread tension dial (yellow) ® Throat plate ® Cylinder cover Cloth plate © Looper cover © Power & light switch © Stitch length dial © Hand wheel © Motor cover ® Spool stand © Cone adapter ® Spool pin 5 3.
PRINCIPAL PARTS Thread guides and holder © Handle Pressure regulating screw Left needle thread tension dial (blue) ® Right needle thread tension dial (green) © Upper looper thread tension dial (orange) © Lower looper thread tension dial (yellow) ® Throat plate ® Cylinder cover Cloth plate © Looper cover © Power & light switch © Stitch length dial © Hand wheel © Motor cover ® Spool stand © Cone adapter ® Spool pin 5 3.

Owner's Manual
Page 10
... plate it will be slightly higher than the right needle ®. * Securely tighten the needle set screw © - * Remove the needle(s). • TO INSERT NEEDLE (S) * Hold the needle with the small screwdriver. - HOW TO REMOVE AND INSERT NEEDLES • TO REMOVE NEEDLE (S) * Be sure to the rear 1? left needle ® will go. 8. Note: * This page machine uses 4 for...
... plate it will be slightly higher than the right needle ®. * Securely tighten the needle set screw © - * Remove the needle(s). • TO INSERT NEEDLE (S) * Hold the needle with the small screwdriver. - HOW TO REMOVE AND INSERT NEEDLES • TO REMOVE NEEDLE (S) * Be sure to the rear 1? left needle ® will go. 8. Note: * This page machine uses 4 for...
Owner's Manual
Page 12
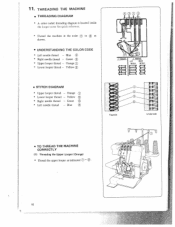
... Blue - Green * Upper looper thread Orange ® * Lower looper thread - Blue ® * Right needle thread - Yellow © * Right needle thread - THREADING THE MACHINE r • THREADING DIAGRAM * A color coded threading diagram is located inside the loopei cover for quick refcrcnce. * Thread the machine in the ... Topside • TO THREAD THE MACHINE CORRECTLY (1) Threading the Upper Looper (Orange) * Thread the upper looper as shown. • UNDERSTANDING THE COLOR CODE ® * Left needle thread - Yellow © • STITCH DIAGRAM * Upper looper thread - 11.
... Blue - Green * Upper looper thread Orange ® * Lower looper thread - Blue ® * Right needle thread - Yellow © * Right needle thread - THREADING THE MACHINE r • THREADING DIAGRAM * A color coded threading diagram is located inside the loopei cover for quick refcrcnce. * Thread the machine in the ... Topside • TO THREAD THE MACHINE CORRECTLY (1) Threading the Upper Looper (Orange) * Thread the upper looper as shown. • UNDERSTANDING THE COLOR CODE ® * Left needle thread - Yellow © • STITCH DIAGRAM * Upper looper thread - 11.

Owner's Manual
Page 16
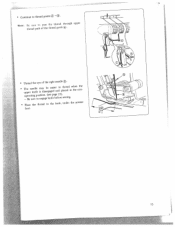
I I * Thread the right needle as indicated (iJ--®. . 1- • - \ L_-4 -- - * Pass thread from back to the front through the thread guide D * Pass thread through hole ® from front to back, then to the front through right slot as shown. * While holding thread with finger, pass it between the tension discs and pull thread down to make certain it is properly located in between the tension discs. (3) Threading the Right Needle (Green) I A 14
I I * Thread the right needle as indicated (iJ--®. . 1- • - \ L_-4 -- - * Pass thread from back to the front through the thread guide D * Pass thread through hole ® from front to back, then to the front through right slot as shown. * While holding thread with finger, pass it between the tension discs and pull thread down to make certain it is properly located in between the tension discs. (3) Threading the Right Needle (Green) I A 14
Owner's Manual
Page 17
upper * Thread the eye of the the thread through thread guide(). * Continue to the back, under the presser foot. 15 L Note: Be sure to thread path pass of the right needle ®. * TuophpepeBerearntsieuknerngdeilfpeetoosimesintaigdoyainsg.eebn(egskeaneegifaepesdaiegbraeenf2odto3re)p.ltsahecrweeidandgi.nwthheen the non - * Place the thread to thread points® -®.
upper * Thread the eye of the the thread through thread guide(). * Continue to the back, under the presser foot. 15 L Note: Be sure to thread path pass of the right needle ®. * TuophpepeBerearntsieuknerngdeilfpeetoosimesintaigdoyainsg.eebn(egskeaneegifaepesdaiegbraeenf2odto3re)p.ltsahecrweeidandgi.nwthheen the non - * Place the thread to thread points® -®.

Owner's Manual
Page 18
J 16 (. (4) Threading the Left Needle (Blue) I * Thread the left needle as indicated * Pass thread from back to the front through the thread guide * Pass thread through hole from front to back, then to the front through right slot as shown. °Tfl * While holding thread with finger, pass it between the tension discs and pull thread down to make certain it is properly located in between the tension discs.
J 16 (. (4) Threading the Left Needle (Blue) I * Thread the left needle as indicated * Pass thread from back to the front through the thread guide * Pass thread through hole from front to back, then to the front through right slot as shown. °Tfl * While holding thread with finger, pass it between the tension discs and pull thread down to make certain it is properly located in between the tension discs.

Owner's Manual
Page 19
Be sure to engage knife before sewing. * Place the thread to the back, under the presser foot. • IMPORTANT THREADiNG INFORMATION * Always thread the needle(s) last to thread when the upper knife is disengaged and placed in the non operating position (see page 17). - Note: Be sure to pass the ...thread through lower thread path of the thread guideC. * Thread the eye of the left needle. ® * The needle may be easier to prevent mis I threading the lower looper. * If the lower looper should come unthreaded. 1) Unthread the...
Be sure to engage knife before sewing. * Place the thread to the back, under the presser foot. • IMPORTANT THREADiNG INFORMATION * Always thread the needle(s) last to thread when the upper knife is disengaged and placed in the non operating position (see page 17). - Note: Be sure to pass the ...thread through lower thread path of the thread guideC. * Thread the eye of the left needle. ® * The needle may be easier to prevent mis I threading the lower looper. * If the lower looper should come unthreaded. 1) Unthread the...

Owner's Manual
Page 20
... wheel toward you have rethreaded the machine always chain off and sew a test sample to test tensions and make adjustments as this may deflect the needle, causing it to break. * At the end of the sample, continue to start the thread chain. * Lower presser foot. * Continue holding the chain and press...
... wheel toward you have rethreaded the machine always chain off and sew a test sample to test tensions and make adjustments as this may deflect the needle, causing it to break. * At the end of the sample, continue to start the thread chain. * Lower presser foot. * Continue holding the chain and press...

Owner's Manual
Page 21
... (7/32 inch) three-thread stitch is sewn. 4 • NARROW 3 THREAD OVERLOCK STITCH * When the left needle stitch width can be made in - 13. The left needle is removed a narrow 3.5mm (9/64 inch) wide three-thread stitch is a four-thread overlock that Adjustments be ... in no greater than half a number at a time. 2) Sew a test sample after each adjustment. .4 S Current Setting is 1) recommended that uses two needles and two loopers to 7.2mm (9/3 2inch), - turn adjustment. 19 creased from 3.5mm (9/64inch) to 1 or 2 for Y2 turn system. BASIC STITCH TYPES...
... (7/32 inch) three-thread stitch is sewn. 4 • NARROW 3 THREAD OVERLOCK STITCH * When the left needle stitch width can be made in - 13. The left needle is removed a narrow 3.5mm (9/64 inch) wide three-thread stitch is a four-thread overlock that Adjustments be ... in no greater than half a number at a time. 2) Sew a test sample after each adjustment. .4 S Current Setting is 1) recommended that uses two needles and two loopers to 7.2mm (9/3 2inch), - turn adjustment. 19 creased from 3.5mm (9/64inch) to 1 or 2 for Y2 turn system. BASIC STITCH TYPES...

Owner's Manual
Page 22
... OVERLOCK MOCK SAFETY STITCH Note: * These are suggested tension settings only. * Tension settings are effected by 1) Type and thickness of fabric 2) Needle size 3) Size, type and fiber content of thread • CORRECT BALANCE OF THE 4 THREAD OVER LOCK MOCK SAFETY STITCH Light weight Tension Dial...looper thread tension dial (yellow) toward a higher number Or turn lower looper thread tension dial (yel - Turn the left needle thread tension is too loose Turn the right needle thread tension dial - (green) toward a higher number. low) to a higher number Or turn the upper looper thread ...
... OVERLOCK MOCK SAFETY STITCH Note: * These are suggested tension settings only. * Tension settings are effected by 1) Type and thickness of fabric 2) Needle size 3) Size, type and fiber content of thread • CORRECT BALANCE OF THE 4 THREAD OVER LOCK MOCK SAFETY STITCH Light weight Tension Dial...looper thread tension dial (yellow) toward a higher number Or turn lower looper thread tension dial (yel - Turn the left needle thread tension is too loose Turn the right needle thread tension dial - (green) toward a higher number. low) to a higher number Or turn the upper looper thread ...

Owner's Manual
Page 23
...dial - (orange) to a lower number. * When needle the needle thread tension dial (blue is too loose, or green) to a lower number. Or, turn to a the higher lower number. Needle Topside Needle thread b00 Topside Lower looper thread L9Werloper Underside - Topside Underside... TENSION SETTINGS FOR THE 3 THREAD OVER LOCK STITCH Note: * These are suggested tension settings only. * T1e) nsTioynpeseattnindgtshiacrkeneefsfsecotfedfabbyric 2) 3) Needle size Size, type and fiber content of the fabric Turn the upper looper thread tension dial I - (orange) Or turn the ...
...dial - (orange) to a lower number. * When needle the needle thread tension dial (blue is too loose, or green) to a lower number. Or, turn to a the higher lower number. Needle Topside Needle thread b00 Topside Lower looper thread L9Werloper Underside - Topside Underside... TENSION SETTINGS FOR THE 3 THREAD OVER LOCK STITCH Note: * These are suggested tension settings only. * T1e) nsTioynpeseattnindgtshiacrkeneefsfsecotfedfabbyric 2) 3) Needle size Size, type and fiber content of the fabric Turn the upper looper thread tension dial I - (orange) Or turn the ...

Owner's Manual
Page 25
... IN * Be sure the machine is in the up position * Turn the hand wheel toward you until the knife clears the top of the the needle, needle. Note: If the knife stops in front of the machine. * Continue to rotate the knife to the horizontal position. 23 J 17. * Pull the... threads through the needle. * Return tension dials to previous settings. 16. HOW TO ADJUST THE STITCH LENGTH * The stitch (7/64 inch) length setting dial for tangles or looping ...
... IN * Be sure the machine is in the up position * Turn the hand wheel toward you until the knife clears the top of the the needle, needle. Note: If the knife stops in front of the machine. * Continue to rotate the knife to the horizontal position. 23 J 17. * Pull the... threads through the needle. * Return tension dials to previous settings. 16. HOW TO ADJUST THE STITCH LENGTH * The stitch (7/64 inch) length setting dial for tangles or looping ...

Owner's Manual
Page 26
Note: All lines are 2.0mm (5/64 inch) apart. 24 Caution: Always close looper cover before operating machine. 18. • TO PLACE MOVABLE KNIFE IN WORKING POSITION * Open looper cover and push the movable knife [ holder to the right as far as it will go. * Turn the knob up and toward you until the knife clicks into the operating position. SEAM GUIDE LINES * When the left needle is inserted, the thick line on the left of the looper cover is 16.0mm (5/8 inch). * When sewing with the right needle, the thick line on the left of the looper cover is 14.0mm (35/64 inch).
Note: All lines are 2.0mm (5/64 inch) apart. 24 Caution: Always close looper cover before operating machine. 18. • TO PLACE MOVABLE KNIFE IN WORKING POSITION * Open looper cover and push the movable knife [ holder to the right as far as it will go. * Turn the knob up and toward you until the knife clicks into the operating position. SEAM GUIDE LINES * When the left needle is inserted, the thick line on the left of the looper cover is 16.0mm (5/8 inch). * When sewing with the right needle, the thick line on the left of the looper cover is 14.0mm (35/64 inch).

Owner's Manual
Page 27
... HOW TO ADJUST THE OVEREDGE SEAM WIDTH * The and machine is needle position set screws. (3) * Replace the cylinder cover (page 9). * Return the movable knife to its original position (page 24). * Test sew pensate and for adjust tensions ... provided in the accesso ries. (1) * Move the stationary knife holder increase the stitch width, or to the to the left sew the four-thread stitch needle position stitch at a width of 5.7mm (7/32 inch). * The machine is set to three-thread left to right to decrease the stitch width. * Be sure...
... HOW TO ADJUST THE OVEREDGE SEAM WIDTH * The and machine is needle position set screws. (3) * Replace the cylinder cover (page 9). * Return the movable knife to its original position (page 24). * Test sew pensate and for adjust tensions ... provided in the accesso ries. (1) * Move the stationary knife holder increase the stitch width, or to the to the left sew the four-thread stitch needle position stitch at a width of 5.7mm (7/32 inch). * The machine is set to three-thread left to right to decrease the stitch width. * Be sure...

Owner's Manual
Page 28
.... 0 MACHINE SET UP * Be sure the machine is disconnected from the power source. * Remove the left needle. * Insert a #2054 size #10 or #14 needle in the right needle position. * Turn the hand wheel toward you until the needle is at its highest position. * Unscrew the throat plate 3crew. 1F * Install careful the not rolled...
.... 0 MACHINE SET UP * Be sure the machine is disconnected from the power source. * Remove the left needle. * Insert a #2054 size #10 or #14 needle in the right needle position. * Turn the hand wheel toward you until the needle is at its highest position. * Unscrew the throat plate 3crew. 1F * Install careful the not rolled...

Owner's Manual
Page 29
...-thread overlock stitch (page 21). For a beautiful rolled hem thread the upper looper with wooly nylon and the needle and I lower loopet with lightweight regular thread. Topside Blue Tension Dial Green Orange Yellow 3.5 1 5.5 Needle thread Upper looper thread : Topside Low looper Underside 27 i • HOW TO BALANCE THE UPPER LOOPER THREAD WRAPPED...
...-thread overlock stitch (page 21). For a beautiful rolled hem thread the upper looper with wooly nylon and the needle and I lower loopet with lightweight regular thread. Topside Blue Tension Dial Green Orange Yellow 3.5 1 5.5 Needle thread Upper looper thread : Topside Low looper Underside 27 i • HOW TO BALANCE THE UPPER LOOPER THREAD WRAPPED...


