
Owner's Manual
Page 1
hobby lock MADE FOR PFAFF OPERATING I NSTRUCTION I I I HL-604
hobby lock MADE FOR PFAFF OPERATING I NSTRUCTION I I I HL-604
Owner's Manual
Page 2
... looper cover 3 7. Test sewing 5 9. Presser toot pressure 7 12. Specification 15 20. Lubrication 3 6. Types of poor sewing and its solution 14 18. Replacing needles 11 1 5. Packing details 15 21.Accessories 16 CONTENTS i.Parts name 1 2. Drive belt tension 3 5. Causes of seam and their applications 8 Folding back the upper knife 8 Disengaging the overlock looper 9 Interchanging the upper knife guard and welt guide 9 1 3, Adjusting stitch length 10 14. Variation of weight of fabric, threads and stitch length 15...
... looper cover 3 7. Test sewing 5 9. Presser toot pressure 7 12. Specification 15 20. Lubrication 3 6. Types of poor sewing and its solution 14 18. Replacing needles 11 1 5. Packing details 15 21.Accessories 16 CONTENTS i.Parts name 1 2. Drive belt tension 3 5. Causes of seam and their applications 8 Folding back the upper knife 8 Disengaging the overlock looper 9 Interchanging the upper knife guard and welt guide 9 1 3, Adjusting stitch length 10 14. Variation of weight of fabric, threads and stitch length 15...
Owner's Manual
Page 3
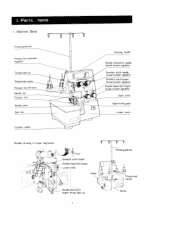
I Machine Body Thread gude bar Presser foot pressure Thread take-up Carrying handle Double chainstitch needle thread tension regulator Overlock stitch needle thread tenslen regulator Overlock stitch looper thread tension regulator chainstitch looper thread tension regulator Upper knife Cushion rubber Detailed drawing of looper nchanism Overlook stitch looper Double chainstitch looper Lower knife LZ) Pulley Double chainstitch looper thread take-up 1 - 1) iread reel Motor Parts name I .
I Machine Body Thread gude bar Presser foot pressure Thread take-up Carrying handle Double chainstitch needle thread tension regulator Overlock stitch needle thread tenslen regulator Overlock stitch looper thread tension regulator chainstitch looper thread tension regulator Upper knife Cushion rubber Detailed drawing of looper nchanism Overlook stitch looper Double chainstitch looper Lower knife LZ) Pulley Double chainstitch looper thread take-up 1 - 1) iread reel Motor Parts name I .
Owner's Manual
Page 4
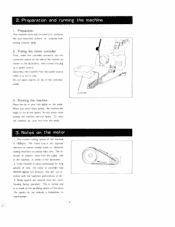
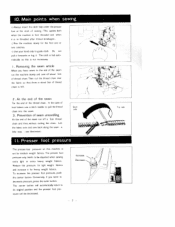
... time, the motor or controller may become slightly hot, however, this will not in use. If the machine is not in terfere with the niachines performance at low speed: As you press more heavily the machine will begin to run faster. Do not place obtects on top of your foot from the power source when it is used on domestic sewing machines...
... time, the motor or controller may become slightly hot, however, this will not in use. If the machine is not in terfere with the niachines performance at low speed: As you press more heavily the machine will begin to run faster. Do not place obtects on top of your foot from the power source when it is used on domestic sewing machines...
Owner's Manual
Page 5
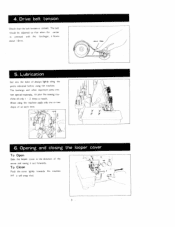
... Push the cover lightly towards the machine and it out forwards. The bushings and other important parts con tain special materials, so pour the sewing ma chine oil only I - 2 times a month. Drive belt tension . - Lubrication Get into the habit of oil each time. 6. Check that when the center is correct. When oiling the machine apply only one or two drops of always lightly oiling the...
... Push the cover lightly towards the machine and it out forwards. The bushings and other important parts con tain special materials, so pour the sewing ma chine oil only I - 2 times a month. Drive belt tension . - Lubrication Get into the habit of oil each time. 6. Check that when the center is correct. When oiling the machine apply only one or two drops of always lightly oiling the...
Owner's Manual
Page 6
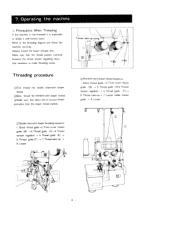
... seam. Threading procedure WFirst thread the double chainstitch looper thread. [ZJNext, thread the overlock stitch looper thread. •Make sure that the thread passes correctly between the thread tension regulating discs. Thread tension regulator -. 5. Looper LLlDouble chainstitch looper threading sequence I . Front cover thread guide (8) -.3. Thread guide (E) -. 6. Thread guide (F) 7. Precautions When Threading If the machine is mis-threaded it is impossible to make threading easier. Thread take -up -. 7 Looper holder thread guide -. 8. Thread take -up -. 8. Operating...
... seam. Threading procedure WFirst thread the double chainstitch looper thread. [ZJNext, thread the overlock stitch looper thread. •Make sure that the thread passes correctly between the thread tension regulating discs. Thread tension regulator -. 5. Looper LLlDouble chainstitch looper threading sequence I . Front cover thread guide (8) -.3. Thread guide (E) -. 6. Thread guide (F) 7. Precautions When Threading If the machine is mis-threaded it is impossible to make threading easier. Thread take -up -. 7 Looper holder thread guide -. 8. Thread take -up -. 8. Operating...
Owner's Manual
Page 7
... thread tension regulator before actual operation of the arrow clockwise for 2 or .3 turns. I . Front cover thread guide (A) -. 3. Front cover thread guide (A) --. 3. Hold the 2 needle threads and the overlock stitch looper thread in your left hand and with your right hand turn the pulley smoothly in the direction of the machine. Needle 5 Stand thread guide -. 2. Check that the threads have interlocked cor rectly and then start to make a sewing test before sewing. Thread tension regulator 4. Thread guide (G) -. 6. Needle thread guide -. 8. tension spring -. 5. Insert...
... thread tension regulator before actual operation of the arrow clockwise for 2 or .3 turns. I . Front cover thread guide (A) -. 3. Front cover thread guide (A) --. 3. Hold the 2 needle threads and the overlock stitch looper thread in your left hand and with your right hand turn the pulley smoothly in the direction of the machine. Needle 5 Stand thread guide -. 2. Check that the threads have interlocked cor rectly and then start to make a sewing test before sewing. Thread tension regulator 4. Thread guide (G) -. 6. Needle thread guide -. 8. tension spring -. 5. Insert...
Owner's Manual
Page 8
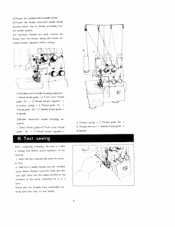
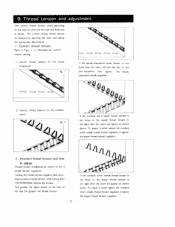
... overlock stitch needle thread tension is too loose or the looper thread tension is too loose then the seam will appear as shown above . To adjust it , either loosen the overlock stitch needle thread tension regulator, or tighten the looper thread tension regulator. 2. I, 2 and obtain the correct tenson setting. = c= Ii Correct thread balance for the overlook stitch. Turning the thread tension regulator dials clock wise increases thread tension while turning them counterclockwise reduces the tension. 9. If the double...
... overlock stitch needle thread tension is too loose or the looper thread tension is too loose then the seam will appear as shown above . To adjust it , either loosen the overlock stitch needle thread tension regulator, or tighten the looper thread tension regulator. 2. I, 2 and obtain the correct tenson setting. = c= Ii Correct thread balance for the overlook stitch. Turning the thread tension regulator dials clock wise increases thread tension while turning them counterclockwise reduces the tension. 9. If the double...
Owner's Manual
Page 9
... left. Removing the sewn article When you want to guide cloth. In the case of sewing. The center button will automatically return to the end of thread chain. 10. Then cut the thread chain near me fabric so that there is about 5cm of the seam run off about 3cm of the thread chain. Presser foot pressure The presser foot pressure on this is set for light weight fabrics and...
... left. Removing the sewn article When you want to guide cloth. In the case of sewing. The center button will automatically return to the end of thread chain. 10. Then cut the thread chain near me fabric so that there is about 5cm of the seam run off about 3cm of the thread chain. Presser foot pressure The presser foot pressure on this is set for light weight fabrics and...
Owner's Manual
Page 10
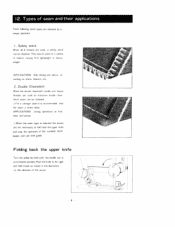
... overlook stitch looper, and use welt guide. Double Chainstitch When the double chainstitch needle and looper threads are not necessary, so fold back the upper knife and stop the operation of seam and their applications Three following stitch types are used, a safety stitch can be obtained. This may he used an attractive double chainstitch seam can be obtained. .'For a stronger seam it back as shown in the direction of fabrics...
... overlook stitch looper, and use welt guide. Double Chainstitch When the double chainstitch needle and looper threads are not necessary, so fold back the upper knife and stop the operation of seam and their applications Three following stitch types are used, a safety stitch can be obtained. This may he used an attractive double chainstitch seam can be obtained. .'For a stronger seam it back as shown in the direction of fabrics...
Owner's Manual
Page 11
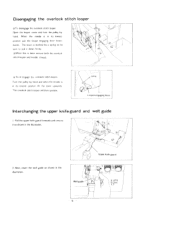
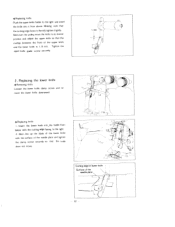
... lever down wards. The overlock stitch hoper will then operate. Looper engaging lever Interchanging the upper knife guard and welt guide I H Ti - . / Upper knife guard 2. Disengaging the overlock stitch looper .To disengage the overlock stitch hoper Open the hoper cover and turn the pufley by a spring so be sure to pull it as shown in the illustration. When the needle is in its owest position lift the lever...
... lever down wards. The overlock stitch hoper will then operate. Looper engaging lever Interchanging the upper knife guard and welt guide I H Ti - . / Upper knife guard 2. Disengaging the overlock stitch looper .To disengage the overlock stitch hoper Open the hoper cover and turn the pufley by a spring so be sure to pull it as shown in the illustration. When the needle is in its owest position lift the lever...
Owner's Manual
Page 12
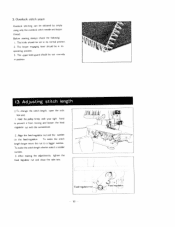
... using only the overlook stitch needle and looper thread. tighten the feed regulator nut and close the side box. Feed regulator 10 - 3. Overlook stitch seam Overlock stitching can be in positkn. 13. Adjusting stitch length .To change the stitch length, open the side box and, • Hold the pulley firmly with your right hand to a bigger number. After making the adjustments. The looper engaging lever should be set oorrcetly in its normal position...
... using only the overlook stitch needle and looper thread. tighten the feed regulator nut and close the side box. Feed regulator 10 - 3. Overlook stitch seam Overlock stitching can be in positkn. 13. Adjusting stitch length .To change the stitch length, open the side box and, • Hold the pulley firmly with your right hand to a bigger number. After making the adjustments. The looper engaging lever should be set oorrcetly in its normal position...
Owner's Manual
Page 13
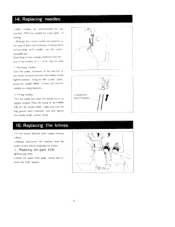
... depenas on your sewing conditions however, ally of the needles fully into the needle holder, make sure that the long groove faces forwards, and then tighten the needle holder screws firmly. Always disconnect the machine from the power source before replacing the knives. • Replacing the upper knife * Removing knife Loosen the upper knife gude screw and re move the needle bar to their highest position. Fitting needles Turn the...
... depenas on your sewing conditions however, ally of the needles fully into the needle holder, make sure that the long groove faces forwards, and then tighten the needle holder screws firmly. Always disconnect the machine from the power source before replacing the knives. • Replacing the upper knife * Removing knife Loosen the upper knife gude screw and re move the needle bar to their highest position. Fitting needles Turn the...
Owner's Manual
Page 14
... I. 0 mm. * Replacing knife Push the upper knife holder to the right and insert the knife into the holder from above. Making sure that the cutting edge faces to the left, tighten it from below with the surface of the needle plate and tighten V the clamp screw securely so that the knife -f dose not move the knife to ts lowest position and...
... I. 0 mm. * Replacing knife Push the upper knife holder to the right and insert the knife into the holder from above. Making sure that the cutting edge faces to the left, tighten it from below with the surface of the needle plate and tighten V the clamp screw securely so that the knife -f dose not move the knife to ts lowest position and...
Owner's Manual
Page 15
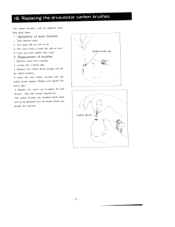
.... 2 . There are standard spare parts and can be replaced when they wear down. • Symptoms of brushes Remove motor from the de&er where you bought the machine. // Carbon brush cap I . The motor emits a noise but will not turn . 4 . Insert the new carbon brushes and the carbon brush springs. The motor will not turn at all 3. Replacement of worn brushes I /' / Carbon...
.... 2 . There are standard spare parts and can be replaced when they wear down. • Symptoms of brushes Remove motor from the de&er where you bought the machine. // Carbon brush cap I . The motor emits a noise but will not turn . 4 . Insert the new carbon brushes and the carbon brush springs. The motor will not turn at all 3. Replacement of worn brushes I /' / Carbon...
Owner's Manual
Page 16
... as easy to use as wfiei sewxig lightweight faliri Re - PROBLEM Cloth is not fed Needle breaks Thread breaks Skip stitching occurs Poor seam for a new one see p. 4 Che k that t he ii rease the The needle is bent or the needle point is too small ADJUSTMENT Press in the control button H the presser font regulating but ton and increase the presser foot pressure. Re- See p. 6 See p. Thread has beconrie...
... as easy to use as wfiei sewxig lightweight faliri Re - PROBLEM Cloth is not fed Needle breaks Thread breaks Skip stitching occurs Poor seam for a new one see p. 4 Che k that t he ii rease the The needle is bent or the needle point is too small ADJUSTMENT Press in the control button H the presser font regulating but ton and increase the presser foot pressure. Re- See p. 6 See p. Thread has beconrie...
Owner's Manual
Page 17
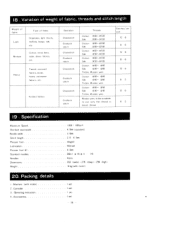
... outerwear fabrics, etc. Presser foot lift Standard needles Needles Dimensions Weight 20. Accessones - 1300 lOOsp.m. '. 4. 0mm (stundard) 3. 0mm 2. 0 4. 5mm Hinged Manual 4. 0mm DBxI # l4( II 14) 4pcs. 263 (wide) - 276 (deep) . 294 (high) 8 kg (with motor) 2. satin, dress fabrics, etc. 18 Variation of weight of fabric, threads and stitch length Weight of fabric Light Medium Type of fabric Organdies, tight tricots, traffeta. Specification Maximum Speed Overlock searnwidth Needle width Stitch length Presser foot Lubrication . . . Operating tnstructwn 4. I set I set...
... outerwear fabrics, etc. Presser foot lift Standard needles Needles Dimensions Weight 20. Accessones - 1300 lOOsp.m. '. 4. 0mm (stundard) 3. 0mm 2. 0 4. 5mm Hinged Manual 4. 0mm DBxI # l4( II 14) 4pcs. 263 (wide) - 276 (deep) . 294 (high) 8 kg (with motor) 2. satin, dress fabrics, etc. 18 Variation of weight of fabric, threads and stitch length Weight of fabric Light Medium Type of fabric Organdies, tight tricots, traffeta. Specification Maximum Speed Overlock searnwidth Needle width Stitch length Presser foot Lubrication . . . Operating tnstructwn 4. I set I set...

Owner's Manual
Page 18
21. Accessories Accessories case 1 Needles (DBxI) Oiler (Contained with 50cc.) Upper knife Converskn plate Screwdriver Screwdriver (hexagonal head) Tweezers 0 Brush for dusting Machine head cover
21. Accessories Accessories case 1 Needles (DBxI) Oiler (Contained with 50cc.) Upper knife Converskn plate Screwdriver Screwdriver (hexagonal head) Tweezers 0 Brush for dusting Machine head cover


