
Owner's Manual
Page 3
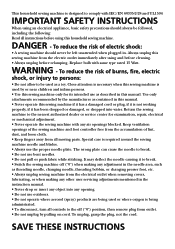
... removing covers, lubricating, or when making any other user servicing adjustments mentioned in the instruction manual. • Never drop or insert any object into water. Always unplug this manual. Close attention is necessary when this sewing machine is used by or near children and infirm persons. • Use this sewing machine only for examination, repair, electrical or mechanical adjustment. • Never operate the sewing machine with any opening. • Do not use as threading needle, changing needle, threading bobbin, or changing presser foot...
... removing covers, lubricating, or when making any other user servicing adjustments mentioned in the instruction manual. • Never drop or insert any object into water. Always unplug this manual. Close attention is necessary when this sewing machine is used by or near children and infirm persons. • Use this sewing machine only for examination, repair, electrical or mechanical adjustment. • Never operate the sewing machine with any opening. • Do not use as threading needle, changing needle, threading bobbin, or changing presser foot...
Owner's Manual
Page 4
...Presser foot pressure adjustment 14 Thread tension adjustment 14 Differential feed adjustment 16 Stitch width adjustment 17 Stitch length adjustment 17 Sewing curved seams 18 3-2 Setting waste tray 18 3-3 3-thread overlock stitch using 1 needle 18 3-4 2-thread overlock stitch using 1 needle 19 Conversion to 2-thread overlock 20 Stitch selection table 20 Thread tension adjustment 21 3-5 How to roll hem 22 3-thread rolled hem 22 2-thread rolled hem 23 3-6 Corded overlock 24 4Maintenance 25 4-1 Replacing the blades 25 4-2 Changing the light bulb 26 4-3 Oiling ...26 4-4 Cleaning...
...Presser foot pressure adjustment 14 Thread tension adjustment 14 Differential feed adjustment 16 Stitch width adjustment 17 Stitch length adjustment 17 Sewing curved seams 18 3-2 Setting waste tray 18 3-3 3-thread overlock stitch using 1 needle 18 3-4 2-thread overlock stitch using 1 needle 19 Conversion to 2-thread overlock 20 Stitch selection table 20 Thread tension adjustment 21 3-5 How to roll hem 22 3-thread rolled hem 22 2-thread rolled hem 23 3-6 Corded overlock 24 4Maintenance 25 4-1 Replacing the blades 25 4-2 Changing the light bulb 26 4-3 Oiling ...26 4-4 Cleaning...

Owner's Manual
Page 5
Your Pfaff hobbylock 4764 will give you start, please spend some time reading these operating instructions. You will soon discover how easy it is to your imagination and make your ideas into reality will free your creative energies - turning your ideas become reality! 5Sewing problems and their solutions 28 6Table of use your Pfaff hobbylock 4764. Its ease of sewing fabrics, needles and machine settings 29 7Specifications 30 8Index 31...
Your Pfaff hobbylock 4764 will give you start, please spend some time reading these operating instructions. You will soon discover how easy it is to your imagination and make your ideas into reality will free your creative energies - turning your ideas become reality! 5Sewing problems and their solutions 28 6Table of use your Pfaff hobbylock 4764. Its ease of sewing fabrics, needles and machine settings 29 7Specifications 30 8Index 31...
Owner's Manual
Page 6
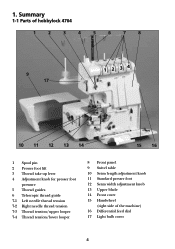
... 1-1 Parts of hobbylock 4764 1 2 3 4 5 6 7 8 9 17 1 2 34 10 11 12 13 14 15 16 1 Spool pin 2 Presser foot lift 3 Thread take up lever 4 Adjustment knob for presser foot pressure 5 Thread guides 6 Telescopic thread guide 7-1 Left needle thread tension 7-2 Right needle thread tension 7-3 Thread tension/upper looper 7-4 Thread tension/lower looper 8 Front panel 9 Swivel table 10 Seam length adjustment knob 11 Standard presser foot 12 Seam width adjustment knob 13 Upper blade 14 Front cover 15 Handwheel (right side of the machine) 16 Differential feed dial 17 Light bulb cover 4 1.
... 1-1 Parts of hobbylock 4764 1 2 3 4 5 6 7 8 9 17 1 2 34 10 11 12 13 14 15 16 1 Spool pin 2 Presser foot lift 3 Thread take up lever 4 Adjustment knob for presser foot pressure 5 Thread guides 6 Telescopic thread guide 7-1 Left needle thread tension 7-2 Right needle thread tension 7-3 Thread tension/upper looper 7-4 Thread tension/lower looper 8 Front panel 9 Swivel table 10 Seam length adjustment knob 11 Standard presser foot 12 Seam width adjustment knob 13 Upper blade 14 Front cover 15 Handwheel (right side of the machine) 16 Differential feed dial 17 Light bulb cover 4 1.
Owner's Manual
Page 8
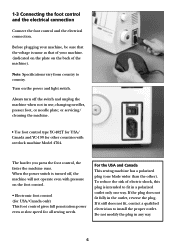
... machine will not operate even with overlock machine Model 4764. The harder you press the foot control, the faster the machine runs. changing needles, presser foot, or needle plate; If the plug does not fit fully in any way. 6 If it still does not fit, contact a qualified electrician to country. or servicing/ cleaning the machine. • Use foot control type YC-482T for USA/ Canada and YC-190 for all sewing needs. When the power...
... machine will not operate even with overlock machine Model 4764. The harder you press the foot control, the faster the machine runs. changing needles, presser foot, or needle plate; If the plug does not fit fully in any way. 6 If it still does not fit, contact a qualified electrician to country. or servicing/ cleaning the machine. • Use foot control type YC-482T for USA/ Canada and YC-190 for all sewing needs. When the power...
Owner's Manual
Page 12
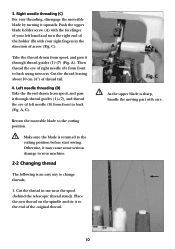
... the thread in the direction of right needle (8) from front to the cutting position. A). 3. C As the upper blade is sharp, handle the moving part with your machine. 2-2 Changing thread The following is returned to back using tweezers. Right needle threading (C) For easy threading, disengage the moveable blade by turning it through thread guides (1)-(7) (Fig. Left needle threading (D) Take the thread drawn from spool, and pass it to change threads; 1. Place the new thread...
... the thread in the direction of right needle (8) from front to the cutting position. A). 3. C As the upper blade is sharp, handle the moving part with your machine. 2-2 Changing thread The following is returned to back using tweezers. Right needle threading (C) For easy threading, disengage the moveable blade by turning it through thread guides (1)-(7) (Fig. Left needle threading (D) Take the thread drawn from spool, and pass it to change threads; 1. Place the new thread...
Owner's Manual
Page 13
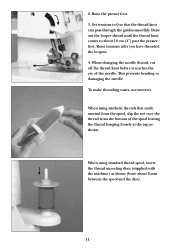
... eye of the spool leaving the thread hanging loosely at the top as shown (leave about 10 cm (4") past the presser foot. 2. Draw out the looper thread until the thread knot comes to 0 so that easily unwind from the spool, slip the net over the thread from the bottom of the needle. Reset tensions after you have threaded the loopers. 4. To make threading easier, use tweezers. This...
... eye of the spool leaving the thread hanging loosely at the top as shown (leave about 10 cm (4") past the presser foot. 2. Draw out the looper thread until the thread knot comes to 0 so that easily unwind from the spool, slip the net over the thread from the bottom of the needle. Reset tensions after you have threaded the loopers. 4. To make threading easier, use tweezers. This...
Owner's Manual
Page 14
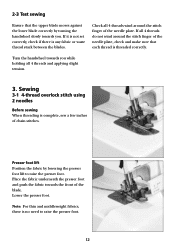
... 4 threads wind around the stitch finger of the needle plate. If all 4 threads and applying slight tension. 3. Sewing 3-1 4-thread overlock stitch using 2 needles Before sewing When threading is no need to raise the presser foot. Presser foot lift Position the fabric by turning the handwheel slowly towards you while holding all 4 threads do not wind around the stitch finger of the needle plate, check and make sure that the upper blade moves against the lower blade correctly by lowering the presser foot lift...
... 4 threads wind around the stitch finger of the needle plate. If all 4 threads and applying slight tension. 3. Sewing 3-1 4-thread overlock stitch using 2 needles Before sewing When threading is no need to raise the presser foot. Presser foot lift Position the fabric by turning the handwheel slowly towards you while holding all 4 threads do not wind around the stitch finger of the needle plate, check and make sure that the upper blade moves against the lower blade correctly by lowering the presser foot lift...
Owner's Manual
Page 15
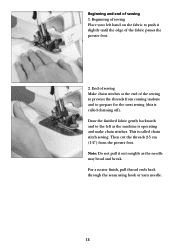
... the fabric to push it out roughly as the machine is called chaining off). For a neater finish, pull thread ends back through the seam using hook or yarn needle. 13 Then cut the threads 2-5 cm (1-2") from coming undone and to prevent the threads from the presser foot. This is operating and make chain stitches. Note: Do not pull it slightly until the edge of the sewing...
... the fabric to push it out roughly as the machine is called chaining off). For a neater finish, pull thread ends back through the seam using hook or yarn needle. 13 Then cut the threads 2-5 cm (1-2") from coming undone and to prevent the threads from the presser foot. This is operating and make chain stitches. Note: Do not pull it slightly until the edge of the sewing...
Owner's Manual
Page 18
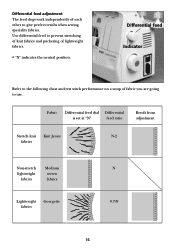
... stitch performance on a scrap of fabric you are going to give perfect results when sewing speciality fabrics. Differential feed adjustment The feed dogs work independently of each other to use. Fabric Differential feed dial Differential is set at "N" feed ratio Result from adjustment Stretch knit Knit Jersey N-2 fabrics Non-stretch lightweight fabrics Medium woven fabrics Lightweight fabrics Georgette N 0.7-N 16 Use differential feed to prevent stretching of knit fabrics and puckering of lightweight fabrics. • "N" indicates the neutral position...
... stitch performance on a scrap of fabric you are going to give perfect results when sewing speciality fabrics. Differential feed adjustment The feed dogs work independently of each other to use. Fabric Differential feed dial Differential is set at "N" feed ratio Result from adjustment Stretch knit Knit Jersey N-2 fabrics Non-stretch lightweight fabrics Medium woven fabrics Lightweight fabrics Georgette N 0.7-N 16 Use differential feed to prevent stretching of knit fabrics and puckering of lightweight fabrics. • "N" indicates the neutral position...
Owner's Manual
Page 19
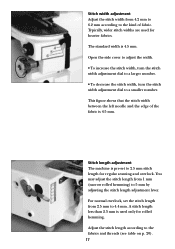
... the stitch width between the left needle and the edge of fabric. Typically, wider stitch widths are used only for rolled hemming. The standard width is 4.5 mm. Stitch length adjustment The machine is used for regular seaming and overlock. A stitch length less than 2.5 mm is pre-set the stitch length from 2.5 mm to 4.4 mm. For normal overlock, set to 2.5 mm stitch length for heavier fabrics. Adjust the stitch length according to a smaller number. Open the side cover to adjust the...
... the stitch width between the left needle and the edge of fabric. Typically, wider stitch widths are used only for rolled hemming. The standard width is 4.5 mm. Stitch length adjustment The machine is used for regular seaming and overlock. A stitch length less than 2.5 mm is pre-set the stitch length from 2.5 mm to 4.4 mm. For normal overlock, set to 2.5 mm stitch length for heavier fabrics. Adjust the stitch length according to a smaller number. Open the side cover to adjust the...
Owner's Manual
Page 20
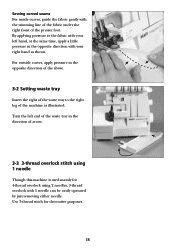
... presser foot. Turn the left hand, at the same time, apply a little pressure in the opposite direction of the above. 3-2 Setting waste tray Insert the right of the waste tray to the fabric with 1 needle can be easily operated by just removing either needle. Sewing curved seams For inside curves, guide the fabric gently with your left end of the waste tray in the direction of arrow. 3-3 3-thread overlock stitch using 1 needle...
... presser foot. Turn the left hand, at the same time, apply a little pressure in the opposite direction of the above. 3-2 Setting waste tray Insert the right of the waste tray to the fabric with 1 needle can be easily operated by just removing either needle. Sewing curved seams For inside curves, guide the fabric gently with your left end of the waste tray in the direction of arrow. 3-3 3-thread overlock stitch using 1 needle...
Owner's Manual
Page 21
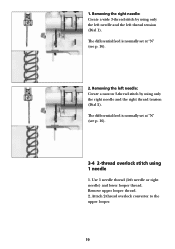
... needle: Create a narrow 3-thread stitch by using only the left needle and the left needle or right needle) and lower looper thread. The differential feed is normally set at "N" (see p. 16). 3-4 2-thread overlock stitch using only the right needle and the right thread tension (Dial 2). 1. The differential feed is normally set at "N" (see p. 16). 2. Attach 2-thread overlock convertor to the upper looper. 19 Use 1 needle thread (left thread tension (Dial 1). Remove upper looper thread. 2. Removing the right needle: Create a wide 3-thread stitch by using 1 needle 1.
... needle: Create a narrow 3-thread stitch by using only the left needle and the left needle or right needle) and lower looper thread. The differential feed is normally set at "N" (see p. 16). 3-4 2-thread overlock stitch using only the right needle and the right thread tension (Dial 2). 1. The differential feed is normally set at "N" (see p. 16). 2. Attach 2-thread overlock convertor to the upper looper. 19 Use 1 needle thread (left thread tension (Dial 1). Remove upper looper thread. 2. Removing the right needle: Create a wide 3-thread stitch by using 1 needle 1.

Owner's Manual
Page 22
... to its lowest position by turning the handwheel towards you are using. Put 2-thread overlock convertor on normal weight thread, it may be necessary to adjust the thread tension according to 2-thread overlock 1. Push the projection (A) of convertor and insert the tip (B) of convertor into the eye (C) of fabric and thread you . A B C Stitch selection table Thread tension Pattern stitches Material (see p. 29) Left needle 4 5 6 Right needle 4 5 6 Upper looper 4 5 6 Lower looper 2 3 4 Stitch length dial Stitch width adjusting dial 2-Thread Light - 1-2 - 3-4 Overlock Medium...
... to its lowest position by turning the handwheel towards you are using. Put 2-thread overlock convertor on normal weight thread, it may be necessary to adjust the thread tension according to 2-thread overlock 1. Push the projection (A) of convertor and insert the tip (B) of convertor into the eye (C) of fabric and thread you . A B C Stitch selection table Thread tension Pattern stitches Material (see p. 29) Left needle 4 5 6 Right needle 4 5 6 Upper looper 4 5 6 Lower looper 2 3 4 Stitch length dial Stitch width adjusting dial 2-Thread Light - 1-2 - 3-4 Overlock Medium...
Owner's Manual
Page 24
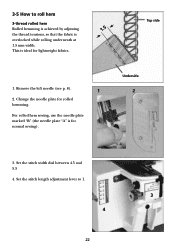
Underside 2 3. For rolled hem sewing, use the needle plate marked "B" (the needle plate "A" is ideal for lightweight fabrics. Set the stitch length adjustment lever to roll hem 3-thread rolled hem Rolled hemming is achieved by adjusting 1.5 the thread tensions, so that the fabric is overlocked while rolling underneath at 1.5 mm width. Remove the left needle (see p. 8). 1 2. Top side 1. Change the needle plate for normal sewing). 3-5 How to 1. 3 4 22 Set the stitch width dial between 4.5 and 5.5 4. This is for rolled hemming.
Underside 2 3. For rolled hem sewing, use the needle plate marked "B" (the needle plate "A" is ideal for lightweight fabrics. Set the stitch length adjustment lever to roll hem 3-thread rolled hem Rolled hemming is achieved by adjusting 1.5 the thread tensions, so that the fabric is overlocked while rolling underneath at 1.5 mm width. Remove the left needle (see p. 8). 1 2. Top side 1. Change the needle plate for normal sewing). 3-5 How to 1. 3 4 22 Set the stitch width dial between 4.5 and 5.5 4. This is for rolled hemming.
Owner's Manual
Page 25
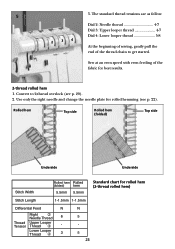
... hem) Stitch Length 1-1.5mm 1-1.5mm Differential Feed N Right ➁ Needle Thread 6 Thread Upper Looper Tension Thread ➂ - Rolled hem Top side Rolled hem (folded) Top side Underside Underside Stitch Width Rolled hem Rolled (folded) hem 5.5mm 5.5mm Standard chart for best results. 2-thread rolled hem 1. Lower Looper Thread ➃ 3 N 5 5 23 Sew at an even speed with even feeding of the thread chain to 2-thread overlock (see p. 22). Convert to get started. Use only the right needle and change the needle plate...
... hem) Stitch Length 1-1.5mm 1-1.5mm Differential Feed N Right ➁ Needle Thread 6 Thread Upper Looper Tension Thread ➂ - Rolled hem Top side Rolled hem (folded) Top side Underside Underside Stitch Width Rolled hem Rolled (folded) hem 5.5mm 5.5mm Standard chart for best results. 2-thread rolled hem 1. Lower Looper Thread ➃ 3 N 5 5 23 Sew at an even speed with even feeding of the thread chain to 2-thread overlock (see p. 22). Convert to get started. Use only the right needle and change the needle plate...

Owner's Manual
Page 27
... of the moveable blade holder. 4. Loosen the lower blade clamp screw and remove the lower blade. 3. However, when they do not cut the fabric, even though they are made of the upper blade is positioned downwards 0.5 to the nonoperating position (see figure C, p. 10). 2. Upper blade 1-1.5 Needle plate 0.5-1 Lower blade Lowest position Replacing the upper blade: 1. Set the upper blade to be replaced. Make sure that the cutting position of a specially long-lasting...
... of the moveable blade holder. 4. Loosen the lower blade clamp screw and remove the lower blade. 3. However, when they do not cut the fabric, even though they are made of the upper blade is positioned downwards 0.5 to the nonoperating position (see figure C, p. 10). 2. Upper blade 1-1.5 Needle plate 0.5-1 Lower blade Lowest position Replacing the upper blade: 1. Set the upper blade to be replaced. Make sure that the cutting position of a specially long-lasting...

Owner's Manual
Page 28
Remove the light bulb cover. 3. Unplug the machine. 2. Change the light bulb. 4. When the light does not come on even though the power switch is turned on, it to change the light bulb. 1. Replace the light bulb cover. However, periodically one or two drops of a specially-made of oil at the oiling point shown will increase its durability. 26 Note: The maximum power of the light bulb is 15W. 4-3 Oiling Lubrication is not necessary for this...
Remove the light bulb cover. 3. Unplug the machine. 2. Change the light bulb. 4. When the light does not come on even though the power switch is turned on, it to change the light bulb. 1. Replace the light bulb cover. However, periodically one or two drops of a specially-made of oil at the oiling point shown will increase its durability. 26 Note: The maximum power of the light bulb is 15W. 4-3 Oiling Lubrication is not necessary for this...
Owner's Manual
Page 30
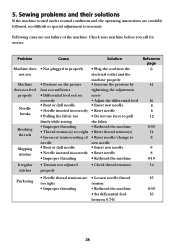
... you call for service. Problem Machine does not sew Machine does not feed properly Needle breaks Breaking threads Skipping stitches Irregular stitches Cause Solution • Not plugged in properly • Pressure on the presser foot not sufficient • Differential feed not set correctly • Bent or dull needle • Needle inserted incorrectly • Pulling the fabric too firmly while sewing • Improper threading • Thread tension(s) too tight • Incorrect tension setting of the machine. 5. Following cases are not...
... you call for service. Problem Machine does not sew Machine does not feed properly Needle breaks Breaking threads Skipping stitches Irregular stitches Cause Solution • Not plugged in properly • Pressure on the presser foot not sufficient • Differential feed not set correctly • Bent or dull needle • Needle inserted incorrectly • Pulling the fabric too firmly while sewing • Improper threading • Thread tension(s) too tight • Incorrect tension setting of the machine. 5. Following cases are not...
Owner's Manual
Page 33
... 16 Fabric types 29 Feed dogs 16 Four thread, sewing 12 Four thread, threading 8-10 Front cover 7 Handwheel 4 Irregular stitches 28 Light bulb 26 Light bulb, changing 26 Needles, breakage 28 Needles, changing 8 Needles, threading 8-10 Needles, size and type 29, 30 Oiling 26 Power switch 6 Preparation 6 Presser foot/feet, changing 8 Presser foot/feet, lift 12 Presser foot/feet, pressure 14 Problem solving 28 Puckering 28 Rolled hem 22-23 Sewing problems and their solutions ..28 Skipping stitches 28 Specifications 30 Speed adjustment 6, 30 Stitch length 17, 20 Stitch...
... 16 Fabric types 29 Feed dogs 16 Four thread, sewing 12 Four thread, threading 8-10 Front cover 7 Handwheel 4 Irregular stitches 28 Light bulb 26 Light bulb, changing 26 Needles, breakage 28 Needles, changing 8 Needles, threading 8-10 Needles, size and type 29, 30 Oiling 26 Power switch 6 Preparation 6 Presser foot/feet, changing 8 Presser foot/feet, lift 12 Presser foot/feet, pressure 14 Problem solving 28 Puckering 28 Rolled hem 22-23 Sewing problems and their solutions ..28 Skipping stitches 28 Specifications 30 Speed adjustment 6, 30 Stitch length 17, 20 Stitch...


