
Owner's Manual
Page 2
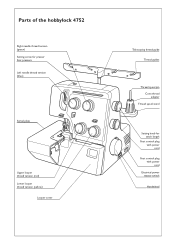
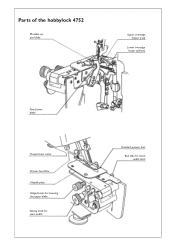
Parts of the hobbylock 4752 Right needle thread tension (green) Setting screw for presser foot pressure Left needle thread tension (blue) Swivel plate Upper looper thread tension (red) Lower looper thread tension (yellow) Looper cover Telescoping thread guide Thread guides Thread spool pin Cone thread adapter Thread spool stand Setting knob for stitch length Foot control plug with power cord Foot control plug with power cord Electrical power master switch Handwheel
Parts of the hobbylock 4752 Right needle thread tension (green) Setting screw for presser foot pressure Left needle thread tension (blue) Swivel plate Upper looper thread tension (red) Lower looper thread tension (yellow) Looper cover Telescoping thread guide Thread guides Thread spool pin Cone thread adapter Thread spool stand Setting knob for stitch length Foot control plug with power cord Foot control plug with power cord Electrical power master switch Handwheel

Owner's Manual
Page 5
... unique advantages. Your new hobbylock 4752 can do and make full use of service with any help or advice. It is certainly time well spent, and is happy to find out just what your machine can take the time to follow. You have any material in design and technology, and it is just as simple to operate as this instruction manual is to read...
... unique advantages. Your new hobbylock 4752 can do and make full use of service with any help or advice. It is certainly time well spent, and is happy to find out just what your machine can take the time to follow. You have any material in design and technology, and it is just as simple to operate as this instruction manual is to read...
Owner's Manual
Page 6
... Accessory box 6 Changing a spool on a threaded machine 11 Cleaning the machine 38 Cone thread adapter 9 Connecting the machine 7 Differential feed 20 Electrical power master switch 7 Foot control 7, 8 Handwheel 8 Light bulb (sewing lamp), changing 41 Looper cover 8 Lubricating the machine 39 Maintenance 38 - 41 Needle holder 22 Needle plate, removing 38 Needle position 23 Needle, changing 22 Oiling the machine 39 Presser foot 9, 21 Presser foot lifter 9 Presser foot pressure 21 Presser foot, changing 21 Program overview 30, 31 Safety notes 2, 7 Seam guidelines 26 Seam...
... Accessory box 6 Changing a spool on a threaded machine 11 Cleaning the machine 38 Cone thread adapter 9 Connecting the machine 7 Differential feed 20 Electrical power master switch 7 Foot control 7, 8 Handwheel 8 Light bulb (sewing lamp), changing 41 Looper cover 8 Lubricating the machine 39 Maintenance 38 - 41 Needle holder 22 Needle plate, removing 38 Needle position 23 Needle, changing 22 Oiling the machine 39 Presser foot 9, 21 Presser foot lifter 9 Presser foot pressure 21 Presser foot, changing 21 Program overview 30, 31 Safety notes 2, 7 Seam guidelines 26 Seam...
Owner's Manual
Page 7
... Sewing 26 Sewing light cover 41 Sewing problems and their solutions 42, 43 Specifications 44 Stitch formation correction measures 32 - 36 Stitch length setting knob 20 Stitch length, setting 20 Stitch width latch 25 Swivel plate 8 Telescoping thread guide 9 Thread chain cutter 26 Thread net 9 Thread tensions, setting 29 Thread unreeling disc 9 Threading aid for looper thread 13, 15 Threading aid for needle thread 16, 18 Threading paths/overview 0 Threading the lower overedge looper (yellow 14, 15 Threading the machine 10 Threading the needle(s 16, 17, 18 Threading...
... Sewing 26 Sewing light cover 41 Sewing problems and their solutions 42, 43 Specifications 44 Stitch formation correction measures 32 - 36 Stitch length setting knob 20 Stitch length, setting 20 Stitch width latch 25 Swivel plate 8 Telescoping thread guide 9 Thread chain cutter 26 Thread net 9 Thread tensions, setting 29 Thread unreeling disc 9 Threading aid for looper thread 13, 15 Threading aid for needle thread 16, 18 Threading paths/overview 0 Threading the lower overedge looper (yellow 14, 15 Threading the machine 10 Threading the needle(s 16, 17, 18 Threading...
Owner's Manual
Page 11
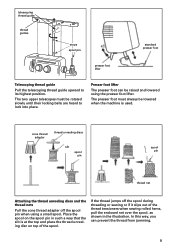
... thread guide Pull the telescoping thread guide upward to lock into place. The presser foot must be rotated slowly until their locking balls are heard to its highest position. Place the spool on the spool pin in the illustration. In this way, you can be lowered when the machine is at the top and place the thread unreeling disc on top of the thread tensioners when sewing rolled hems...
... thread guide Pull the telescoping thread guide upward to lock into place. The presser foot must be rotated slowly until their locking balls are heard to its highest position. Place the spool on the spool pin in the illustration. In this way, you can be lowered when the machine is at the top and place the thread unreeling disc on top of the thread tensioners when sewing rolled hems...
Owner's Manual
Page 13
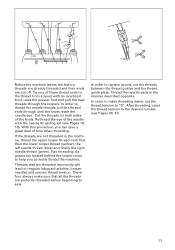
... new threads in the machine, thread the upper looper thread (red) first, then the lower looper thread (yellow), the left needle thread (blue) and finally the right needle thread (green). Cut the threads on both sides of time when threading. Two threading diagrams are threaded incorrectly will lead to replace spools, cut off. If the threads are cut the threads between the thread guides and the thread guide plate. In order to irregular (skipped) stitches, broken needles and uneven thread tension...
... new threads in the machine, thread the upper looper thread (red) first, then the lower looper thread (yellow), the left needle thread (blue) and finally the right needle thread (green). Cut the threads on both sides of time when threading. Two threading diagrams are threaded incorrectly will lead to replace spools, cut off. If the threads are cut the threads between the thread guides and the thread guide plate. In order to irregular (skipped) stitches, broken needles and uneven thread tension...

Owner's Manual
Page 17
... lower looper thread. Lay the thread to the left under the presser foot. Feed the thread into the guide (8) for the lower looper thread. Feed the looper threading aid through the eye of the guide (10) for the lower looper. Remove the thread from both sides. guide (5) for the lower looper thread guide (9) for the lower looper thread thread tensioner of the lower looper thread guide (8) for the lower looper thread guide (6) for the lower looper thread take -up lever (7) of the lower looper thread Guide...
... lower looper thread. Lay the thread to the left under the presser foot. Feed the thread into the guide (8) for the lower looper thread. Feed the looper threading aid through the eye of the guide (10) for the lower looper. Remove the thread from both sides. guide (5) for the lower looper thread guide (9) for the lower looper thread thread tensioner of the lower looper thread guide (8) for the lower looper thread guide (6) for the lower looper thread take -up lever (7) of the lower looper thread Guide...

Owner's Manual
Page 18
... the needle threading aid and pull the needle threading aid with the threading. Feed the needle threading aid through the left thread guide (1) and both sides. Two threading diagrams are marked in blue. Pull on the needle bar cover of the take-up lever (4) thread tension (3) of the left to help you . Then hook the thread end into the thread guide (6). Threading the left needle (blue) Place the spool on the left under the presser foot. Lay the thread...
... the needle threading aid and pull the needle threading aid with the threading. Feed the needle threading aid through the left thread guide (1) and both sides. Two threading diagrams are marked in blue. Pull on the needle bar cover of the take-up lever (4) thread tension (3) of the left to help you . Then hook the thread end into the thread guide (6). Threading the left needle (blue) Place the spool on the left under the presser foot. Lay the thread...

Owner's Manual
Page 20
... hook the thread end into the thread guide (7). Feed the needle threading aid through the needle eye. Pull on threading The needle(s) must pull the needle threads out of the needle eye, rethread the looper thread and then rethread the needle threads. 18 If the looper threads break, you must always be followed, thread breakage or skipped stitches can occur. Lay the thread to the left to the right into the needle threading...
... hook the thread end into the thread guide (7). Feed the needle threading aid through the needle eye. Pull on threading The needle(s) must pull the needle threads out of the needle eye, rethread the looper thread and then rethread the needle threads. 18 If the looper threads break, you must always be followed, thread breakage or skipped stitches can occur. Lay the thread to the left to the right into the needle threading...

Owner's Manual
Page 22
The setting R is used for sewing rolled hems. setting mark setting knob for differential feed stretched contracted Setting the differential feed ratio The differential feed ratio can be altered by turning the setting knob. Turn the setting knob clockwise (towards 2.0) to achieve gathering effects on the stitch length setting knob. The higher the number, the longer the stitch. The number at the setting mark. Setting: - Turn the setting knob counterclockwise (towards 0.7) to achieve a ruffled...
The setting R is used for sewing rolled hems. setting mark setting knob for differential feed stretched contracted Setting the differential feed ratio The differential feed ratio can be altered by turning the setting knob. Turn the setting knob clockwise (towards 2.0) to achieve gathering effects on the stitch length setting knob. The higher the number, the longer the stitch. The number at the setting mark. Setting: - Turn the setting knob counterclockwise (towards 0.7) to achieve a ruffled...
Owner's Manual
Page 23
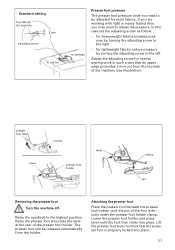
... may need to be released automatically from the top side of the machine (see illustration). presser foot lifter lever needle presser foot holder lever clamp pin Removing the presser foot Turn the machine off. Raise the presser foot and press the lever at the rear of the presser foot holder. for lightweight fabrics reduce pressure by turning the adjusting screw to the right - The presser foot will be adjusted for normal sewing work in such a way that the pressser foot is directly under the presser foot holder clamp...
... may need to be released automatically from the top side of the machine (see illustration). presser foot lifter lever needle presser foot holder lever clamp pin Removing the presser foot Turn the machine off. Raise the presser foot and press the lever at the rear of the presser foot holder. for lightweight fabrics reduce pressure by turning the adjusting screw to the right - The presser foot will be adjusted for normal sewing work in such a way that the pressser foot is directly under the presser foot holder clamp...

Owner's Manual
Page 25
... right needle thread. Use of the right needle only (for 3-thread seams with a wide seam width) Turn the machine off . Use of the left needle only (for 3-thread seams with a narrow seam width) Turn the machine off . Insert the new needle as far as it does not fall out. Changing the needle when sewing with three threads Undo both needle fastening screws and remove the old needle. Tighten the left needle thread. Tighten the right needle fastening screw again...
... right needle thread. Use of the right needle only (for 3-thread seams with a wide seam width) Turn the machine off . Use of the left needle only (for 3-thread seams with a narrow seam width) Turn the machine off . Insert the new needle as far as it does not fall out. Changing the needle when sewing with three threads Undo both needle fastening screws and remove the old needle. Tighten the left needle thread. Tighten the right needle fastening screw again...

Owner's Manual
Page 27
... of standard overlock seams. Set the bed slide for the stitch width latch to the setting mark S (standard) or R (rolled hem). Then release the setting knob again slowly. - Open the looper cover and the swivel plate. - Close the looper cover and the swivel plate. This setting allows you to sew all types of the stitch width latch to position R. standard seams stitch width latch rolled hems bed slide stitch width latch...
... of standard overlock seams. Set the bed slide for the stitch width latch to the setting mark S (standard) or R (rolled hem). Then release the setting knob again slowly. - Open the looper cover and the swivel plate. - Close the looper cover and the swivel plate. This setting allows you to sew all types of the stitch width latch to position R. standard seams stitch width latch rolled hems bed slide stitch width latch...
Owner's Manual
Page 28
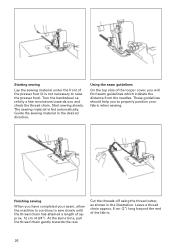
... (4 3/4"). Starting sewing Lay the sewing material under the front of the presser foot (it is fed automatically. Cut the threads off using the thread cutter, as shown in the desired direction. Start sewing slowly. These guidelines should help you will find seam guidelines which indicate the distance from the needles. Using the seam guidelines On the top side of the looper cover, you to properly position your seam, allow the machine to...
... (4 3/4"). Starting sewing Lay the sewing material under the front of the presser foot (it is fed automatically. Cut the threads off using the thread cutter, as shown in the desired direction. Start sewing slowly. These guidelines should help you will find seam guidelines which indicate the distance from the needles. Using the seam guidelines On the top side of the looper cover, you to properly position your seam, allow the machine to...

Owner's Manual
Page 29
... them together. Before inserting fabric under the upper blade. Lay the thread chain under the presser foot, serge a thread chain of approx. 5 cm (2") in this position, lower the presser foot and begin to prevent the seam from coming undone. Insert the sewing fabric into the machine and sew 2-3 stitches into the overlock stitches of the seam 1. Raise the presser foot, guide the thread chain to the left around the presser foot towards the upper blade. The upper blade will cut...
... them together. Before inserting fabric under the upper blade. Lay the thread chain under the presser foot, serge a thread chain of approx. 5 cm (2") in this position, lower the presser foot and begin to prevent the seam from coming undone. Insert the sewing fabric into the machine and sew 2-3 stitches into the overlock stitches of the seam 1. Raise the presser foot, guide the thread chain to the left around the presser foot towards the upper blade. The upper blade will cut...

Owner's Manual
Page 40
... the needle plate Cleaning the feed dog Switch the main switch to OFF. fastening screw of the needle plate and remove the needle plate. Remove any waste thread. Open the looper cover and swivel plate. Use the cleaning brush provided to clean the upper blade and the feed dog, you may also use a vacuum cleaner. Fasten the needle plate, attach the presser foot, insert the needles and close the looper cover and the swivel plate. 38 Open the looper cover and the swivel plate. Machine maintenance Cleaning the machine...
... the needle plate Cleaning the feed dog Switch the main switch to OFF. fastening screw of the needle plate and remove the needle plate. Remove any waste thread. Open the looper cover and swivel plate. Use the cleaning brush provided to clean the upper blade and the feed dog, you may also use a vacuum cleaner. Fasten the needle plate, attach the presser foot, insert the needles and close the looper cover and the swivel plate. 38 Open the looper cover and the swivel plate. Machine maintenance Cleaning the machine...
Owner's Manual
Page 44
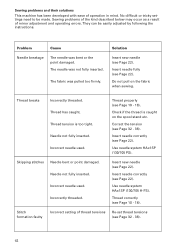
... damaged. Thread breaks Incorrectly threaded. Insert needle correctly (see Page 10 - 18). Thread properly (see Page 22). Incorrectly threaded. Insert needle correctly (see Page 32 - 36). 42 Stitch formation faulty Incorrect setting of thread tensions Re-set thread tensions (see Page 22). No difficult or tricky settings need to be easily adjusted by following the instructions. Thread has caught. The needle was not fully inserted. Insert new needle (see Page 22). Sewing problems and their solutions This machine has...
... damaged. Thread breaks Incorrectly threaded. Insert needle correctly (see Page 10 - 18). Thread properly (see Page 22). Incorrectly threaded. Insert needle correctly (see Page 32 - 36). 42 Stitch formation faulty Incorrect setting of thread tensions Re-set thread tensions (see Page 22). No difficult or tricky settings need to be easily adjusted by following the instructions. Thread has caught. The needle was not fully inserted. Insert new needle (see Page 22). Sewing problems and their solutions This machine has...

Owner's Manual
Page 45
... fabrics. Sewing foot pressure too high for heavy fabrics. Puckered seams Thread tension too tight. Fabric not fed through evenly Stitches too short. Increase sewing foot pressure (see Page 40). Clean the feed dog. Upper blade is not switched on. (see Page 7). Replace upper blade (see Page 21). Waste thread in the socket. (see Page 7). 43 Machine will not operate The lead cord/plug is not seated properly in the feed dog. Incorrect setting of differential feed...
... fabrics. Sewing foot pressure too high for heavy fabrics. Puckered seams Thread tension too tight. Fabric not fed through evenly Stitches too short. Increase sewing foot pressure (see Page 40). Clean the feed dog. Upper blade is not switched on. (see Page 7). Replace upper blade (see Page 21). Waste thread in the socket. (see Page 7). 43 Machine will not operate The lead cord/plug is not seated properly in the feed dog. Incorrect setting of differential feed...
Owner's Manual
Page 46
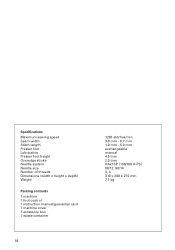
Specifications Maximum sewing speed Seam width Stitch length Presser foot Lubrication Presser foot height Overedge stroke Needle system Needle size Number of threads Dimensions (width x height x depth) Weight Packing contents 1 machine 1 foot control 1 instruction manual/guarantee card 1 machine cover 1 accessory box 1 waste container 44 1200 stitches/min. 3.0 mm - 6.7 mm 1.0 mm - 5.0 mm exchangeable manual 4.5 mm 2.0 mm HAx1SP (130/705 H-PS) 80/12, 90/14 3, 4 310 x 280 x 270 mm 7.1 kg
Specifications Maximum sewing speed Seam width Stitch length Presser foot Lubrication Presser foot height Overedge stroke Needle system Needle size Number of threads Dimensions (width x height x depth) Weight Packing contents 1 machine 1 foot control 1 instruction manual/guarantee card 1 machine cover 1 accessory box 1 waste container 44 1200 stitches/min. 3.0 mm - 6.7 mm 1.0 mm - 5.0 mm exchangeable manual 4.5 mm 2.0 mm HAx1SP (130/705 H-PS) 80/12, 90/14 3, 4 310 x 280 x 270 mm 7.1 kg
Owner's Manual
Page 51
Parts of the hobbylock 4752 Movable upper blade Upper overedge looper (red) Lower overedge looper (yellow) Fixed lower blade Thread chain cutter Presser foot lifter Needle plate Ridged knob for lowering the upper blade Setting knob for seam width Standard presser foot Bed slide for stitch width latch
Parts of the hobbylock 4752 Movable upper blade Upper overedge looper (red) Lower overedge looper (yellow) Fixed lower blade Thread chain cutter Presser foot lifter Needle plate Ridged knob for lowering the upper blade Setting knob for seam width Standard presser foot Bed slide for stitch width latch


