
Owner's Manual
Page 5
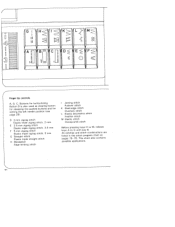
... Bobbin winding tension 103 Carrying handle 104 Bobbin winder 105 Hand wheel 106 Stop motion knob 107 Stitch length control 108 Detachable work support with accessory compartment 109 110 Needle plate Sewing foot holder with sewing foot 111 Threading slots 112 Needle thread tension 11 3 Presser bar lifter 114 Needle holder with screw 11 5 Thread reel pins 116 Table of stitch patterns 11 7 Finger-tip controls 118 Bedplate 11 9 Free arm cover enclosing sewing hook> 1 20 Thread guide 121 Stop for darning operations 1 22 Fancy-stitch thumb wheel 1 23 Reverse-feed control 124 Free arm...
... Bobbin winding tension 103 Carrying handle 104 Bobbin winder 105 Hand wheel 106 Stop motion knob 107 Stitch length control 108 Detachable work support with accessory compartment 109 110 Needle plate Sewing foot holder with sewing foot 111 Threading slots 112 Needle thread tension 11 3 Presser bar lifter 114 Needle holder with screw 11 5 Thread reel pins 116 Table of stitch patterns 11 7 Finger-tip controls 118 Bedplate 11 9 Free arm cover enclosing sewing hook> 1 20 Thread guide 121 Stop for darning operations 1 22 Fancy-stitch thumb wheel 1 23 Reverse-feed control 124 Free arm...

Owner's Manual
Page 7
... or drop into water or other user servicing adjustments mentioned in the needle area, such as a toy. Never operate the sewing machine with same type rated 15 Watts. To unplug, grasp the plug, not the cord. The wrong plate can fall or be used as threading needle, changing needle, threading bobbin, or changing presser foot, etc. Switch the sewing machine off ("0") position, then remove plug from the electrical outlet when removing covers, lubricating, or when making any air openings...
... or drop into water or other user servicing adjustments mentioned in the needle area, such as a toy. Never operate the sewing machine with same type rated 15 Watts. To unplug, grasp the plug, not the cord. The wrong plate can fall or be used as threading needle, changing needle, threading bobbin, or changing presser foot, etc. Switch the sewing machine off ("0") position, then remove plug from the electrical outlet when removing covers, lubricating, or when making any air openings...
Owner's Manual
Page 8
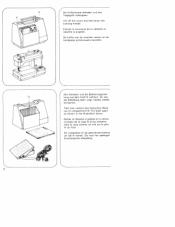
...machine nemen en de handgreep achterwaarts kantelen. ) 4 Den Anlasser und die Bedienungsanlei tung aus dem Fach N nehmen. Zie voor het opbergen bovenstaande afbeelding, ) Retirer Ia rheostat a pédale et Ia notice d'emploi de Ia case N et les remettre dans Ia case comme on voit sur Ia pho to du haut. Take foot control and Instruction Book... out of compartment N. Lift off the cover and fold down the carrying handle. 4 Die ...
...machine nemen en de handgreep achterwaarts kantelen. ) 4 Den Anlasser und die Bedienungsanlei tung aus dem Fach N nehmen. Zie voor het opbergen bovenstaande afbeelding, ) Retirer Ia rheostat a pédale et Ia notice d'emploi de Ia case N et les remettre dans Ia case comme on voit sur Ia pho to du haut. Take foot control and Instruction Book... out of compartment N. Lift off the cover and fold down the carrying handle. 4 Die ...
Owner's Manual
Page 17
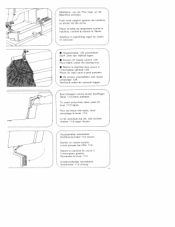
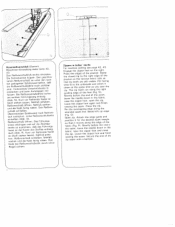
...schuiven. Stoff unter den Nähfult legen. • Switch off master switch 125. To insert extra-thick fabric plies lift lever 113 higher. Switch on master switch. Placer du tissu sous le pied presseur. • ...work support against the machine, as shown by the arrow. comme le montre Ia flèche. Beim Einlegen extrem dicker Stofflagen Hebei 113 hdher anheben. Descendre le levier 11 3. Placer a bolte de rangement contre Ia machine. Place fabric under the sewing foot. • Mettre Ia machine hors circuit a I • Hauptschalter 125 ausschalten. Lower presser bar...
...schuiven. Stoff unter den Nähfult legen. • Switch off master switch 125. To insert extra-thick fabric plies lift lever 113 higher. Switch on master switch. Placer du tissu sous le pied presseur. • ...work support against the machine, as shown by the arrow. comme le montre Ia flèche. Beim Einlegen extrem dicker Stofflagen Hebei 113 hdher anheben. Descendre le levier 11 3. Placer a bolte de rangement contre Ia machine. Place fabric under the sewing foot. • Mettre Ia machine hors circuit a I • Hauptschalter 125 ausschalten. Lower presser bar...
Owner's Manual
Page 21
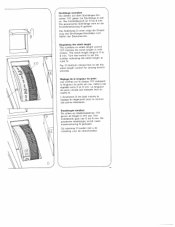
... Einstel lung des Stichlangen-Einstellers zum Ndhen der Stretchstiche. Fig. 0 (bottoml shows how to set the stitch length control for sewing stretch stitches. L'illustration 0 len bas) montre le reglage du regle-point pour Ia couture des points élastiques. La longueur...bis 6 mm. Turn the control to set the number indicating the stitch length at mark N. Steeklengte instellen: De cijfers op steeklengteknop 107 geven de lengte in mm an. Regulating the stitch length The numbers on stitch length control 107 indicate the stitch length in milli meters, The stitch length range is 0 to 6 ...
... Einstel lung des Stichlangen-Einstellers zum Ndhen der Stretchstiche. Fig. 0 (bottoml shows how to set the stitch length control for sewing stretch stitches. L'illustration 0 len bas) montre le reglage du regle-point pour Ia couture des points élastiques. La longueur...bis 6 mm. Turn the control to set the number indicating the stitch length at mark N. Steeklengte instellen: De cijfers op steeklengteknop 107 geven de lengte in mm an. Regulating the stitch length The numbers on stitch length control 107 indicate the stitch length in milli meters, The stitch length range is 0 to 6 ...
Owner's Manual
Page 26
... 2-mm zigzag stitch Elastic triple zigzag stitch, 2 mm E 35-mm zigzag stitch Elastic triple zigzag stitch, 3.5 mm F 5-mm zigzag stitch Elastic triple zigzag stitch, 5 mm G Straight stitch Elastic triple straight stitch H Blindstitch Edge binding stitch I Joining stitch Pullover stitch K Shell-edge stitch Overlock stitch L Elastic decorative stitch Feather stitch M Elastic stitch Honeycomb stitch Before pressing keys H to M, release keys A to G with key B. Buttons for buttonholing Button B is also used as clearing button for releasing the pushed buttons and for setting the left needle position...
... 2-mm zigzag stitch Elastic triple zigzag stitch, 2 mm E 35-mm zigzag stitch Elastic triple zigzag stitch, 3.5 mm F 5-mm zigzag stitch Elastic triple zigzag stitch, 5 mm G Straight stitch Elastic triple straight stitch H Blindstitch Edge binding stitch I Joining stitch Pullover stitch K Shell-edge stitch Overlock stitch L Elastic decorative stitch Feather stitch M Elastic stitch Honeycomb stitch Before pressing keys H to M, release keys A to G with key B. Buttons for buttonholing Button B is also used as clearing button for releasing the pushed buttons and for setting the left needle position...
Owner's Manual
Page 30
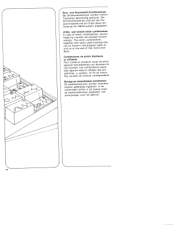
and stretch-stitch combinations In case of this Instruction Book. Utility- Les combinaisons possi bles figurent dans le tableau des pro grammes, y compris, en fin de notice, des conseils de couture correspondant Nuttige-en stretchsteken kombineren Bij steekkombinaties worden meerdere toetsen gelijktijdig ingedrukt. In de stekentabel achter in the program table as well as at the end...
and stretch-stitch combinations In case of this Instruction Book. Utility- Les combinaisons possi bles figurent dans le tableau des pro grammes, y compris, en fin de notice, des conseils de couture correspondant Nuttige-en stretchsteken kombineren Bij steekkombinaties worden meerdere toetsen gelijktijdig ingedrukt. In de stekentabel achter in the program table as well as at the end...
Owner's Manual
Page 39
... the following: P Needle systems Q The sewing operations for which to use the respective foot R Threading path for standard accessories Open lid 127 of the respective sewing feet and bobbins. Accessory box for bobbin winding 3oite d'accessoires pour accessoires ;tandard elever Ic couvercle 1 27 de Ia bolte faccessoires 1 28. The compartments are identified by illustrations of accessory box 1 28. o = Normal sewing foot 2 = Clear-view sewing foot 3 = Blind-stitch foot 4= Zipper foot 5= Button-hole sewing foot Needles 0= Bobbins The table in do vakjes...
... the following: P Needle systems Q The sewing operations for which to use the respective foot R Threading path for standard accessories Open lid 127 of the respective sewing feet and bobbins. Accessory box for bobbin winding 3oite d'accessoires pour accessoires ;tandard elever Ic couvercle 1 27 de Ia bolte faccessoires 1 28. The compartments are identified by illustrations of accessory box 1 28. o = Normal sewing foot 2 = Clear-view sewing foot 3 = Blind-stitch foot 4= Zipper foot 5= Button-hole sewing foot Needles 0= Bobbins The table in do vakjes...
Owner's Manual
Page 40
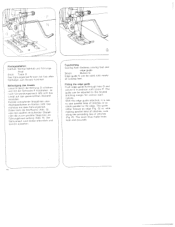
... ordntl,ch mci korrekt aussehen Topstitching sewing foot: Ordinary sewing foot and edge guide Stitch: Button G Edge guide N can he used with nearly all sewing feet, Fitting the edge guide Push edge guide N throim lh hole 0 and secure it is eec to sew parallel lines of stitches Fig RI. Normal NdhfuR urd Fir...seam thus made looks neat and accurate. The guide emther follows an edge Fig. 01 or 'tide making parallel lines of stitches, runs along the preceding line of stitches or to stitch parallel to the desired sttchmng margin for StiOUS ,mppli sdtions. With the edge gumde attached...
... ordntl,ch mci korrekt aussehen Topstitching sewing foot: Ordinary sewing foot and edge guide Stitch: Button G Edge guide N can he used with nearly all sewing feet, Fitting the edge guide Push edge guide N throim lh hole 0 and secure it is eec to sew parallel lines of stitches Fig RI. Normal NdhfuR urd Fir...seam thus made looks neat and accurate. The guide emther follows an edge Fig. 01 or 'tide making parallel lines of stitches, runs along the preceding line of stitches or to stitch parallel to the desired sttchmng margin for StiOUS ,mppli sdtions. With the edge gumde attached...
Owner's Manual
Page 44
... with the letter N or coloured black. Safety rules valid for United Kingdom only The wires in the mains cad are coloured according to the following code: Blue: Neutral Brown: Live As the colours of the wires in the mains lead of this appliance may not correspond with the colour... coding of the terminals in your plug, proceed as follows: the wire which is coloured blue must be connected to the terminal which is used, a 3-ampere fuse has to be connected to the terminal which is coloured brown...
... with the letter N or coloured black. Safety rules valid for United Kingdom only The wires in the mains cad are coloured according to the following code: Blue: Neutral Brown: Live As the colours of the wires in the mains lead of this appliance may not correspond with the colour... coding of the terminals in your plug, proceed as follows: the wire which is coloured blue must be connected to the terminal which is used, a 3-ampere fuse has to be connected to the terminal which is coloured brown...
Owner's Manual
Page 52
...seam. Pin the overlapping edge along the right guiding edge of the placket. P1. SnL.cihnlkitezrFan1deilnvaecrshchNluaRhstevieter einheften )Abb. 0). --n- -4 -- Baste the closed zip to the underside and stitch it down in ladies' slacks For machine setting see page 42, 43. Shortly before the end of the placket on the right. Lower the zipper foot and finist sewing the seam. Open zip, Attach the edge guide and position... Engage the zipper foot on the reverse fabric side so that it for the desired seam margin so that its teeth are still visible. Baste left zip ...
...seam. Pin the overlapping edge along the right guiding edge of the placket. P1. SnL.cihnlkitezrFan1deilnvaecrshchNluaRhstevieter einheften )Abb. 0). --n- -4 -- Baste the closed zip to the underside and stitch it down in ladies' slacks For machine setting see page 42, 43. Shortly before the end of the placket on the right. Lower the zipper foot and finist sewing the seam. Open zip, Attach the edge guide and position... Engage the zipper foot on the reverse fabric side so that it for the desired seam margin so that its teeth are still visible. Baste left zip ...

Owner's Manual
Page 62
...flivnceeht-i,fmffoeansn,hceybdasteisatme,s and embroidery work. Narrow twist point Leather, suede, calf and goatskin leathers Narrow wedge point with buttonhole 30/3 synthetic thread. topstitched with left-twist groove Light ball point long eye ...light canvas. Coarse knitted jersey fabrics, fabrics, Qulana Lastex, doubleand Simplex. Fabric weight: light 6N0eed7le0 size: 75 r Fabric weight medium - silk C Hemstitching point Attractive hemstitching on dressed materials, organdy heavily and glass cambric. eedle chart se of the correct needle...
...flivnceeht-i,fmffoeansn,hceybdasteisatme,s and embroidery work. Narrow twist point Leather, suede, calf and goatskin leathers Narrow wedge point with buttonhole 30/3 synthetic thread. topstitched with left-twist groove Light ball point long eye ...light canvas. Coarse knitted jersey fabrics, fabrics, Qulana Lastex, doubleand Simplex. Fabric weight: light 6N0eed7le0 size: 75 r Fabric weight medium - silk C Hemstitching point Attractive hemstitching on dressed materials, organdy heavily and glass cambric. eedle chart se of the correct needle...
Owner's Manual
Page 63
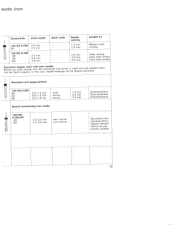
... Ornamentations Decorative hem stitching effect. Heavily dressed fabrics are par ticulary suitable. 55 leedle chart System & No. Needle spacing 1.6 mm 2.0 mm 2.5 mm 3.0 mm 4Mmm Suitable for Medium-wide cording Wide cording Extra wide cording Exftawecorng DBineetofcoortrehaetyivofeaubdrsietcasripgtrnossepwesreilnywg.n, Intwutrihtnhistthwweianyh,annnedeeweddlheleeselbraenadkacgheecckantobemalakregesluyreprtehveennteeedd.les stitch Decorative and zigzag patterns II 80 J 80 ' 80 0,5-1.5 mm [ 0.5-1.5 mm 0.5-1.5 mm wide narrow narrow Special hemstitching twin needle 1 130/705...
... Ornamentations Decorative hem stitching effect. Heavily dressed fabrics are par ticulary suitable. 55 leedle chart System & No. Needle spacing 1.6 mm 2.0 mm 2.5 mm 3.0 mm 4Mmm Suitable for Medium-wide cording Wide cording Extra wide cording Exftawecorng DBineetofcoortrehaetyivofeaubdrsietcasripgtrnossepwesreilnywg.n, Intwutrihtnhistthwweianyh,annnedeeweddlheleeselbraenadkacgheecckantobemalakregesluyreprtehveennteeedd.les stitch Decorative and zigzag patterns II 80 J 80 ' 80 0,5-1.5 mm [ 0.5-1.5 mm 0.5-1.5 mm wide narrow narrow Special hemstitching twin needle 1 130/705...
Owner's Manual
Page 70
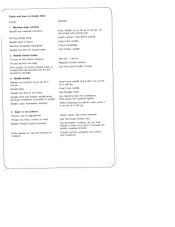
... or knotty thread used . Needle bent and strikes needle plate because workpiece is not uniform Tension out of adjustment. When inserting the bobbin case, push it in hand, but pass it through the bobbin winding tension. Check upper and lower tensions. Use first-class thread only. Thread machine properly and check both tensions. Insert system 130/705 H needle. Use thicker needle. 2. Needle thread breaks For any of material. Needle breaks Needle not pushed up as far as it will go . 4. Insert new needle. Bobbin thread wound...
... or knotty thread used . Needle bent and strikes needle plate because workpiece is not uniform Tension out of adjustment. When inserting the bobbin case, push it in hand, but pass it through the bobbin winding tension. Check upper and lower tensions. Use first-class thread only. Thread machine properly and check both tensions. Insert system 130/705 H needle. Use thicker needle. 2. Needle thread breaks For any of material. Needle breaks Needle not pushed up as far as it will go . 4. Insert new needle. Bobbin thread wound...
Owner's Manual
Page 71
Remove thread ends and put a drop of feed dog. Cause: Remedy: 5. The machine does not sew the stitches on the push-buttons (Models with difficulty Thread ends in hook raceway. Push feed-lowering control to the left. 6. Disengage thumb-wheel: set at right.( Remove needle plate and clean Out lint. Machine feeds irregularly or not at all Lint has accumulated between tooth rows of oil into hook raceway. 7. Feed dog lowered. (Feed-lowering control is engaged. Machine runs with fancy stitches( Fancy-stitch thumb...
Remove thread ends and put a drop of feed dog. Cause: Remedy: 5. The machine does not sew the stitches on the push-buttons (Models with difficulty Thread ends in hook raceway. Push feed-lowering control to the left. 6. Disengage thumb-wheel: set at right.( Remove needle plate and clean Out lint. Machine feeds irregularly or not at all Lint has accumulated between tooth rows of oil into hook raceway. 7. Feed dog lowered. (Feed-lowering control is engaged. Machine runs with fancy stitches( Fancy-stitch thumb...
Owner's Manual
Page 78
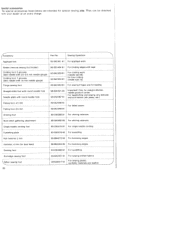
... accessories The special accessories listed below are intended for dual feed) 98-694 823-00 For hemming edges Darning foot 93-035960-91 For eyeletting Knit-edge sewing foot Tflon sewing foot 93-042957-91 93-036917-91 For sewing knitted fabrics For sewing plastic. Sewing Operation Appliqué foot 93-042941-91 For appliqué work Binder (remove sewing foot holder) 98-053484-91 For binding edges with tape Cording foot, 5 grooves (twin needle with 2.0-25 mm needle...
... accessories The special accessories listed below are intended for dual feed) 98-694 823-00 For hemming edges Darning foot 93-035960-91 For eyeletting Knit-edge sewing foot Tflon sewing foot 93-042957-91 93-036917-91 For sewing knitted fabrics For sewing plastic. Sewing Operation Appliqué foot 93-042941-91 For appliqué work Binder (remove sewing foot holder) 98-053484-91 For binding edges with tape Cording foot, 5 grooves (twin needle with 2.0-25 mm needle...
Owner's Manual
Page 79
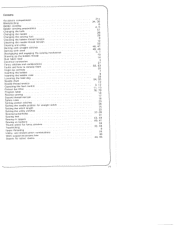
... Changing the sewing foot Checking the bobbin thread tension Checking the needle thread tension Cleaning and oiling Darning with straight stitches Darning with wool Disengaging and engaging the sewing mechanism Drawing up the bobbin thread Dual fabric feed Electrical connection Fancy stitches and combinations Faults and how to remedy them Finger-tip controls Inserting the bobbin Inserting the bobbin case Lowering the feed dog Needle chart Needle thread tension Operating the foot control Presser bar lifter Program table Reverse sewing Second thread reel pin Safety rules Setting stretch stitches...
... Changing the sewing foot Checking the bobbin thread tension Checking the needle thread tension Cleaning and oiling Darning with straight stitches Darning with wool Disengaging and engaging the sewing mechanism Drawing up the bobbin thread Dual fabric feed Electrical connection Fancy stitches and combinations Faults and how to remedy them Finger-tip controls Inserting the bobbin Inserting the bobbin case Lowering the feed dog Needle chart Needle thread tension Operating the foot control Presser bar lifter Program table Reverse sewing Second thread reel pin Safety rules Setting stretch stitches...

Owner's Manual
Page 86
... ordinary sewing operations and 6-mm fancy stitching operations. Inserting patches and darning rips on dainty fabrics. D0 E --- --- - .- - The stitch density can be stitch program number, the corresponding stitch pressed to sew this chart are the the lower half, the buttons marked stretch", turn the stitch to great stress which stretch under stress. For serging or enhancing edges. Just push the buttons and the buttonhole is finished. Sewing on elastic threads or covering seams on...
... ordinary sewing operations and 6-mm fancy stitching operations. Inserting patches and darning rips on dainty fabrics. D0 E --- --- - .- - The stitch density can be stitch program number, the corresponding stitch pressed to sew this chart are the the lower half, the buttons marked stretch", turn the stitch to great stress which stretch under stress. For serging or enhancing edges. Just push the buttons and the buttonhole is finished. Sewing on elastic threads or covering seams on...
Owner's Manual
Page 87
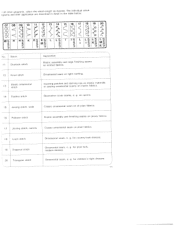
... dresses. 70 DK No. on light clothing. for countrylook dresses. - - ---- --------.. 19 Diagonal stitch Ornamental seam, a. The individual detail in as desired. Elastic ornamental 13 stitch Inserting patches and darning rips on elastic materials or sewing ornamentai seams on e 1 astic fabrics. 14 Feather stitch Decorative cover seams, e. M t M 15 - all plain fabrics. 16 Pullover stitch Elastic assembly and finishing seams on jersey fabrics. - 1 - - --- - - 17 Joining stitch, narrow Classic ornamental seam on plain fabrics. 18 Loom...
... dresses. 70 DK No. on light clothing. for countrylook dresses. - - ---- --------.. 19 Diagonal stitch Ornamental seam, a. The individual detail in as desired. Elastic ornamental 13 stitch Inserting patches and darning rips on elastic materials or sewing ornamentai seams on e 1 astic fabrics. 14 Feather stitch Decorative cover seams, e. M t M 15 - all plain fabrics. 16 Pullover stitch Elastic assembly and finishing seams on jersey fabrics. - 1 - - --- - - 17 Joining stitch, narrow Classic ornamental seam on plain fabrics. 18 Loom...


