

Owner's Manual
Page 2
... use outdoors. • Do not operate where aerosol (spray) products are being used as a toy. It may deÁect the needle causing it to break. • Switch the sewing machine off ("0") position, then remove plug from the electrical outlet when removing covers, lubricating..., or when making any adjustment in the needle area, such as threading needle, changing needle, threading bobbin, or changing presser foot, etc. • Always unplug the sewing machine from outlet. • Do not...
... use outdoors. • Do not operate where aerosol (spray) products are being used as a toy. It may deÁect the needle causing it to break. • Switch the sewing machine off ("0") position, then remove plug from the electrical outlet when removing covers, lubricating..., or when making any adjustment in the needle area, such as threading needle, changing needle, threading bobbin, or changing presser foot, etc. • Always unplug the sewing machine from outlet. • Do not...
Owner's Manual
Page 5
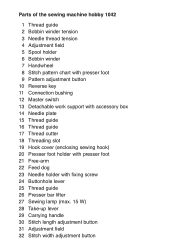
...the sewing machine hobby 1042 1 Thread guide 2 Bobbin winder tension 3 Needle thread tension 4 Adjustment field 5 Spool holder 6 Bobbin winder 7 Handwheel 8 Stitch pattern chart with presser foot 9 Pattern adjustment button 10 Reverse key 11 Connection bushing 12 Master switch 13 Detachable work support with accessory box 14 Needle plate 15 Thread...18 Threading slot 19 Hook cover (enclosing sewing hook) 20 Presser foot holder with presser foot 21 Free-arm 22 Feed dog 23 Needle holder with fixing screw 24 Buttonhole lever 25 Thread guide 26 Presser bar lifter 27 Sewing lamp (max. 15 W) 28 Take-up...
...the sewing machine hobby 1042 1 Thread guide 2 Bobbin winder tension 3 Needle thread tension 4 Adjustment field 5 Spool holder 6 Bobbin winder 7 Handwheel 8 Stitch pattern chart with presser foot 9 Pattern adjustment button 10 Reverse key 11 Connection bushing 12 Master switch 13 Detachable work support with accessory box 14 Needle plate 15 Thread...18 Threading slot 19 Hook cover (enclosing sewing hook) 20 Presser foot holder with presser foot 21 Free-arm 22 Feed dog 23 Needle holder with fixing screw 24 Buttonhole lever 25 Thread guide 26 Presser bar lifter 27 Sewing lamp (max. 15 W) 28 Take-up...

Owner's Manual
Page 7
...sewing machine hobby 1022 and 1032 1 Thread guide 2 Bobbin winder tension 3 Needle thread tension 4 Adjustment field 5 Spool holder 6 Bobbin winder 7 Handwheel 8 Stitch pattern chart with presser foot 9 Pattern adjustment button 10 Reverse key 11 Connection bushing 12 Master switch 13 Detachable work support with accessory box 14 Needle plate ... 18 Threading slot 19 Hook cover (enclosing sewing hook) 20 Presser foot holder with presser foot 21 Free-arm 22 Feed dog 23 Needle holder with fixing screw 25 Thread guide 26 Presser bar lifter 27 Sewing lamp (max. 15 W) 28 Take-up lever 29 Carrying ...
...sewing machine hobby 1022 and 1032 1 Thread guide 2 Bobbin winder tension 3 Needle thread tension 4 Adjustment field 5 Spool holder 6 Bobbin winder 7 Handwheel 8 Stitch pattern chart with presser foot 9 Pattern adjustment button 10 Reverse key 11 Connection bushing 12 Master switch 13 Detachable work support with accessory box 14 Needle plate ... 18 Threading slot 19 Hook cover (enclosing sewing hook) 20 Presser foot holder with presser foot 21 Free-arm 22 Feed dog 23 Needle holder with fixing screw 25 Thread guide 26 Presser bar lifter 27 Sewing lamp (max. 15 W) 28 Take-up lever 29 Carrying ...
Owner's Manual
Page 8
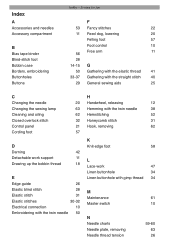
Index A Accessories and needles Accessory compartment B Bias tape binder Blind-stitch foot Bobbin case Borders, embroidering Buttonholes Buttons hobby - Sewing for fun F 53 Fancy stitches 22 11 Feed dog, lowering 20 Felling foot 57 Foot control 10 56 Free arm 11 28 14-15 G ...50 Gathering with the elastic thread 41 33-37 Gathering with the straight stitch 40 29 General sewing aids 25 C Changing the needle 20...
Index A Accessories and needles Accessory compartment B Bias tape binder Blind-stitch foot Bobbin case Borders, embroidering Buttonholes Buttons hobby - Sewing for fun F 53 Fancy stitches 22 11 Feed dog, lowering 20 Felling foot 57 Foot control 10 56 Free arm 11 28 14-15 G ...50 Gathering with the elastic thread 41 33-37 Gathering with the straight stitch 40 29 General sewing aids 25 C Changing the needle 20...

Owner's Manual
Page 9
hobby - Sewing for fun O Oiling the machine One step buttonhole Open overlock stitch Overlock stitches P Patchwork quilt Practical sewing Presser bar lifter Q Quilt and patchwork foot R ... triple straight stitch 30 Stretch triple zigzag stitch 30 T Thread cutter 18 Thread tension 14 Threading 16-17 Threading the needle thread 16 Topstitching 26 Traditional embroidery techniques 49 Troubleshooting 64 Twin needle 38 W Winding the bobbin 12-13 S Safety notes 2 Serging with the blind stitch foot 28 Serging with the zigzag...
hobby - Sewing for fun O Oiling the machine One step buttonhole Open overlock stitch Overlock stitches P Patchwork quilt Practical sewing Presser bar lifter Q Quilt and patchwork foot R ... triple straight stitch 30 Stretch triple zigzag stitch 30 T Thread cutter 18 Thread tension 14 Threading 16-17 Threading the needle thread 16 Topstitching 26 Traditional embroidery techniques 49 Troubleshooting 64 Twin needle 38 W Winding the bobbin 12-13 S Safety notes 2 Serging with the blind stitch foot 28 Serging with the zigzag...
Owner's Manual
Page 10
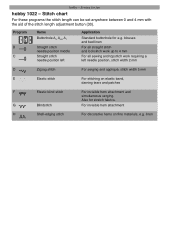
... the aid of the stitch length adjustment button (30). Program B C Name Buttonhole A3, A4/2, A1 Straight stitch needle position middle Straight stitch needle position left needle position, stitch width 2 mm D Zigzag stitch For serging and appliqué, stitch width 5 mm E Elastic stitch ...For stitching on Àne materials, e.g. hobby - blouses and bed linen For all straight stitch and lockstitch work up ...
... the aid of the stitch length adjustment button (30). Program B C Name Buttonhole A3, A4/2, A1 Straight stitch needle position middle Straight stitch needle position left needle position, stitch width 2 mm D Zigzag stitch For serging and appliqué, stitch width 5 mm E Elastic stitch ...For stitching on Àne materials, e.g. hobby - blouses and bed linen For all straight stitch and lockstitch work up ...

Owner's Manual
Page 11
... materials J Closed overlock stitch A closing and serging seam for fraying materials hobby - Program B C D Name Buttonhole A3 A4/2 A1 Straight stitch needle position middle Straight stitch needle position left Zigzag stitch Application Standard buttonhole for stretch fabrics G Blind stitch ... of the stitch length adjustment button (30). Also for e.g. stitch, needle pos. middle and workwear C Stretch triple straight For stretch seams requiring a left needle position stitch, needle position left needle position For serging and appliqué, stitch width 5 mm E Elastic ...
... materials J Closed overlock stitch A closing and serging seam for fraying materials hobby - Program B C D Name Buttonhole A3 A4/2 A1 Straight stitch needle position middle Straight stitch needle position left Zigzag stitch Application Standard buttonhole for stretch fabrics G Blind stitch ... of the stitch length adjustment button (30). Also for e.g. stitch, needle pos. middle and workwear C Stretch triple straight For stretch seams requiring a left needle position stitch, needle position left needle position For serging and appliqué, stitch width 5 mm E Elastic ...

Owner's Manual
Page 12
...to 4 mm C Straight stitch, For all sewing and topstitch work requiring a left needle position left needle position. M N OP Program A Name Buttonhole Application Standard buttonhole for fun hobby 1042 - For stitching on elastic band, darning tears and patches For invisible hem attachment and... materials J Closed overlock stitch A closing and serging seam for fraying materials Ornamental stitches for stretch fabrics. Also for hobby 1042 Application: Embroidery, e.g. crotch seams on sports- and workwear C Stretch triple straight For stretch seams requiring a left ...
...to 4 mm C Straight stitch, For all sewing and topstitch work requiring a left needle position left needle position. M N OP Program A Name Buttonhole Application Standard buttonhole for fun hobby 1042 - For stitching on elastic band, darning tears and patches For invisible hem attachment and... materials J Closed overlock stitch A closing and serging seam for fraying materials Ornamental stitches for stretch fabrics. Also for hobby 1042 Application: Embroidery, e.g. crotch seams on sports- and workwear C Stretch triple straight For stretch seams requiring a left ...

Owner's Manual
Page 13
Operating the machine Bobbin winding Bobbin case Changing the needle Changing the presser foot Control panel Detachable work support Drawing up the bobbin thread Electrical connection Free arm Lowering the feed dog Needle thread tension Presser bar lifter Reverse serging Setting the utility stitches Setting the stretch stitches Threading the needle thread Thread cutter 12-13 14 20 19 21 11 18 10 11 20 20 17 24 22 23 16-17 18 9
Operating the machine Bobbin winding Bobbin case Changing the needle Changing the presser foot Control panel Detachable work support Drawing up the bobbin thread Electrical connection Free arm Lowering the feed dog Needle thread tension Presser bar lifter Reverse serging Setting the utility stitches Setting the stretch stitches Threading the needle thread Thread cutter 12-13 14 20 19 21 11 18 10 11 20 20 17 24 22 23 16-17 18 9
Owner's Manual
Page 16
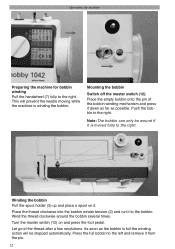
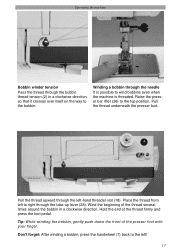
... press the foot pedal. Turn the master switch (12) on it down as far as the bobbin is full the winding action will prevent the needle moving while the machine is moved fully to the bobbin. Let go of the bobbin winding mechanism and press it . This will be wound if...
... press the foot pedal. Turn the master switch (12) on it down as far as the bobbin is full the winding action will prevent the needle moving while the machine is moved fully to the bobbin. Let go of the bobbin winding mechanism and press it . This will be wound if...
Owner's Manual
Page 17
Place the thread from left to right through the needle It is possible to the bobbin. Hold the end of the presser foot with your finger. Winding a bobbin through the take-up lever (28). Tip: ...
Place the thread from left to right through the needle It is possible to the bobbin. Hold the end of the presser foot with your finger. Winding a bobbin through the take-up lever (28). Tip: ...
Owner's Manual
Page 18
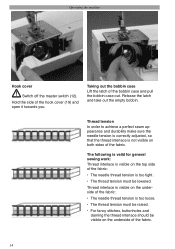
.... 14 Release the latch and take out the empty bobbin. Thread tension In order to achieve a perfect seam appearance and durability make sure the needle tension is correctly adjusted, so that the thread interlace is too tight . • The thread tension must be raised. • For fancy stitches..., buttonholes and darning the thread interlace should be lowered. Hold the side of the fabric: • The needle thread tension is not visible on both sides of the bobbin case and pull the bobbin case out. Operating the machine Hook cover Switch off...
.... 14 Release the latch and take out the empty bobbin. Thread tension In order to achieve a perfect seam appearance and durability make sure the needle tension is correctly adjusted, so that the thread interlace is too tight . • The thread tension must be raised. • For fancy stitches..., buttonholes and darning the thread interlace should be lowered. Hold the side of the fabric: • The needle thread tension is not visible on both sides of the bobbin case and pull the bobbin case out. Operating the machine Hook cover Switch off...
Owner's Manual
Page 20
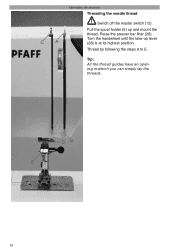
Pull the spool holder (5) up lever (28) is at its highest position. Operating the machine Threading the needle thread CA Switch off the master switch (12). Thread by following the steps A to E. Turn the handwheel until the take-up and mount the thread. Tip: All the thread guides have an opening in which you can simply lay the threads. DB E 16 Raise the presser bar lifter (26).
Pull the spool holder (5) up lever (28) is at its highest position. Operating the machine Threading the needle thread CA Switch off the master switch (12). Thread by following the steps A to E. Turn the handwheel until the take-up and mount the thread. Tip: All the thread guides have an opening in which you can simply lay the threads. DB E 16 Raise the presser bar lifter (26).
Owner's Manual
Page 21
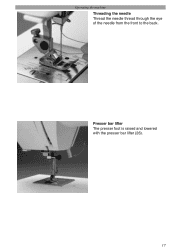
Operating the machine Threading the needle Thread the needle thread through the eye of the needle from the front to the back. Presser bar lifter The presser foot is raised and lowered with the presser bar lifter (26). 17
Operating the machine Threading the needle Thread the needle thread through the eye of the needle from the front to the back. Presser bar lifter The presser foot is raised and lowered with the presser bar lifter (26). 17
Owner's Manual
Page 22
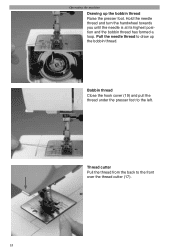
Thread cutter Pull the thread from the back to draw up the bobbin thread Raise the presser foot. Hold the needle thread and turn the handwheel towards you until the needle is at its highest position and the bobbin thread has formed a loop. Pull the needle thread to the front over the thread cutter (17). 18 Bobbin thread Close the hook cover (19) and pull the thread under the presser foot to the left. Operating the machine Drawing up the bobbin thread.
Thread cutter Pull the thread from the back to draw up the bobbin thread Raise the presser foot. Hold the needle thread and turn the handwheel towards you until the needle is at its highest position and the bobbin thread has formed a loop. Pull the needle thread to the front over the thread cutter (17). 18 Bobbin thread Close the hook cover (19) and pull the thread under the presser foot to the left. Operating the machine Drawing up the bobbin thread.

Owner's Manual
Page 23
Raise the needle to its highest position. Check: Please check that when the presser bar lifter (26) is properly attached by raising the presser bar lifter. 19 Attaching the presser foot Place the presser foot under the presser foot holder (20) so that the presser foot is lowered, the pins of the presser foot down until it disengages from the presser foot holder (20). Operating the machine Removing the presser foot Switch off the master switch (12). Press the front of the presser foot up and the rear of the foot engage in the presser foot holder.
Raise the needle to its highest position. Check: Please check that when the presser bar lifter (26) is properly attached by raising the presser bar lifter. 19 Attaching the presser foot Place the presser foot under the presser foot holder (20) so that the presser foot is lowered, the pins of the presser foot down until it disengages from the presser foot holder (20). Operating the machine Removing the presser foot Switch off the master switch (12). Press the front of the presser foot up and the rear of the foot engage in the presser foot holder.
Owner's Manual
Page 24
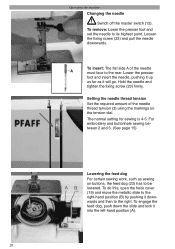
...the right-hand position (B) by pushing it downwards and then to the rear. Operating the machine Changing the needle Switch off the master switch (12). To insert: The Áat side A of the needle thread tension (3) using the markings on buttons, the feed dog (22) has to its highest point. Setting... it up as far as sewing on the tension dial. To remove: Lower the presser foot and set the needle to be lowered. Loosen the Àxing screw (23) and pull the needle downwards. The normal setting for sewing is 4-5. For embroidery and buttonhole sewing between 2 and 3. (See page 15) AB...
...the right-hand position (B) by pushing it downwards and then to the rear. Operating the machine Changing the needle Switch off the master switch (12). To insert: The Áat side A of the needle thread tension (3) using the markings on buttons, the feed dog (22) has to its highest point. Setting... it up as far as sewing on the tension dial. To remove: Lower the presser foot and set the needle to be lowered. Loosen the Àxing screw (23) and pull the needle downwards. The normal setting for sewing is 4-5. For embroidery and buttonhole sewing between 2 and 3. (See page 15) AB...

Owner's Manual
Page 29
Utility stitches and practical sewing Buttonholes Darning Elastic stitches Gathering General sewing aids Hemming with the twin needle Lace work Non-elastic stitches Overlock stitches Roll hemming Sewing on buttons Shell edging Smocking Zippers 33-37 42-43 28, 30-31 40-41 26 38 47 27 32 46 29 48 39 44-45 25
Utility stitches and practical sewing Buttonholes Darning Elastic stitches Gathering General sewing aids Hemming with the twin needle Lace work Non-elastic stitches Overlock stitches Roll hemming Sewing on buttons Shell edging Smocking Zippers 33-37 42-43 28, 30-31 40-41 26 38 47 27 32 46 29 48 39 44-45 25
Owner's Manual
Page 30
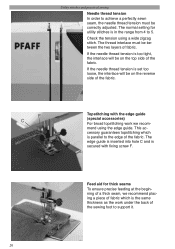
... be on the top side of the fabric. F C Topstitching with Àxing screw F. Utility stitches and practical sewing Needle thread tension In order to 5. If the needle thread tension is too tight, the interlace will be on the reverse side of the fabric. Check the tension using the ...support it. 26 The edge guide is inserted into hole C and is in the range from 4 to achieve a perfectly sewn seam, the needle thread tension must be correctly adjusted. Feed aid for utility stitches is secured with the edge guide (special accessories) For broad topstitching work under ...
... be on the top side of the fabric. F C Topstitching with Àxing screw F. Utility stitches and practical sewing Needle thread tension In order to 5. If the needle thread tension is too tight, the interlace will be on the reverse side of the fabric. Check the tension using the ...support it. 26 The edge guide is inserted into hole C and is in the range from 4 to achieve a perfectly sewn seam, the needle thread tension must be correctly adjusted. Feed aid for utility stitches is secured with the edge guide (special accessories) For broad topstitching work under ...
Owner's Manual
Page 31
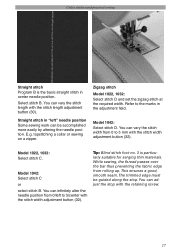
... materials. You can be guided along the stop with the stitch length adjustment button (30). Model 1042: Select stitch D. The trimmed edge must be accomplished more easily by altering the needle position. You can adjust the stop . E.g. Model 1022, 1032: Select stitch C. Refer to the... to 5/center with the stitch width adjustment button (32). This ensures a good, smooth seam. Straight stitch in the adjustment Àeld. Model 1042: Select stitch C or select stitch B. Zigzag stitch Model 1022, 1032: Select stitch D and set the zigzag stitch at the required width. Tip...
... materials. You can be guided along the stop with the stitch length adjustment button (30). Model 1042: Select stitch D. The trimmed edge must be accomplished more easily by altering the needle position. You can adjust the stop . E.g. Model 1022, 1032: Select stitch C. Refer to the... to 5/center with the stitch width adjustment button (32). This ensures a good, smooth seam. Straight stitch in the adjustment Àeld. Model 1042: Select stitch C or select stitch B. Zigzag stitch Model 1022, 1032: Select stitch D and set the zigzag stitch at the required width. Tip...

