
Owner's Manual
Page 1
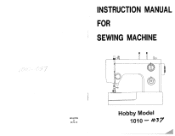
INSTRUCTION MANUAL FOR SEWING MACHINE 0] 351427004 0012.14 Hobby Model 1010 - 37
INSTRUCTION MANUAL FOR SEWING MACHINE 0] 351427004 0012.14 Hobby Model 1010 - 37
Owner's Manual
Page 2
... of electric shock: An appliance should always be followed, including the following: Read all moving parts. Close attention is necessary when this sewing machine) DANGER To reduce the risk of lint, dust, and loose cloth. & Never drop or insert any opening. 8. Do not unplug..., changing needle, threading bobbin, or changing presser foot, etc. 15. io Keep fingers away from outlet. 9. Always unplug sewing machine from the electric outlet immediately after using and before using an electrical appliance, basic safety precautions should never be left unattended when plugged...
... of electric shock: An appliance should always be followed, including the following: Read all moving parts. Close attention is necessary when this sewing machine) DANGER To reduce the risk of lint, dust, and loose cloth. & Never drop or insert any opening. 8. Do not unplug..., changing needle, threading bobbin, or changing presser foot, etc. 15. io Keep fingers away from outlet. 9. Always unplug sewing machine from the electric outlet immediately after using and before using an electrical appliance, basic safety precautions should never be left unattended when plugged...
Owner's Manual
Page 4
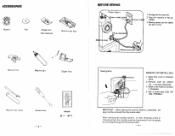
... -3- Open face cover in direction arrow. 2. ACCESSORIES BEFORE SEWING Bobbin Felt Zigzag foot Button hole foot (On machine) 1 Fit plug into the machine. 2. IMPORTANT When leaving the sewing machine unattended, the plug must be disconnected from the supply by removing the plug from the socket outlet. Sewing speed can be removed from the socket outlet. -4- Remove...
... -3- Open face cover in direction arrow. 2. ACCESSORIES BEFORE SEWING Bobbin Felt Zigzag foot Button hole foot (On machine) 1 Fit plug into the machine. 2. IMPORTANT When leaving the sewing machine unattended, the plug must be disconnected from the supply by removing the plug from the socket outlet. Sewing speed can be removed from the socket outlet. -4- Remove...
Owner's Manual
Page 5
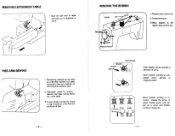
... kric 2.Thread as shown at side. -5- 5cm thread Push bobbin winder spindle in diecfion or arrow. When bobbin winding is balanced. -6- This sewing machine can be used as a fiat bed machine but easily converts to original position. When bobbin winding is in correct, release .the screw of table and pull out in direction...
... kric 2.Thread as shown at side. -5- 5cm thread Push bobbin winder spindle in diecfion or arrow. When bobbin winding is balanced. -6- This sewing machine can be used as a fiat bed machine but easily converts to original position. When bobbin winding is in correct, release .the screw of table and pull out in direction...
Owner's Manual
Page 7
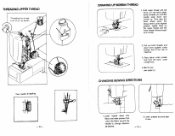
... to change direction as desired. 2. Lightly draw up the upper tbread and the lower thread will be brought up . Lower presser foot and start to sew. -10- Hold upper thread with left hand, turn the hand wheel slcwly towards you until the needle qoes down into fabric and raise presser foot..., pivot the fabric around the needle to the rear of machine. 3. DRAWING UP BOBBIN THREAD 1. Then stop the hand wheel when the takeup lever is at its highest position. THREADING UPPER THREAD Twin needle threading...
... to change direction as desired. 2. Lightly draw up the upper tbread and the lower thread will be brought up . Lower presser foot and start to sew. -10- Hold upper thread with left hand, turn the hand wheel slcwly towards you until the needle qoes down into fabric and raise presser foot..., pivot the fabric around the needle to the rear of machine. 3. DRAWING UP BOBBIN THREAD 1. Then stop the hand wheel when the takeup lever is at its highest position. THREADING UPPER THREAD Twin needle threading...
Owner's Manual
Page 10
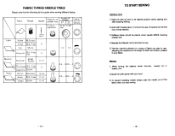
... under needle before starting and after stopping sewing. 2. TO START SEWING Important Hints 1. Depress foot/Speed control and start to its highest position before lowering presser foot. 4. Test the machine stitches on a scrap of fabric you plan to the rear of machine for the length of the fabric when you.... 2.Guide the cloth gently with your fabric. FABRIC THREAD NEEDLE TABLE Please note that the following list is a guide when sewing different fabrics. Hold both threads about 10 cms to use, adjusting the machine for the first two or three stitches. 3. Raise the takeup lever to...
... under needle before starting and after stopping sewing. 2. TO START SEWING Important Hints 1. Depress foot/Speed control and start to its highest position before lowering presser foot. 4. Test the machine stitches on a scrap of fabric you plan to the rear of machine for the length of the fabric when you.... 2.Guide the cloth gently with your fabric. FABRIC THREAD NEEDLE TABLE Please note that the following list is a guide when sewing different fabrics. Hold both threads about 10 cms to use, adjusting the machine for the first two or three stitches. 3. Raise the takeup lever to...
Owner's Manual
Page 11
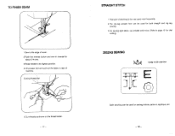
...the one used most frequently. 2.The zig-zag presser foot can be used for dial setting). TO FINISH SEAM 1 .Sew to the edge of seam. 2.Push the reverse button and sew in reverse 'for about 3-4 cms. 3.Raise needle to its highest position. 4.Lift presser foot and pulloul the fabric ...to page 15 for sewing initials, patterns, applique, etc. - 18 - STRAIGHT STITCH 1 This type of machine. 5.Cut threads as shown on the thread cutter....
...the one used most frequently. 2.The zig-zag presser foot can be used for dial setting). TO FINISH SEAM 1 .Sew to the edge of seam. 2.Push the reverse button and sew in reverse 'for about 3-4 cms. 3.Raise needle to its highest position. 4.Lift presser foot and pulloul the fabric ...to page 15 for sewing initials, patterns, applique, etc. - 18 - STRAIGHT STITCH 1 This type of machine. 5.Cut threads as shown on the thread cutter....
Owner's Manual
Page 14
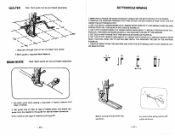
... STITCH LENGTh KNOB ON '0', ZIGZAG WIDTH KNOB ON '5' AND NEEDLE POSITION KNOt CENTER POSIflON, THEN SEW 3-5 STITCHES AS FIGURE (1). 4. REMOVE FABRIC FROM THE MACHINE AND OPEN ThE BUTTONHOLE WITH A BUTTONHOLE CUT OR SEAM CUTTER. (1) p r(2) (3) (4) 01 41 1. Run machine with cutter as shown. SET STITCH LENGTH ABOUT 0.5, ZIGZAG WIDTh KNOB ABOUT '2' NEEDLE POSITION KNOB...
... STITCH LENGTh KNOB ON '0', ZIGZAG WIDTH KNOB ON '5' AND NEEDLE POSITION KNOt CENTER POSIflON, THEN SEW 3-5 STITCHES AS FIGURE (1). 4. REMOVE FABRIC FROM THE MACHINE AND OPEN ThE BUTTONHOLE WITH A BUTTONHOLE CUT OR SEAM CUTTER. (1) p r(2) (3) (4) 01 41 1. Run machine with cutter as shown. SET STITCH LENGTH ABOUT 0.5, ZIGZAG WIDTh KNOB ABOUT '2' NEEDLE POSITION KNOB...
Owner's Manual
Page 15
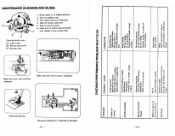
...0 'C C0'CD DC 0. 0 0 z 'a, 0. Light pressure on presser foot. - Re-thread machine. - Reset. - C0D U' C9 5. .4 "I -s >c, o-' zCD (V In D-C' 'C 0 C 0 . CD 5: -. No oil. -Dust and thread in o position. - Adjust sewing foot pressure. - In -' .4 CD 0 0. Needle bent. • Pulling fabric. - Nicks or...upper thread tension. DC rCD p. (fTl Cl) rDC' 3' .4 ,.4 ,- E '2: . - Sewing foot pressure too strong. - Improper threading. - Machine Jamming Knocking Noise Puckering - Tight stop motion. - Reset needle. - Do not pull fabric. - ...
...0 'C C0'CD DC 0. 0 0 z 'a, 0. Light pressure on presser foot. - Re-thread machine. - Reset. - C0D U' C9 5. .4 "I -s >c, o-' zCD (V In D-C' 'C 0 C 0 . CD 5: -. No oil. -Dust and thread in o position. - Adjust sewing foot pressure. - In -' .4 CD 0 0. Needle bent. • Pulling fabric. - Nicks or...upper thread tension. DC rCD p. (fTl Cl) rDC' 3' .4 ,.4 ,- E '2: . - Sewing foot pressure too strong. - Improper threading. - Machine Jamming Knocking Noise Puckering - Tight stop motion. - Reset needle. - Do not pull fabric. - ...


