
Owner's Manual
Page 1
INSTRUCTION MANUAL FOR SEWING MACHINE 0] 351427004 0012.14 Hobby Model 1010 - 37
INSTRUCTION MANUAL FOR SEWING MACHINE 0] 351427004 0012.14 Hobby Model 1010 - 37
Owner's Manual
Page 2
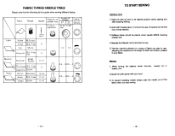
...10 Control dial & Adjusting thread tension Regulating the presser foot pressure 11 & 12 13 Drop feed 13 Changing needle 14 Fabric. Always unplug sewing machine from outlet. 9. SAVE THESE INSTRUCTIONS CONTENTS Names of lint, dust, and loose cloth. & Never drop or insert any object into any air openings blocked, Keep ventilation open ings of the sewing machine and foot controller free from the accumulation of Parts I&2 Accessories 3 Before sewing (Power supply and Sewing Lamp) 4 Take out extension table, tree arm sewing 5 Winding the bobbin 6 Removing bobbin case and...
...10 Control dial & Adjusting thread tension Regulating the presser foot pressure 11 & 12 13 Drop feed 13 Changing needle 14 Fabric. Always unplug sewing machine from outlet. 9. SAVE THESE INSTRUCTIONS CONTENTS Names of lint, dust, and loose cloth. & Never drop or insert any object into any air openings blocked, Keep ventilation open ings of the sewing machine and foot controller free from the accumulation of Parts I&2 Accessories 3 Before sewing (Power supply and Sewing Lamp) 4 Take out extension table, tree arm sewing 5 Winding the bobbin 6 Removing bobbin case and...
Owner's Manual
Page 3
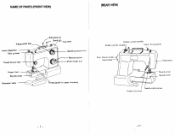
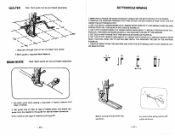
NAME OF PARTS (FRONT VIEW) (REAR VIEW) Zigzag width dal resure Regulator Take up lever Thread tension dial Presser toot Shuttle Extension table Sub-spool pin pin Top cover Needle position knor Reverse button d al read guide for upper threading Bobbin winder Bobbin winder spindle Upper thread guide Stop Motion knob Hand wheel Face cover Thumb screw Needle plate Needle clamp screw Presser foot lever -1-- -2--
NAME OF PARTS (FRONT VIEW) (REAR VIEW) Zigzag width dal resure Regulator Take up lever Thread tension dial Presser toot Shuttle Extension table Sub-spool pin pin Top cover Needle position knor Reverse button d al read guide for upper threading Bobbin winder Bobbin winder spindle Upper thread guide Stop Motion knob Hand wheel Face cover Thumb screw Needle plate Needle clamp screw Presser foot lever -1-- -2--
Owner's Manual
Page 4
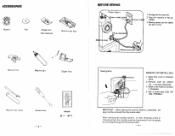
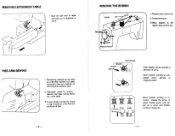
... the plug must be disconnected from the socket outlet. Use a screw type bulb with 12W/i 5W(Max). ACCESSORIES BEFORE SEWING Bobbin Felt Zigzag foot Button hole foot (On machine) 1 Fit plug into the machine. 2. When servicing the sewing machine, or when removing covers or changing lamps, the machine must be varied the foot control. Sewing speed can be removed from the supply by unscre ing it counter-clockwise. 3. Install a now bulb by screwinl ri clockwise. 4. Button foot Machine Oil Zipper foot Button hole cutter Screw driver -3- Open face cover in direction arrow. 2.
... the plug must be disconnected from the socket outlet. Use a screw type bulb with 12W/i 5W(Max). ACCESSORIES BEFORE SEWING Bobbin Felt Zigzag foot Button hole foot (On machine) 1 Fit plug into the machine. 2. When servicing the sewing machine, or when removing covers or changing lamps, the machine must be varied the foot control. Sewing speed can be removed from the supply by unscre ing it counter-clockwise. 3. Install a now bulb by screwinl ri clockwise. 4. Button foot Machine Oil Zipper foot Button hole cutter Screw driver -3- Open face cover in direction arrow. 2.
Owner's Manual
Page 5
WINDING ThE BOBBIN 1 Release stop motion kric 2.Thread as shown. 3.When bobbIn is balanced. -6- When bobbin winding is in diecfion or arrow. This sewing machine can be used as shown at side. -5- 5cm thread Push bobbin winder spindle in direction of upper thread guide and ad just up or down until bobbin winding is filk tighten stop motion kno :REE.Ai SEWING 1. When bobbin winding is com pleted return spindle to free arm machine by removing the extension table. 2. REMOVING EXTENSION TABLE 1 Hold...
WINDING ThE BOBBIN 1 Release stop motion kric 2.Thread as shown. 3.When bobbIn is balanced. -6- When bobbin winding is in diecfion or arrow. This sewing machine can be used as shown at side. -5- 5cm thread Push bobbin winder spindle in direction of upper thread guide and ad just up or down until bobbin winding is filk tighten stop motion kno :REE.Ai SEWING 1. When bobbin winding is com pleted return spindle to free arm machine by removing the extension table. 2. REMOVING EXTENSION TABLE 1 Hold...
Owner's Manual
Page 6
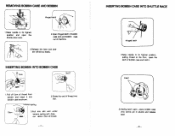
... out easily. E in2.Holding latch open, place bobbin case onto centre pin shuttle and release latch -8- Tension spring 3.Puli into slot. INSERTING BOBBIN INTO BOBBIN CASE insertI.PulI off 5cm of thread from bobbin and it . REMOVING BOBBIN CASE AND BOBBIN Hinged 1 .Raise needle to the front, open the latch of bobbin case and hold it into bobbin case as shown. 2.Guide the end of thread into slot and under tension spring and draw out about 10cm...
... out easily. E in2.Holding latch open, place bobbin case onto centre pin shuttle and release latch -8- Tension spring 3.Puli into slot. INSERTING BOBBIN INTO BOBBIN CASE insertI.PulI off 5cm of thread from bobbin and it . REMOVING BOBBIN CASE AND BOBBIN Hinged 1 .Raise needle to the front, open the latch of bobbin case and hold it into bobbin case as shown. 2.Guide the end of thread into slot and under tension spring and draw out about 10cm...
Owner's Manual
Page 7
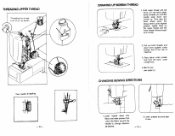
...- Lower presser foot and start to the rear of machine. 3. Hold upper thread with left hand, turn the hand wheel slcwly towards you until the needle qoes down into fabric and raise presser foot, pivot the fabric around the needle to change direction as desired. 2. Pull out both threads and place them together under presser foot from the front, lower presser foot. 4.Startto sew (see page 16) CHANGING SEWING DIRECTIONS 1 Lower needle down and comes up in a loop. 2. THREADING UPPER THREAD Twin needle threading...
...- Lower presser foot and start to the rear of machine. 3. Hold upper thread with left hand, turn the hand wheel slcwly towards you until the needle qoes down into fabric and raise presser foot, pivot the fabric around the needle to change direction as desired. 2. Pull out both threads and place them together under presser foot from the front, lower presser foot. 4.Startto sew (see page 16) CHANGING SEWING DIRECTIONS 1 Lower needle down and comes up in a loop. 2. THREADING UPPER THREAD Twin needle threading...

Owner's Manual
Page 8
ADJUSTiNG THREAD TENSION Coaect Weak Strong Upper thread tension may be adjusted by turning the thread tension dial. Turn the screw (counter-clockwise) to the left to increase tension. Zig-zag width dial 3. Needle position knob 5 Stitch length dial -11- Fabric Incorrect Inside of fabric Upper thread Upper thread Bobbin tbread LOWER THREAD TENSION Lower thread tension can be adjusted by turning screw on bobbin case slight ly to the right (clock-wise) to decrease ten sion. -12- Thread tension dial 4. CONTROL DIAL 1 Reverse button 2.
ADJUSTiNG THREAD TENSION Coaect Weak Strong Upper thread tension may be adjusted by turning the thread tension dial. Turn the screw (counter-clockwise) to the left to increase tension. Zig-zag width dial 3. Needle position knob 5 Stitch length dial -11- Fabric Incorrect Inside of fabric Upper thread Upper thread Bobbin tbread LOWER THREAD TENSION Lower thread tension can be adjusted by turning screw on bobbin case slight ly to the right (clock-wise) to decrease ten sion. -12- Thread tension dial 4. CONTROL DIAL 1 Reverse button 2.
Owner's Manual
Page 9
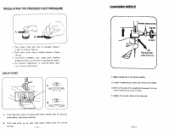
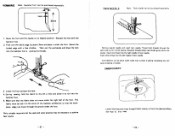
... in guiding the fabric. 4. DROP FEED A B A Push feed lever down inner pin (A) to increase pressure. (Light to medium fabrics) 2. Raise needle bar to release pressure. (Heavy fabrics) 3. CHANGING NEEDLE 1. Push down to raise feed above needle plate for darning, embroidery, and button sewing. 8. Push down outer ring to its highest position. 2.Loosen needle clamp screw and remove old needle. 3. With the flat side of the needle facing away from you, insert needle as far up to drop feed below needle plate for normal sewing. 13 - - No pressure adjustment is...
... in guiding the fabric. 4. DROP FEED A B A Push feed lever down inner pin (A) to increase pressure. (Light to medium fabrics) 2. Raise needle bar to release pressure. (Heavy fabrics) 3. CHANGING NEEDLE 1. Push down to raise feed above needle plate for darning, embroidery, and button sewing. 8. Push down outer ring to its highest position. 2.Loosen needle clamp screw and remove old needle. 3. With the flat side of the needle facing away from you, insert needle as far up to drop feed below needle plate for normal sewing. 13 - - No pressure adjustment is...
Owner's Manual
Page 10
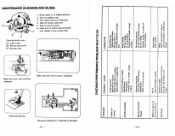
... lever to your hand. 3. Sufficient fabric should be placed under needle before starting and after stopping sewing. 2. Test the machine stitches on a scrap of fabric you plan to use, adjusting the machine for the first two or three stitches. 3. To prevent breaking needle always raise the needle out of machine for the length of stitch and tension suitable to its highest position before lowering presser foot. 4. FABRIC THREAD NEEDLE TABLE Please note that the following list is a guide when sewing...
... lever to your hand. 3. Sufficient fabric should be placed under needle before starting and after stopping sewing. 2. Test the machine stitches on a scrap of fabric you plan to use, adjusting the machine for the first two or three stitches. 3. To prevent breaking needle always raise the needle out of machine for the length of stitch and tension suitable to its highest position before lowering presser foot. 4. FABRIC THREAD NEEDLE TABLE Please note that the following list is a guide when sewing...
Owner's Manual
Page 11
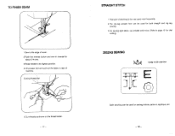
... thread cutter. - 17- ZIGZAG SEWING zigzag width position ] Satin stitching can be used for both straight and zig-zag sewing. 3.For sewing light fabric, use smaller stitch size. (Refer to page 15 for sewing initials, patterns, applique, etc. - 18 - TO FINISH SEAM 1 .Sew to the edge of seam. 2.Push the reverse button and sew in reverse 'for about 3-4 cms. 3.Raise needle to its highest position. 4.Lift presser foot and pulloul the fabric to rear of stitching is the one used most frequently. 2.The zig-zag presser foot can be used for dial setting...
... thread cutter. - 17- ZIGZAG SEWING zigzag width position ] Satin stitching can be used for both straight and zig-zag sewing. 3.For sewing light fabric, use smaller stitch size. (Refer to page 15 for sewing initials, patterns, applique, etc. - 18 - TO FINISH SEAM 1 .Sew to the edge of seam. 2.Push the reverse button and sew in reverse 'for about 3-4 cms. 3.Raise needle to its highest position. 4.Lift presser foot and pulloul the fabric to rear of stitching is the one used most frequently. 2.The zig-zag presser foot can be used for dial setting...
Owner's Manual
Page 12
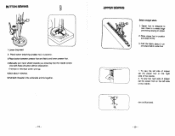
... needle. Place button attaching presser foot in position. 3.Place button between presser foot and fabric and lower presser foot. 4.Manually turn hand wheel towards you ensuring that the needle enters into both threads the underside and tie together. - 19- Fold the fabric about 7 stitches. sew as illustrated. 20 - - Place zipper foot In position and attach firmly 3. ZIpper foot is designed to sow close to 6.Pull both holes of the needle. 2. ZIPPER SEWING Select straight stitch. 1. BLflTON SEWING 1 .Lower drop feed. 2. To sew the right side of zipper set the zipper foot...
... needle. Place button attaching presser foot in position. 3.Place button between presser foot and fabric and lower presser foot. 4.Manually turn hand wheel towards you ensuring that the needle enters into both threads the underside and tie together. - 19- Fold the fabric about 7 stitches. sew as illustrated. 20 - - Place zipper foot In position and attach firmly 3. ZIpper foot is designed to sow close to 6.Pull both holes of the needle. 2. ZIPPER SEWING Select straight stitch. 1. BLflTON SEWING 1 .Lower drop feed. 2. To sew the right side of zipper set the zipper foot...
Owner's Manual
Page 13
.... pulling the threads. 3. Make sure that the workpiece edge runs freely through the same path as for normal sewing. Thread both threads through the groove under the foot. Insert other thread into the right needle of needle. E,cceeding this will cause breaking of twin needle. Separate threads before last thread guide above the needle. EMBROIDERY Lower feed dog and move under the foot. Take out the workpiece and draw the hem into the...
.... pulling the threads. 3. Make sure that the workpiece edge runs freely through the same path as for normal sewing. Thread both threads through the groove under the foot. Insert other thread into the right needle of needle. E,cceeding this will cause breaking of twin needle. Separate threads before last thread guide above the needle. EMBROIDERY Lower feed dog and move under the foot. Take out the workpiece and draw the hem into the...
Owner's Manual
Page 14
.... 5. Run machine with cutter as shown. SET ZIGZAG WIDTH KNOB ON '5' THEN SEW 3-5 STITCHES AS FIGURE (3). 6. Set guide hole on top of presser foot holder. .Move guide to the guide for desired seam allowance. 3. SET THE STITCH LENGTh KNOB ON '0', ZIGZAG WIDTH KNOB ON '5' AND NEEDLE POSITION KNOt CENTER POSIflON, THEN SEW 3-5 STITCHES AS FIGURE (1). 4. r Before sewing fit buttonhole foot as shown. -24- REMOVE THE REGULAR PRESSER FOOT AND ATTACH THE BUTTONHOLE FOOT & PUT THE FAE UNDER ThE BUTTONHOLE FOOT. 3. QUILTER Note: Quilt guide can be...
.... 5. Run machine with cutter as shown. SET ZIGZAG WIDTH KNOB ON '5' THEN SEW 3-5 STITCHES AS FIGURE (3). 6. Set guide hole on top of presser foot holder. .Move guide to the guide for desired seam allowance. 3. SET THE STITCH LENGTh KNOB ON '0', ZIGZAG WIDTH KNOB ON '5' AND NEEDLE POSITION KNOt CENTER POSIflON, THEN SEW 3-5 STITCHES AS FIGURE (1). 4. r Before sewing fit buttonhole foot as shown. -24- REMOVE THE REGULAR PRESSER FOOT AND ATTACH THE BUTTONHOLE FOOT & PUT THE FAE UNDER ThE BUTTONHOLE FOOT. 3. QUILTER Note: Quilt guide can be...
Owner's Manual
Page 15
...fabric, - Needle bent. - CORRECTION Raise feed dog. Re-thread machine. - Sewing foot pressure too strong. - Machine not moving Breaking Needle Breaking Bobbin Thread CHECKING PERFORMANCE PROBLEMS WHAT TO DO PROBABLE CAUSE - Replace shuttle, or polish off burrs completely. Incorrect use of needle. - CD o 0 C') oC.CD , CD N - Needle bent. • Pulling fabric. - Fit new needle. - CD CCD. 0 -4. Moving dial to 1 -4. - Loosen upper thread tension. CD 5: -. Do not pull fabric. - C. Incorrect setting of fabric, and thread. Adjust sewing foot pressure...
...fabric, - Needle bent. - CORRECTION Raise feed dog. Re-thread machine. - Sewing foot pressure too strong. - Machine not moving Breaking Needle Breaking Bobbin Thread CHECKING PERFORMANCE PROBLEMS WHAT TO DO PROBABLE CAUSE - Replace shuttle, or polish off burrs completely. Incorrect use of needle. - CD o 0 C') oC.CD , CD N - Needle bent. • Pulling fabric. - Fit new needle. - CD CCD. 0 -4. Moving dial to 1 -4. - Loosen upper thread tension. CD 5: -. Do not pull fabric. - C. Incorrect setting of fabric, and thread. Adjust sewing foot pressure...


