Owner's Manual
Page 2
... this manual. • Never operate this sewing machine from all instructions before using and before cleaning. • Always unplug before relamping. SAVE THESE INSTRUCTIONS WARNING - Special care is designed to break. • Do not use bent needles. • Do not pull or push fabric while stitching. This household sewing machine is required around the Sewing machine needle. • Always use the proper needle plate. To reduce the risk of lint, dust, and loose...
... this manual. • Never operate this sewing machine from all instructions before using and before cleaning. • Always unplug before relamping. SAVE THESE INSTRUCTIONS WARNING - Special care is designed to break. • Do not use bent needles. • Do not pull or push fabric while stitching. This household sewing machine is required around the Sewing machine needle. • Always use the proper needle plate. To reduce the risk of lint, dust, and loose...
Owner's Manual
Page 4
...14 Presser foot lifter 2:14 Thread cutter 2:14 Changing the presser feet 2:15 Winding a bobbin through the needle 2:16 Changing needles 2:17 Threading twin needle 2:17 Integrated Dual Feed/IDT 2:18-2:19 Lowering feed dog 2:20 3 Sewing functions Stitch selection Altering pattern sizes Altering the stitch width/needle position Altering the pattern width/stitch length Altering the pattern length/stitch density Balance Reverse sewing button Pattern mirror button "Lock" button Twin needle Formation of the stitches 4 Utility stitches Sewing recommendations table Zippers Non-elastic...
...14 Presser foot lifter 2:14 Thread cutter 2:14 Changing the presser feet 2:15 Winding a bobbin through the needle 2:16 Changing needles 2:17 Threading twin needle 2:17 Integrated Dual Feed/IDT 2:18-2:19 Lowering feed dog 2:20 3 Sewing functions Stitch selection Altering pattern sizes Altering the stitch width/needle position Altering the pattern width/stitch length Altering the pattern length/stitch density Balance Reverse sewing button Pattern mirror button "Lock" button Twin needle Formation of the stitches 4 Utility stitches Sewing recommendations table Zippers Non-elastic...
Owner's Manual
Page 8
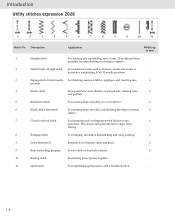
...6 6 Elastic blind hem stitch For securing hems invisibly and Ànishing the edge on stretch 6 fabrics. 7 Closed overlock stitch For hemming and overlapping stretch fabrics in zippers. 2 Stretch triple straight stitch For reinforced seams such as trousers, under arm seams or - With 13 needle positions. 3 Zigzag stitch, Center needle For Ànishing seams on fabrics, applique, and inserting lace. 6 position 4 Elastic stitch Strong stitch for blouses, shirts and linen. 6 0 Button attaching program For two-hole or four-hole buttons. 6 10 Basting stitch For basting...
...6 6 Elastic blind hem stitch For securing hems invisibly and Ànishing the edge on stretch 6 fabrics. 7 Closed overlock stitch For hemming and overlapping stretch fabrics in zippers. 2 Stretch triple straight stitch For reinforced seams such as trousers, under arm seams or - With 13 needle positions. 3 Zigzag stitch, Center needle For Ànishing seams on fabrics, applique, and inserting lace. 6 position 4 Elastic stitch Strong stitch for blouses, shirts and linen. 6 0 Button attaching program For two-hole or four-hole buttons. 6 10 Basting stitch For basting...

Owner's Manual
Page 9
... overlock stitch For joining and overcasting woven fabric and easily fraying 6 fabrics in the bobbin. 17 Stretch triple zigzag stitch Elastic stitch for decorative hems and topstitching. 6 18 Cross hem stitch Provides a highly elastic decorative seam for decorative elastic application and sewing with elastic thread in one operation. 6 16 Honeycomb stitch Elastic, decorative stitch for ornamental hem Ànishing on 6 stretch fabric, for hems on bulky fabrics such as 6 leathers and terry cloth. Can be used with wing needle. 6 1:7 Utility stitches expression 2026...
... overlock stitch For joining and overcasting woven fabric and easily fraying 6 fabrics in the bobbin. 17 Stretch triple zigzag stitch Elastic stitch for decorative hems and topstitching. 6 18 Cross hem stitch Provides a highly elastic decorative seam for decorative elastic application and sewing with elastic thread in one operation. 6 16 Honeycomb stitch Elastic, decorative stitch for ornamental hem Ànishing on 6 stretch fabric, for hems on bulky fabrics such as 6 leathers and terry cloth. Can be used with wing needle. 6 1:7 Utility stitches expression 2026...

Owner's Manual
Page 12
... section Parts of the sewing machine 1 -/+ button A (stitch width/pattern 17 Threading slots width controls) 18 Needle thread tension 2 -/+ button B (stitch length/pattern length controls) 19 Take-up lever 20 Presser foot lifter 3 -/+ button C (stitch density/balance controls) 21 Thread guide 4 Carrying handle 22 Spool holder with spool cap 5 Handwheel 23 Hole for second spool holder 6 Direct selection buttons 24 Lid with stitch chart 7 Stitch selection button 25 Bobbin winder 8 Connection socket "lead cord" 26 Bobbin door 9 Connection socket "foot control" 27 Free arm 10...
... section Parts of the sewing machine 1 -/+ button A (stitch width/pattern 17 Threading slots width controls) 18 Needle thread tension 2 -/+ button B (stitch length/pattern length controls) 19 Take-up lever 20 Presser foot lifter 3 -/+ button C (stitch density/balance controls) 21 Thread guide 4 Carrying handle 22 Spool holder with spool cap 5 Handwheel 23 Hole for second spool holder 6 Direct selection buttons 24 Lid with stitch chart 7 Stitch selection button 25 Bobbin winder 8 Connection socket "lead cord" 26 Bobbin door 9 Connection socket "foot control" 27 Free arm 10...
Owner's Manual
Page 27
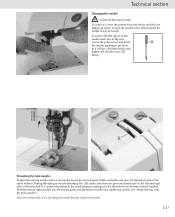
... integrated needle threader with a twin needle. B Threading the twin needle: Replace the sewing needle with a twin needle. 2:17 Continue threading in the left threading slot (17), make sure that you pass one spool of thread on each to its highest position. Technical section Changing the needle Switch off the main switch To remove: Lower the presser foot and set the needle to the left into the thread guide and thread the needles (for additional details, see "Embroidering with the twin needle"). Loosen the needle screw...
... integrated needle threader with a twin needle. B Threading the twin needle: Replace the sewing needle with a twin needle. 2:17 Continue threading in the left threading slot (17), make sure that you pass one spool of thread on each to its highest position. Technical section Changing the needle Switch off the main switch To remove: Lower the presser foot and set the needle to the left into the thread guide and thread the needles (for additional details, see "Embroidering with the twin needle"). Loosen the needle screw...

Owner's Manual
Page 32
... right of the most commonly used stitches (0 - 9). 3. With the direct selection buttons to choose the stitch number. Each change : Stitch width Pattern width Needle position for instant selection of the window. Sewing functions Stitch selection There are in the last stitch, No. 46, and continue to scroll you tap on your desired stitch: 1. With the direct selection buttons for straight stitches Stitch length Pattern length Stitch density Pattern density Balance Use -/+ buttons: A B C 3:2 The stitch number appears in the expression window.
... right of the most commonly used stitches (0 - 9). 3. With the direct selection buttons to choose the stitch number. Each change : Stitch width Pattern width Needle position for instant selection of the window. Sewing functions Stitch selection There are in the last stitch, No. 46, and continue to scroll you tap on your desired stitch: 1. With the direct selection buttons for straight stitches Stitch length Pattern length Stitch density Pattern density Balance Use -/+ buttons: A B C 3:2 The stitch number appears in the expression window.

Owner's Manual
Page 35
...;ne silk. heavy fabric is used for stepping between different sections of the machine from -9 to (+)9. This symbol indicates that the balance can change the reverse feed of the buttonhole. 3:5 The standard balance setting is sewn in reverse for different fabrics. Reverse sewing If you press this stitch. After having selected a stitch, you can be sewn shorter. With -/+ button C you will be altered on different fabric types -
...;ne silk. heavy fabric is used for stepping between different sections of the machine from -9 to (+)9. This symbol indicates that the balance can change the reverse feed of the buttonhole. 3:5 The standard balance setting is sewn in reverse for different fabrics. Reverse sewing If you press this stitch. After having selected a stitch, you can be sewn shorter. With -/+ button C you will be altered on different fabric types -

Owner's Manual
Page 40
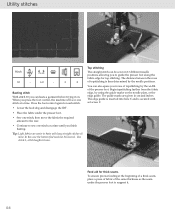
Utility stitches Explanation of presser foot 4:2 whether you will Ànd the settings we recommend for sewing the selected stitches - Stitch Stitch Stitch number Stitch width in mm Stitch length in mm IDT switched on switched off Needle thread tension Number of the sewing recommendations table In the following table you should sew with the Integrated Dual Feed (IDT) engaged or disengaged, needle thread tension setting and recommended presser foot,. These tables give you further information required for different sewing purposes.
Utility stitches Explanation of presser foot 4:2 whether you will Ànd the settings we recommend for sewing the selected stitches - Stitch Stitch Stitch number Stitch width in mm Stitch length in mm IDT switched on switched off Needle thread tension Number of the sewing recommendations table In the following table you should sew with the Integrated Dual Feed (IDT) engaged or disengaged, needle thread tension setting and recommended presser foot,. These tables give you further information required for different sewing purposes.
Owner's Manual
Page 42
... to sew one stitch at a time. The distance between the rows of topstitching by the needle positions. Feed aid for top stitching. Press the foot control again for each stitch. • Lower the feed dog and disengage the IDT. • Place the fabric under the presser foot to guide the presser foot along the fabric edge for thick seams To ensure precise feeding at a time until you Ànish basting. In this case the bottom feed need...
... to sew one stitch at a time. The distance between the rows of topstitching by the needle positions. Feed aid for top stitching. Press the foot control again for each stitch. • Lower the feed dog and disengage the IDT. • Place the fabric under the presser foot to guide the presser foot along the fabric edge for thick seams To ensure precise feeding at a time until you Ànish basting. In this case the bottom feed need...

Owner's Manual
Page 44
... hems and with decorative threads on the right swing of the needle. Utility stitches Stitch Stitch 3 3.0 2.0 3-5 0 17 4.0 3.0 3-5 0/1 Zigzag stitch Raw edges can be Ànished easily with decorative thread and sew. Stretch triple zigzag stitch The stretch triple zigzag stitch produces a highly elastic and decorative seam. This stitch can be used for decorative threads. Stitch 2 - 3.0 3-5 0 Stretch triple straight stitch This stitch is needed, such as underarm and crotch seams. The heavier the fabric, the longer the stitch length required. 4:6 Make sure...
... hems and with decorative threads on the right swing of the needle. Utility stitches Stitch Stitch 3 3.0 2.0 3-5 0 17 4.0 3.0 3-5 0/1 Zigzag stitch Raw edges can be Ànished easily with decorative thread and sew. Stretch triple zigzag stitch The stretch triple zigzag stitch produces a highly elastic and decorative seam. This stitch can be used for decorative threads. Stitch 2 - 3.0 3-5 0 Stretch triple straight stitch This stitch is needed, such as underarm and crotch seams. The heavier the fabric, the longer the stitch length required. 4:6 Make sure...

Owner's Manual
Page 49
Utility stitches Stitch 1 0 - - 2-3 6 Darning with the feed dogs lowered, the stitch length is engaged for darning. • Lower the feed dog. • Draw up the bobbin thread and hold the threads when you start sewing. • Repair the damaged area/hole by you. Tighten the set screw. In this position the thread tension is determined by guiding the fabric evenly forwards and backwards. Tip: Remember, when sewing with the straight stitch • Attach darning foot No. 6. Sewing too slowly may cause small knots to...
Utility stitches Stitch 1 0 - - 2-3 6 Darning with the feed dogs lowered, the stitch length is engaged for darning. • Lower the feed dog. • Draw up the bobbin thread and hold the threads when you start sewing. • Repair the damaged area/hole by you. Tighten the set screw. In this position the thread tension is determined by guiding the fabric evenly forwards and backwards. Tip: Remember, when sewing with the straight stitch • Attach darning foot No. 6. Sewing too slowly may cause small knots to...

Owner's Manual
Page 50
..., elastic gathering seams such as a guide. • Gather the fabric by the amount you pull on the fabric. Make sure you do not catch the elastic thread in the stitching. • When you should sew two or three rows of gathering stitches. • Set your stitch length to gather. Lower needle thread tension to 3. • Mark the Àrst gathering line on the ends of the elastic threads to 6.0 mm. Raise the presser foot and place the elastic thread...
..., elastic gathering seams such as a guide. • Gather the fabric by the amount you pull on the fabric. Make sure you do not catch the elastic thread in the stitching. • When you should sew two or three rows of gathering stitches. • Set your stitch length to gather. Lower needle thread tension to 3. • Mark the Àrst gathering line on the ends of the elastic threads to 6.0 mm. Raise the presser foot and place the elastic thread...

Owner's Manual
Page 60
... threads are sewn with a straight pin. Guide the gimp thread along the foot at the back of the gimp thread until the loop is hidden below the buttonhole bartack. After completing the buttonhole, pull the ends of the presser foot. Warning: The presser foot must not be sewn. Use pearl cotton or a regular gimp thread approximately the same color as the sewing thread to stitch over. After the machine sews...
... threads are sewn with a straight pin. Guide the gimp thread along the foot at the back of the gimp thread until the loop is hidden below the buttonhole bartack. After completing the buttonhole, pull the ends of the presser foot. Warning: The presser foot must not be sewn. Use pearl cotton or a regular gimp thread approximately the same color as the sewing thread to stitch over. After the machine sews...

Owner's Manual
Page 69
.... • Set stitch length to 0.2 - 0.3 mm. • Using -/+ button A increase and reduce the width while sewing. Note: If you have selected the right or left needle position, the stitch width only changes in one direction. These larger embroideries are perfect for motifs with this technique. Decorative sewing/Specialty techniques Manual change/ Regular pattern • Place stabilizer under fabric. • Set needle thread tension to 3. A B C A B Manual change/ Irregular pattern • Place stabilizer under fabric. • Set needle thread tension to 3.
.... • Set stitch length to 0.2 - 0.3 mm. • Using -/+ button A increase and reduce the width while sewing. Note: If you have selected the right or left needle position, the stitch width only changes in one direction. These larger embroideries are perfect for motifs with this technique. Decorative sewing/Specialty techniques Manual change/ Regular pattern • Place stabilizer under fabric. • Set needle thread tension to 3. A B C A B Manual change/ Irregular pattern • Place stabilizer under fabric. • Set needle thread tension to 3.

Owner's Manual
Page 70
... the width of the satin stitch zigzag while sewing. • Select zigzag stitch 12 (right needle position). • Set stitch width to 6 mm, stitch length to 0.2-0.3 mm. • Set the needle thread tension to 3. • Satin stitch a single straight line. • To miter the corner, lower the needle into the fabric on the right side of the stitch, reduce the stitch width using the -/+ button A (1) by 0.5 mm and sew one stitch. Continue until the stitch width is to 0.5 mm...
... the width of the satin stitch zigzag while sewing. • Select zigzag stitch 12 (right needle position). • Set stitch width to 6 mm, stitch length to 0.2-0.3 mm. • Set the needle thread tension to 3. • Satin stitch a single straight line. • To miter the corner, lower the needle into the fabric on the right side of the stitch, reduce the stitch width using the -/+ button A (1) by 0.5 mm and sew one stitch. Continue until the stitch width is to 0.5 mm...

Owner's Manual
Page 72
... decorative stitches can create unique new patterns. 6:10 A patchwork quilt consists of three layers of fabric, two layers of the quilt. Many pieces of leftover fabric. Quilt stitch - 11 and 19 Quilt stitch 11 and 19 enable you to make use of fabric are joined together in patterns to be set quite tight (7), and the bobbin thread tension quite loose (approximately 1/4 turn counterclockwise) to allow the needle thread to pull the bobbin thread to...
... decorative stitches can create unique new patterns. 6:10 A patchwork quilt consists of three layers of fabric, two layers of the quilt. Many pieces of leftover fabric. Quilt stitch - 11 and 19 Quilt stitch 11 and 19 enable you to make use of fabric are joined together in patterns to be set quite tight (7), and the bobbin thread tension quite loose (approximately 1/4 turn counterclockwise) to allow the needle thread to pull the bobbin thread to...

Owner's Manual
Page 80
... of needle. Check bobbin threading path Re-thread machine, making sure presser foot is raised to make sure bobbin case is poor or has slubs in it fully into bobbin tension spring. Thread tension is sewn unevenly The tension needs adjusting. Thread is secure. See above . Insert different type of fabric. Only guide the fabric lightly. Use needle system 130/705 H. Only use good quality threads. Use needle with large eye (system 130 N). Needle is bent, and has hit the needle plate because you insert the bobbin case...
... of needle. Check bobbin threading path Re-thread machine, making sure presser foot is raised to make sure bobbin case is poor or has slubs in it fully into bobbin tension spring. Thread tension is sewn unevenly The tension needs adjusting. Thread is secure. See above . Insert different type of fabric. Only guide the fabric lightly. Use needle system 130/705 H. Only use good quality threads. Use needle with large eye (system 130 N). Needle is bent, and has hit the needle plate because you insert the bobbin case...

Owner's Manual
Page 81
... is lowered. Feed dog is important if there are thread remnants in the hook ways. Push slide B to sew without fabric under the presser foot. Select the desired stitch again Non-original Parts and Accessories The warranty does not cover any children nearby. Slide B is at the right (see page 2:20) The needle plate is not lying Áat the front of the sewing operation and then...
... is lowered. Feed dog is important if there are thread remnants in the hook ways. Push slide B to sew without fabric under the presser foot. Select the desired stitch again Non-original Parts and Accessories The warranty does not cover any children nearby. Slide B is at the right (see page 2:20) The needle plate is not lying Áat the front of the sewing operation and then...

Owner's Manual
Page 82
... D Darning, sewing on patches Decorative sewing, general notes Decorative stitches 4:7-8, 4:11 6:2 1:8 7:6 E Elastic utility stitches Electrical connection Eyelet embroidery F Feed dog, lowering Foot control, connecting Free motion embroidery G Gathering H Hemming, rolled Hemstitching I IDT (Integrated Dual Feed) Invisible hems, blind stitch L Lid with stitch program chart Light bulb, changing "Lock" button M Master switch Monograms, Free motion N Needle plate, changing Needle threader, Integrated Needle, changing Needle, threading Needle/bobbin thread tension Non-elastic/elastic stitches...
... D Darning, sewing on patches Decorative sewing, general notes Decorative stitches 4:7-8, 4:11 6:2 1:8 7:6 E Elastic utility stitches Electrical connection Eyelet embroidery F Feed dog, lowering Foot control, connecting Free motion embroidery G Gathering H Hemming, rolled Hemstitching I IDT (Integrated Dual Feed) Invisible hems, blind stitch L Lid with stitch program chart Light bulb, changing "Lock" button M Master switch Monograms, Free motion N Needle plate, changing Needle threader, Integrated Needle, changing Needle, threading Needle/bobbin thread tension Non-elastic/elastic stitches...


