
Owner's Manual
Page 4
... of headings A Accessories Applique designs Applique toot B Balance Basting Bias binder Blind hem Bobbin case Bobbin thread tension Bobbin thread, drawing up Bobbin winding Bobbin winding through the needle Braiding foot Bridging Buttonhole, fully-automatic Buttonholes Buttonholes with gimp thread Buttonhole tips Buttons, sewing on C Carrying case Circular embroidery guide Cleaning and oiling Combined borders Combined borders with twin needle Cording toot Cross hem stitch Cross-stitch 0 Darning, sewing on patches Decorative sewing, general notes Decorative stitches, Espression 2024 Decorative...
... of headings A Accessories Applique designs Applique toot B Balance Basting Bias binder Blind hem Bobbin case Bobbin thread tension Bobbin thread, drawing up Bobbin winding Bobbin winding through the needle Braiding foot Bridging Buttonhole, fully-automatic Buttonholes Buttonholes with gimp thread Buttonhole tips Buttons, sewing on C Carrying case Circular embroidery guide Cleaning and oiling Combined borders Combined borders with twin needle Cording toot Cross hem stitch Cross-stitch 0 Darning, sewing on patches Decorative sewing, general notes Decorative stitches, Espression 2024 Decorative...

Owner's Manual
Page 5
...witri satin-stitch zigzag Technical data Thread cutter Thread tension, general notes Threading Tips for decorative stitches Pattern length/stitch density Pattern m rroring Pattern settings, altering Pattern sizes altering Pattern width stitch length. N Narrow edge foot Needw plate, changing Neede table Needle tnreader, Integrated Needle, changing Needle, threading Needle'bobbin thread tensior Non-elasticelastic stitches Non-stick fancy stitch toot for esther 0 Overlock St tches p Parts of the sewing machine (2024) Parts of the sewing machine (2014) Patchwork and quilting Pattern lengthpattern...
...witri satin-stitch zigzag Technical data Thread cutter Thread tension, general notes Threading Tips for decorative stitches Pattern length/stitch density Pattern m rroring Pattern settings, altering Pattern sizes altering Pattern width stitch length. N Narrow edge foot Needw plate, changing Neede table Needle tnreader, Integrated Needle, changing Needle, threading Needle'bobbin thread tensior Non-elasticelastic stitches Non-stick fancy stitch toot for esther 0 Overlock St tches p Parts of the sewing machine (2024) Parts of the sewing machine (2014) Patchwork and quilting Pattern lengthpattern...

Owner's Manual
Page 6
... 13 needle positions. 3 Zigzag stitch, For finishing seams on fabrics, applique, 6 Center needle position and inserting lace. 4 Elastic stitch Strong stitch for seam finishes, sewing elastic. 6 darning tears, and patches. 5 Blind hem stitch For securing hems invisibly on woven fabrics 6 6 Elastic blind hem stitch For securing hems Invisibly and finishing the edge on 6 stretch fabrics. 7 Closvd ovvrlock stitch 8 Bridging stitch 9 Linen buttonhole For joining and overcasting stretch fabrics in one operation. 6 For bridging, decorative hemstitching and crazy quilting...
... 13 needle positions. 3 Zigzag stitch, For finishing seams on fabrics, applique, 6 Center needle position and inserting lace. 4 Elastic stitch Strong stitch for seam finishes, sewing elastic. 6 darning tears, and patches. 5 Blind hem stitch For securing hems invisibly on woven fabrics 6 6 Elastic blind hem stitch For securing hems Invisibly and finishing the edge on 6 stretch fabrics. 7 Closvd ovvrlock stitch 8 Bridging stitch 9 Linen buttonhole For joining and overcasting stretch fabrics in one operation. 6 For bridging, decorative hemstitching and crazy quilting...

Owner's Manual
Page 7
... need e position 13 Stem Stitch, narrow For decorafive sewing such as leathers and terry cloth. 15 Ope'r overlock stitch For joini'g and overcastng stretch fabrics in the bobbin. 17 Stretch triple zigzag stitch Elastic stitch for decoratlee hems and topstrc-fvng. 6 16 Cross hem stitch Provides a highly elastic decorat ye nean'i for hems on bulky fabrics 6 such as fiower stems and 3 undert n ng letters. 14 Decorat ye elastic stitch For Joining overlapped seams...
... need e position 13 Stem Stitch, narrow For decorafive sewing such as leathers and terry cloth. 15 Ope'r overlock stitch For joini'g and overcastng stretch fabrics in the bobbin. 17 Stretch triple zigzag stitch Elastic stitch for decoratlee hems and topstrc-fvng. 6 16 Cross hem stitch Provides a highly elastic decorat ye nean'i for hems on bulky fabrics 6 such as fiower stems and 3 undert n ng letters. 14 Decorat ye elastic stitch For Joining overlapped seams...

Owner's Manual
Page 8
III LI r,,Js_4I.AI_,LIIJI Utility stitches Expression 2014 I II > 4> >
III LI r,,Js_4I.AI_,LIIJI Utility stitches Expression 2014 I II > 4> >
Owner's Manual
Page 9
... topstitching quilt projects with a handlook stitch. 12 Zigzag stitch Right/Left needle positron For applique couching over cords and creating eyelets 13 Stem stitch, narrow 14 Decorative elastic stitch 15 Open overlock stitch 16 Honeycomb stitch 17 Stretch triple zigzag stitch For decorative sewing such as leathers and terry cloth. Elastic, decorative stitch for ornamental hem finishing on bulky fabrics such as f ower stems and underlining letters For joining overlapped seams on stretch fabric for...
... topstitching quilt projects with a handlook stitch. 12 Zigzag stitch Right/Left needle positron For applique couching over cords and creating eyelets 13 Stem stitch, narrow 14 Decorative elastic stitch 15 Open overlock stitch 16 Honeycomb stitch 17 Stretch triple zigzag stitch For decorative sewing such as leathers and terry cloth. Elastic, decorative stitch for ornamental hem finishing on bulky fabrics such as f ower stems and underlining letters For joining overlapped seams on stretch fabric for...

Owner's Manual
Page 12
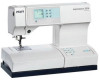
... 6 Direct selection buttons 7 Stitch selection button 8 Connection socket "lead cord" 9 Connection socket "foot control" 10 Master switch 11 Base plate 12 Removable accessory tray 13 Presser foot holder with presser foot 14 Integrated dual feed/IDT 15 Integrated needle threader 16 Reverse sewing" button 17 Threading slots 18 Needle thread tension 19 Take-up lever 20 Presser foot lifter 21 Thread guide 22 Spool holder with spool cap 23 Hole for second spool holder 24 Lid with stitch chart 25 Bobbin winder 26 Bobbin door 27 Free arm 28 Sewing bulb (max. 5 W) 29 Thread cutter 30 "Pattern...
... 6 Direct selection buttons 7 Stitch selection button 8 Connection socket "lead cord" 9 Connection socket "foot control" 10 Master switch 11 Base plate 12 Removable accessory tray 13 Presser foot holder with presser foot 14 Integrated dual feed/IDT 15 Integrated needle threader 16 Reverse sewing" button 17 Threading slots 18 Needle thread tension 19 Take-up lever 20 Presser foot lifter 21 Thread guide 22 Spool holder with spool cap 23 Hole for second spool holder 24 Lid with stitch chart 25 Bobbin winder 26 Bobbin door 27 Free arm 28 Sewing bulb (max. 5 W) 29 Thread cutter 30 "Pattern...

Owner's Manual
Page 14
... Direct selection buttons 7 Stitch selection button 8 Connection socket "lead cord" 9 Connection socket "foot control" 10 Master switch 11 Base plate 12 Removable accessory tray 13 Presser foot holder with presser foot 15 Integrated needle threader 16 'Reverse sewing" button 17 Threading slots 18 Needle thread tension 19 Take-up lever 20 Presser foot lifter 21 Thread guide 22 Spool holder with spool cap 23 Hole for second spool holder 24 Lid with stitch program chart 25 Bobbin winder 26 Bobbin door 27 Free arm 28 Sewing bulb (max. 5 W) 29 Thread cutter 30 "Pattern mirror" button/"Lock" button...
... Direct selection buttons 7 Stitch selection button 8 Connection socket "lead cord" 9 Connection socket "foot control" 10 Master switch 11 Base plate 12 Removable accessory tray 13 Presser foot holder with presser foot 15 Integrated needle threader 16 'Reverse sewing" button 17 Threading slots 18 Needle thread tension 19 Take-up lever 20 Presser foot lifter 21 Thread guide 22 Spool holder with spool cap 23 Hole for second spool holder 24 Lid with stitch program chart 25 Bobbin winder 26 Bobbin door 27 Free arm 28 Sewing bulb (max. 5 W) 29 Thread cutter 30 "Pattern mirror" button/"Lock" button...
Owner's Manual
Page 20
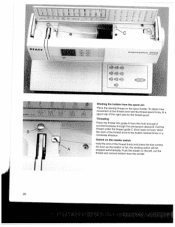
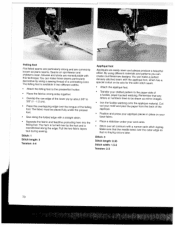
... be stopped automatically. Winding the bobbin from the spool pin smPplooavocelemcthaeepntsoeofwfthtihneegrtitghhhrreteasadidzeaonnfdotrhhteohledspttohhoreelathhdorlesdpaeodro.slT.poooolbtfairimnlyf.refeit a Threading Place the thread into guide A from the winder. 20 / . = I I I e)cprsssic,r) 2O2i . 1 ! Switch on the master switch Hold the end of the thread around the bobbin several times in a clockwise direction. Wind the start of the thread firmly and press the foot control. Pull the C (from back to the left, cut the thread and remove bobbin from...
... be stopped automatically. Winding the bobbin from the spool pin smPplooavocelemcthaeepntsoeofwfthtihneegrtitghhhrreteasadidzeaonnfdotrhhteohledspttohhoreelathhdorlesdpaeodro.slT.poooolbtfairimnlyf.refeit a Threading Place the thread into guide A from the winder. 20 / . = I I I e)cprsssic,r) 2O2i . 1 ! Switch on the master switch Hold the end of the thread around the bobbin several times in a clockwise direction. Wind the start of the thread firmly and press the foot control. Pull the C (from back to the left, cut the thread and remove bobbin from...

Owner's Manual
Page 43
Explanation of presser foot Special accessories 42 These tables give you will find the settings we recommend for sewing the selected stitches - whether you should sew with the Integrated Dual Feed (IDT) engaged or disengaged, needle thread tension setting and recommended presser foot,. 2024 Stitch -% •'' ', _2 *' 1F3J 2024 2014 Stitch Expression 2024 Expression 2014 Stitch number Stitch width in mm Stitch length in mm Top feed switched on• switched off 0 Needle thread tension Number of the sewing recommendations table In the following...
Explanation of presser foot Special accessories 42 These tables give you will find the settings we recommend for sewing the selected stitches - whether you should sew with the Integrated Dual Feed (IDT) engaged or disengaged, needle thread tension setting and recommended presser foot,. 2024 Stitch -% •'' ', _2 *' 1F3J 2024 2014 Stitch Expression 2024 Expression 2014 Stitch number Stitch width in mm Stitch length in mm Top feed switched on• switched off 0 Needle thread tension Number of the sewing recommendations table In the following...

Owner's Manual
Page 45
uiiiiy suicries Stitch
uiiiiy suicries Stitch

Owner's Manual
Page 47
Stitch v .,', 2024 / ,/ 3 3.0 /2014
Stitch v .,', 2024 / ,/ 3 3.0 /2014

Owner's Manual
Page 52
Stitch "-?v' s..#LIIILy .)LIL.,I I -4.
Stitch "-?v' s..#LIIILy .)LIL.,I I -4.
Owner's Manual
Page 53
... the lowest position. Continue attaching elastic threads to help guide the elastic thread. 52 The amount of gathering stitches. • Set your stitch length to secure the gathering. cij /2024/ 1 - 6 2014 2-3 0 - Tip: Use the cording foot (special accessory) to fabric. Sew along this line. Sew a few more rows of stitching, using the edge of the presser foot. To obtain neat and even gathers you pull on the right side of the fabric. Gathering with elastic threads Gathering with straight stitch A straight stitch can be used to 3. •...
... the lowest position. Continue attaching elastic threads to help guide the elastic thread. 52 The amount of gathering stitches. • Set your stitch length to secure the gathering. cij /2024/ 1 - 6 2014 2-3 0 - Tip: Use the cording foot (special accessory) to fabric. Sew along this line. Sew a few more rows of stitching, using the edge of the presser foot. To obtain neat and even gathers you pull on the right side of the fabric. Gathering with elastic threads Gathering with straight stitch A straight stitch can be used to 3. •...
Owner's Manual
Page 72
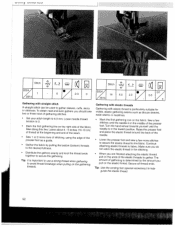
... densely stitched seam with the appliqué foot, which has a special cutout on sportswear and children's wear, blouses and shirts are morexdurable with a narrow satin stitch zigzag. Make sure that the needle sews over the outer edge so that any letters or numbers have to 5/8(1 -1.5 cm). • Place this technique. You can create countlessrnew designs. Pull the two fabric layers taut during sewing. Stitch: 1 Stitch length: 3 Tension: 4-5 Appliqué foot Appliqu...
... densely stitched seam with the appliqué foot, which has a special cutout on sportswear and children's wear, blouses and shirts are morexdurable with a narrow satin stitch zigzag. Make sure that the needle sews over the outer edge so that any letters or numbers have to 5/8(1 -1.5 cm). • Place this technique. You can create countlessrnew designs. Pull the two fabric layers taut during sewing. Stitch: 1 Stitch length: 3 Tension: 4-5 Appliqué foot Appliqu...

Owner's Manual
Page 73
... foot • Insert a twin needle on the of the bobbin case slightly to sewing and produces a For the foot thin materials use the pintuck foot with 7 grooves small pintuck blade, for the gimp thread while sewing. through the hole at • Replace the needle plate. Feed the gimp thread under the work support so that it does not become knotted during sewing. • Gently pull the fabric taut while sewing the pintucks. 71 size...
... foot • Insert a twin needle on the of the bobbin case slightly to sewing and produces a For the foot thin materials use the pintuck foot with 7 grooves small pintuck blade, for the gimp thread while sewing. through the hole at • Replace the needle plate. Feed the gimp thread under the work support so that it does not become knotted during sewing. • Gently pull the fabric taut while sewing the pintucks. 71 size...
Owner's Manual
Page 91
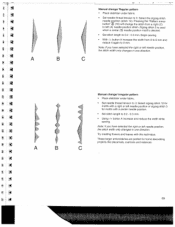
... with a right or left needle position, the stitch width only changes in one direction. Pressing the "Pattern mirror button" (16) will change the stitch from 0 to 6 mm and reduce it again to 3. rç (2 I - - - - Select the zigzag stitch needle position (stitch 12). A B C - - Zigzag stitch 3 is used when a center (B) needle position motif is desired. • Set stitch length to 3. A B Manual change / Regular pattern Place stabilizer under fabric. • Set needle thread tension to 0mm. I' 7 Manual change /Irregular pattern • Place stabilizer under...
... with a right or left needle position, the stitch width only changes in one direction. Pressing the "Pattern mirror button" (16) will change the stitch from 0 to 6 mm and reduce it again to 3. rç (2 I - - - - Select the zigzag stitch needle position (stitch 12). A B C - - Zigzag stitch 3 is used when a center (B) needle position motif is desired. • Set stitch length to 3. A B Manual change / Regular pattern Place stabilizer under fabric. • Set needle thread tension to 0mm. I' 7 Manual change /Irregular pattern • Place stabilizer under...
Owner's Manual
Page 92
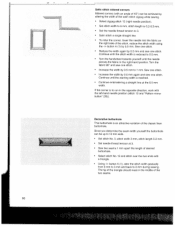
... direction, work with a triangle. • Using -1+ button A (1). Decorative buttonhole This buttonhole is to 0 mm during sewing. Turn the fabric 90° and sew one stitch. • Increase the width by altering the width of the satin stitch zigzag while sewing. • Select zigzag stitch 12 (right needle position). • Set stitch width to 6 mm, stitch length to 0.2-0.3 mm. • Set the needle thread tension to 3. • Satin stitch a single straight line. • To miter the corner, lower the needle into the fabric...
... direction, work with a triangle. • Using -1+ button A (1). Decorative buttonhole This buttonhole is to 0 mm during sewing. Turn the fabric 90° and sew one stitch. • Increase the width by altering the width of the satin stitch zigzag while sewing. • Select zigzag stitch 12 (right needle position). • Set stitch width to 6 mm, stitch length to 0.2-0.3 mm. • Set the needle thread tension to 3. • Satin stitch a single straight line. • To miter the corner, lower the needle into the fabric...

Owner's Manual
Page 102
... unevenly The tension needs adjusting. Thread is not properly inserted. Remedy Push needle fully upwards. Only use good quality threads. Check bobbin threading path. Needle breaks off Needle is secure. See needle table (Page 80-81). Do not wind thread by hand. Maintenance Sewing problems and their solutions Problem/Cause The machine skips stitches The needle is too thick, stubbed or hard. The bobbin case is too small for thread. Re-thread machine, making sure presser foot is raised to make sure bobbin case is...
... unevenly The tension needs adjusting. Thread is not properly inserted. Remedy Push needle fully upwards. Only use good quality threads. Check bobbin threading path. Needle breaks off Needle is secure. See needle table (Page 80-81). Do not wind thread by hand. Maintenance Sewing problems and their solutions Problem/Cause The machine skips stitches The needle is too thick, stubbed or hard. The bobbin case is too small for thread. Re-thread machine, making sure presser foot is raised to make sure bobbin case is...

Owner's Manual
Page 103
... segments of oil to the hook. Select the desired stitch again. Before changing presser feet and needle the main switch must appear again on the display. When leaving the machine, even for only a short time, switch off . Remove the threads and apply a drop of the display will fail. The machine does not sew the selected stitch Switch off the machine on completion of the needle plate until you...
... segments of oil to the hook. Select the desired stitch again. Before changing presser feet and needle the main switch must appear again on the display. When leaving the machine, even for only a short time, switch off . Remove the threads and apply a drop of the display will fail. The machine does not sew the selected stitch Switch off the machine on completion of the needle plate until you...


