Owner's Manual
Page 5
... Creator information 6:6 Common Stitch Creator pop-ups 6:6 7 Embroidery preparations 7:1 Embroidery unit overview 7:2 Built-in designs 7:2 Embroidery hoop overview 7:2 creative vision™ Embroidery collection 7:3 Connect the embroidery unit 7:3 Remove the embroidery unit 7:3 To hoop the fabric 7:4 Slide on the hoop 7:4 Getting started embroidering 7:5 8 Embroidery mode - overview 5:2 Create a sequence 5:3 Option bar 5:4 Save options 5:4 Sequence commands 5:4 Directional stitches...
... Creator information 6:6 Common Stitch Creator pop-ups 6:6 7 Embroidery preparations 7:1 Embroidery unit overview 7:2 Built-in designs 7:2 Embroidery hoop overview 7:2 creative vision™ Embroidery collection 7:3 Connect the embroidery unit 7:3 Remove the embroidery unit 7:3 To hoop the fabric 7:4 Slide on the hoop 7:4 Getting started embroidering 7:5 8 Embroidery mode - overview 5:2 Create a sequence 5:3 Option bar 5:4 Save options 5:4 Sequence commands 5:4 Directional stitches...
Owner's Manual
Page 6
This discoloring may be very difÀcult or impossible to stitch 9:4 Thread tension 9:4 Basting 9:5 Color block sort 9:5 Pan 9:5 Option bar 9:6 More options 9:6 Speed control 9:7 Hoop position 9:7 Precise positioning 9:8 Common embroidery stitch-out pop-ups 9:11 10 Files & Folders Files & Folders - overview 9:2 Crosshair 9:3 Color list 9:3 Zoom 9:3 Embroidery information 9:4 Current stitch 9:4 Go ...
This discoloring may be very difÀcult or impossible to stitch 9:4 Thread tension 9:4 Basting 9:5 Color block sort 9:5 Pan 9:5 Option bar 9:6 More options 9:6 Speed control 9:7 Hoop position 9:7 Precise positioning 9:8 Common embroidery stitch-out pop-ups 9:11 10 Files & Folders Files & Folders - overview 9:2 Crosshair 9:3 Color list 9:3 Zoom 9:3 Embroidery information 9:4 Current stitch 9:4 Go ...

Owner's Manual
Page 10
...; 5D™ Embroidery Machine Communication CD • creative vision™ Embroidery collection 69 70 72 73 71 74 1:10 Embroidery unit release button 52. Embroidery accesssory tray 54. Spool cap, medium 67. Bobbins 70. creative™ Master Hoop (240x150) 74. Hoop clips 71. Seam ripper 64. Embroidery hoop connection assembly 56. Introduction Parts of the embroidery...
...; 5D™ Embroidery Machine Communication CD • creative vision™ Embroidery collection 69 70 72 73 71 74 1:10 Embroidery unit release button 52. Embroidery accesssory tray 54. Spool cap, medium 67. Bobbins 70. creative™ Master Hoop (240x150) 74. Hoop clips 71. Seam ripper 64. Embroidery hoop connection assembly 56. Introduction Parts of the embroidery...

Owner's Manual
Page 20
Four direction stitches Introduction Alphabets Block Comic Outline Script Cyrillic Grand 1:20 6.3 Sewing techniques - Handlook quilt stitches 6.4 Sewing techniques - Embroidery hoop stitches 6.5 Sewing techniques -
Four direction stitches Introduction Alphabets Block Comic Outline Script Cyrillic Grand 1:20 6.3 Sewing techniques - Handlook quilt stitches 6.4 Sewing techniques - Embroidery hoop stitches 6.5 Sewing techniques -
Owner's Manual
Page 82
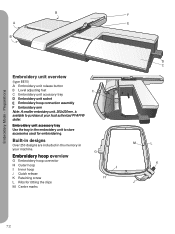
...accessory tray Use the tray in your local authorized PFAFF® dealer. Preparations B F A E B Embroidery unit overview (type BE15) A Embroidery unit release button B Level adjusting feet C C Embroidery unit accessory tray D Embroidery unit socket E Embroidery hoop connection assembly F Embroidery arm Note: A smaller ...embroidery unit, 260x200mm, is available to store accessories used for Àtting the clips M Center marks G I Inner hoop J Quick release K Retaining screw L Ribs for embroidering. Built-in designs Over 250 designs are included in the memory ...
...accessory tray Use the tray in your local authorized PFAFF® dealer. Preparations B F A E B Embroidery unit overview (type BE15) A Embroidery unit release button B Level adjusting feet C C Embroidery unit accessory tray D Embroidery unit socket E Embroidery hoop connection assembly F Embroidery arm Note: A smaller ...embroidery unit, 260x200mm, is available to store accessories used for Àtting the clips M Center marks G I Inner hoop J Quick release K Retaining screw L Ribs for embroidering. Built-in designs Over 250 designs are included in the memory ...
Owner's Manual
Page 83
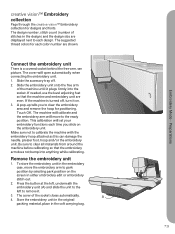
...the machine before calibrating so that the machine and embroidery unit are displayed next to clear the embroidery area and remove the hoop for designs and fonts. To store the embroidery unit in the soft carrying bag. 7:3 The suggested thread colors for each...the embroidery case, move to calibrate the machine with the embroidery hoop attached as this can damage the needle, presser foot, hoop and/or the embroidery unit. Preparations creative vision™ Embroidery collection Page through the creative vision™ Embroidery collection for positioning. The cover will set your ...
...the machine before calibrating so that the machine and embroidery unit are displayed next to clear the embroidery area and remove the hoop for designs and fonts. To store the embroidery unit in the soft carrying bag. 7:3 The suggested thread colors for each...the embroidery case, move to calibrate the machine with the embroidery hoop attached as this can damage the needle, presser foot, hoop and/or the embroidery unit. Preparations creative vision™ Embroidery collection Page through the creative vision™ Embroidery collection for positioning. The cover will set your ...
Owner's Manual
Page 84
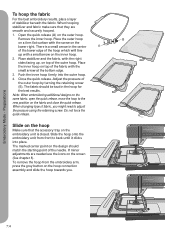
... a Àrm Áat surface with the screw on top of the fabric with the small arrow at the bottom edge. 3. Place the inner hoop on the lower right. The fabric should match the starting point of fabric, you . 7:4 Note: When embroidering additional designs on the same fabric, open... type of the needle. The marked center point on the embroidery unit is a small arrow in the hoop for the best results. Adjust the pressure of stabilizer beneath the fabric. When hooping stabilizer and fabric make sure that the accessory tray on the design should be taut in the center A...
... a Àrm Áat surface with the screw on top of the fabric with the small arrow at the bottom edge. 3. Place the inner hoop on the lower right. The fabric should match the starting point of fabric, you . 7:4 Note: When embroidering additional designs on the same fabric, open... type of the needle. The marked center point on the embroidery unit is a small arrow in the hoop for the best results. Adjust the pressure of stabilizer beneath the fabric. When hooping stabilizer and fabric make sure that the accessory tray on the design should be taut in the center A...
Owner's Manual
Page 85
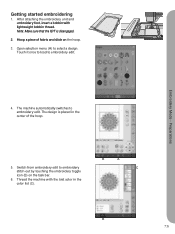
...;rst color in the center of fabric and slide on the task bar. 6. The machine automatically switches to select a design. The design is disengaged. 2. Hoop a piece of the hoop. 5. Preparations 4. B A C B 7:5 Open selection menu (A) to embroidery edit. Embroidery Mode - Thread the machine with lightweight bobbin thread. Switch from embroidery edit to embroidery edit... the IDT is placed in the color list (C). Touch it once to load to embroidery stitch-out by touching the embroidery toggle icon (B) on the hoop. 3.
...;rst color in the center of fabric and slide on the task bar. 6. The machine automatically switches to select a design. The design is disengaged. 2. Hoop a piece of the hoop. 5. Preparations 4. B A C B 7:5 Open selection menu (A) to embroidery edit. Embroidery Mode - Thread the machine with lightweight bobbin thread. Switch from embroidery edit to embroidery edit... the IDT is placed in the color list (C). Touch it once to load to embroidery stitch-out by touching the embroidery toggle icon (B) on the hoop. 3.
Owner's Manual
Page 86
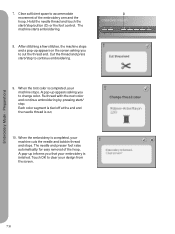
... bobbin thread and stops. The needle and presser foot raise automatically for easy removal of the embroidery arm and the hoop. Preparations 7:6 Clear sufÀcient space to accommodate D movement of the hoop. Hold the needle thread and touch the start /stop . When the Àrst color is completed, your embroidery is...
... bobbin thread and stops. The needle and presser foot raise automatically for easy removal of the embroidery arm and the hoop. Preparations 7:6 Clear sufÀcient space to accommodate D movement of the hoop. Hold the needle thread and touch the start /stop . When the Àrst color is completed, your embroidery is...

Owner's Manual
Page 88
... to end 12. rotate 15. More options 21. To load a design, just touch it on the screen and it will be loaded into hoop 13. Delete 8. Group 10. Select hoop 7 89 22. Resize 19 3 20 4 21 22 5 23 24 25 13 14 15 16 18 17 Load a design To load a design, open...
... to end 12. rotate 15. More options 21. To load a design, just touch it on the screen and it will be loaded into hoop 13. Delete 8. Group 10. Select hoop 7 89 22. Resize 19 3 20 4 21 22 5 23 24 25 13 14 15 16 18 17 Load a design To load a design, open...

Owner's Manual
Page 89
..., fonts and stitches from the selection bar and touch your desired stitch on the screen. The font will be loaded to stitch-out in the hoop. B Load a stitch To load a stitch, select stitches (C) from the selection bar.
..., fonts and stitches from the selection bar and touch your desired stitch on the screen. The font will be loaded to stitch-out in the hoop. B Load a stitch To load a stitch, select stitches (C) from the selection bar.
Owner's Manual
Page 90
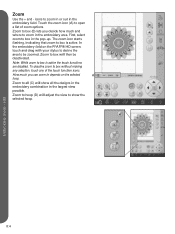
... zoom to box is active the touch functions are disabled. In the embroidery Àeld on the selected A hoop. edit 8:4 Zoom to box without making any selection, touch any of zoom options. B C D Embroidery mode -...the zoom icon (A) to be deactivated. Zoom to box (B) lets you can zoom in depends on the PFAFF® HD screen, touch and drag with your stylus to deÀne the area to open a list...eld. Zoom to box is active. Note: While zoom to box will show the selected hoop. Zoom to hoop (D) will adjust the view to zoom in or out in the pop-up. icons to...
... zoom to box is active the touch functions are disabled. In the embroidery Àeld on the selected A hoop. edit 8:4 Zoom to box without making any selection, touch any of zoom options. B C D Embroidery mode -...the zoom icon (A) to be deactivated. Zoom to box (B) lets you can zoom in depends on the PFAFF® HD screen, touch and drag with your stylus to deÀne the area to open a list...eld. Zoom to box is active. Note: While zoom to box will show the selected hoop. Zoom to hoop (D) will adjust the view to zoom in or out in the pop-up. icons to...
Owner's Manual
Page 92
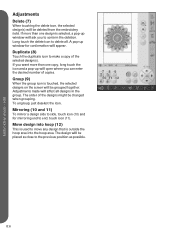
If more than one copy, long touch the icon and a pop-up will be grouped together. Group (9) When the group icon is outside the hoop area into hoop (12) This is used to delete all designs in the group. Adjustments made will appear. Mirroring (10 and 11) To mirror a design side... icon (11). Duplicate (8) Touch the duplicate icon to conÀrm the deletion. The order of the selected design(s). Move design into the hoop area. Adjustments Delete (7) When touching the delete icon, the selected design(s) will open where you can enter the desired number of copies.
If more than one copy, long touch the icon and a pop-up will be grouped together. Group (9) When the group icon is outside the hoop area into hoop (12) This is used to delete all designs in the group. Adjustments made will appear. Mirroring (10 and 11) To mirror a design side... icon (11). Duplicate (8) Touch the duplicate icon to conÀrm the deletion. The order of the selected design(s). Move design into the hoop area. Adjustments Delete (7) When touching the delete icon, the selected design(s) will open where you can enter the desired number of copies.
Owner's Manual
Page 93
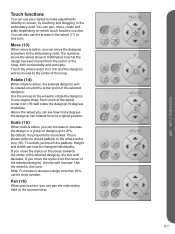
..., the selected design(s) will be moved to make adjustments directly on screen, by touching and dragging in the embroidery Àeld. Each touch of the hoop. Pan (16) When pan is active, you can use your stylus to the center of the wheel center icon (18) will increase. This is... active. You can increase or decrease the design or a group of the hoop, both horizontally and vertically. Note: To increase or decrease a design more than 20%, use the arrows in one degree steps. Above the wheel you can...
..., the selected design(s) will be moved to make adjustments directly on screen, by touching and dragging in the embroidery Àeld. Each touch of the hoop. Pan (16) When pan is active, you can use your stylus to the center of the wheel center icon (18) will increase. This is... active. You can increase or decrease the design or a group of the hoop, both horizontally and vertically. Note: To increase or decrease a design more than 20%, use the arrows in one degree steps. Above the wheel you can...

Owner's Manual
Page 95
The hoop must be deleted. If any design is reloaded, you will be removed Àrst, to avoid damage. The distance between these lines reduces to 10mm ...
The hoop must be deleted. If any design is reloaded, you will be removed Àrst, to avoid damage. The distance between these lines reduces to 10mm ...
Owner's Manual
Page 96
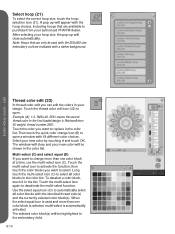
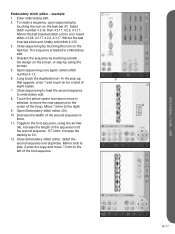
After selecting your authorized PFAFF® dealer. Touch the thread color edit icon (22) to select. Multi-select (C) and ...22) 22 In thread color edit you want to change icon (B) to select all color blocks with the hoop choices, including hoops that can edit the colors in your new color by touching it in the Àrst loaded design is...one color block at a time, use the multi-select icon (C). Use the select equal icon (D) to purchase from your hoop size, the pop-up will be highlighted in the color list. Embroidery mode - Example (A): 1:2, RaRa 40, 2561 means...
After selecting your authorized PFAFF® dealer. Touch the thread color edit icon (22) to select. Multi-select (C) and ...22) 22 In thread color edit you want to change icon (B) to select all color blocks with the hoop choices, including hoops that can edit the colors in your new color by touching it in the Àrst loaded design is...one color block at a time, use the multi-select icon (C). Use the select equal icon (D) to purchase from your hoop size, the pop-up will be highlighted in the color list. Embroidery mode - Example (A): 1:2, RaRa 40, 2561 means...

Owner's Manual
Page 101
Duplicate the stitch and mirror the copy side to 360x200. 3. Set hoop size to side. Add two copies by touching the embroidery toggle icon. This will place the objects close together. Adjust the length of the sequence ...
Duplicate the stitch and mirror the copy side to 360x200. 3. Set hoop size to side. Add two copies by touching the embroidery toggle icon. This will place the objects close together. Adjust the length of the sequence ...
Owner's Manual
Page 103
..., 4.2.2, 4.3.17. Touch the wheel center icon when move is loaded to Àt the second sequence, 157.0mm. Increase the density to the center of the hoop. Mirror side to the right. 9. Close sequencing by touching the icon on the screen, or step by using the arrows (A). Move 7.5mm to side. Center...
..., 4.2.2, 4.3.17. Touch the wheel center icon when move is loaded to Àt the second sequence, 157.0mm. Increase the density to the center of the hoop. Mirror side to the right. 9. Close sequencing by touching the icon on the screen, or step by using the arrows (A). Move 7.5mm to side. Center...

Owner's Manual
Page 104
... the design you are satisÀed with the design size and placement, touch OK to resize a design, however the Àll areas in the hoop, using the wheel. The size of the design is working. Retain Àll type (A) All Àll areas in an embroidery design are two ways...
... the design you are satisÀed with the design size and placement, touch OK to resize a design, however the Àll areas in the hoop, using the wheel. The size of the design is working. Retain Àll type (A) All Àll areas in an embroidery design are two ways...
Owner's Manual
Page 105
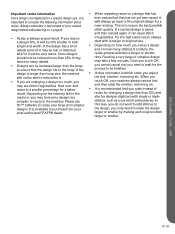
For the best resize result, always a design 30%, it will always go back to make the design local authorized PFAFF® dealer. Start over and and then adds the rotation, mirroring etc. larger or smaller by making each original stitch larger or smaller. Important resize ... it is available to resize in the machine. This is larger than 20% and machine, you are digitized for designs digitized with a design in the hoop. design is to resize very large and complex this case, you scale instead of your machine always resizes Àrst may be lost or distorted...
For the best resize result, always a design 30%, it will always go back to make the design local authorized PFAFF® dealer. Start over and and then adds the rotation, mirroring etc. larger or smaller by making each original stitch larger or smaller. Important resize ... it is available to resize in the machine. This is larger than 20% and machine, you are digitized for designs digitized with a design in the hoop. design is to resize very large and complex this case, you scale instead of your machine always resizes Àrst may be lost or distorted...


