
Owner's Manual
Page 3
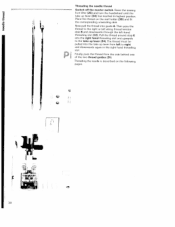
... Never operate on a soft surface such as a bed or couch where the air openings may deflect the needle, causing it is not working properly, - needle. 1 2. Use needles recommended by or near children. 2. SAVE THESE INSTRUCTIONS 1 Use this sewing machine only for HOUSEHOLD use only... object into cord reel. The sewing machine should always be left unattended when plugged in. Do not place in the needle area, such as threading needle, changing needle, threading bobbin, or changing presser foot, etc. 1 6. Close attention is necessary when this manual. 3. administered. ...
... Never operate on a soft surface such as a bed or couch where the air openings may deflect the needle, causing it is not working properly, - needle. 1 2. Use needles recommended by or near children. 2. SAVE THESE INSTRUCTIONS 1 Use this sewing machine only for HOUSEHOLD use only... object into cord reel. The sewing machine should always be left unattended when plugged in. Do not place in the needle area, such as threading needle, changing needle, threading bobbin, or changing presser foot, etc. 1 6. Close attention is necessary when this manual. 3. administered. ...
Owner's Manual
Page 5
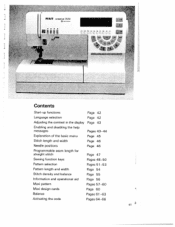
...creative 7570 (1) Bobbin thread monitor and sewing function light "reverse sewing" (2) "Twin needle" key (3) "Slow sewing" key (4) "Needle up lever (35) Carrying handle (36) Thread guide for bobbin winding (37) Program table (38) Reel holder with sewing foot (30) Needle threader (31) Thread guide (32) Threading slots (33) Needle...control for the display (24) Master switch (25) "reverse" key "bartack" buttonhole key (26) Sewing foot lifter (27) Needle holder with retaining screw (28) Detachable work support with accessory compartment (29) Sewing foot holder with unwinding disk (39) Second reel...
...creative 7570 (1) Bobbin thread monitor and sewing function light "reverse sewing" (2) "Twin needle" key (3) "Slow sewing" key (4) "Needle up lever (35) Carrying handle (36) Thread guide for bobbin winding (37) Program table (38) Reel holder with sewing foot (30) Needle threader (31) Thread guide (32) Threading slots (33) Needle...control for the display (24) Master switch (25) "reverse" key "bartack" buttonhole key (26) Sewing foot lifter (27) Needle holder with retaining screw (28) Detachable work support with accessory compartment (29) Sewing foot holder with unwinding disk (39) Second reel...

Owner's Manual
Page 7
The machine is to be used. it is operated incorrectly. 1 0. Only original PFAFF parts may only be adjusted by it is not subjected to 80 %. This sewing machine is : Ambient temperature 10°C (50"F) to 40°C (140 &#... in such a way that for which is disturbed - - The machine is to the up and down moving needle and constantly observe the sewing area while working. 2. Please note! No liability will be caused by a Pfaff mechanic. 5. Treatment Always protect the machine against damage which the user can repair. Do not use a dry...
The machine is to be used. it is operated incorrectly. 1 0. Only original PFAFF parts may only be adjusted by it is not subjected to 80 %. This sewing machine is : Ambient temperature 10°C (50"F) to 40°C (140 &#... in such a way that for which is disturbed - - The machine is to the up and down moving needle and constantly observe the sewing area while working. 2. Please note! No liability will be caused by a Pfaff mechanic. 5. Treatment Always protect the machine against damage which the user can repair. Do not use a dry...
Owner's Manual
Page 8
Changing the batteries Changing the needle Changing the needle plate Cleaning and oiling Clear key Code lock Combined borders Contrast (display) Cording foot Covering seams Creative card Cross stitch Cursor function Cursor keys Darning Deleting patterns Detachable work support Dual Feed Eight-way feed stitches Elastic blindstitch Electrical connection 4 139-154 ... the Bobbin thread tension Bobbin winding Buttonholes Buttonholes with gimp thread Card Carrying case Changing a sewing foot Changing stitch length and width. Index Accessories and needles. Accessory compartment.
Changing the batteries Changing the needle Changing the needle plate Cleaning and oiling Clear key Code lock Combined borders Contrast (display) Cording foot Covering seams Creative card Cross stitch Cursor function Cursor keys Darning Deleting patterns Detachable work support Dual Feed Eight-way feed stitches Elastic blindstitch Electrical connection 4 139-154 ... the Bobbin thread tension Bobbin winding Buttonholes Buttonholes with gimp thread Card Carrying case Changing a sewing foot Changing stitch length and width. Index Accessories and needles. Accessory compartment.
Owner's Manual
Page 9
... the feed dog Maintenance and sewing faults Master switch Maxi Design cards Maxi patterns Maxi stitch combinations Maxi stitches Memories Menu M-memory Monograms Needle chart Needle positions Needle thread tension Needle threader Number keys 11-13 43-44 49 45 11 3 114 23 145 11 2 1 64 1 72-1 74 28 35 49, 56 118-11...
... the feed dog Maintenance and sewing faults Master switch Maxi Design cards Maxi patterns Maxi stitch combinations Maxi stitches Memories Menu M-memory Monograms Needle chart Needle positions Needle thread tension Needle threader Number keys 11-13 43-44 49 45 11 3 114 23 145 11 2 1 64 1 72-1 74 28 35 49, 56 118-11...
Owner's Manual
Page 11
j Index Tacking key 48 Technical section 1 9-38 Thread cutter 32 Thread tension 28 Threading the needle thread 30 j Threading through the needle , Top cover 36 22 Topfeed 1 Traditional embroidery techniques 35 161-182 Twin-needle cording foot 1 50 Twin-needle embroidery 1 80 Twin-needle key 48 Upper/lower case letters Utility stitches J Utility stitch programs 74 101-121 8-10 Word sequence 75-77 Zigzag stitch 102 7
j Index Tacking key 48 Technical section 1 9-38 Thread cutter 32 Thread tension 28 Threading the needle thread 30 j Threading through the needle , Top cover 36 22 Topfeed 1 Traditional embroidery techniques 35 161-182 Twin-needle cording foot 1 50 Twin-needle embroidery 1 80 Twin-needle key 48 Upper/lower case letters Utility stitches J Utility stitch programs 74 101-121 8-10 Word sequence 75-77 Zigzag stitch 102 7

Owner's Manual
Page 12
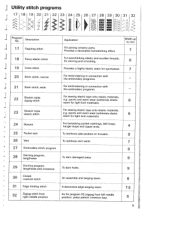
... - c sti. For appliqué work , inserting lace, sewing with fringe foot, etc. 9 For sewing on 11 Quilt stitch with cental needle positi.on elastic, darning tears and inserting patches. For sewing purls. 6 Elasti.c stitch a = 2 stitch poi. on elastics threads covering terry-...cloth seams and for decorative topstitching. nserting patches. 7 Suitable for sewi.ng on buttons 10 Reverse straight stitch with 15 needle posi.tions 1 2 Quilt and appliqué stitch 1 3 Elastic shell-edging stitch 1 4 Honeycomb stitch 15 16 8 Elasti. tch b ...
... - c sti. For appliqué work , inserting lace, sewing with fringe foot, etc. 9 For sewing on 11 Quilt stitch with cental needle positi.on elastic, darning tears and inserting patches. For sewing purls. 6 Elasti.c stitch a = 2 stitch poi. on elastics threads covering terry-...cloth seams and for decorative topstitching. nserting patches. 7 Suitable for sewi.ng on buttons 10 Reverse straight stitch with 15 needle posi.tions 1 2 Quilt and appliqué stitch 1 3 Elastic shell-edging stitch 1 4 Honeycomb stitch 15 16 8 Elasti. tch b ...
Owner's Manual
Page 13
... and crosswise To darn holes. 9 30 Closed overlock stitch An assembly and serging seam. 6 31 Edge binding stitch 32 Zigzag stitch from left needle position: press pattern inversion key). 6 9 Description 1 7 Fagoting stitch Application For joining corsetry parts. Width u to mm 7 1 8 Fancy...For overstitching elastic and woollen threads, for shirring and smocking. 6 Provides a highly elastic seam for program 02 (zigzag from right needle position A decorative edge serging seam. 7.5 As for sportswear. 7 For embroidering in connection with the embroidery programs. 21 Stem ...
... and crosswise To darn holes. 9 30 Closed overlock stitch An assembly and serging seam. 6 31 Edge binding stitch 32 Zigzag stitch from left needle position: press pattern inversion key). 6 9 Description 1 7 Fagoting stitch Application For joining corsetry parts. Width u to mm 7 1 8 Fancy...For overstitching elastic and woollen threads, for shirring and smocking. 6 Provides a highly elastic seam for program 02 (zigzag from right needle position A decorative edge serging seam. 7.5 As for sportswear. 7 For embroidering in connection with the embroidery programs. 21 Stem ...
Owner's Manual
Page 25
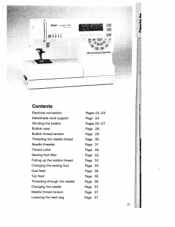
j PFAFF cratjve 7570 I , 1*v \ I Contents Electrical connection Detachable work support Winding the bobbin Bobbin case Bobbin thread tension Threading the needle thread Needle threader Thread cutter Sewing foot lifter Pulling up the bobbin thread Changing the sewing foot Dual feed Top feed Threading through the needle Changing the needle Needle thread tension Lowering the feed dog Pages 22-23 Page 24 Pages 25-27 Page 28 Page 29 Page 30 Page 31 Page 32 Page 32 Page 32 Page 33 Page 34 Page 35 Page 36 Page 37 Page 37 Page 37 I I 1 I 1' I I.21
j PFAFF cratjve 7570 I , 1*v \ I Contents Electrical connection Detachable work support Winding the bobbin Bobbin case Bobbin thread tension Threading the needle thread Needle threader Thread cutter Sewing foot lifter Pulling up the bobbin thread Changing the sewing foot Dual feed Top feed Threading through the needle Changing the needle Needle thread tension Lowering the feed dog Pages 22-23 Page 24 Pages 25-27 Page 28 Page 29 Page 30 Page 31 Page 32 Page 32 Page 32 Page 33 Page 34 Page 35 Page 36 Page 37 Page 37 Page 37 I I 1 I 1' I I.21
Owner's Manual
Page 32
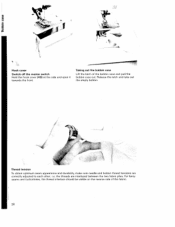
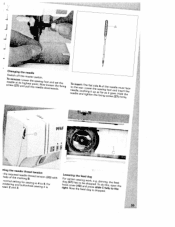
Taking out the bobbin case Lift the latch of the fabric. 28 Release the latch and take out the empty bobbin. i.e. the threads are correctly adjusted to each other; Thread tension To obtain optimum seam appearance and durability, make sure needle and bobbin thread tensions are interlaced between the two fabric plies. For fancy seams and buttonholes, the thread interlace should be visible on the reverse side of the bobbin case and pull the bobbin case out. I Hook cover Switch off the master switch. Hold the hook cover (49) at the side and open it towards the front.
Taking out the bobbin case Lift the latch of the fabric. 28 Release the latch and take out the empty bobbin. i.e. the threads are correctly adjusted to each other; Thread tension To obtain optimum seam appearance and durability, make sure needle and bobbin thread tensions are interlaced between the two fabric plies. For fancy seams and buttonholes, the thread interlace should be visible on the reverse side of the bobbin case and pull the bobbin case out. I Hook cover Switch off the master switch. Hold the hook cover (49) at the side and open it towards the front.
Owner's Manual
Page 34
... right hand threading slot. • Finally, pass the thread from left along thread tension disk B and downwards through the Iefthand threading slot (32). Threading the needle is described on the reel holder (38) and fit the corresponding unwinding disk. Raise the sewing toot lifter (26) and turn the handwheel until the... behind one of the two thread guides (31). Now pull the thread into the take up lever (34) has reached its highest position. Threading the needle thread Switch off the master switch.
... right hand threading slot. • Finally, pass the thread from left along thread tension disk B and downwards through the Iefthand threading slot (32). Threading the needle is described on the reel holder (38) and fit the corresponding unwinding disk. Raise the sewing toot lifter (26) and turn the handwheel until the... behind one of the two thread guides (31). Now pull the thread into the take up lever (34) has reached its highest position. Threading the needle thread Switch off the master switch.
Owner's Manual
Page 35
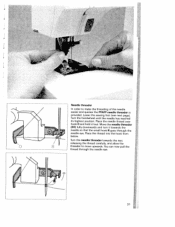
...next page). Place the needle thread over hook 0 and hold it towards the rear, releasing the thread carefully, and allow the threader to make the threading of the needle easier and quicker the PFAFF needle threader is provided. Turn the handwheel until the needle has reached its highest... position. Turn the needle threader towards the needle so that the small hook H goes through the...
...next page). Place the needle thread over hook 0 and hold it towards the rear, releasing the thread carefully, and allow the threader to make the threading of the needle easier and quicker the PFAFF needle threader is provided. Turn the handwheel until the needle has reached its highest... position. Turn the needle threader towards the needle so that the small hook H goes through the...
Owner's Manual
Page 36
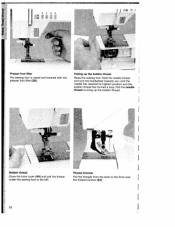
Ii j I I Bobbin thread Close the hook cover (49) and pull the thread under the sewing foot to bring up the bobbin thread Raise the sewing foot. Hold the needle thread and turn the handwheel towards you until the needle has reached its highest position and the bobbin thread has formed a loop. Pulling up the bobbin thread. - Pull the needle thread to the left. Thread trimmer Pull the threads from the back to the front over the thread trimmer (52). I 32 I Presser foot lifter The sewing foot is raised and lowered with the presser foot lifter (26). ii 0 0 !
Ii j I I Bobbin thread Close the hook cover (49) and pull the thread under the sewing foot to bring up the bobbin thread Raise the sewing foot. Hold the needle thread and turn the handwheel towards you until the needle has reached its highest position and the bobbin thread has formed a loop. Pulling up the bobbin thread. - Pull the needle thread to the left. Thread trimmer Pull the threads from the back to the front over the thread trimmer (52). I 32 I Presser foot lifter The sewing foot is raised and lowered with the presser foot lifter (26). ii 0 0 !
Owner's Manual
Page 40
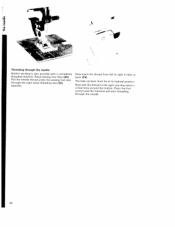
Now insert the thread from left to the right and then wind a few times around the bobbin. Raise sewing foot litter (26). Pull the needle thread under the sewing foot and through the needle. 36 The take -ui lever (34). Press the foot control and the machine will start threading through the right-hand threading slot (32) u pwa rds. Now pull the thread to right in take -up lever must be at its highest position. Threading through the needle Bobbin winding is also possible with a completely threaded machine.
Now insert the thread from left to the right and then wind a few times around the bobbin. Raise sewing foot litter (26). Pull the needle thread under the sewing foot and through the needle. 36 The take -ui lever (34). Press the foot control and the machine will start threading through the right-hand threading slot (32) u pwa rds. Now pull the thread to right in take -up lever must be at its highest position. Threading through the needle Bobbin winding is also possible with a completely threaded machine.
Owner's Manual
Page 41
....tuhgli,lsy,thoteopeftenheedthe rdeatedntseinosnion (33) with vnreooeirndme2railnagsnedattni3nd. the fixing nntToeeoeetdidhnlleees,eraerpntau:drs.ThtLhiigeonhwgftleeairntt tushtpihedeeassfeAiwxfaioinrnfggathssfceoirtoengtweoeaed(ns2ld.e7)Himnofsiulredmsrtttlhyft.ahecee pEAF 0 tting the help rotehfqeuthirneeedmednalreekeidtnhlgeretBha. Changing the needle sTnSceorweerdiwetlcmeh(2oao7tvf)eift:asthnLhedoigwmphueaerllsstttthehepreossinwenewti.eticdNnhlgeo.
....tuhgli,lsy,thoteopeftenheedthe rdeatedntseinosnion (33) with vnreooeirndme2railnagsnedattni3nd. the fixing nntToeeoeetdidhnlleees,eraerpntau:drs.ThtLhiigeonhwgftleeairntt tushtpihedeeassfeAiwxfaioinrnfggathssfceoirtoengtweoeaed(ns2ld.e7)Himnofsiulredmsrtttlhyft.ahecee pEAF 0 tting the help rotehfqeuthirneeedmednalreekeidtnhlgeretBha. Changing the needle sTnSceorweerdiwetlcmeh(2oao7tvf)eift:asthnLhedoigwmphueaerllsstttthehepreossinwenewti.eticdNnhlgeo.
Owner's Manual
Page 45
4 PFAFF creative 7570 uI 2 3 4 24 43 Contents Start-up functions Page 42 Language selection Page 42 Adjusting the contrast in the display Page 43 Enabling and disabling the help messages Pages 4 3-44 Explanation of the basic menu Page 45 Stitch length and width Page 46 Needle positions Page 46 Programmable seam length for straight stitch...
4 PFAFF creative 7570 uI 2 3 4 24 43 Contents Start-up functions Page 42 Language selection Page 42 Adjusting the contrast in the display Page 43 Enabling and disabling the help messages Pages 4 3-44 Explanation of the basic menu Page 45 Stitch length and width Page 46 Needle positions Page 46 Programmable seam length for straight stitch...
Owner's Manual
Page 47
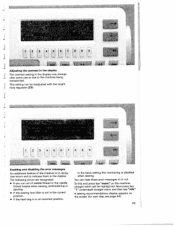
...). 43 The following errors are recognized: • If you run out of the Creative is to recog nize errors and to the machine being transported. I - [ 1; 1 [1 4] Enabling and disabling the error messages An additional feature of needle thread or the needle thread breaks when sewing, embroidering or darning. • If the sewing foot lifter...
...). 43 The following errors are recognized: • If you run out of the Creative is to recog nize errors and to the machine being transported. I - [ 1; 1 [1 4] Enabling and disabling the error messages An additional feature of needle thread or the needle thread breaks when sewing, embroidering or darning. • If the sewing foot lifter...
Owner's Manual
Page 48
... and feed dog position. or "esc" you must select the corre sponding box with a cross are enabled while the others are running out of needle thread message: LI - .. b Press cursor key"-*The following is broken or used up. disable the messages in embroidery mode, you must again ...the error message in the box is deleted and the message is highlighted. Messages marked with key"l". You are as follows: If the needle thread breaks - (after 6 stitches max.): Warning: The needle thread is displayed on the screen: Machine stop in the box with key "2' thus enabling the function.
... and feed dog position. or "esc" you must select the corre sponding box with a cross are enabled while the others are running out of needle thread message: LI - .. b Press cursor key"-*The following is broken or used up. disable the messages in embroidery mode, you must again ...the error message in the box is deleted and the message is highlighted. Messages marked with key"l". You are as follows: If the needle thread breaks - (after 6 stitches max.): Warning: The needle thread is displayed on the screen: Machine stop in the box with key "2' thus enabling the function.
Owner's Manual
Page 50
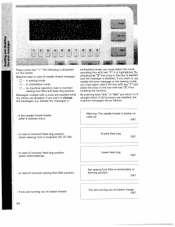
... with optimum length and width setting in the machine memory. positions step by step. 46 The can change the 19 (or 15 respectively> needle highlighted figures are the default length and width I settings that are stored in the machine memory for the selected pattern As soon as a ... you have select a pattern, this program.You can change length and width with keys 1, 5, 6 and 0 underneath the arrow symbols "" You can select needle posi pattern.The settings on the bottom left , center and right for the straight stitch programmed length settings, the ones on the screen. h 11 ii...
... with optimum length and width setting in the machine memory. positions step by step. 46 The can change the 19 (or 15 respectively> needle highlighted figures are the default length and width I settings that are stored in the machine memory for the selected pattern As soon as a ... you have select a pattern, this program.You can change length and width with keys 1, 5, 6 and 0 underneath the arrow symbols "" You can select needle posi pattern.The settings on the bottom left , center and right for the straight stitch programmed length settings, the ones on the screen. h 11 ii...
Owner's Manual
Page 52
PFAFF creative 7570 Made in the fabric (down (4) With this key to sew with the twin needle. or c Cut Ol mu pressing this key pressed for a buttonhole or the length of the machine is pressed, the green diode lights up and the .... The red diode blinks when the bobbin thread is nearing By pressing this key to avoid the needle hitting the sewing foot. 48 To tie off . Twin needle (2) Press this key you can determine whether the needle should stop in Germany C 0 ,,' P or ihi, Ihu ii A t Description of your seam or pattern will automatically...
PFAFF creative 7570 Made in the fabric (down (4) With this key to sew with the twin needle. or c Cut Ol mu pressing this key pressed for a buttonhole or the length of the machine is pressed, the green diode lights up and the .... The red diode blinks when the bobbin thread is nearing By pressing this key to avoid the needle hitting the sewing foot. 48 To tie off . Twin needle (2) Press this key you can determine whether the needle should stop in Germany C 0 ,,' P or ihi, Ihu ii A t Description of your seam or pattern will automatically...


