
Owner's Manual
Page 5
...24) Master switch (25) "reverse" key "bartack" buttonhole key (26) Sewing foot lifter (27) Needle holder with retaining screw (28) Detachable work support with accessory compartment (29) Sewing foot holder with sewing foot (30) Needle threader (31) Thread guide (32) ...Threading slots (33) Needle thread tension (34) Take-up /down" key (5) "Tacking" key (6) Multi function display (7) Number keys (8) Cursor keys (9) "esc" key (10) "clear" key (11) Key "0-9" for embroidery device (57) Feed dog Parts of the creative 7570...
...24) Master switch (25) "reverse" key "bartack" buttonhole key (26) Sewing foot lifter (27) Needle holder with retaining screw (28) Detachable work support with accessory compartment (29) Sewing foot holder with sewing foot (30) Needle threader (31) Thread guide (32) ...Threading slots (33) Needle thread tension (34) Take-up /down" key (5) "Tacking" key (6) Multi function display (7) Number keys (8) Cursor keys (9) "esc" key (10) "clear" key (11) Key "0-9" for embroidery device (57) Feed dog Parts of the creative 7570...
Owner's Manual
Page 8
...Bobbin case Bobbin thread Bobbin thread monitor Bobbin thread, raising the Bobbin thread tension Bobbin winding Buttonholes Buttonholes with gimp thread Card Carrying case Changing a sewing foot Changing stitch length and width. Index Accessories and needles. Changing the batteries Changing the needle ...Changing the needle plate Cleaning and oiling Clear key Code lock Combined borders Contrast (display) Cording foot Covering seams Creative card Cross stitch Cursor function Cursor keys Darning Deleting patterns Detachable work support Dual Feed Eight-way feed stitches Elastic...
...Bobbin case Bobbin thread Bobbin thread monitor Bobbin thread, raising the Bobbin thread tension Bobbin winding Buttonholes Buttonholes with gimp thread Card Carrying case Changing a sewing foot Changing stitch length and width. Index Accessories and needles. Changing the batteries Changing the needle ...Changing the needle plate Cleaning and oiling Clear key Code lock Combined borders Contrast (display) Cording foot Covering seams Creative card Cross stitch Cursor function Cursor keys Darning Deleting patterns Detachable work support Dual Feed Eight-way feed stitches Elastic...
Owner's Manual
Page 9
... cord Fringe toot Gathering General tips on embroidering Hemstitching Hook cover IDT (Top feed) Info J Inserting zippers Keyhole buttonhole Keyhole buttonhole with gimp thread Knit-edge foot "K's symbol Lacework Language selection Length and width settings Letter width Light bulb Light knit mending stitch Linen embroidery Lowering the feed dog Maintenance and sewing ...
... cord Fringe toot Gathering General tips on embroidering Hemstitching Hook cover IDT (Top feed) Info J Inserting zippers Keyhole buttonhole Keyhole buttonhole with gimp thread Knit-edge foot "K's symbol Lacework Language selection Length and width settings Letter width Light bulb Light knit mending stitch Linen embroidery Lowering the feed dog Maintenance and sewing ...
Owner's Manual
Page 10
... Pattern start Pattern stencils Pattern width Pintuck foot Programmable seam length with straight stitch Programs Pullover stitch Quilting Quilting and patchwork foot Quilt stitch Reverse sewing Richelieu Roll-hemming Round buttonhole Ruffler Sewing screen symbols Sewing faults and ... functions Sewing-function keys Sewing lamp Sewing on buttons Sewing recommendations Shirring foot Single pattern Smocking effect Standard buttonhole Start-up functions Stitch density Stitch length Stitch width Straight stitch Stretch buttonhole Stretch triple straight stitch Stretch triple zigzag stitch 6 49 1 50...
... Pattern start Pattern stencils Pattern width Pintuck foot Programmable seam length with straight stitch Programs Pullover stitch Quilting Quilting and patchwork foot Quilt stitch Reverse sewing Richelieu Roll-hemming Round buttonhole Ruffler Sewing screen symbols Sewing faults and ... functions Sewing-function keys Sewing lamp Sewing on buttons Sewing recommendations Shirring foot Single pattern Smocking effect Standard buttonhole Start-up functions Stitch density Stitch length Stitch width Straight stitch Stretch buttonhole Stretch triple straight stitch Stretch triple zigzag stitch 6 49 1 50...

Owner's Manual
Page 12
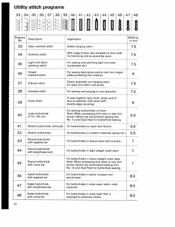
... edge thread. 5 For basting your sewing cuttings. - For appliqué work wear and for stretch materials (edge securing). 6 For sewing and finishing seams with fringe foot, etc. 9 For sewing on elastic, darning tears and inserting patches. Elasti.c stitch a = 2 stitch poi. on 11 Quilt stitch with each stress without being broken. - For....on Width up to mm For all fabrics. nts 04 Blind stitch Elastic 05 Blind stitch 06 Closed overlock stitch 07 Basting stitch 08 Linen buttonhole 09 Program for decorative hems 7 (smocking effect).
... edge thread. 5 For basting your sewing cuttings. - For appliqué work wear and for stretch materials (edge securing). 6 For sewing and finishing seams with fringe foot, etc. 9 For sewing on elastic, darning tears and inserting patches. Elasti.c stitch a = 2 stitch poi. on 11 Quilt stitch with each stress without being broken. - For....on Width up to mm For all fabrics. nts 04 Blind stitch Elastic 05 Blind stitch 06 Closed overlock stitch 07 Basting stitch 08 Linen buttonhole 09 Program for decorative hems 7 (smocking effect).
Owner's Manual
Page 14
Note: When processing knit wear or very thin woven fabrics we recommend sewing foot No. 1 a and Dual Feed for buttonhole sewing. 41 Stretch buttonhole, enforced For buttonholes on open -knit fabric and jersey. 75 38 Overlock stitch For sewing and serging in one operation. 7.5 Cover stitch To sew together terry cloth, jersey ...
Note: When processing knit wear or very thin woven fabrics we recommend sewing foot No. 1 a and Dual Feed for buttonhole sewing. 41 Stretch buttonhole, enforced For buttonholes on open -knit fabric and jersey. 75 38 Overlock stitch For sewing and serging in one operation. 7.5 Cover stitch To sew together terry cloth, jersey ...
Owner's Manual
Page 52
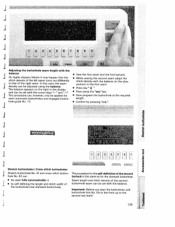
PFAFF creative 7570 Made in the fabric (down position) or at its end (less than 2 m thread on the bobbin), tied-off , hold this key pressed for a buttonhole or the length of the machine is pressed, the green diode lights up position) when re leasing the foot control. The red diode blinks when the bobbin... the sewing function keys cod or C me ,, Reverse key (25) When the reverse key is reduced by 2 mm to avoid the needle hitting the sewing foot. 48 or c Cut Ol mu pressing this key you can determine whether the needle should stop in Germany C 0 ,,' P or ihi, Ihu ii A t ...
PFAFF creative 7570 Made in the fabric (down position) or at its end (less than 2 m thread on the bobbin), tied-off , hold this key pressed for a buttonhole or the length of the machine is pressed, the green diode lights up position) when re leasing the foot control. The red diode blinks when the bobbin... the sewing function keys cod or C me ,, Reverse key (25) When the reverse key is reduced by 2 mm to avoid the needle hitting the sewing foot. 48 or c Cut Ol mu pressing this key you can determine whether the needle should stop in Germany C 0 ,,' P or ihi, Ihu ii A t ...
Owner's Manual
Page 53
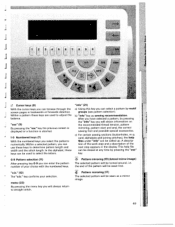
.... After you have selected a pattern, by motif screen pages in the display. mirroring, pattern start and end, the correct sewing foot and possible special accessories. 1-0 Numbered keys (7) c) For certain sewing sections (buttonholes, rn-p. This help With the numbered keys you can enter the pattern number of your selection. Pattern mirroring (19) (lateral...
.... After you have selected a pattern, by motif screen pages in the display. mirroring, pattern start and end, the correct sewing foot and possible special accessories. 1-0 Numbered keys (7) c) For certain sewing sections (buttonholes, rn-p. This help With the numbered keys you can enter the pattern number of your selection. Pattern mirroring (19) (lateral...
Owner's Manual
Page 109
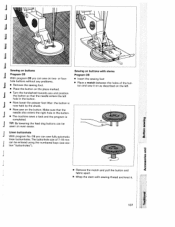
...107 j TIP: By lowering the feed dog buttons can be sewn on even easier. Linen buttonhole J With program No. 08 you can sew on two- Sewing on buttons with stems Program 09 • Insert the sewing foot • Place a match between the holes of 7-16 mm can be entered using the... numbered keys (see sec tion "buttonholes"). 0 C 0 U, U, • Remove the match and pull the button and fabric apart. • Wrap the...
...107 j TIP: By lowering the feed dog buttons can be sewn on even easier. Linen buttonhole J With program No. 08 you can sew on two- Sewing on buttons with stems Program 09 • Insert the sewing foot • Place a match between the holes of 7-16 mm can be entered using the... numbered keys (see sec tion "buttonholes"). 0 C 0 U, U, • Remove the match and pull the button and fabric apart. • Wrap the...
Owner's Manual
Page 124
... should be z be achieved by Madeira or Use buttonhole foot No. 5 for all types of material and garment. fabrics. 1 22 thread"). Buttonholes The Creative 7570 offers you the perfect button hole for buttonhole sewing. sewing loot No. 1 A with the dual feed t You only have to mea with the buttonhole guide No. 10 and sensor tech nology. Using...
... should be z be achieved by Madeira or Use buttonhole foot No. 5 for all types of material and garment. fabrics. 1 22 thread"). Buttonholes The Creative 7570 offers you the perfect button hole for buttonhole sewing. sewing loot No. 1 A with the dual feed t You only have to mea with the buttonhole guide No. 10 and sensor tech nology. Using...
Owner's Manual
Page 127
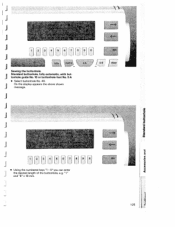
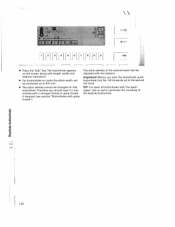
1-' 1r311r1v1rr81r91ro1 info men\ Sewing the buttonhole Standard buttonhole, fully automatic, with but J tonhole guide No.10 or buttonhole foot No. 5 A • Select buffonhole No. 40. On the dsplay appears the above shown J message. / [o- clear • Using the numbered keys "1 -0" you can enter the desired length of the buttonhole, e.g. "1 and"8'=18 mm. 0 Y t C C, I C C, C, Ci i125
1-' 1r311r1v1rr81r91ro1 info men\ Sewing the buttonhole Standard buttonhole, fully automatic, with but J tonhole guide No.10 or buttonhole foot No. 5 A • Select buffonhole No. 40. On the dsplay appears the above shown J message. / [o- clear • Using the numbered keys "1 -0" you can enter the desired length of the buttonhole, e.g. "1 and"8'=18 mm. 0 Y t C C, I C C, C, Ci i125
Owner's Manual
Page 128
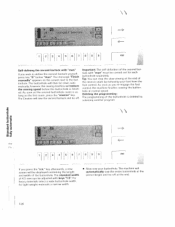
... re engage the foot control, I he sewn auto matically, however, the sewing machine will automatically sew the entire buttonhole at the preset length and tie off . As soon as the first seam press the "reverse" key. The machine will reduce the sewing speed before the buttonhole is deleted by... screen next to define the second bartack yourself. Important: The self definition of the second bar tack with "man" If you press the "ok." The Creative will then he machine I 1 11 [3 6117 8 91 If you wish to the but tonhole. i 1 [5 61 IH 1 1°] Self-defining the second ...
... re engage the foot control, I he sewn auto matically, however, the sewing machine will automatically sew the entire buttonhole at the preset length and tie off . As soon as the first seam press the "reverse" key. The machine will reduce the sewing speed before the buttonhole is deleted by... screen next to define the second bartack yourself. Important: The self definition of the second bar tack with "man" If you press the "ok." The Creative will then he machine I 1 11 [3 6117 8 91 If you wish to the but tonhole. i 1 [5 61 IH 1 1°] Self-defining the second ...
Owner's Manual
Page 130
... the same length. 1 1 [5 61 81 [01 The total length of the buttonhole foot No. 5A. The machine now sews the first bartack and the second buttonhole seam. Watch the red marks on the buttonhole foot while sewing. Press the "reverse" key. When the second buttonhole seam is the same length as the first one, the machine...
... the same length. 1 1 [5 61 81 [01 The total length of the buttonhole foot No. 5A. The machine now sews the first bartack and the second buttonhole seam. Watch the red marks on the buttonhole foot while sewing. Press the "reverse" key. When the second buttonhole seam is the same length as the first one, the machine...
Owner's Manual
Page 131
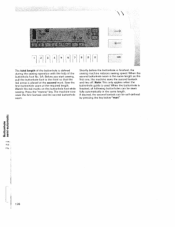
... however, only be adjusted using the balance. j This procedure can be applied tot • Now program the buttonhole at the required semi-automatic buttonholes and engaged button length. to that the • While sewing the second seam adapt the stitch density of the ...the first bartack. hole guide No. 10. • Confirm by self-defining the length and stitch width of the buttonhole (see standard buttonhole). Important: Before you start the buttonhole, pull buttonhole foot No. 5A to the front up to the first seam. C 0 .c 'C 0 H H 1 11 C 161 [7 0) I 0...
... however, only be adjusted using the balance. j This procedure can be applied tot • Now program the buttonhole at the required semi-automatic buttonholes and engaged button length. to that the • While sewing the second seam adapt the stitch density of the ...the first bartack. hole guide No. 10. • Confirm by self-defining the length and stitch width of the buttonhole (see standard buttonhole). Important: Before you start the buttonhole, pull buttonhole foot No. 5A to the front up to the first seam. C 0 .c 'C 0 H H 1 11 C 161 [7 0) I 0...
Owner's Manual
Page 133
... necessary (see "Button second red markl j hole with gimp thread). 1."y' 4, Keyhole buttonholes Important' The keyhole buttonhole should use a stronger buttonhole foot No. 5 A forwards up to measure from the inside outwards towards the edge. The keyhole buttonhole is automatically sewn between a length of the buttonhole, however, begins at the bartack. If you wish, you should be placed...
... necessary (see "Button second red markl j hole with gimp thread). 1."y' 4, Keyhole buttonholes Important' The keyhole buttonhole should use a stronger buttonhole foot No. 5 A forwards up to measure from the inside outwards towards the edge. The keyhole buttonhole is automatically sewn between a length of the buttonhole, however, begins at the bartack. If you wish, you should be placed...
Owner's Manual
Page 134
... the screen along with gimp thread"). TIP: Cut open all buttonholes with the balance. Important! C 0 0 > 132 key. a) 0 . Therefore you start the buttonhole, push buttonhole foot No. 5A forwards up to 8.5 mm. • The stitch density cannot be changed for this buttonhole. The buttonhole appears on coats the stitch width can be increased up to perforate the...
... the screen along with gimp thread"). TIP: Cut open all buttonholes with the balance. Important! C 0 0 > 132 key. a) 0 . Therefore you start the buttonhole, push buttonhole foot No. 5A forwards up to 8.5 mm. • The stitch density cannot be changed for this buttonhole. The buttonhole appears on coats the stitch width can be increased up to perforate the...
Owner's Manual
Page 135
...shops. • Push the runner forwards up to the second marking. • Now sew buttonhole No. 40, 41 or 42. • Place the gimp thread over the front ridge of the buttonhole foot and clamp the thread ends to the right and left • Cut off the loose ends... close to the bartack. C Ua,, I 1' 1; C) thread until the loop is covered by the button hole bartack. a, 0 I I I .. 0 U, 0a,.. • After finishing the buttonhole, pull the left into...
...shops. • Push the runner forwards up to the second marking. • Now sew buttonhole No. 40, 41 or 42. • Place the gimp thread over the front ridge of the buttonhole foot and clamp the thread ends to the right and left • Cut off the loose ends... close to the bartack. C Ua,, I 1' 1; C) thread until the loop is covered by the button hole bartack. a, 0 I I I .. 0 U, 0a,.. • After finishing the buttonhole, pull the left into...

Owner's Manual
Page 136
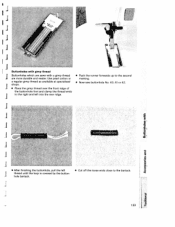
/ / Keyhole buttonhole with gimp thread • Push the buttonhole guide backwards. • Place the gimp thread over the front ridge. E • Push the runner forwards up to the second red mark. • Before you start sewing, press the "needle down" key. • Sew the first buttonhole seam. 134 Clamp them right and left of the back ridge respectively. Pull the thread ends taut backwards under the sewing foot.
/ / Keyhole buttonhole with gimp thread • Push the buttonhole guide backwards. • Place the gimp thread over the front ridge. E • Push the runner forwards up to the second red mark. • Before you start sewing, press the "needle down" key. • Sew the first buttonhole seam. 134 Clamp them right and left of the back ridge respectively. Pull the thread ends taut backwards under the sewing foot.

Owner's Manual
Page 137
Cut off the loose ends of the rounding, pull down the gimp thread from J the back ridge using an ordinary pin. The round buttonhole with gimp thread is just in the same way. [135 Important: The sewing foot must not be raised during this procedure! • Pull the gimp thread to the left and backwards until the loop is sewn in front of the needle. • Now sew the rounding carefully. 4444 • Then, hold the gimp thread slightly tauter and finish sewing the buttonhole. • When the machine sews the first stitches of the gimp thread.
Cut off the loose ends of the rounding, pull down the gimp thread from J the back ridge using an ordinary pin. The round buttonhole with gimp thread is just in the same way. [135 Important: The sewing foot must not be raised during this procedure! • Pull the gimp thread to the left and backwards until the loop is sewn in front of the needle. • Now sew the rounding carefully. 4444 • Then, hold the gimp thread slightly tauter and finish sewing the buttonhole. • When the machine sews the first stitches of the gimp thread.


