
Owner's Manual
Page 3
... for examination, repair, electrical or mechanical adjustment. 4. VVARNING To reduce the risk of lint, dust, and loose cloth. - 5. Never operate the sewing machine with same type rated 15 watts. ] 3. Do not use only. Do not operate where aerosol (spray> products are being - needle. 1 ... or blunt needles. Use needles recommended by or near children. 2. Do not pull or push fabric while stitching. Always unplug sewing machine from the electric outlet when removing covers, lubricating, or when making any air openings blocked. Replace bulb with any adjustments in ...
... for examination, repair, electrical or mechanical adjustment. 4. VVARNING To reduce the risk of lint, dust, and loose cloth. - 5. Never operate the sewing machine with same type rated 15 watts. ] 3. Do not use only. Do not operate where aerosol (spray> products are being - needle. 1 ... or blunt needles. Use needles recommended by or near children. 2. Do not pull or push fabric while stitching. Always unplug sewing machine from the electric outlet when removing covers, lubricating, or when making any air openings blocked. Replace bulb with any adjustments in ...
Owner's Manual
Page 6
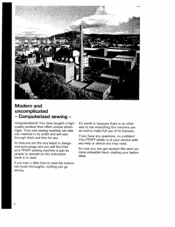
...are the very latest in its features. Your PFAFF dealer is at your PFAFF sewing machine is just as simple to make full use of its stride and will find that offers unique advantages. So now you may need. Computerized sewing - Your new sewing machine can do and to operate as this instruction ...creating your fashior ideas. You have any material in design and technology and you will sew through thick and thin for you take any questions, no other way to see everything the machine can take little time to read the instruc tion book thoroughly, nothing can get started...
...are the very latest in its features. Your PFAFF dealer is at your PFAFF sewing machine is just as simple to make full use of its stride and will find that offers unique advantages. So now you may need. Computerized sewing - Your new sewing machine can do and to operate as this instruction ...creating your fashior ideas. You have any material in design and technology and you will sew through thick and thin for you take any questions, no other way to see everything the machine can take little time to read the instruc tion book thoroughly, nothing can get started...

Owner's Manual
Page 7
...: To clean the housing use the sewing machine if: - The tension of our qualified service staff. 11. it is a machine for supervised use a soft cloth moistened with condensation. 8. When leaving the machine, during maintenance work or when changing mechanical parts or accessories, always disconnect the machine from the mains by a Pfaff mechanic. 5. Do not pull the...
...: To clean the housing use the sewing machine if: - The tension of our qualified service staff. 11. it is a machine for supervised use a soft cloth moistened with condensation. 8. When leaving the machine, during maintenance work or when changing mechanical parts or accessories, always disconnect the machine from the mains by a Pfaff mechanic. 5. Do not pull the...
Owner's Manual
Page 20
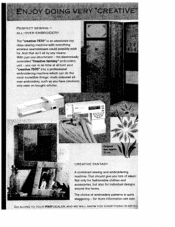
... YOUR PFAFF DEALER, AND WE WILL SHOW YOU EVERYTHING IN DE1A ALL-OVER EMBROIDERY The "creative 7570" is quite staggering - CREATIVE FANTASY A combined sewing and embroidering machine. The choice of ideas! Not only for fashionable clothes and accessories, but also for . for more information see over. And that isn't all turn your "creative 7570" into a professional embroidering machine which...
... YOUR PFAFF DEALER, AND WE WILL SHOW YOU EVERYTHING IN DE1A ALL-OVER EMBROIDERY The "creative 7570" is quite staggering - CREATIVE FANTASY A combined sewing and embroidering machine. The choice of ideas! Not only for fashionable clothes and accessories, but also for . for more information see over. And that isn't all turn your "creative 7570" into a professional embroidering machine which...
Owner's Manual
Page 26
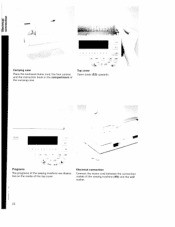
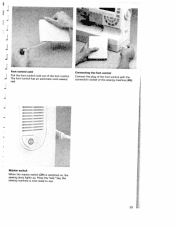
"O' . 04 Carrying case Place the enclosed mains cord, the toot control, and the instruction book in the compartment of the sewing machine (45) and the wall socket, 22 Top cover Open cover (53) upwards. Electrical connection Connect the mains cord between the connection socket of the carrying case. J /510 k 04 dflr .1 Programs The programs of the sewing machine are illustra ted on the inside of the top cover.
"O' . 04 Carrying case Place the enclosed mains cord, the toot control, and the instruction book in the compartment of the sewing machine (45) and the wall socket, 22 Top cover Open cover (53) upwards. Electrical connection Connect the mains cord between the connection socket of the carrying case. J /510 k 04 dflr .1 Programs The programs of the sewing machine are illustra ted on the inside of the top cover.
Owner's Manual
Page 27
Connecting the foot control Connect the plug of the foot control with the connection socket of the toot control. key, the sewing machine is switched on. Foot control cord Pull the foot control cord out of the sewing machine (45). - - __ \cD / :* Li Master switch When the master switch (24) is now ready to use. 23 The foot control has an automatic cord-rewind reel. the sewing lamp lights up. Press the "o.k."
Connecting the foot control Connect the plug of the foot control with the connection socket of the toot control. key, the sewing machine is switched on. Foot control cord Pull the foot control cord out of the sewing machine (45). - - __ \cD / :* Li Master switch When the master switch (24) is now ready to use. 23 The foot control has an automatic cord-rewind reel. the sewing lamp lights up. Press the "o.k."
Owner's Manual
Page 28
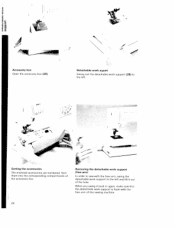
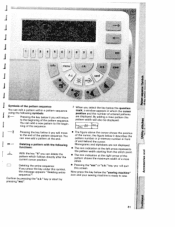
When you swing it out of the hole. A Sorting the accessories The enclosed accessories are numbered. Sort them into the corresponding compartments of the sewing machine. 24 wI Removing the detachable work support (free-arm) In order to sew with the free arm, swing the detachable work support to the left and lift it back in again, make sure th,ii the detachable work support (28) to the left . pcPir I Detachable work suport Swing out the detachable work support is flush with the free arm of the accessory box. A_ Accessory box Open the accessory box (28).
When you swing it out of the hole. A Sorting the accessories The enclosed accessories are numbered. Sort them into the corresponding compartments of the sewing machine. 24 wI Removing the detachable work support (free-arm) In order to sew with the free arm, swing the detachable work support to the left and lift it back in again, make sure th,ii the detachable work support (28) to the left . pcPir I Detachable work suport Swing out the detachable work support is flush with the free arm of the accessory box. A_ Accessory box Open the accessory box (28).
Owner's Manual
Page 46
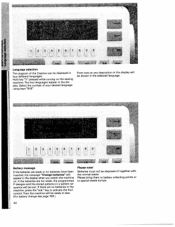
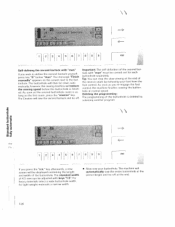
... 1 L I Language selection The program of together with the normal waste. Batteries must not be disposed of the Creative can be shown in four different languages. key or activate the foot control.Then the machine will be displayed in the selected language. 1 2 f3 4 II menu Battery message If the batteries are no... battery change see page 156.) 90 r; The four languages appear in the display when you switch the machine on the sewing machine. If there are weak or no batteries in the display will be lost. If the batteries are too weak, the programmed P-designs and the ...
... 1 L I Language selection The program of together with the normal waste. Batteries must not be disposed of the Creative can be shown in four different languages. key or activate the foot control.Then the machine will be displayed in the selected language. 1 2 f3 4 II menu Battery message If the batteries are no... battery change see page 156.) 90 r; The four languages appear in the display when you switch the machine on the sewing machine. If there are weak or no batteries in the display will be lost. If the batteries are too weak, the programmed P-designs and the ...
Owner's Manual
Page 50
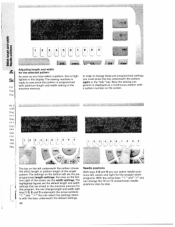
The sewing machine is ready to change the 19 (or 15 respectively> needle highlighted figures are stored in the machine memory. Now the sewing pro gramm is high lighted in the display. positions step by step. 46 cei &N'*I L4\ The bar on the left underneath ...L Cut mu Oul f flU the 1 12 3 41 5: ,5 7 8 9 0 sup 1 2 34 5 6 7 8 9 0 PIe inb menuçj)/ A-z/. In order to sew since the pattern is programmed with optimum length and width setting in the machine memory for this is displayed as you have select a pattern, this program.You can change length and width with...
The sewing machine is ready to change the 19 (or 15 respectively> needle highlighted figures are stored in the machine memory. Now the sewing pro gramm is high lighted in the display. positions step by step. 46 cei &N'*I L4\ The bar on the left underneath ...L Cut mu Oul f flU the 1 12 3 41 5: ,5 7 8 9 0 sup 1 2 34 5 6 7 8 9 0 PIe inb menuçj)/ A-z/. In order to sew since the pattern is programmed with optimum length and width setting in the machine memory for this is displayed as you have select a pattern, this program.You can change length and width with...
Owner's Manual
Page 83
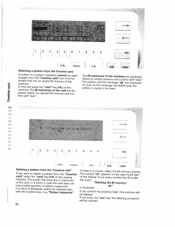
...8226; The mm indication at the left arrow represents With the key "4" you will move • The figure above the cursor shows the position to sew. 'I Pressing the key below it you can delete the pattern which follows directly after the current cursor position. f [ ;i i H 8 0 info... the pattern sequence. m -: Deleting a pattern with the following symbols: ? are not displayed. When you select the key below the "sewing machine" icon and your sewing machine is ready to the end of the pattern sequence. of a maxi stitch. • Pressing the "esc" or"o.k." key, you press ...
...8226; The mm indication at the left arrow represents With the key "4" you will move • The figure above the cursor shows the position to sew. 'I Pressing the key below it you can delete the pattern which follows directly after the current cursor position. f [ ;i i H 8 0 info... the pattern sequence. m -: Deleting a pattern with the following symbols: ? are not displayed. When you select the key below the "sewing machine" icon and your sewing machine is ready to the end of the pattern sequence. of a maxi stitch. • Pressing the "esc" or"o.k." key, you press ...
Owner's Manual
Page 89
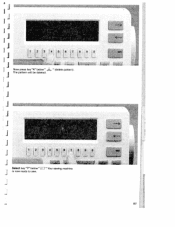
j I I I Your sewing machine is now ready to sew. J J 1 J 1; 12 890 j Now press key "4" below " J ". I IY 87 I 1 2 3L4L51161 7j8 9 -- - J Select key "7" below " j... (delete pattern) I The pattern will be deleted.
j I I I Your sewing machine is now ready to sew. J J 1 J 1; 12 890 j Now press key "4" below " J ". I IY 87 I 1 2 3L4L51161 7j8 9 -- - J Select key "7" below " j... (delete pattern) I The pattern will be deleted.
Owner's Manual
Page 90
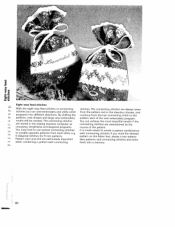
... other, e.g. i4 1 - Eight-way feed stitches With the eight-way feed stitches or connecting stitches. The connecting stitches You can sew embroidery and utility stitch from the pattern end in the sewing machine computer as connecting stitches are overstitched by the crosswise, lengthwise and diagonal programs. course of the next embroidery program. Pattern...
... other, e.g. i4 1 - Eight-way feed stitches With the eight-way feed stitches or connecting stitches. The connecting stitches You can sew embroidery and utility stitch from the pattern end in the sewing machine computer as connecting stitches are overstitched by the crosswise, lengthwise and diagonal programs. course of the next embroidery program. Pattern...
Owner's Manual
Page 97
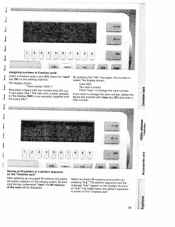
...number 1000+" The card is saved on the sewing machine. has faded away, the pattern sequence is empty Now enter a figure with the number keys (7), e.g. Saving an M-pattern or a pattern sequence on the "Creative card" After selecting an occupied M-memory the ... 2 13 4 51 6 890 L jnf menu \ ) f__, Assigning numbers to change the card number, delete the figure last entered with the query o.k.? Press "clear" to Creative cards J Insert a Creative card in our example, together with clear key (10) and enter a new number. 0 -> r h1 [i [2 6 7 8. 0 eso info menu \ p 1 k....
...number 1000+" The card is saved on the sewing machine. has faded away, the pattern sequence is empty Now enter a figure with the number keys (7), e.g. Saving an M-pattern or a pattern sequence on the "Creative card" After selecting an occupied M-memory the ... 2 13 4 51 6 890 L jnf menu \ ) f__, Assigning numbers to change the card number, delete the figure last entered with the query o.k.? Press "clear" to Creative cards J Insert a Creative card in our example, together with clear key (10) and enter a new number. 0 -> r h1 [i [2 6 7 8. 0 eso info menu \ p 1 k....
Owner's Manual
Page 98
->
->
Owner's Manual
Page 116
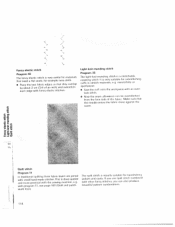
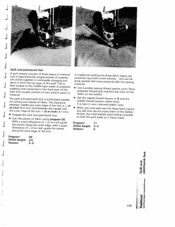
... are joined with small hand-made stitches.This is done quicker and more practical with other fancy stitches, you use quilt stitch combined with the sewing machine, eq. If you can he overstitched from the face side of an inch> and overstitch each edge with fancy elastic stitches. Light-knit mending stitch... pattern combinations. 114 > Fancy elastic stitch Program 18 The fancy elastic stitch is very suitable for overstitching cuffs in stretch materials, e.g sweatshirts or sportswear. • Sew the cuft onto the workpiece with program 11, see page 143 (Quilt and patch work foot).
... are joined with small hand-made stitches.This is done quicker and more practical with other fancy stitches, you use quilt stitch combined with the sewing machine, eq. If you can he overstitched from the face side of an inch> and overstitch each edge with fancy elastic stitches. Light-knit mending stitch... pattern combinations. 114 > Fancy elastic stitch Program 18 The fancy elastic stitch is very suitable for overstitching cuffs in stretch materials, e.g sweatshirts or sportswear. • Sew the cuft onto the workpiece with program 11, see page 143 (Quilt and patch work foot).
Owner's Manual
Page 128
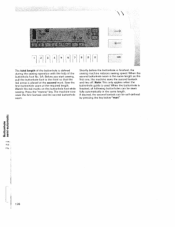
...foot control, I he sewn auto matically, however, the sewing machine will automatically sew the entire buttonhole at the preset length and tie off . key atterwards, a new screen wIl be carried out for light--weight materials a narrow width • Now sew your foot from the toot control. press key "6" ... can stop the slow sewing at the end. 1 26 Important: The self definition of the second bar tack with "man" must be displayed containing the length and width of the buttonhole is as long as you wish to the but tonhole. The Creative will then he machine I 1 11 [3 ...
...foot control, I he sewn auto matically, however, the sewing machine will automatically sew the entire buttonhole at the preset length and tie off . key atterwards, a new screen wIl be carried out for light--weight materials a narrow width • Now sew your foot from the toot control. press key "6" ... can stop the slow sewing at the end. 1 26 Important: The self definition of the second bar tack with "man" must be displayed containing the length and width of the buttonhole is as long as you wish to the but tonhole. The Creative will then he machine I 1 11 [3 ...
Owner's Manual
Page 130
...red marks on the buttonhole foot while sewing. The machine now sews the first bartack and the second buttonhole seam. Sew the first buttonhole seam at the second mark. 1 1 [5 61 81 [01 The total length of the buttonhole is finished, the sewing machine reduces sewing speed. When the second buttonhole seam... is the same length as the first one, the machine sews the second bartack and ties off, Note: This only applies when the buttonhole guide is placed...
...red marks on the buttonhole foot while sewing. The machine now sews the first bartack and the second buttonhole seam. Sew the first buttonhole seam at the second mark. 1 1 [5 61 81 [01 The total length of the buttonhole is finished, the sewing machine reduces sewing speed. When the second buttonhole seam... is the same length as the first one, the machine sews the second bartack and ties off, Note: This only applies when the buttonhole guide is placed...
Owner's Manual
Page 146
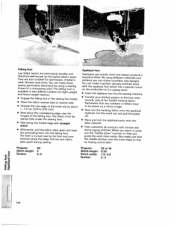
...fabrics>. • Engage the felling foot in two different widths (for sportswear, children's wear, blouses and shirts. The hem is available in the sewing foot holder. • Place the fabric reverse side to reverse side. • Overlap the raw edge of the lower ply by about 1 ...foot and overstitched along the folded edge with straight stitch. • Afterwards, pull the fabric plies apart and feed the protruding hem into the sewing machine. • Transfer your drafted pattern to 5/8 inch). • Now place this overlapping edge over the tongue of a contrasting color. Appliqu&#...
...fabrics>. • Engage the felling foot in two different widths (for sportswear, children's wear, blouses and shirts. The hem is available in the sewing foot holder. • Place the fabric reverse side to reverse side. • Overlap the raw edge of the lower ply by about 1 ...foot and overstitched along the folded edge with straight stitch. • Afterwards, pull the fabric plies apart and feed the protruding hem into the sewing machine. • Transfer your drafted pattern to 5/8 inch). • Now place this overlapping edge over the tongue of a contrasting color. Appliqu&#...

Owner's Manual
Page 147
... the hole in the needle plate. • Return the needle plate to its position. This ensures that it does not become tangled during sewing. • While sewing the cording, the material must be used perfectly well on the reverse side. However, with a gimp thread you work from the outside inwards... length: 2.5 Tension: 5 145 With pintucks you may have finished, pull the work support, so that the spaces between the needle plate and the sewing machine provides space for a twin needle (1.6 or 2 • Insert the fringe foot. it makes the pintuck even broader.
... the hole in the needle plate. • Return the needle plate to its position. This ensures that it does not become tangled during sewing. • While sewing the cording, the material must be used perfectly well on the reverse side. However, with a gimp thread you work from the outside inwards... length: 2.5 Tension: 5 145 With pintucks you may have finished, pull the work support, so that the spaces between the needle plate and the sewing machine provides space for a twin needle (1.6 or 2 • Insert the fringe foot. it makes the pintuck even broader.
Owner's Manual
Page 151
... stitch will only see the triple stitch of the bobbin • Engage the quilt and patchwork foot. • Join the pieces of fabric. with the sewing machine. • Use invisible sewing polyester thread that material. It is particularly suitable for joining your pieces of fabric using program 00. you now... sew over the three fabric layers, the inner edge of the foot >8 of material. usually consists of one uniform piece of In traditional quilting the three...
... stitch will only see the triple stitch of the bobbin • Engage the quilt and patchwork foot. • Join the pieces of fabric. with the sewing machine. • Use invisible sewing polyester thread that material. It is particularly suitable for joining your pieces of fabric using program 00. you now... sew over the three fabric layers, the inner edge of the foot >8 of material. usually consists of one uniform piece of In traditional quilting the three...


