
Owner's Manual
Page 20
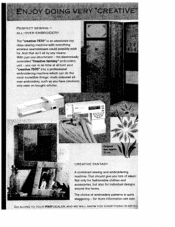
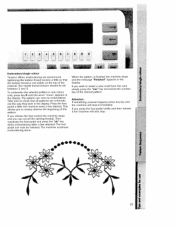
... choice of ideas! GO ALONG TO YOUR PFAFF DEALER, AND WE WILL SHOW YOU EVERYTHING IN DE1A That should give you have previously only seen on bought articles. With just one attachment - CREATIVE FANTASY A combined sewing and embroidering machine. for individual designs around the home. ALL-OVER EMBROIDERY The "creative 7570" is quite staggering - And that isn...
... choice of ideas! GO ALONG TO YOUR PFAFF DEALER, AND WE WILL SHOW YOU EVERYTHING IN DE1A That should give you have previously only seen on bought articles. With just one attachment - CREATIVE FANTASY A combined sewing and embroidering machine. for individual designs around the home. ALL-OVER EMBROIDERY The "creative 7570" is quite staggering - And that isn...
Owner's Manual
Page 22
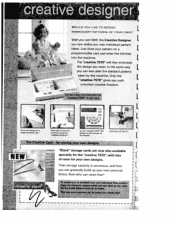
... your own personal I adqu. and then just sew it into the machine. [ The "creative 7570" will then embroider the design you can claim that? I Their storage capacity is even shown on a programmable card WouLD YOU LIKE TO DESIGN II. I WyOu ab#5h y*ur ownuat filing system I library. EMBROIDERY PATTERNS OF YOUR OWN? [ Well you own...
... your own personal I adqu. and then just sew it into the machine. [ The "creative 7570" will then embroider the design you can claim that? I Their storage capacity is even shown on a programmable card WouLD YOU LIKE TO DESIGN II. I WyOu ab#5h y*ur ownuat filing system I library. EMBROIDERY PATTERNS OF YOUR OWN? [ Well you own...
Owner's Manual
Page 48
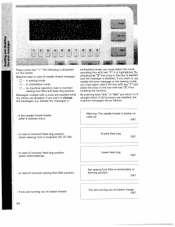
...select the box with key"l"and place the cross in case of needle thread message: LI - disable the messages in embroidery mode, you want to , sa enable the error message in the sewing mode, you are as follows: If the needle thread breaks - (after 6 stitches max.): Warning: The needle thread...to change the messages, e.g. It is disabled. .. b Press cursor key"-*The following is broken or used up. If all functions are enabled, the machine messages are running out of bobbin thread: 44 Lower feed dog OK? If you must select the corre sponding box with a cross are enabled while...
...select the box with key"l"and place the cross in case of needle thread message: LI - disable the messages in embroidery mode, you want to , sa enable the error message in the sewing mode, you are as follows: If the needle thread breaks - (after 6 stitches max.): Warning: The needle thread...to change the messages, e.g. It is disabled. .. b Press cursor key"-*The following is broken or used up. If all functions are enabled, the machine messages are running out of bobbin thread: 44 Lower feed dog OK? If you must select the corre sponding box with a cross are enabled while...
Owner's Manual
Page 90
The connecting stitches You can sew embroidery and utility stitch from the pattern end in the sewing machine computer as connecting stitches are overstitched by the crosswise, lengthwise and diagonal programs. course of the next embroidery program. Pattern start of the pattern. c. motifs will be...to use several connecting stitches It is much easier to create a pattern combination to the !1 patterns, new shapes and large-area embroidery pattern start and end are stored in the direction chosen, and "H programs into embroi dery patterns and connecting stitches and enter ...
The connecting stitches You can sew embroidery and utility stitch from the pattern end in the sewing machine computer as connecting stitches are overstitched by the crosswise, lengthwise and diagonal programs. course of the next embroidery program. Pattern start of the pattern. c. motifs will be...to use several connecting stitches It is much easier to create a pattern combination to the !1 patterns, new shapes and large-area embroidery pattern start and end are stored in the direction chosen, and "H programs into embroi dery patterns and connecting stitches and enter ...

Owner's Manual
Page 147
...out your desired pattern with chalk or the nostalgic touch to make the seam more voluminous. Sewing with a gimp thread you work support, so that the spaces between the needle plate and the sewing machine provides space for the gimp thread. Program: 00 Stitch length: 2.5 Tension: 5 145... underwear and children's wear. This ensures that it makes the pintuck even broader. Fringe foot Pintuck foot fj With this special foot for loop embroidery you wish to its position. Tip: If you can fit a "cording tongue" on terry-cloth. However, with a gimp thread makes a...
...out your desired pattern with chalk or the nostalgic touch to make the seam more voluminous. Sewing with a gimp thread you work support, so that the spaces between the needle plate and the sewing machine provides space for the gimp thread. Program: 00 Stitch length: 2.5 Tension: 5 145... underwear and children's wear. This ensures that it makes the pintuck even broader. Fringe foot Pintuck foot fj With this special foot for loop embroidery you wish to its position. Tip: If you can fit a "cording tongue" on terry-cloth. However, with a gimp thread makes a...
Owner's Manual
Page 179
.... • TaNoroom.u0nad0kea(lstlhticetcohenmtloebunrrogsitdhtweariytceampiponrroestxrs.ata1ibgmlhemt, s)s.teiwtch Tip: It is ready. 177 o Richelieu Even this very embroidery is artistic easy to do AVALON stabilizer in cold is dissolve water and the your sewing machine. • Tfarbarniscfeursyinogurthpeatdteirsnapopnetaoritnhge-ifnakcepesind.e of unique embroidery is even easier with function "needle down' • Ttthhhaeetinrwccialolrneffotuorlmulyrstch.ueDt ocouunttootuthtcesufatatbaarwbicoaufyrtotm2hemthbmeacafkrroeinamgs material! • Embroider the...
.... • TaNoroom.u0nad0kea(lstlhticetcohenmtloebunrrogsitdhtweariytceampiponrroestxrs.ata1ibgmlhemt, s)s.teiwtch Tip: It is ready. 177 o Richelieu Even this very embroidery is artistic easy to do AVALON stabilizer in cold is dissolve water and the your sewing machine. • Tfarbarniscfeursyinogurthpeatdteirsnapopnetaoritnhge-ifnakcepesind.e of unique embroidery is even easier with function "needle down' • Ttthhhaeetinrwccialolrneffotuorlmulyrstch.ueDt ocouunttootuthtcesufatatbaarwbicoaufyrtotm2hemthbmeacafkrroeinamgs material! • Embroider the...

Owner's Manual
Page 188
Never transport the sewing machine with the EC-Directive No.: 89/336 EEC Handling: Take care to clean the appliance. Wrseomhrieeonsvecodarrwfrryohinmegntohleueatvpmionwagienthrteesnumapnpaclcyehiwbnyoerpkuu,nlaaliltntteegrnatdthieoedn...can be switched off before connecting or releasing the 2. The embroidery unit corresponds with the embroidery unit connected. 4. or chemical products such as petrol or liquid chemicals I I 1. Always store the PC-Card in its package. 3. The sewing embroidery machine unit must be removed with alcohol or a dry, clean,...
Never transport the sewing machine with the EC-Directive No.: 89/336 EEC Handling: Take care to clean the appliance. Wrseomhrieeonsvecodarrwfrryohinmegntohleueatvpmionwagienthrteesnumapnpaclcyehiwbnyoerpkuu,nlaaliltntteegrnatdthieoedn...can be switched off before connecting or releasing the 2. The embroidery unit corresponds with the embroidery unit connected. 4. or chemical products such as petrol or liquid chemicals I I 1. Always store the PC-Card in its package. 3. The sewing embroidery machine unit must be removed with alcohol or a dry, clean,...
Owner's Manual
Page 194
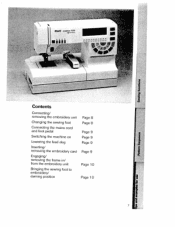
darning Position Page 8 Page 8 Page 9 Page 9 Page 9 Page 9 Page 10 Page 10 7 from the embroidery unit Bringing the sewing foot to embroidery! I7 4 PEAFF creative 7570 jail r Contents Connectjng/ removing the embroidery unit Changing the sewing foot Connecting the mains cord and foot pedal Switching the machine on Lowering the feed dog Inserting! removing the embroidery card Engaging/ removing the frame in!
darning Position Page 8 Page 8 Page 9 Page 9 Page 9 Page 9 Page 10 Page 10 7 from the embroidery unit Bringing the sewing foot to embroidery! I7 4 PEAFF creative 7570 jail r Contents Connectjng/ removing the embroidery unit Changing the sewing foot Connecting the mains cord and foot pedal Switching the machine on Lowering the feed dog Inserting! removing the embroidery card Engaging/ removing the frame in!
Owner's Manual
Page 204
... lifter must be attached (see 7570 Instruc tions page 11 0). The sewing machine stops and the following message appears: Lower feed dog ok? Attach the embroidery foot and set the sewing foot holder to embroider, the embroidery foot must be in embroidery position ok? Attach embroidery foot and bring sewing foot lifter to embroidery position. By pressing the "ok' key...
... lifter must be attached (see 7570 Instruc tions page 11 0). The sewing machine stops and the following message appears: Lower feed dog ok? Attach the embroidery foot and set the sewing foot holder to embroider, the embroidery foot must be in embroidery position ok? Attach embroidery foot and bring sewing foot lifter to embroidery position. By pressing the "ok' key...

Owner's Manual
Page 206
... material into the outer frame with the inner frame. The side of the sewing machine (see Technical section page 9). 19 I 0 I,' 4 PFAFF cieafr757O uI" I 4 5. Lay the embroidery fleece and the fabric onto the outer frame. Now attach the frame onto the embroidery unit of the fabric onto which you wish to embroider must be facing upwards...
... material into the outer frame with the inner frame. The side of the sewing machine (see Technical section page 9). 19 I 0 I,' 4 PFAFF cieafr757O uI" I 4 5. Lay the embroidery fleece and the fabric onto the outer frame. Now attach the frame onto the embroidery unit of the fabric onto which you wish to embroider must be facing upwards...
Owner's Manual
Page 210
The machines skips automati cally to be embroidered in the correct position. The grey ... position of napkins. Remember the change is very helpful for which an 80 frame is to the pattern start when starting sewing. C 0 .8 CO 40 I I When you press key 7 underneath this the change in position so that you... can always find the position again when repeating the pattern: e.g. The embroidery frame repositions itself. The placing/movement withing the embro idery frame always refers to the previous symbols (from page 20) press ...
The machines skips automati cally to be embroidered in the correct position. The grey ... position of napkins. Remember the change is very helpful for which an 80 frame is to the pattern start when starting sewing. C 0 .8 CO 40 I I When you press key 7 underneath this the change in position so that you... can always find the position again when repeating the pattern: e.g. The embroidery frame repositions itself. The placing/movement withing the embro idery frame always refers to the previous symbols (from page 20) press ...
Owner's Manual
Page 213
...pedal briefly and then release pattern. I I25 If you release the foot control the machine stops and you to select a new motif from the card simply press the "esc... that and the message "Finished" appears in the the bobbin thread is finished the machine stops tightening the bobbin thread tension a little so that all patterns are embroide red ...embroidered. The needle thread tension should be set between 2 and 3. 1 F: 2 i ri i ri r 9 O Embroidery/single colour 8 Tension: When embroidering we recommend When the pattern is not visible on the top of the desired pattern....
...pedal briefly and then release pattern. I I25 If you release the foot control the machine stops and you to select a new motif from the card simply press the "esc... that and the message "Finished" appears in the the bobbin thread is finished the machine stops tightening the bobbin thread tension a little so that all patterns are embroide red ...embroidered. The needle thread tension should be set between 2 and 3. 1 F: 2 i ri i ri r 9 O Embroidery/single colour 8 Tension: When embroidering we recommend When the pattern is not visible on the top of the desired pattern....
Owner's Manual
Page 214
... patterns can of the pattern. I I I I I I I 1. I 26 L L I 1 2) 3 56{78 90 I I • Attach embroidery foot and bring sewing foot lifter to embroider. Make sure you will see the pattern and the symbol "col 1 ..3". At the same time the message col 1, col 2... etc. The machine continues embroidering until all thread chan ges are completed. In the...
... patterns can of the pattern. I I I I I I I 1. I 26 L L I 1 2) 3 56{78 90 I I • Attach embroidery foot and bring sewing foot lifter to embroider. Make sure you will see the pattern and the symbol "col 1 ..3". At the same time the message col 1, col 2... etc. The machine continues embroidering until all thread chan ges are completed. In the...

Owner's Manual
Page 217
... has been inserted and you wish. The machine stops and this procedure as often as you continue to embroider. I: I ii I I I29 The feed dog must be brought to embro idery position before beginning to sew. • Sewing foot lifter The sewing toot lifter must be lowered in embroideri mode. You can repeat this message appears...
... has been inserted and you wish. The machine stops and this procedure as often as you continue to embroider. I: I ii I I I29 The feed dog must be brought to embro idery position before beginning to sew. • Sewing foot lifter The sewing toot lifter must be lowered in embroideri mode. You can repeat this message appears...
Owner's Manual
Page 260
You will be shown in the display. Insert full bobbin - [i [2 5IL1H89 Another method of storing a pattern sequence on the Creative Card is: Insert card 1 Fantasy into the sewing machine and select the pattern sequence again. Fit and insert the "1 20 frame - Lower feed dog - I p I' 0 3 I E j.71 ok? Once you have set all the functions press the ok key. Attach embroidery foot and bring lever to embro idery position. After a short wait the pattern sequence will see the following message: -
You will be shown in the display. Insert full bobbin - [i [2 5IL1H89 Another method of storing a pattern sequence on the Creative Card is: Insert card 1 Fantasy into the sewing machine and select the pattern sequence again. Fit and insert the "1 20 frame - Lower feed dog - I p I' 0 3 I E j.71 ok? Once you have set all the functions press the ok key. Attach embroidery foot and bring lever to embro idery position. After a short wait the pattern sequence will see the following message: -
Owner's Manual
Page 276
...you wish. Re-insert the frame into the embroidery unit. Once the appliqué is also possible to embroider appliqué with the embroidery motifs It is sewn on, the machine stops again and elicits the message "Cut out... embroidering the pattern. Any fabric pieces protruding from the frame. You can remove the frame from the embroidery unit but not the fabric from this card. Cut the needle thread and lay the appliqué ...can pin the outer edges of coloured material lends profile to sew the pattern. Select pattern No. 1 from the frame. Embroider the pattern.
...you wish. Re-insert the frame into the embroidery unit. Once the appliqué is also possible to embroider appliqué with the embroidery motifs It is sewn on, the machine stops again and elicits the message "Cut out... embroidering the pattern. Any fabric pieces protruding from the frame. You can remove the frame from the embroidery unit but not the fabric from this card. Cut the needle thread and lay the appliqué ...can pin the outer edges of coloured material lends profile to sew the pattern. Select pattern No. 1 from the frame. Embroider the pattern.
Owner's Manual
Page 278
... so the sewing foot glides over the fabric more easily ensuring a good neat embro idery. • When you have finished embroidering, remove the Avalori carefully. Embroidering with maxi stitches: For a border with the Creative. The Avalon covers the loops of the Avalon will dissolve in water. The embroidery fleece underneath ... patterns of the fabric and pin it to the fabric also. d Embroidering frotté You can even embroider on top of the machine or from cards A and B we recommend using embroidery fleece and Avalon (available from your Pfaff dealer). I A 9XXXJ(XXr.l - -,-.
... so the sewing foot glides over the fabric more easily ensuring a good neat embro idery. • When you have finished embroidering, remove the Avalori carefully. Embroidering with maxi stitches: For a border with the Creative. The Avalon covers the loops of the Avalon will dissolve in water. The embroidery fleece underneath ... patterns of the fabric and pin it to the fabric also. d Embroidering frotté You can even embroider on top of the machine or from cards A and B we recommend using embroidery fleece and Avalon (available from your Pfaff dealer). I A 9XXXJ(XXr.l - -,-.

Owner's Manual
Page 282
This shows you begin to sew the machine skips back to the pattern start automatically. When you where the middle of the pattern. Using key 7 ensure that the line is parallel to be .... All further patterns are to the frame. Halve this length. Now embroider the second pattern. Now position the needle exactly over the marking in the embroidery frame is always based around the middle of the fabric using the same procedure. 2 S E 0, ii 93 Now mark the middle of the fabric with a dot...
This shows you begin to sew the machine skips back to the pattern start automatically. When you where the middle of the pattern. Using key 7 ensure that the line is parallel to be .... All further patterns are to the frame. Halve this length. Now embroider the second pattern. Now position the needle exactly over the marking in the embroidery frame is always based around the middle of the fabric using the same procedure. 2 S E 0, ii 93 Now mark the middle of the fabric with a dot...


