

Owner's Manual
Page 3
...presser foot, etc. 1 6. Replace bulb with any other liquid. Do not place in the needle area, such as described in this manual. Do not allow to be pulled into water or other user servicing adjustments mentioned in . Keep ventilation openings of the sewing machine and ... accumulation of lint, dust, and loose cloth. 5. SAVE THESE INSTRUCTIONS 1 The sewing machine should always be left unattended when plugged in the instruction manual. Do not reach for a sewing machine that has fallen into water. Unplug immediately. 4. Never operate the sewing machine with same type rated 1 ...
...presser foot, etc. 1 6. Replace bulb with any other liquid. Do not place in the needle area, such as described in this manual. Do not allow to be pulled into water or other user servicing adjustments mentioned in . Keep ventilation openings of the sewing machine and ... accumulation of lint, dust, and loose cloth. 5. SAVE THESE INSTRUCTIONS 1 The sewing machine should always be left unattended when plugged in the instruction manual. Do not reach for a sewing machine that has fallen into water. Unplug immediately. 4. Never operate the sewing machine with same type rated 1 ...
Owner's Manual
Page 75
I I creatiVe 7560 I r. I PFAFF I I I Embroidery unit I 7560 I -- - I EOOO 11 I PFAFF I I I I I Instruction manual I I I I
I I creatiVe 7560 I r. I PFAFF I I I Embroidery unit I 7560 I -- - I EOOO 11 I PFAFF I I I I I Instruction manual I I I I

Owner's Manual
Page 83
Remove the attachment tray, followed by the ' bobbin door and then lower the feed dog (see - a) x a) 7 0 I- "creative 7560" Instruction Manual, page 27). As a result the release button will go. Switch the machine on at the on/off switch. The card is to the slot the ...direction of the arrow as far as it will spring out approx. 1/4 inch (1/2 cm). Inserting/removing the Creative Fantasy card 7 Connect the power cord and the...
Remove the attachment tray, followed by the ' bobbin door and then lower the feed dog (see - a) x a) 7 0 I- "creative 7560" Instruction Manual, page 27). As a result the release button will go. Switch the machine on at the on/off switch. The card is to the slot the ...direction of the arrow as far as it will spring out approx. 1/4 inch (1/2 cm). Inserting/removing the Creative Fantasy card 7 Connect the power cord and the...
Owner's Manual
Page 84
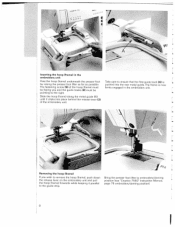
... the hoop (frame) along the metal guide (1) until it parallel to the guide strip, J P4p Bring the presser foot lifter to embroidery/darning position (see "Creative 7560" Instruction Manual, page 76 embroidery/darning position). 8 7 Inserting the hoop (frame) in the embroidery unit. .,1 I / '1 Removing the hoop (frame) If you and the guide tracks (8) must...
... the hoop (frame) along the metal guide (1) until it parallel to the guide strip, J P4p Bring the presser foot lifter to embroidery/darning position (see "Creative 7560" Instruction Manual, page 76 embroidery/darning position). 8 7 Inserting the hoop (frame) in the embroidery unit. .,1 I / '1 Removing the hoop (frame) If you and the guide tracks (8) must...


