

Owner's Manual
Page 4
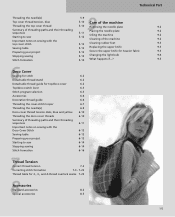
... width Setting the stitch length 1-3 Differential feed 2-32 2-33 2-34 How to use this instruction manual 1-6 Parts of creative 4874 Summary of stitch programs for the creative 4874 3 1-10 1-13 Electronic functions Set language 3-2 2Technical section, general Machine cover LCD Display Button functions 2-2 Save 3-2 ... 2-25 Stitch program selection 5-3 Thread cutter 2-26 Top/deco switch lever 5-3 Check spring for edging the thread chain 2-26 Accessories 5-5 Disengage the upper knife 2-27 Top cover hook 5-5 Engage the upper knife 2-27 Top cover round thread guide 5-6 Stitch...
... width Setting the stitch length 1-3 Differential feed 2-32 2-33 2-34 How to use this instruction manual 1-6 Parts of creative 4874 Summary of stitch programs for the creative 4874 3 1-10 1-13 Electronic functions Set language 3-2 2Technical section, general Machine cover LCD Display Button functions 2-2 Save 3-2 ... 2-25 Stitch program selection 5-3 Thread cutter 2-26 Top/deco switch lever 5-3 Check spring for edging the thread chain 2-26 Accessories 5-5 Disengage the upper knife 2-27 Top cover hook 5-5 Engage the upper knife 2-27 Top cover round thread guide 5-6 Stitch...
Owner's Manual
Page 5
......? 9-5 6Deco Cover Sewing for stitch 6-2 Detachable thread stand 6-2 Detachable thread guide for top/deco cover 6-2 Top/deco switch lever 6-3 Stitch program selection 6-3 Accessories 6-6 Decorative thread guide 6-6 Threading the cover-stitch looper 6-7 Threading the needle(s) 6-9 Deco-cover thread tension dials, blue and yellow 6-10 Threading the deco... 6-16 7Thread Tension Correct thread tension Correcting stitch formation 7-2 7-3 - 7-22 Thread table for 2-, 3-, and 4-thread overlock seams 7-23 8Accessories Standard accessories 8-2 Special accessories 8-5 1-5
......? 9-5 6Deco Cover Sewing for stitch 6-2 Detachable thread stand 6-2 Detachable thread guide for top/deco cover 6-2 Top/deco switch lever 6-3 Stitch program selection 6-3 Accessories 6-6 Decorative thread guide 6-6 Threading the cover-stitch looper 6-7 Threading the needle(s) 6-9 Deco-cover thread tension dials, blue and yellow 6-10 Threading the deco... 6-16 7Thread Tension Correct thread tension Correcting stitch formation 7-2 7-3 - 7-22 Thread table for 2-, 3-, and 4-thread overlock seams 7-23 8Accessories Standard accessories 8-2 Special accessories 8-5 1-5
Owner's Manual
Page 6
... to follow. How to use of all the electronic functions of your creative 4874. 9. This chapter contains information on all the basic mechanical functions of service with your PFAFF dealer. This chapter contains information about all its stride and will also ... easy as the table of your creative 4874 and suggestions for care and maintenance of time to use with your creative 4874 with a number of the machine - Accessories - This chapter contains pages that provides unique advantages. Electronic functions - Your PFAFF® coverlock™ features the...
... to follow. How to use of all the electronic functions of your creative 4874. 9. This chapter contains information on all the basic mechanical functions of service with your PFAFF dealer. This chapter contains information about all its stride and will also ... easy as the table of your creative 4874 and suggestions for care and maintenance of time to use with your creative 4874 with a number of the machine - Accessories - This chapter contains pages that provides unique advantages. Electronic functions - Your PFAFF® coverlock™ features the...
Owner's Manual
Page 16
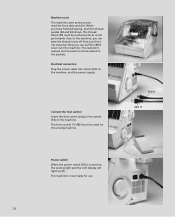
... (54) on , the sewing light and the LCD display will go towards close to be used for this is not essential. The operator's manual and accessories can take the thread cones off first, but this sewing machine. 120 V 220 V Power switch When the power switch (55) is now ready for... use. 2-2 Connect the foot control Insert the foot control plug in the pockets. When you can pull the 4874 cover over the machine. Machine cover The machine cover protects your machine from dust and dirt. Now you have finished sewing, push the thread...
... (54) on , the sewing light and the LCD display will go towards close to be used for this is not essential. The operator's manual and accessories can take the thread cones off first, but this sewing machine. 120 V 220 V Power switch When the power switch (55) is now ready for... use. 2-2 Connect the foot control Insert the foot control plug in the pockets. When you can pull the 4874 cover over the machine. Machine cover The machine cover protects your machine from dust and dirt. Now you have finished sewing, push the thread...

Owner's Manual
Page 19
... guide (44) and thread as shown in the illustration. Cone holders serve to advance the thread flawlessly. Spool net The spool net in the accessory box is used for synthetic threads or decorative threads that large cones are using large cones (5,000 - 10,000 mm), the foam pads (52) and... holders If you are well positioned. Thread run-off disc The thread run -off disc in the accessory box should be helpful to you. Attach the thread run -off disc as shown in the accessory box. Use the foam pads (52) and place the spool on the foam pad. Detachable thread guide...
... guide (44) and thread as shown in the illustration. Cone holders serve to advance the thread flawlessly. Spool net The spool net in the accessory box is used for synthetic threads or decorative threads that large cones are using large cones (5,000 - 10,000 mm), the foam pads (52) and... holders If you are well positioned. Thread run-off disc The thread run -off disc in the accessory box should be helpful to you. Attach the thread run -off disc as shown in the accessory box. Use the foam pads (52) and place the spool on the foam pad. Detachable thread guide...

Owner's Manual
Page 21
... F Changing the presser foot A Turn off the power switch To remove: Raise the needle(s) to use clearview foot R from the accessory box can pull it is directly beneath the presser foot holder. Technical section, general Presser foot The standard presser foot has two different positions...A, the presser foot will be used. For cover stitch (progs. 1, 2, 3) and double chainstitch (prog. 4), clearview foot F from the accessories box. Check: Lift the presser foot to the left. Position "B" - The presser foot is released automatically and you need to its/their highest ...
... F Changing the presser foot A Turn off the power switch To remove: Raise the needle(s) to use clearview foot R from the accessory box can pull it is directly beneath the presser foot holder. Technical section, general Presser foot The standard presser foot has two different positions...A, the presser foot will be used. For cover stitch (progs. 1, 2, 3) and double chainstitch (prog. 4), clearview foot F from the accessories box. Check: Lift the presser foot to the left. Position "B" - The presser foot is released automatically and you need to its/their highest ...

Owner's Manual
Page 23
..., general Changing a needle Turn off at side K of the needle is opposite face B of the tool. To insert: Insert the needle in hole A of the accessory box and push it up over the needle as far as it will go . No. 2002. 2-9 Take the needle changing tool out of the needle... the retaining screw. Insert the needle as far as it will go into the needle holder (you may have to its/their highest position. The 4874 uses system EL X 705 overlock needles, Cat.
..., general Changing a needle Turn off at side K of the needle is opposite face B of the tool. To insert: Insert the needle in hole A of the accessory box and push it up over the needle as far as it will go . No. 2002. 2-9 Take the needle changing tool out of the needle... the retaining screw. Insert the needle as far as it will go into the needle holder (you may have to its/their highest position. The 4874 uses system EL X 705 overlock needles, Cat.

Owner's Manual
Page 32
To thread needles more easily, use the thread guide A. 5 4 7 8 A Pull the thread about 10 cm (5") through the eye of the needle and place it facing to 8. 1 2 3 5 4 6 7 8 The thread must pass through the lower slot in thread guide 5. 2-18 Threading the needle(s) Thread the thread in order from 1 to the left under the presser foot (if necessary, press the tension release button (10), see page 2-21). If you sew with the needle(s) L0, L1, or L2 you have to use the needle threader in the accessories box (see page 3-4).
To thread needles more easily, use the thread guide A. 5 4 7 8 A Pull the thread about 10 cm (5") through the eye of the needle and place it facing to 8. 1 2 3 5 4 6 7 8 The thread must pass through the lower slot in thread guide 5. 2-18 Threading the needle(s) Thread the thread in order from 1 to the left under the presser foot (if necessary, press the tension release button (10), see page 2-21). If you sew with the needle(s) L0, L1, or L2 you have to use the needle threader in the accessories box (see page 3-4).

Owner's Manual
Page 35
... the needle. This causes a small metal pin to pass through to pull the thread loop through the eye and the needle is included in the accessory box). Note: If you press too hard, the small metal pin will no longer be pointing A upwards. Place the needle threader against the needle. Place...
... the needle. This causes a small metal pin to pass through to pull the thread loop through the eye and the needle is included in the accessory box). Note: If you press too hard, the small metal pin will no longer be pointing A upwards. Place the needle threader against the needle. Place...

Owner's Manual
Page 45
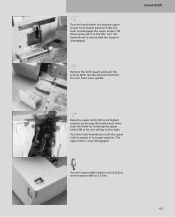
A 2-31 Technical section, general Remove knife guard Remove the trim catcher and open the front cover. A Note: The sewing table (accessory) is attached in the same way. Pull the knife guard (17) up and off. To insert, place the knife guard under latch A and push down into the front cover guides.
A 2-31 Technical section, general Remove knife guard Remove the trim catcher and open the front cover. A Note: The sewing table (accessory) is attached in the same way. Pull the knife guard (17) up and off. To insert, place the knife guard under latch A and push down into the front cover guides.
Owner's Manual
Page 52
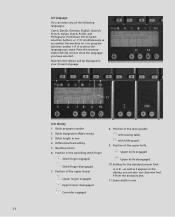
... mm 4. Now the description will be displayed in mm 3-2 Stitch finger disengaged. 7. Needle position 6. Set language You can also use clearview foot F from the accessory box. 11. as well as you can select any of the following languages: Czech, Danish, German, English, Spanish, French, Italian, Dutch, Polish, and Portuguese. Use...
... mm 4. Now the description will be displayed in mm 3-2 Stitch finger disengaged. 7. Needle position 6. Set language You can also use clearview foot F from the accessory box. 11. as well as you can select any of the following languages: Czech, Danish, German, English, Spanish, French, Italian, Dutch, Polish, and Portuguese. Use...
Owner's Manual
Page 61
... hand wheel. Turn the hand wheel to bring the upper looper to the right. Cover stitch Remove the knife guard and push the sewing table (accessory) down and push it will go to its lowest position.
... hand wheel. Turn the hand wheel to bring the upper looper to the right. Cover stitch Remove the knife guard and push the sewing table (accessory) down and push it will go to its lowest position.

Owner's Manual
Page 62
..., followed by the blue, green and red thread tensions for the needles. The thread tension settings appear beside the program number in order from the accessory box. Threading the cover-stitch looper Turn the hand wheel towards you press the memory selection button P once, the program memory opens. You can also...
..., followed by the blue, green and red thread tensions for the needles. The thread tension settings appear beside the program number in order from the accessory box. Threading the cover-stitch looper Turn the hand wheel towards you press the memory selection button P once, the program memory opens. You can also...

Owner's Manual
Page 64
Threading the needle(s) Thread the threads in thread guide 5. To thread needles more easily, use the needle threader in the accessory box. 5 4 Pull the thread about 10 cm (5") through the lower slot in order from 1 to 9. 1 2 5 3 4 6 7 89 The thread must pass through the eye of the needle and place it to the left under the presser foot (if necessary, press the tension release button (10), see page 3-4). 7 8 9 4-6
Threading the needle(s) Thread the threads in thread guide 5. To thread needles more easily, use the needle threader in the accessory box. 5 4 Pull the thread about 10 cm (5") through the lower slot in order from 1 to 9. 1 2 5 3 4 6 7 89 The thread must pass through the eye of the needle and place it to the left under the presser foot (if necessary, press the tension release button (10), see page 3-4). 7 8 9 4-6

Owner's Manual
Page 66
... threads moderately taut and start sewing slowly. Depending on the ruler of the seam and sew slowly off the project. As soon as an extra accessory. Note: In most cases, the differential feed will need to the hem. If you are sewing a continuous hem (around a project): Sew 4-5 stitches over the previous...
... threads moderately taut and start sewing slowly. Depending on the ruler of the seam and sew slowly off the project. As soon as an extra accessory. Note: In most cases, the differential feed will need to the hem. If you are sewing a continuous hem (around a project): Sew 4-5 stitches over the previous...

Owner's Manual
Page 67
... the stitch finger to normal sewing: Open the front cover and take off the sewing table. Grasp the threads at a constant distance from the accessory box left to the right so that the upper looper is used programs 21-30. At the same time, loosen the needle threads slightly with... the presser foot. Edge guide A Slide the edge guide from the edge of the presser foot holder. The edge guide is engaged. To return your creative 4874 to its upright and engage the movable knife.
... the stitch finger to normal sewing: Open the front cover and take off the sewing table. Grasp the threads at a constant distance from the accessory box left to the right so that the upper looper is used programs 21-30. At the same time, loosen the needle threads slightly with... the presser foot. Edge guide A Slide the edge guide from the edge of the presser foot holder. The edge guide is engaged. To return your creative 4874 to its upright and engage the movable knife.

Owner's Manual
Page 72
... sticker 2 (25) is located behind the front cover and 3 includes the following information: 4 1. Row: Tension setting in grey 5-2 Place the detachable thread guide from the accessories box on the rear cover and press the bottom portion of the thread stand (27) into place. Detachable thread guide for top/deco cover Pull...
... sticker 2 (25) is located behind the front cover and 3 includes the following information: 4 1. Row: Tension setting in grey 5-2 Place the detachable thread guide from the accessories box on the rear cover and press the bottom portion of the thread stand (27) into place. Detachable thread guide for top/deco cover Pull...
Owner's Manual
Page 74
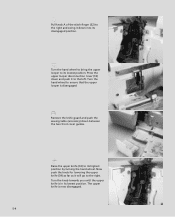
Remove the knife guard and push the sewing table (accessory) down and push it to the left. The upper knife is disengaged. Raise the upper knife (32) to its lowest position. Turn the knob towards ...
Remove the knife guard and push the sewing table (accessory) down and push it to the left. The upper knife is disengaged. Raise the upper knife (32) to its lowest position. Turn the knob towards ...

Owner's Manual
Page 75
3,5 Turn the seam width adjustment knob (22) to set the seam width to 3.5 mm. Top cover triangle thread guide Top cover hook Insert the top cover hook into the top slot (blue) of the holder. Top cover hook 2. To do this, loosen but do not remove the screw on the side with the allen key. Note: You must attach presser foot R and lower it. 5-5 Top cover round thread guide 3. Top Cover Stitch R Use clearview foot R from the accessory box. 1 3 2 Accessories The following accessories are provided for the top cover: 1.
3,5 Turn the seam width adjustment knob (22) to set the seam width to 3.5 mm. Top cover triangle thread guide Top cover hook Insert the top cover hook into the top slot (blue) of the holder. Top cover hook 2. To do this, loosen but do not remove the screw on the side with the allen key. Note: You must attach presser foot R and lower it. 5-5 Top cover round thread guide 3. Top Cover Stitch R Use clearview foot R from the accessory box. 1 3 2 Accessories The following accessories are provided for the top cover: 1.

Owner's Manual
Page 79
The thread must pass through the lower slot in order from 1 to 9. To thread needles more easily, use the needle threader in the accessory box. 7 8 Pull the thread about 10 cm (5") of the needle and place it to the left under the presser foot. Top Cover Stitch 1 2 5 3 4 6 7 8 9 5 4 Threading the needle(s) Thread the thread in thread guide 5. Pull about 10 cm (5") through the eye of thread through the looper and place it to the left under the presser foot (if necessary, press the tension release button (10), see page 3-4). 9 5-9
The thread must pass through the lower slot in order from 1 to 9. To thread needles more easily, use the needle threader in the accessory box. 7 8 Pull the thread about 10 cm (5") of the needle and place it to the left under the presser foot. Top Cover Stitch 1 2 5 3 4 6 7 8 9 5 4 Threading the needle(s) Thread the thread in thread guide 5. Pull about 10 cm (5") through the eye of thread through the looper and place it to the left under the presser foot (if necessary, press the tension release button (10), see page 3-4). 9 5-9


