
Owner's Manual
Page 3
...; This sewing machine is not intended for use by the manufacturer as threading needle, changing needle, threading bobbin, or changing presser foot, etc. • Always unplug the sewing machine from the electric outlet immediately after using and before cleaning. • Always unplug before using an electrical appliance, basic safety precautions should always be supervised to break. • Do not use the proper needle plate. Keep ventilation openings of the Sewing machine and foot controller free from moving parts...
...; This sewing machine is not intended for use by the manufacturer as threading needle, changing needle, threading bobbin, or changing presser foot, etc. • Always unplug the sewing machine from the electric outlet immediately after using and before cleaning. • Always unplug before using an electrical appliance, basic safety precautions should always be supervised to break. • Do not use the proper needle plate. Keep ventilation openings of the Sewing machine and foot controller free from moving parts...

Owner's Manual
Page 4
... creative 4874 3 1-10 1-13 Electronic functions Set language 3-2 2Technical section, general Machine cover LCD Display Button functions 2-2 Save 3-2 3-4 3-5 Electrical connection 2-2 Recalling the memory 3-5 Connect the foot control 2-2 Selecting a memory 3-5 Power switch 2-2 Notes on the saving to memory 3-6 Swivel table 2-3 Deleting all memories 3-6 Trim catcher Front cover Detachable thread stand 2-3 Changing settings for tension, stitch length and 2-3 differential feed directly without saving 3-7 2-4 Error 3-7 Thread stand Thread guide slide Foam pads/Cone holders...
... creative 4874 3 1-10 1-13 Electronic functions Set language 3-2 2Technical section, general Machine cover LCD Display Button functions 2-2 Save 3-2 3-4 3-5 Electrical connection 2-2 Recalling the memory 3-5 Connect the foot control 2-2 Selecting a memory 3-5 Power switch 2-2 Notes on the saving to memory 3-6 Swivel table 2-3 Deleting all memories 3-6 Trim catcher Front cover Detachable thread stand 2-3 Changing settings for tension, stitch length and 2-3 differential feed directly without saving 3-7 2-4 Error 3-7 Thread stand Thread guide slide Foam pads/Cone holders...
Owner's Manual
Page 5
... cover stitch 5-12 Cleaning rubber feet 9-3 Sewing table 5-12 Replacing the upper knife 9-3 Preparing your project 5-12 Secure the upper knife for heavier fabric 9-3 Stopping sewing 5-13 Changing the light bulb 9-4 Stitch formation 5-14 What happens if...? 9-5 6Deco Cover Sewing for stitch 6-2 Detachable thread stand 6-2 Detachable thread guide for top/deco cover 6-2 Top/deco switch lever 6-3 Stitch program selection 6-3 Accessories 6-6 Decorative thread guide 6-6 Threading the cover-stitch looper 6-7 Threading the needle(s) 6-9 Deco-cover thread tension dials...
... cover stitch 5-12 Cleaning rubber feet 9-3 Sewing table 5-12 Replacing the upper knife 9-3 Preparing your project 5-12 Secure the upper knife for heavier fabric 9-3 Stopping sewing 5-13 Changing the light bulb 9-4 Stitch formation 5-14 What happens if...? 9-5 6Deco Cover Sewing for stitch 6-2 Detachable thread stand 6-2 Detachable thread guide for top/deco cover 6-2 Top/deco switch lever 6-3 Stitch program selection 6-3 Accessories 6-6 Decorative thread guide 6-6 Threading the cover-stitch looper 6-7 Threading the needle(s) 6-9 Deco-cover thread tension dials...
Owner's Manual
Page 6
... on correct thread tensions for care and maintenance of your creative 4874. In this instruction manual is happy to be of all the basic mechanical functions of time to top cover stitching. 6. Accessories - Your new creative™ 4874 can take a bit of your creative 4874 with your creative 4874. 9. If you can create with your creative 4874 and suggestions for use with reference to study the instruction manual, nothing can do, and make it...
... on correct thread tensions for care and maintenance of your creative 4874. In this instruction manual is happy to be of all the basic mechanical functions of time to top cover stitching. 6. Accessories - Your new creative™ 4874 can take a bit of your creative 4874 with your creative 4874. 9. If you can create with your creative 4874 and suggestions for use with reference to study the instruction manual, nothing can do, and make it...
Owner's Manual
Page 8
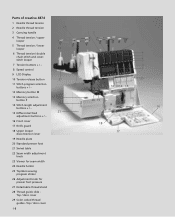
... button P 20 19 14 Stitch length adjustment 22 buttons + / - 16 15 Differential feed 21 adjustment buttons + / - 16 Front cover 18 17 Knife guard 18 Upper looper 17 disconnection lever 19 Needle plate 20 Standard presser foot 21 Swivel table 22 Seam width adjustment knob 23 Viewer for seam width 24 Needle holder 25 Top/deco sewing program sticker 26 Adjustment knob for presser foot pressure 27 Detachable thread stand 28 Thread guide slide Top / deco cover 29 Color coded thread guides -Top / deco cover...
... button P 20 19 14 Stitch length adjustment 22 buttons + / - 16 15 Differential feed 21 adjustment buttons + / - 16 Front cover 18 17 Knife guard 18 Upper looper 17 disconnection lever 19 Needle plate 20 Standard presser foot 21 Swivel table 22 Seam width adjustment knob 23 Viewer for seam width 24 Needle holder 25 Top/deco sewing program sticker 26 Adjustment knob for presser foot pressure 27 Detachable thread stand 28 Thread guide slide Top / deco cover 29 Color coded thread guides -Top / deco cover...
Owner's Manual
Page 16
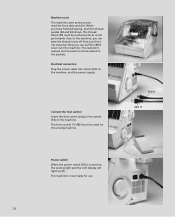
... machine. Connect the foot control Insert the foot control plug in the pockets. Now you can take the thread cones off first, but this sewing machine. 120 V 220 V Power switch When the power switch (55) is not essential. Electrical connection Plug the power cable into socket (53) on the machine, and the power supply. Machine cover The machine cover protects your machine from dust and dirt. The operator's manual and accessories...
... machine. Connect the foot control Insert the foot control plug in the pockets. Now you can take the thread cones off first, but this sewing machine. 120 V 220 V Power switch When the power switch (55) is not essential. Electrical connection Plug the power cable into socket (53) on the machine, and the power supply. Machine cover The machine cover protects your machine from dust and dirt. The operator's manual and accessories...

Owner's Manual
Page 47
However, it can be changed and stored at any time using stitch length adjustment buttons (14) (see page 3-4). 2-33 Technical section, general Setting the stitch length The stitch length is selected automatically by the creative 4874.
However, it can be changed and stored at any time using stitch length adjustment buttons (14) (see page 3-4). 2-33 Technical section, general Setting the stitch length The stitch length is selected automatically by the creative 4874.

Owner's Manual
Page 48
... of the rear feed dog. Differential feed The differential feed consists of the seam. The setting range is 1; This setting regulates the amount of material being used. Both feed dogs (A + B) move the fabric. But you can A prevent puckering of two feed dogs arranged one behind the other. The creative 4874 selects the differential feed automatically, but it to 2. The seam will remain flat any time using the differential feed adjustment buttons (15).
... of the rear feed dog. Differential feed The differential feed consists of the seam. The setting range is 1; This setting regulates the amount of material being used. Both feed dogs (A + B) move the fabric. But you can A prevent puckering of two feed dogs arranged one behind the other. The creative 4874 selects the differential feed automatically, but it to 2. The seam will remain flat any time using the differential feed adjustment buttons (15).
Owner's Manual
Page 52
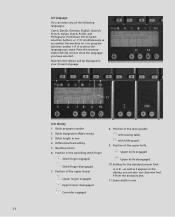
... feed setting 5. Needle position 6. Use program selection button + (11) to store the language you can select any of the sewing table with sewing table with knife guard 9. Position of the upper knife Upper knife engaged Upper knife disengaged 10. Position of the upper looper Upper looper engaged Upper looper disengaged Converter engaged 8. Set language You can also use clearview foot F from the accessory box. 11. Position of the following languages: Czech, Danish, German, English, Spanish...
... feed setting 5. Needle position 6. Use program selection button + (11) to store the language you can select any of the sewing table with sewing table with knife guard 9. Position of the upper knife Upper knife engaged Upper knife disengaged 10. Position of the upper looper Upper looper engaged Upper looper disengaged Converter engaged 8. Set language You can also use clearview foot F from the accessory box. 11. Position of the following languages: Czech, Danish, German, English, Spanish...
Owner's Manual
Page 54
... tension release button, all thread tension discs are 30 programs to adjust the stitch length. The program that was last used always appears when the machine is first switched on. 12 Memory button M: Use this button to store changed settings for a moment longer, the display scrolls through the programs automatically. If no changes are made within 10 seconds, the display switches back to adjust the differential feed...
... tension release button, all thread tension discs are 30 programs to adjust the stitch length. The program that was last used always appears when the machine is first switched on. 12 Memory button M: Use this button to store changed settings for a moment longer, the display scrolls through the programs automatically. If no changes are made within 10 seconds, the display switches back to adjust the differential feed...

Owner's Manual
Page 57
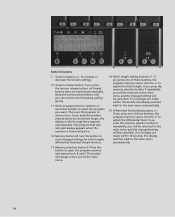
... change tension settings in the display: ERROR. Electronic functions Changing settings for tension, stitch length and differential feed directly without saving If you can change any setting with the corresponding +/- buttons. The program memory will be saved. Error 1 means: stepping motor number 1 for controlling thread tension should take your machine to the main menu automatically. To change the stitch length or the differential feed value, press the corresponding +/- If no functioning. buttons. Error If a stepping motor for the blue needle thread tension...
... change tension settings in the display: ERROR. Electronic functions Changing settings for tension, stitch length and differential feed directly without saving If you can change any setting with the corresponding +/- buttons. The program memory will be saved. Error 1 means: stepping motor number 1 for controlling thread tension should take your machine to the main menu automatically. To change the stitch length or the differential feed value, press the corresponding +/- If no functioning. buttons. Error If a stepping motor for the blue needle thread tension...

Owner's Manual
Page 67
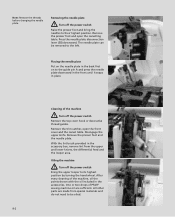
Now turn the hand wheel back until the needles are in the guide. To return your creative 4874 to normal sewing: Open the front cover and take off . Push the upper looper lever to pull the project out. At the same time, loosen the needle threads slightly with one finger. Cover stitch Raise the presser foot. Return the stitch finger to the wrong side of a project...
Now turn the hand wheel back until the needles are in the guide. To return your creative 4874 to normal sewing: Open the front cover and take off . Push the upper looper lever to pull the project out. At the same time, loosen the needle threads slightly with one finger. Cover stitch Raise the presser foot. Return the stitch finger to the wrong side of a project...

Owner's Manual
Page 108
... needle size all affect seam formation to some degree, so it may need to be adjusted to accommodate the fabric you will not be found on how to adjust the thread tension settings. See chapter 3 for the top cover and deco cover threads (42) must be necessary to do this. The program memory will open. Correct thread tension Your 4874 automatically sets the thread tension, stitch length and differential feed for each stitch type. However, the type...
... needle size all affect seam formation to some degree, so it may need to be adjusted to accommodate the fabric you will not be found on how to adjust the thread tension settings. See chapter 3 for the top cover and deco cover threads (42) must be necessary to do this. The program memory will open. Correct thread tension Your 4874 automatically sets the thread tension, stitch length and differential feed for each stitch type. However, the type...

Owner's Manual
Page 113
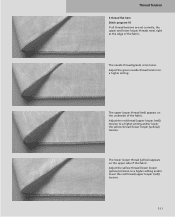
... upper looper thread (red) appears on the underside of the fabric. Adjust the yellow thread (lower looper (yellow)) tension to a higher setting and/or lower the yellow thread (lower looper) tension. The lower looper (yellow) appears on the upper side of the fabric. Thread tension setting too low. Thread Tension 4-thread overlock seam Stitch program 18 If all the thread tensions are too loose, causing large loops of needle thread on the underside of the fabric. Set the blue and green thread tension...
... upper looper thread (red) appears on the underside of the fabric. Adjust the yellow thread (lower looper (yellow)) tension to a higher setting and/or lower the yellow thread (lower looper) tension. The lower looper (yellow) appears on the upper side of the fabric. Thread tension setting too low. Thread Tension 4-thread overlock seam Stitch program 18 If all the thread tensions are too loose, causing large loops of needle thread on the underside of the fabric. Set the blue and green thread tension...

Owner's Manual
Page 114
... needle thread tension to a higher setting and/or lower the yellow thread (lower looper) tension. Adjust the red thread (upper looper) tension to a higher setting. 3-thread overlock, narrow and wide Stitch programs 10 and 11 If all the thread tensions are set correctly, the two looper threads (red and yellow) meet right at the edge of the fabric. The needle thread is too loose. Adjust the yellow thread (lower looper) tension to a higher setting and/or lower the red thread (upper looper) tension...
... needle thread tension to a higher setting and/or lower the yellow thread (lower looper) tension. Adjust the red thread (upper looper) tension to a higher setting. 3-thread overlock, narrow and wide Stitch programs 10 and 11 If all the thread tensions are set correctly, the two looper threads (red and yellow) meet right at the edge of the fabric. The needle thread is too loose. Adjust the yellow thread (lower looper) tension to a higher setting and/or lower the red thread (upper looper) tension...
Owner's Manual
Page 117
... thread (upper looper (red)) tension to a higher setting and/or lower the red thread (upper looper (red)) tension. 7-11 The upper looper thread (red) appears on the upper side of the fabric. Adjust the yellow thread (lower looper (yellow)) tension to a higher setting and/or lower the yellow thread (lower looper (yellow)) tension. The needle thread (green) is too loose. Adjust the green needle thread tension to a higher setting. Thread Tension 3-thread flat hem Stitch program 16 If all thread tensions are set correctly, the upper and lower...
... thread (upper looper (red)) tension to a higher setting and/or lower the red thread (upper looper (red)) tension. 7-11 The upper looper thread (red) appears on the upper side of the fabric. Adjust the yellow thread (lower looper (yellow)) tension to a higher setting and/or lower the yellow thread (lower looper (yellow)) tension. The needle thread (green) is too loose. Adjust the green needle thread tension to a higher setting. Thread Tension 3-thread flat hem Stitch program 16 If all thread tensions are set correctly, the upper and lower...
Owner's Manual
Page 129
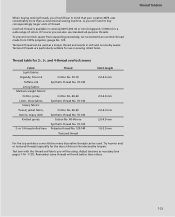
... use standard all-purpose threads. Thread Tension 7-23 When buying sewing threads, you should bear in mind that your creative 4874 uses considerably more than others. Overlock thread is available in cones (2,000-5,000 m) or mini-kingspools (1,000 m) in a wide range of thread. Try heavier and/ or textured threads especially for the deco stitches in soft and non-bulky seams. Textured threads are particularly suitable for 2-, 3-, and 4-thread overlock seams Fabric Light fabrics...
... use standard all-purpose threads. Thread Tension 7-23 When buying sewing threads, you should bear in mind that your creative 4874 uses considerably more than others. Overlock thread is available in cones (2,000-5,000 m) or mini-kingspools (1,000 m) in a wide range of thread. Try heavier and/ or textured threads especially for the deco stitches in soft and non-bulky seams. Textured threads are particularly suitable for 2-, 3-, and 4-thread overlock seams Fabric Light fabrics...
Owner's Manual
Page 135
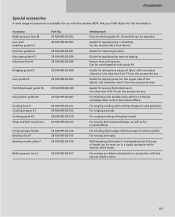
... Sewing work Foot to the reverse side of the fabric). Guide for applying lace (on beads. For serging cording with the creative 4874. For sewing on the upper side of the fabric). Use clearview foot F from the accessories box. Guide for hemming borders. Can be sewn on in a single operation while sewing rolled seams. For sewing on ribbons and elastic in conjunction with bias tape of various widths. Accessories Special accessories A wide range of accessories...
... Sewing work Foot to the reverse side of the fabric). Guide for applying lace (on beads. For serging cording with the creative 4874. For sewing on the upper side of the fabric). Use clearview foot F from the accessories box. Guide for hemming borders. Can be sewn on in a single operation while sewing rolled seams. For sewing on ribbons and elastic in conjunction with bias tape of various widths. Accessories Special accessories A wide range of accessories...
Owner's Manual
Page 138
... two drops of PFAFF sewing machine oil are made from the upper and lower knives, the differential feed and the looper area. All other parts are sufficient. The needle plate can be oiled. 9-2 Remove the presser foot and open the front cover and the swivel table. Remove the presser foot and the needle plate. With the lint brush provided in place. Note: Remove the threads before changing the needle plate. Press the needle plate disconnection lever (38) downward. Oiling the machine...
... two drops of PFAFF sewing machine oil are made from the upper and lower knives, the differential feed and the looper area. All other parts are sufficient. The needle plate can be oiled. 9-2 Remove the presser foot and open the front cover and the swivel table. Remove the presser foot and the needle plate. With the lint brush provided in place. Note: Remove the threads before changing the needle plate. Press the needle plate disconnection lever (38) downward. Oiling the machine...
Owner's Manual
Page 141
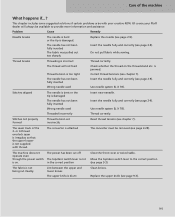
... cover or swivel table. Check whether the thread on . Correct thread tensions (see page 9-3). 9-5 The seam track of the machine What happens if...? Do not pull fabric while sewing. The power has been cut cleanly. This chapter includes some suggested solutions if certain problems arise with thread. Use needle system EL X 705. Of course your creative 4874. The machine does not operate even though the power switch is jammed. Insert the needle...
... cover or swivel table. Check whether the thread on . Correct thread tensions (see page 9-3). 9-5 The seam track of the machine What happens if...? Do not pull fabric while sewing. The power has been cut cleanly. This chapter includes some suggested solutions if certain problems arise with thread. Use needle system EL X 705. Of course your creative 4874. The machine does not operate even though the power switch is jammed. Insert the needle...


