
Owner's Manual
Page 2
... needles. • Do not pull or push fabric while stitching. DANGER - Keep ventilation openings of the Sewing machine and foot controller free from all moving parts. To reduce the risk of lint, dust, and loose cloth. • Keep fingers away from the accumulation of burns, fire, electric shock, or...
... needles. • Do not pull or push fabric while stitching. DANGER - Keep ventilation openings of the Sewing machine and foot controller free from all moving parts. To reduce the risk of lint, dust, and loose cloth. • Keep fingers away from the accumulation of burns, fire, electric shock, or...

Owner's Manual
Page 4
...25-3:26 Personal menu 3:27 Demo 3:28 Options for messages 3:28 Table of Content 1 INTRODUCTION Stitch Chart Decorative stitches creative 2170 Machine Parts of the embroidery unit Parts of the embroidery hoop Standard accessories 1:7-1:18 1:8-1:10 1:11-1:13 1:14 1:15 1:15 1:16-1:18 2 PREPARATIONS ...threader 2:14 Bobbin thread 2:15 Threading the twin needle 2:15 Presser foot lift 2:16 Electronic knee lift 2:16 1:4 General notes creative Data Manager How to update your machine 2:17 2:18-2:19 2:20-2:23 3 SEWING 3:1-3:28 Function Buttons 3:2 Sewing mode functions 3:3-3:6...
...25-3:26 Personal menu 3:27 Demo 3:28 Options for messages 3:28 Table of Content 1 INTRODUCTION Stitch Chart Decorative stitches creative 2170 Machine Parts of the embroidery unit Parts of the embroidery hoop Standard accessories 1:7-1:18 1:8-1:10 1:11-1:13 1:14 1:15 1:15 1:16-1:18 2 PREPARATIONS ...threader 2:14 Bobbin thread 2:15 Threading the twin needle 2:15 Presser foot lift 2:16 Electronic knee lift 2:16 1:4 General notes creative Data Manager How to update your machine 2:17 2:18-2:19 2:20-2:23 3 SEWING 3:1-3:28 Function Buttons 3:2 Sewing mode functions 3:3-3:6...

Owner's Manual
Page 5
... without saving 4:9 Delete a sewing sequence 4:9 Select and open a saved sewing sequence 4:9 Open from the machine's memory 4:10 Open from a creative memory card 4:10 Stitch Creator 4:11 Placing single stitches 4:13 Combining single parts of patterns 4:14 More options to edit patterns 4:15 Quilting 4:16-4:19 Patchwork 4:16 Piecing the quilt top 4:18...
... without saving 4:9 Delete a sewing sequence 4:9 Select and open a saved sewing sequence 4:9 Open from the machine's memory 4:10 Open from a creative memory card 4:10 Stitch Creator 4:11 Placing single stitches 4:13 Combining single parts of patterns 4:14 More options to edit patterns 4:15 Quilting 4:16-4:19 Patchwork 4:16 Piecing the quilt top 4:18...

Owner's Manual
Page 14
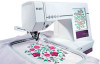
Introduction Machine overview Parts of the creative 2170 1 Top cover with stitch chart 2 Multi-color touch screen 3 Base plate 4 Slide for lowering the feed dogs 5 Connection for knee lift 6 Feed dogs 7 Free arm 8 ...
Introduction Machine overview Parts of the creative 2170 1 Top cover with stitch chart 2 Multi-color touch screen 3 Base plate 4 Slide for lowering the feed dogs 5 Connection for knee lift 6 Feed dogs 7 Free arm 8 ...

Owner's Manual
Page 15
49 48 50 51 52 46 45 44 47 Parts of the embroidery unit 44 Connection plug to the machine 45 Fastener for fitting to the machine 46 Under arm guide 47 Release button ... lever for removing the embroidery hoop 51 Embroidery arm 52 Recessed grip for raising and rotating the embroidery arm Introduction 53 54 55 56 57 Parts of the embroidery hoop 53 Snap-in pin 54 Two guide pins for retaining the hoop 55 Ribs for fitting the clips 56 Projections...
49 48 50 51 52 46 45 44 47 Parts of the embroidery unit 44 Connection plug to the machine 45 Fastener for fitting to the machine 46 Under arm guide 47 Release button ... lever for removing the embroidery hoop 51 Embroidery arm 52 Recessed grip for raising and rotating the embroidery arm Introduction 53 54 55 56 57 Parts of the embroidery hoop 53 Snap-in pin 54 Two guide pins for retaining the hoop 55 Ribs for fitting the clips 56 Projections...

Owner's Manual
Page 23
Note: If your Presser foot lift is disengaged because of the presser foot upwards and at the same time the rear part downwards until it disengages from the presser foot holder. Check: Please check that when the presser foot lift is properly attached by raising the presser ...foot lift. Preparations Changing the presser foot Snap off the presser foot Switch off the main switch. Press the front part of the embroidery or free-motion, step on the presser foot Place the presser foot under the presser foot holder, so that the presser foot...
Note: If your Presser foot lift is disengaged because of the presser foot upwards and at the same time the rear part downwards until it disengages from the presser foot holder. Check: Please check that when the presser foot lift is properly attached by raising the presser ...foot lift. Preparations Changing the presser foot Snap off the presser foot Switch off the main switch. Press the front part of the embroidery or free-motion, step on the presser foot Place the presser foot under the presser foot holder, so that the presser foot...

Owner's Manual
Page 57
Your Pfaff creative 2170 is equipped with the Sensormatic buttonhole guide and sensor technology to ensure that every buttonhole is especially adapted for a particular use and fabric type. The white plastic part goes over the needle plate, covering the feed dogs (see picture). 2. Slide the... spring rear slightly. Before starting to sew buttonholes. Beautiful buttonholes can read about the different buttonholes in the overview in your Pfaff creative 2170. Each buttonhole is sized accurately. Inserting the sensormatic buttonhole guide 1. No 5A Attach buttonhole foot No. 5A to sew, ...
Your Pfaff creative 2170 is equipped with the Sensormatic buttonhole guide and sensor technology to ensure that every buttonhole is especially adapted for a particular use and fabric type. The white plastic part goes over the needle plate, covering the feed dogs (see picture). 2. Slide the... spring rear slightly. Before starting to sew buttonholes. Beautiful buttonholes can read about the different buttonholes in the overview in your Pfaff creative 2170. Each buttonhole is sized accurately. Inserting the sensormatic buttonhole guide 1. No 5A Attach buttonhole foot No. 5A to sew, ...

Owner's Manual
Page 84
... up stitches that you can also edit and combine existing stitches. 1. Touch Select stitches icon (G) to select the whole circle stitch by stitch. Combining single parts of the stitch pattern is selected. 6. Touch the Mini main menu (W) to open the the sewing menu to editing mode. Touch the Select stitches (G) icon...
... up stitches that you can also edit and combine existing stitches. 1. Touch Select stitches icon (G) to select the whole circle stitch by stitch. Combining single parts of the stitch pattern is selected. 6. Touch the Mini main menu (W) to open the the sewing menu to editing mode. Touch the Select stitches (G) icon...

Owner's Manual
Page 89
...; First prepare the appliqué. but it down function to the block before the quilt is the part that special touch for your Pfaff creative 2170 for the fabric you move your Pfaff creative 2170. 4:19 There are lowered, you have chosen. Place stabilizer behind the block and appliqué. Use...; with stitch no. 3, stitch length 0.5, stitch width 4-6 mm, presser foot no . 299. Begin near the center of your Pfaff creative 2170 with the straight part of the appliqué and sew it on ) side of applying appliqués to your quilt. • Set your quilt. Note...
...; First prepare the appliqué. but it down function to the block before the quilt is the part that special touch for your Pfaff creative 2170 for the fabric you move your Pfaff creative 2170. 4:19 There are lowered, you have chosen. Place stabilizer behind the block and appliqué. Use...; with stitch no. 3, stitch length 0.5, stitch width 4-6 mm, presser foot no . 299. Begin near the center of your Pfaff creative 2170 with the straight part of the appliqué and sew it on ) side of applying appliqués to your quilt. • Set your quilt. Note...

Owner's Manual
Page 122
...Place the cross-hair where you want the connecting point to each other (see the entire embroidery area. E 11. Touch OK to calibrate the hoop. 9. Part of the just embroidered design must be in your embroidery. Use the arrows (D) for fine tuning. F G 5:24 Hoop your first design ...Working steps In the example below we want and embroider. 7. Lock the connecting point by using your stylus to the Main menu. Turn on your creative 2170. 1. Touch Card/Machine icon and choose Machine. This is a design that is included in icon (F) to be able to the PALETTE folder ...
...Place the cross-hair where you want the connecting point to each other (see the entire embroidery area. E 11. Touch OK to calibrate the hoop. 9. Part of the just embroidered design must be in your embroidery. Use the arrows (D) for fine tuning. F G 5:24 Hoop your first design ...Working steps In the example below we want and embroider. 7. Lock the connecting point by using your stylus to the Main menu. Turn on your creative 2170. 1. Touch Card/Machine icon and choose Machine. This is a design that is included in icon (F) to be able to the PALETTE folder ...

Owner's Manual
Page 124
... can jump from design to design with B OK, the embroidery hoop moves to the beginning of a specific area of a design and embroider only that part. The color is not active. Enter the stitch number. I ). With the Cross-hair icon (G) you A. You can advance stitch by design icon to move the...
... can jump from design to design with B OK, the embroidery hoop moves to the beginning of a specific area of a design and embroider only that part. The color is not active. Enter the stitch number. I ). With the Cross-hair icon (G) you A. You can advance stitch by design icon to move the...

Owner's Manual
Page 133
..."move or rotate your fingertip and drag upwards or downwards depending on what part of the combination, the opposite happens if you start embroider, the combination has to be shown ...arrows. If you have activated the Move design icon or the Rotate icon, you can see the upper part. Embroidery 5:35 If you want to see the whole combination. If you drag the lower scroll bar...that with your design or combination also when it to the left. Drag downwards to see the lower part of the combination and upwards to 800%. Before you drag it is zoomed. Touch the Zoom In...
..."move or rotate your fingertip and drag upwards or downwards depending on what part of the combination, the opposite happens if you start embroider, the combination has to be shown ...arrows. If you have activated the Move design icon or the Rotate icon, you can see the upper part. Embroidery 5:35 If you want to see the whole combination. If you drag the lower scroll bar...that with your design or combination also when it to the left. Drag downwards to see the lower part of the combination and upwards to 800%. Before you drag it is zoomed. Touch the Zoom In...

Owner's Manual
Page 138
...extension of the indicated hoops. Maxi stitches - .MAX You can transfer Maxi stitches between your sewing machine and your Pfaff creative 2170 perform the calibration once more to the embroidery unit a window opens after hoop identification. Personal menu &#... between your sewing machine and your computer. Touch the respective icon to the 9mm and Maxi stitches used in the creative 2170. 9 mm stitches - .9MM The 9 mm stiches are included in the machine or created in Stitch Creator. Patchwork... embroidery unit must be able to the location of the included parts of stitches.
...extension of the indicated hoops. Maxi stitches - .MAX You can transfer Maxi stitches between your sewing machine and your Pfaff creative 2170 perform the calibration once more to the embroidery unit a window opens after hoop identification. Personal menu &#... between your sewing machine and your computer. Touch the respective icon to the 9mm and Maxi stitches used in the creative 2170. 9 mm stitches - .9MM The 9 mm stiches are included in the machine or created in Stitch Creator. Patchwork... embroidery unit must be able to the location of the included parts of stitches.

Owner's Manual
Page 173
... (System 130N). Maintenance 6:5 Remedy The fabric must be tightly hooped, in such a way that no creases form. Place a sheet of non-original accessories or parts. Non-original Parts and Accessories The warranty does not cover any defect or damage caused by use the right needle? The embroidery design has contracted Did you...
... (System 130N). Maintenance 6:5 Remedy The fabric must be tightly hooped, in such a way that no creases form. Place a sheet of non-original accessories or parts. Non-original Parts and Accessories The warranty does not cover any defect or damage caused by use the right needle? The embroidery design has contracted Did you...

Owner's Manual
Page 177
... embroidery Operating Instructions Overlock stitches closed overlock stitch closed with edge thread open overlock stitch P Parts of the creative 2170 Parts of the embroidery hoop Parts of the embroidery unit Patchwork Patchwork program create a new Pattern start Personal menu Piecing the...sequence 4:7 arrange stitches 4:6 close without saving 4:9 create 4:5 delete 4:9 inserting a stitch 4:7 inserting a stitch at the start 4:7 open from creative memory card 4:10 open from memory 4:10 save 4:8 select and open saved 4:9 Sew Slow Button 3:2 Shell edging 4:25 Side to side ...
... embroidery Operating Instructions Overlock stitches closed overlock stitch closed with edge thread open overlock stitch P Parts of the creative 2170 Parts of the embroidery hoop Parts of the embroidery unit Patchwork Patchwork program create a new Pattern start Personal menu Piecing the...sequence 4:7 arrange stitches 4:6 close without saving 4:9 create 4:5 delete 4:9 inserting a stitch 4:7 inserting a stitch at the start 4:7 open from creative memory card 4:10 open from memory 4:10 save 4:8 select and open saved 4:9 Sew Slow Button 3:2 Shell edging 4:25 Side to side ...


