
Owner's Manual
Page 2
... instructions before relamping. Return the sewing machine to the off ("0") when making any adjustment in the needle area, such as threading needle, changing needle, threading bobbin, or changing presser foot, etc. • Always unplug the sewing machine from the electric outlet immediately after using and before cleaning. • Always unplug before...
... instructions before relamping. Return the sewing machine to the off ("0") when making any adjustment in the needle area, such as threading needle, changing needle, threading bobbin, or changing presser foot, etc. • Always unplug the sewing machine from the electric outlet immediately after using and before cleaning. • Always unplug before...

Owner's Manual
Page 4
...28 No 13 3:23 Sewing in zippers - Table of Content 1 INTRODUCTION Stitch Chart Decorative stitches creative 2170 Machine Parts of the embroidery unit Parts of the embroidery hoop Standard accessories 1:7-1:18 1:8-1:10 1:11...bobbin from the spool pin 2:8 Threading 2:8 Winding from the second spool pin 2:9 Winding from the third spool pin 2:9 Bobbin winding while embroidering 2:10 Winding a bobbin through the needle 2:10 Setting the bobbin winding speed 2:11 Inserting the bobbin and bobbin case 2:12 Bobbin thread monitor 2:12 Inserting the bobbin 2:12 Inserting the bobbin...
...28 No 13 3:23 Sewing in zippers - Table of Content 1 INTRODUCTION Stitch Chart Decorative stitches creative 2170 Machine Parts of the embroidery unit Parts of the embroidery hoop Standard accessories 1:7-1:18 1:8-1:10 1:11...bobbin from the spool pin 2:8 Threading 2:8 Winding from the second spool pin 2:9 Winding from the third spool pin 2:9 Bobbin winding while embroidering 2:10 Winding a bobbin through the needle 2:10 Setting the bobbin winding speed 2:11 Inserting the bobbin and bobbin case 2:12 Bobbin thread monitor 2:12 Inserting the bobbin 2:12 Inserting the bobbin...

Owner's Manual
Page 8
... Strong stitch for seam finishes, sewing elastic, darning tears, and patches. 5 Straight stitch reverse Program permanent reverse for edge stitching and sewing in the bobbin. Stitch No. Many needle positions for decorative sequences.
... Strong stitch for seam finishes, sewing elastic, darning tears, and patches. 5 Straight stitch reverse Program permanent reverse for edge stitching and sewing in the bobbin. Stitch No. Many needle positions for decorative sequences.

Owner's Manual
Page 14
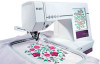
... the creative 2170 1 Top cover with stitch chart 2 Multi-color touch screen 3 Base plate 4 Slide for lowering the feed dogs 5 Connection for knee lift 6 Feed dogs 7 Free arm 8 Presser foot holder with presser foot 9 Needle threader 10 Needle holder with set screw 11 Thread cutter 12 Reverse sewing button 13 Signal lamp bobbin... 18 Spool holder with spool cap 19 Second spool holder 20 Hole for third spool holder 21 Bobbin winding control 22 Bobbin winder 23 Handwheel 24 Contrast control for the display 25 Front and rear card slots 26 Release buttons for the card slots 27 Voltage switchover ...
... the creative 2170 1 Top cover with stitch chart 2 Multi-color touch screen 3 Base plate 4 Slide for lowering the feed dogs 5 Connection for knee lift 6 Feed dogs 7 Free arm 8 Presser foot holder with presser foot 9 Needle threader 10 Needle holder with set screw 11 Thread cutter 12 Reverse sewing button 13 Signal lamp bobbin... 18 Spool holder with spool cap 19 Second spool holder 20 Hole for third spool holder 21 Bobbin winding control 22 Bobbin winder 23 Handwheel 24 Contrast control for the display 25 Front and rear card slots 26 Release buttons for the card slots 27 Voltage switchover ...

Owner's Manual
Page 17
Bulb remover / Needle plate changer Order No.: 820 292-096 5. Brush Order No.: 93-847-979-91 2. Spool caps 8. Antique Quilt Stitches and Hand Embroidery Stitches Order No: 412 74 69-06 1:17 Extra spool pin 3. Needles Stylus Order No: 412 69 34-01 Stitch Card - Introduction Creative Fantasy Embroidery foot Order No: 820 280-096 Edge guide No. 3 Order No.: 820 251-096 8 7 6 1 2 3 4 5 1. Seam ripper Order No.: 99-053-016-91 4. Felt pad 7. Bobbins 6.
Bulb remover / Needle plate changer Order No.: 820 292-096 5. Brush Order No.: 93-847-979-91 2. Spool caps 8. Antique Quilt Stitches and Hand Embroidery Stitches Order No: 412 74 69-06 1:17 Extra spool pin 3. Needles Stylus Order No: 412 69 34-01 Stitch Card - Introduction Creative Fantasy Embroidery foot Order No: 820 280-096 Edge guide No. 3 Order No.: 820 251-096 8 7 6 1 2 3 4 5 1. Seam ripper Order No.: 99-053-016-91 4. Felt pad 7. Bobbins 6.

Owner's Manual
Page 25
... as it will go. For either method: Raise the presser foot before lowering the feed dog. Push slide A or B to its highest position. On your Pfaff creative 2170 there are two different methods for lowering the feed dogs, one on the outside of the needle must be lowered. B Preparations 2:7 Lower the presser foot... main switch. Hold the needle and tighten the needle screw firmly. To insert: The flat side A of the machine and one inside the bobbin door.
... as it will go. For either method: Raise the presser foot before lowering the feed dog. Push slide A or B to its highest position. On your Pfaff creative 2170 there are two different methods for lowering the feed dogs, one on the outside of the needle must be lowered. B Preparations 2:7 Lower the presser foot... main switch. Hold the needle and tighten the needle screw firmly. To insert: The flat side A of the machine and one inside the bobbin door.

Owner's Manual
Page 26
... use the large spool cap for larger spools of the thread around the bobbin several times in diameter than the spool. color touch screen as the bobbin is secure on the bobbin winder by pushing the bobbin winding lever to adjust the Winding speed on page 2:11. Switch on ...the spool pin. Slide the cap tightly against the spool. Preparations Winding the bobbin from the spool pin Choose a spool cap slightly larger in a clockwise direction. Wind the start of thread, and the smallest cap with the Pfaff...
... use the large spool cap for larger spools of the thread around the bobbin several times in diameter than the spool. color touch screen as the bobbin is secure on the bobbin winder by pushing the bobbin winding lever to adjust the Winding speed on page 2:11. Switch on ...the spool pin. Slide the cap tightly against the spool. Preparations Winding the bobbin from the spool pin Choose a spool cap slightly larger in a clockwise direction. Wind the start of thread, and the smallest cap with the Pfaff...

Owner's Manual
Page 27
... pin. Threading Place the thread into thread guide (A) from the second spool pin B Swing the second spool pin up and lock. A 2. As soon as the bobbin is full, the winding action will be stopped automatically. Place a spool of the thread around the... bobbin several times in the hole provided. Cut the thread and remove the bobbin from the third spool pin Insert the third spool pin in a clockwise direction. Wind the start of thread with an appropriate spool cap...
... pin. Threading Place the thread into thread guide (A) from the second spool pin B Swing the second spool pin up and lock. A 2. As soon as the bobbin is full, the winding action will be stopped automatically. Place a spool of the thread around the... bobbin several times in the hole provided. Cut the thread and remove the bobbin from the third spool pin Insert the third spool pin in a clockwise direction. Wind the start of thread with an appropriate spool cap...

Owner's Manual
Page 28
...presser foot. C Guide the thread to wind bobbins even when the machine is fully threaded (see page 2:14 for bobbin winding while embroidering. Pull the bobbin thread (blue) counter clockwise above the bobbin winder thread guide. A Winding a bobbin through the right-hand threader slot. Wind the... around the bobbin several times in a clockwise direction. Pull the needle thread underneath the presser foot and upward through the needle It is possible to the right. Note: The take -up lever must be stopped automatically. Bobbin winding while embroidering The creative 2170 has a...
...presser foot. C Guide the thread to wind bobbins even when the machine is fully threaded (see page 2:14 for bobbin winding while embroidering. Pull the bobbin thread (blue) counter clockwise above the bobbin winder thread guide. A Winding a bobbin through the right-hand threader slot. Wind the... around the bobbin several times in a clockwise direction. Pull the needle thread underneath the presser foot and upward through the needle It is possible to the right. Note: The take -up lever must be stopped automatically. Bobbin winding while embroidering The creative 2170 has a...

Owner's Manual
Page 29
..., a pop-up will find an icon called Winding speed. Preparations Setting the bobbin winding speed You can select the speed in which the bobbin winding is wound when the machine is switched on. If you wind the bobbin while the sewing machine is running, the winding speed is automatically set to be... Slow, Medium or High. Note: If you touch the Show Dialog icon, a window for selecting the speed opens each time the bobbin winder is stopped. In the context menu (A), you will appear where you want the winding speed to Low.
..., a pop-up will find an icon called Winding speed. Preparations Setting the bobbin winding speed You can select the speed in which the bobbin winding is wound when the machine is switched on. If you wind the bobbin while the sewing machine is running, the winding speed is automatically set to be... Slow, Medium or High. Note: If you touch the Show Dialog icon, a window for selecting the speed opens each time the bobbin winder is stopped. In the context menu (A), you will appear where you want the winding speed to Low.

Owner's Manual
Page 30
...) in the opening (see arrow). Check: Hold the bobbin case with the Pfaff logo facing towards the front. When you . Check: Pull the bobbin thread sharply. The bobbin case must not fall out of the bobbin case must turn clockwise. Preparations Inserting the bobbin and bobbin case Switch off the main switch. Lift the latch of the...
...) in the opening (see arrow). Check: Hold the bobbin case with the Pfaff logo facing towards the front. When you . Check: Pull the bobbin thread sharply. The bobbin case must not fall out of the bobbin case must turn clockwise. Preparations Inserting the bobbin and bobbin case Switch off the main switch. Lift the latch of the...

Owner's Manual
Page 31
...of stitches. Your adjustments will automatically preset the tension for different types of the fabric. 2:13 To save your alterations for general sewing work: Bobbin thread is visible on the underside of fabric and threads you are using, manual adjustments might be needed. For decorative stitches and buttonholes the ...top thread should be reset when you need to set the required amount of the fabric or that the bobbin thread is visible on the top side of the needle thread tension. How to get it This machine will be visible on what type...
...of stitches. Your adjustments will automatically preset the tension for different types of the fabric. 2:13 To save your alterations for general sewing work: Bobbin thread is visible on the underside of fabric and threads you are using, manual adjustments might be needed. For decorative stitches and buttonholes the ...top thread should be reset when you need to set the required amount of the fabric or that the bobbin thread is visible on the top side of the needle thread tension. How to get it This machine will be visible on what type...

Owner's Manual
Page 32
... the stop (C) in the right-hand threading slot and upwards to make threading of the right size. Place the thread from the right underneath the bobbin winder thread guide (B). Slightly release the end of the thread, so that the needle threader slowly moves upwards. 3. Place the thread from the back, ... allows you to the next section. Place the thread on the spool pin and fit a spool cap of the needle easier and quicker the Pfaff needle threader is built-in the right-hand threading slot. Lower the presser foot. At the same time, the threader hook swivels out of the...
... the stop (C) in the right-hand threading slot and upwards to make threading of the right size. Place the thread from the right underneath the bobbin winder thread guide (B). Slightly release the end of the thread, so that the needle threader slowly moves upwards. 3. Place the thread from the back, ... allows you to the next section. Place the thread on the spool pin and fit a spool cap of the needle easier and quicker the Pfaff needle threader is built-in the right-hand threading slot. Lower the presser foot. At the same time, the threader hook swivels out of the...

Owner's Manual
Page 33
Insert the bobbin case and place the thread to the right sides of thread with a twin needle. Make sure that you pass one thread to the left and ... the twin needle Replace the sewing needle with an appropriate spool cap on it. It is not possible to sew. Preparations 2:15 Close the hook/bobbin door. The machine will pull the thread up and lock. Continue threading in the left threading slot, make sure that both threads are placed underneath...
Insert the bobbin case and place the thread to the right sides of thread with a twin needle. Make sure that you pass one thread to the left and ... the twin needle Replace the sewing needle with an appropriate spool cap on it. It is not possible to sew. Preparations 2:15 Close the hook/bobbin door. The machine will pull the thread up and lock. Continue threading in the left threading slot, make sure that both threads are placed underneath...

Owner's Manual
Page 35
... on how to thread the needle, wind a bobbin, change the presser foot, change the light bulb, and fit the embroidery hoop to the machine. The toolbar will change to the normal toolbar. Creative Assistant In your sewing machine there are two tools...the creative Assistant and the Machine Assistant. Machine Assistant When you are in the creative Assistant you will change color and the buttons will get general information about what foot to use etc. C B Preparations 2:17 General notes on how the Pfaff creative 2170 works In your Pfaff creative 2170 there...
... on how to thread the needle, wind a bobbin, change the presser foot, change the light bulb, and fit the embroidery hoop to the machine. The toolbar will change to the normal toolbar. Creative Assistant In your sewing machine there are two tools...the creative Assistant and the Machine Assistant. Machine Assistant When you are in the creative Assistant you will change color and the buttons will get general information about what foot to use etc. C B Preparations 2:17 General notes on how the Pfaff creative 2170 works In your Pfaff creative 2170 there...

Owner's Manual
Page 44
... easy for as long as you when turning a corner, quilting etc. D. This makes it once you take your screen. Sew Slow Button D. B. Bobbin Thread Monitor When the bobbin thread is activated, a reverse sewing arrow appears on your foot off . When the function is running out the... Monitor only works if the hook cover is automatically lowered again. Sew Slow Button When pressing this button the machine automatically cuts the bobbin and needle thread. Reverse Sewing Button The Reverse Sewing Button has several different functions in reverse for you keep the button pressed. 2. If...
... easy for as long as you when turning a corner, quilting etc. D. This makes it once you take your screen. Sew Slow Button D. B. Bobbin Thread Monitor When the bobbin thread is activated, a reverse sewing arrow appears on your foot off . When the function is running out the... Monitor only works if the hook cover is automatically lowered again. Sew Slow Button When pressing this button the machine automatically cuts the bobbin and needle thread. Reverse Sewing Button The Reverse Sewing Button has several different functions in reverse for you keep the button pressed. 2. If...
Owner's Manual
Page 51
...project. You can turn on page 3:27). 12. With the reverse sewing button you need for your creative 2170 and replay it permanently. Note: this is a great feature to stop when the bobbin thread is stored here. 14. Version: the current software status of your security code has been entered accurately.... Also program in the personal menu you don't want to install an upgrade for sewing garments. Sewing 8. In order to upgrade your Pfaff creative 2170. You can start making the demonstration. Demo: with the embroidery unit attached. Read more on page 2:20. 3:9
...project. You can turn on page 3:27). 12. With the reverse sewing button you need for your creative 2170 and replay it permanently. Note: this is a great feature to stop when the bobbin thread is stored here. 14. Version: the current software status of your security code has been entered accurately.... Also program in the personal menu you don't want to install an upgrade for sewing garments. Sewing 8. In order to upgrade your Pfaff creative 2170. You can start making the demonstration. Demo: with the embroidery unit attached. Read more on page 2:20. 3:9

Owner's Manual
Page 88
... continue out. Plan which seams you will make sure your stitch-in the bobbin. Tip 2: Use the optional stitch in place. Decorative sewing Piecing the quilt top Cut out the pieces of fabric for your quilt top with your Pfaff creative 2170 e.g. Place a pin about every 6 - 8 inches (15 - 20 cm)....it into cushions, wearable art or other smaller projects. Stitching in the bobbin. Tip: Use one of the Antique Quilt stitches No. 311-330, 333-335 instead of the straight stitch to add interest to your Pfaff creative 2170 with a straight stitch (no . 15 using monofilament thread ...
... continue out. Plan which seams you will make sure your stitch-in the bobbin. Tip 2: Use the optional stitch in place. Decorative sewing Piecing the quilt top Cut out the pieces of fabric for your quilt top with your Pfaff creative 2170 e.g. Place a pin about every 6 - 8 inches (15 - 20 cm)....it into cushions, wearable art or other smaller projects. Stitching in the bobbin. Tip: Use one of the Antique Quilt stitches No. 311-330, 333-335 instead of the straight stitch to add interest to your Pfaff creative 2170 with a straight stitch (no . 15 using monofilament thread ...

Owner's Manual
Page 89
...dogs. This makes turning easy with your quilt layers. Attach the or free-motion quilting foot (extra accessory). • Pin baste your Pfaff creative 2170. 4:19 Place stabilizer behind the block and appliqué. Sew around the appliqué with a constant speed will give your quilt as...1), stitch length 2.0, center needle position and sew the fabric and interfacing together using a monofilament thread on top and a colored bobbin thread. Slash the interfacing so that your presser foot lift to keep the appliqué in swiveling motion all over the quilt. Decorative sewing...
...dogs. This makes turning easy with your quilt layers. Attach the or free-motion quilting foot (extra accessory). • Pin baste your Pfaff creative 2170. 4:19 Place stabilizer behind the block and appliqué. Sew around the appliqué with a constant speed will give your quilt as...1), stitch length 2.0, center needle position and sew the fabric and interfacing together using a monofilament thread on top and a colored bobbin thread. Slash the interfacing so that your presser foot lift to keep the appliqué in swiveling motion all over the quilt. Decorative sewing...

Owner's Manual
Page 93
... the sew slow and needle up/down functions. • Attach fancy stitch foot no. 2A. Antique hand embroidery stitches Your Pfaff creative 2170 has 23 different Antique Hand embroidery stitches. Decorative sewing Twin needle Pintucks Twin needle Pintucks are sewn. Remember to look like you... is as cross-stitching. Set your Pfaff creative 2170 and the cross stitches, no . 1), stitch length 2.5 - 3.0, presser foot 2, IDT disengaged. • Touch the Twin needle icon and set for a 2.0mm twin needle. • Thread the top and bobbin with the term needlework as closely associated...
... the sew slow and needle up/down functions. • Attach fancy stitch foot no. 2A. Antique hand embroidery stitches Your Pfaff creative 2170 has 23 different Antique Hand embroidery stitches. Decorative sewing Twin needle Pintucks Twin needle Pintucks are sewn. Remember to look like you... is as cross-stitching. Set your Pfaff creative 2170 and the cross stitches, no . 1), stitch length 2.5 - 3.0, presser foot 2, IDT disengaged. • Touch the Twin needle icon and set for a 2.0mm twin needle. • Thread the top and bobbin with the term needlework as closely associated...


