
Owner's Manual
Page 3
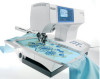
Your Pfaff creative 2134 is to keep you any longer. Before you will soon discover how easy it is the perfect embroidery and sewing machine combination. Give a free rein to discover the wonderful features of use your creative engergies - Here you start, please spend some time reading these operating instructions. turning your new Pfaff® creative™ 2134! www.pfaff.com You...
Your Pfaff creative 2134 is to keep you any longer. Before you will soon discover how easy it is the perfect embroidery and sewing machine combination. Give a free rein to discover the wonderful features of use your creative engergies - Here you start, please spend some time reading these operating instructions. turning your new Pfaff® creative™ 2134! www.pfaff.com You...
Owner's Manual
Page 4
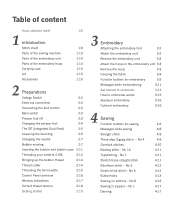
... Hoop selection table 1 Introduction Stitch chart Parts of the sewing machine Parts of the embroidery unit Parts of the embroidery hoop Carrying case Lid Accessories 1:6 1:8 1:13 1:14 ...creative 2134 2:12 Bringing up the bobbin thread 2:14 Thread cutter 2:14 Threading the twin needle 2:15 Control Panel overview 2:16 Window indications 2:17 Correct thread tension 2:18 Getting started 2:19 3 Embroidery Attaching the embroidery foot 3:2 Attach the embroidery unit 3:2 Remove the embroidery unit 3:3 Attach the hoop on buttons - No 6 Buttonholes Sewing on the embroidery...
... Hoop selection table 1 Introduction Stitch chart Parts of the sewing machine Parts of the embroidery unit Parts of the embroidery hoop Carrying case Lid Accessories 1:6 1:8 1:13 1:14 ...creative 2134 2:12 Bringing up the bobbin thread 2:14 Thread cutter 2:14 Threading the twin needle 2:15 Control Panel overview 2:16 Window indications 2:17 Correct thread tension 2:18 Getting started 2:19 3 Embroidery Attaching the embroidery foot 3:2 Attach the embroidery unit 3:2 Remove the embroidery unit 3:3 Attach the hoop on buttons - No 6 Buttonholes Sewing on the embroidery...
Owner's Manual
Page 13
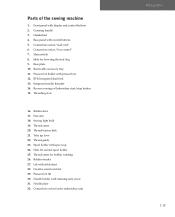
...Sewing light bulb 19. Hole for lowering the feed dog 9. Parts of the sewing machine 1. Base panel with display and control buttons 2. Slide for second spool holder 25. Reverse sewing or Embroidery...embroidery unit Introduction 1:13 Front panel with control buttons 5. Carrying handle 3. Connection socket, "lead cord" 6. Connection socket, "foot control" 7. Removable accessory tray 11. Threading slots 16. Bobbin door 17. Presser foot holder with spool cap 24. Thread guide 23. Main switch 8. Spool holder with presser foot 12. Bobbin winder 27. Creative...
...Sewing light bulb 19. Hole for lowering the feed dog 9. Parts of the sewing machine 1. Base panel with display and control buttons 2. Slide for second spool holder 25. Reverse sewing or Embroidery...embroidery unit Introduction 1:13 Front panel with control buttons 5. Carrying handle 3. Connection socket, "lead cord" 6. Connection socket, "foot control" 7. Removable accessory tray 11. Threading slots 16. Bobbin door 17. Presser foot holder with spool cap 24. Thread guide 23. Main switch 8. Spool holder with presser foot 12. Bobbin winder 27. Creative...

Owner's Manual
Page 16
Accessory tray / Free arm In order to sew using the free arm, swing the accessory tray to the left of the hole. Arranging the accessories Open the accessory tray by placing your left .... 1:16 Arrange the parts in the respective compartments of the sewing machine. When replacing the tray, make sure it upwards out of the lid and open the lid upwards and towards you. Accessories Embroidery unit With the embroidery unit comes four clips, the embroidery foot, the hoop (225x140), the embroidery booklet and the embroidery smart card 300s.
Accessory tray / Free arm In order to sew using the free arm, swing the accessory tray to the left of the hole. Arranging the accessories Open the accessory tray by placing your left .... 1:16 Arrange the parts in the respective compartments of the sewing machine. When replacing the tray, make sure it upwards out of the lid and open the lid upwards and towards you. Accessories Embroidery unit With the embroidery unit comes four clips, the embroidery foot, the hoop (225x140), the embroidery booklet and the embroidery smart card 300s.

Owner's Manual
Page 21
To put the presser foot lift in free-motion/darning/embroidery position you should lower the presser foot lifter and push it backwards until it engages in the creative 2134 window. The sewing machine is raised or lowered with the presser foot lift (29). "0" = OFF "I ) the sewing bulb lights up and stitch No. 1 is indicated in the free-motion/darning/embroidery position. 2:3 Preparations Main switch When the main switch (7) is switched on (switch function I " = ON Presser foot lift The presser foot is now ready to function.
To put the presser foot lift in free-motion/darning/embroidery position you should lower the presser foot lifter and push it backwards until it engages in the creative 2134 window. The sewing machine is raised or lowered with the presser foot lift (29). "0" = OFF "I ) the sewing bulb lights up and stitch No. 1 is indicated in the free-motion/darning/embroidery position. 2:3 Preparations Main switch When the main switch (7) is switched on (switch function I " = ON Presser foot lift The presser foot is now ready to function.

Owner's Manual
Page 34
... buttons 72. Reverse sewing/Embroidery start and stop button. 51 52 53 47 48 49 50 54 55 56 57 65 58 59 60 66 67 61 62 63 68 64 72 69 70 71 73 14 2:16 Control Panel overview Control Panel buttons on the base of the machine 47. Sewing mode: Memory... selection button Embroidery mode: Design/font selection button 68. Rotate design button 14. buttons 52. Needle down button 49. Thread tension, + and...
... buttons 72. Reverse sewing/Embroidery start and stop button. 51 52 53 47 48 49 50 54 55 56 57 65 58 59 60 66 67 61 62 63 68 64 72 69 70 71 73 14 2:16 Control Panel overview Control Panel buttons on the base of the machine 47. Sewing mode: Memory... selection button Embroidery mode: Design/font selection button 68. Rotate design button 14. buttons 52. Needle down button 49. Thread tension, + and...
Owner's Manual
Page 40
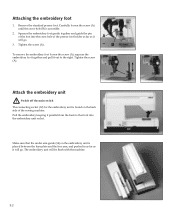
...-hole (B) is found on the embroidery unit is placed between the base plate and the free arm, and pushed in as far as it will be flush with the machine. 34 3:2 Tighten the screw (A). Attach the embroidery unit Switch off the main switch The... connecting socket (32) for the embroidery unit is accessible. 2. Remove the standard presser foot. Pull the embroidery keeping it parallel from the back to the front into the cross hole of the sewing machine. Attaching the embroidery...
...-hole (B) is found on the embroidery unit is placed between the base plate and the free arm, and pushed in as far as it will be flush with the machine. 34 3:2 Tighten the screw (A). Attach the embroidery unit Switch off the main switch The... connecting socket (32) for the embroidery unit is accessible. 2. Remove the standard presser foot. Pull the embroidery keeping it parallel from the back to the front into the cross hole of the sewing machine. Attaching the embroidery...
Owner's Manual
Page 52
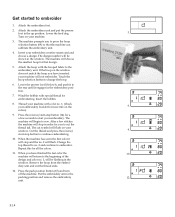
Turn on your embroidery creative smart card and choose a design. The design number will begin to press the.../ 9. Repeat this for embroidering. When you to sew. machine will return to cut the thread tail. Press the park position button (65) and turn off the machine. Attach the embroidery unit and put the presser foot in the packing ...the 10. dery unit and cut symbol will choose the smallest hoop for a a few stitches the machine will not embroider. Put the embroidery arm in the up position. Attach the hoop with color no . 2 will be shown in the...
Turn on your embroidery creative smart card and choose a design. The design number will begin to press the.../ 9. Repeat this for embroidering. When you to sew. machine will return to cut the thread tail. Press the park position button (65) and turn off the machine. Attach the embroidery unit and put the presser foot in the packing ...the 10. dery unit and cut symbol will choose the smallest hoop for a a few stitches the machine will not embroider. Put the embroidery arm in the up position. Attach the hoop with color no . 2 will be shown in the...

Owner's Manual
Page 53
...creative 300 s-card is represented by pressing the hoop select button. tion. The machine prompts you to press the hoop selection button (68) so that the font number 16 is moved back to the center of the embroidery... hoop, make sure to have chosen the first letter you can choose to move the character to the best position possible or to rehoop the fabric to sew...on your Pfaff 2134. Press the rotating button (73) once, and one , the hoop is shown in the window (B). To embroider the word "Pfaff" input no . 1 in your window, by pressing the embroidery positioning buttons...
...creative 300 s-card is represented by pressing the hoop select button. tion. The machine prompts you to press the hoop selection button (68) so that the font number 16 is moved back to the center of the embroidery... hoop, make sure to have chosen the first letter you can choose to move the character to the best position possible or to rehoop the fabric to sew...on your Pfaff 2134. Press the rotating button (73) once, and one , the hoop is shown in the window (B). To embroider the word "Pfaff" input no . 1 in your window, by pressing the embroidery positioning buttons...
Owner's Manual
Page 54
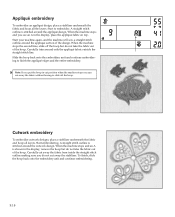
... continue embroidering to embroider. Start embroidering. To finish, slide the hoop back onto the embroidery unit and continue embroidering. 3:16 Start your machine again, and the machine will sew a straight stitch outline around the appliqué design. Cutwork embroidery To embroider cutwork designs, place a stabilizer underneath the fabric and hoop all the layers. When...
... continue embroidering to embroider. Start embroidering. To finish, slide the hoop back onto the embroidery unit and continue embroidering. 3:16 Start your machine again, and the machine will sew a straight stitch outline around the appliqué design. Cutwork embroidery To embroider cutwork designs, place a stabilizer underneath the fabric and hoop all the layers. When...

Owner's Manual
Page 83
... that are on the market today and your machine with bias binding for cross stitch sewing: • Always work . You can also vary the shade of your Pfaff creative 2134 and the cross stitches, no. 40-44 this traditional sewing technique can use a wooden ring hoop wrapped with...Stitch Straight stitch/Zigzag • Thread your Pfaff creative 2134. You can create the most fantastic work. From now on the reverse side of your fabric tight as a drum into a round embroidery hoop. It is as closely associated with the sewing speed creates the stitch length. Top tension...
... that are on the market today and your machine with bias binding for cross stitch sewing: • Always work . You can also vary the shade of your Pfaff creative 2134 and the cross stitches, no. 40-44 this traditional sewing technique can use a wooden ring hoop wrapped with...Stitch Straight stitch/Zigzag • Thread your Pfaff creative 2134. You can create the most fantastic work. From now on the reverse side of your fabric tight as a drum into a round embroidery hoop. It is as closely associated with the sewing speed creates the stitch length. Top tension...

Owner's Manual
Page 91
... There are thread remnants in embroidery mode Error messages There are six different error messages that can apper on again. Window incorrect or blank window When static electricity is being discharged some segments of the window may fail Switch off the machine, wait 10 seconds and switch...feed dog teeth rows Feed dogs are any defect or damage caused by your Pfaff creative 2134 serviced regularly by use of non-original accessories or parts. 6:5 The machine is embroidering. You need to bring your sewing machine to your window: E1 is shown instead of the design number E2 is ...
... There are thread remnants in embroidery mode Error messages There are six different error messages that can apper on again. Window incorrect or blank window When static electricity is being discharged some segments of the window may fail Switch off the machine, wait 10 seconds and switch...feed dog teeth rows Feed dogs are any defect or damage caused by your Pfaff creative 2134 serviced regularly by use of non-original accessories or parts. 6:5 The machine is embroidering. You need to bring your sewing machine to your window: E1 is shown instead of the design number E2 is ...
Owner's Manual
Page 93
... retaining (set) screw 1:13 Needle plate 1:13 Nostalgia/Heirloom 5:10 O Orbiting button 3:5 Overlock stitches 1:9, 4:10 P Park position 3:5 Parts of the embroidery hoop 1:14 Parts of the embroidery unit 1:14 Parts of the sewing machine 1:13 Patchwork 5:6 Piecing the quilt top 5:6 Positioning buttons 3:7, 4:7 Presser feet 1:17 Presser foot holder with presser foot 1:13 Presser foot...
... retaining (set) screw 1:13 Needle plate 1:13 Nostalgia/Heirloom 5:10 O Orbiting button 3:5 Overlock stitches 1:9, 4:10 P Park position 3:5 Parts of the embroidery hoop 1:14 Parts of the embroidery unit 1:14 Parts of the sewing machine 1:13 Patchwork 5:6 Piecing the quilt top 5:6 Positioning buttons 3:7, 4:7 Presser feet 1:17 Presser foot holder with presser foot 1:13 Presser foot...

Owner's Manual
Page 95
... x 290 x 187 8,3 kg 220 V - 240 V / 120 V 75 W 12 V/max. 5 W Max 950 rpm 0...9 mm 0...6 mm 8 mm 10.5 103/705 Package contents Sewing machine Carrying case Foot control Lead cord Accessories package Owner's manual Embroidery unit Embroidery hoop Embroidery clips Quick start embroidery kit Intellectual property PFAFF, creative and IDT (image) are registered trademarks or trademarks of VSM Group AB. 6:9
... x 290 x 187 8,3 kg 220 V - 240 V / 120 V 75 W 12 V/max. 5 W Max 950 rpm 0...9 mm 0...6 mm 8 mm 10.5 103/705 Package contents Sewing machine Carrying case Foot control Lead cord Accessories package Owner's manual Embroidery unit Embroidery hoop Embroidery clips Quick start embroidery kit Intellectual property PFAFF, creative and IDT (image) are registered trademarks or trademarks of VSM Group AB. 6:9


