Owner's Manual
Page 4
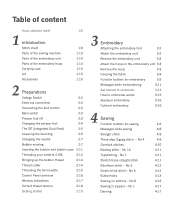
... 2:3 Presser foot lift 2:3 Changing the presser foot 2:4 The IDT (Integrated Dual Feed) 2:5 Lowering the feed dog 2:6 Changing the needle 2:7 Bobbin winding 2:7 Inserting the bobbin and bobbin case 2:11 Threading your creative 2134 2:12 Bringing up the bobbin thread 2:14 Thread cutter 2:14 Threading the twin needle 2:15 Control Panel overview 2:16 Window indications 2:17 Correct thread tension 2:18 Getting started to embroider 3:14 How to embroider words 3:15 Appliqué embroidery 3:16 Cutwork embroidery 3:16 4 Sewing Function buttons for embroidery...
... 2:3 Presser foot lift 2:3 Changing the presser foot 2:4 The IDT (Integrated Dual Feed) 2:5 Lowering the feed dog 2:6 Changing the needle 2:7 Bobbin winding 2:7 Inserting the bobbin and bobbin case 2:11 Threading your creative 2134 2:12 Bringing up the bobbin thread 2:14 Thread cutter 2:14 Threading the twin needle 2:15 Control Panel overview 2:16 Window indications 2:17 Correct thread tension 2:18 Getting started to embroider 3:14 How to embroider words 3:15 Appliqué embroidery 3:16 Cutwork embroidery 3:16 4 Sewing Function buttons for embroidery...
Owner's Manual
Page 8
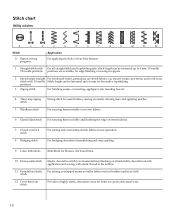
... seam for hems on stretch fabrics. 7 Closed overlock stitch 8 Bridging stitch For joining and overcasting stretch fabrics in zippers. 2 Stretch triple straight For reinforced seams, particulary on elastic, darning tears and applying patches. positions 3 Zigzag stitch For finishing seams, overcasting, appliqué work wear. Stitch chart Utility stitches 0 1 2 3 4 5 6 7 Stitch 0 Button sewing program Application For applying two-hole or four-hole buttons. 8 9 10 11 12 1 Straight stitch with For all straight stitch and topstitching jobs, stitch length...
... seam for hems on stretch fabrics. 7 Closed overlock stitch 8 Bridging stitch For joining and overcasting stretch fabrics in zippers. 2 Stretch triple straight For reinforced seams, particulary on elastic, darning tears and applying patches. positions 3 Zigzag stitch For finishing seams, overcasting, appliqué work wear. Stitch chart Utility stitches 0 1 2 3 4 5 6 7 Stitch 0 Button sewing program Application For applying two-hole or four-hole buttons. 8 9 10 11 12 1 Straight stitch with For all straight stitch and topstitching jobs, stitch length...

Owner's Manual
Page 9
... stretch fabrics. 21 Rounded buttonhole Buttonhole for shirts, jackets and trousers. stitch 14 Basting stitch 15 Lightning stretch stitch For basting project pieces together. The closed seam prevents fabric edges from fraying. 17 Zigzag stitch, right or left needle position For appliqué, couching over cords and creating eyelets. 18 Stretch knit overlock Join and overcast open knit fabrics and jersey. Create eyelets for decorative hems and topstitching. When the feed dog is lowered the machine sews one operation...
... stretch fabrics. 21 Rounded buttonhole Buttonhole for shirts, jackets and trousers. stitch 14 Basting stitch 15 Lightning stretch stitch For basting project pieces together. The closed seam prevents fabric edges from fraying. 17 Zigzag stitch, right or left needle position For appliqué, couching over cords and creating eyelets. 18 Stretch knit overlock Join and overcast open knit fabrics and jersey. Create eyelets for decorative hems and topstitching. When the feed dog is lowered the machine sews one operation...
Owner's Manual
Page 13
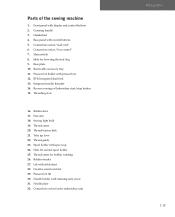
Base plate 10. Reverse sewing or Embroidery start/stop button 15. Free arm 18. Sewing light bulb 19. Creative smart card slot 29. Needle plate 32. Connection socket for second spool holder 25. Connection socket, "foot control" 7. Removable accessory tray 11. Thread tension disk 21. Connection socket, "lead cord" 6. IDT/Integrated dual feed 13. Threading slots 16. Take up lever 22. Hole for the embroidery unit Introduction 1:13 Thread cutter for lowering the feed dog 9. Presser foot lift 30. Carrying handle 3. Handwheel 4. Spool holder with control buttons 5....
Base plate 10. Reverse sewing or Embroidery start/stop button 15. Free arm 18. Sewing light bulb 19. Creative smart card slot 29. Needle plate 32. Connection socket for second spool holder 25. Connection socket, "foot control" 7. Removable accessory tray 11. Thread tension disk 21. Connection socket, "lead cord" 6. IDT/Integrated dual feed 13. Threading slots 16. Take up lever 22. Hole for the embroidery unit Introduction 1:13 Thread cutter for lowering the feed dog 9. Presser foot lift 30. Carrying handle 3. Handwheel 4. Spool holder with control buttons 5....
Owner's Manual
Page 17
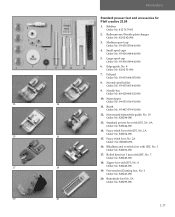
... 13 14 15 16 17 18 Introduction Standard presser feet and accessories for Pfaff creative 2134 1. Bobbins Order No: 412 76 79-01 2. Bulb remover/Needle plate changer Order No: 82 02 92-096 3. Edge guide, No. 8 Order No: 82 02 51-096 7. Rolled hem foot 3 mm with IDT, No. 1A Order No: 820254-096 15. Medium spool cap Order No: 93-035 050-44...
... 13 14 15 16 17 18 Introduction Standard presser feet and accessories for Pfaff creative 2134 1. Bobbins Order No: 412 76 79-01 2. Bulb remover/Needle plate changer Order No: 82 02 92-096 3. Edge guide, No. 8 Order No: 82 02 51-096 7. Rolled hem foot 3 mm with IDT, No. 1A Order No: 820254-096 15. Medium spool cap Order No: 93-035 050-44...

Owner's Manual
Page 35
... 19. Stitch width symbol 22. Design selected from embroidery card 23. Lower feed dogs 25. Mirror indication 27. Balance symbol 32. Single pattern activated 4. Presser foot warning 8. Cut upper thread indication 18. Lower keypad is locked 2:17 Reverse sewing activated 3. Hoop indication 17. Stitch and design width 21. Stitch length/design height Buttonhole slit length/density/balance 30. Half speed activated 38. Mirror function activated 40. Monochrome activated 5. Automatic buttonhole activated 33 29. Basting activated 36. Bobbin thread...
... 19. Stitch width symbol 22. Design selected from embroidery card 23. Lower feed dogs 25. Mirror indication 27. Balance symbol 32. Single pattern activated 4. Presser foot warning 8. Cut upper thread indication 18. Lower keypad is locked 2:17 Reverse sewing activated 3. Hoop indication 17. Stitch and design width 21. Stitch length/design height Buttonhole slit length/density/balance 30. Half speed activated 38. Mirror function activated 40. Monochrome activated 5. Automatic buttonhole activated 33 29. Basting activated 36. Bobbin thread...

Owner's Manual
Page 62
... bobbin case and the machine and continue to sew. Lower the presser foot When the presser foot symbol appears with the arrow flashing, you should not sew with a twin needle. Bobbin thread warning When the bobbin thread is low the machine stops and this icon (B) is flashing in the window. Rethread the top thread and continue to sew. A B Raise the feed dogs For normal sewing the feed dogs should be damaged. Wind the spool, insert...
... bobbin case and the machine and continue to sew. Lower the presser foot When the presser foot symbol appears with the arrow flashing, you should not sew with a twin needle. Bobbin thread warning When the bobbin thread is low the machine stops and this icon (B) is flashing in the window. Rethread the top thread and continue to sew. A B Raise the feed dogs For normal sewing the feed dogs should be damaged. Wind the spool, insert...

Owner's Manual
Page 65
... is determined by changing A the needle positions. Free motion basting: • Attach the darning/free-motion foot, no 6 (see page 4:18). • Lower the feed dog and disengage the IDT. • Place the fabric under arm and crotch seams. The heavier the fabric, the longer the stitch length required. Your Pfaff creative 2134 has 19 needle positions that can be used for topstitching. No 14 The basting stitch can be sewn in up position the machine sews the stitch continuously with normal...
... is determined by changing A the needle positions. Free motion basting: • Attach the darning/free-motion foot, no 6 (see page 4:18). • Lower the feed dog and disengage the IDT. • Place the fabric under arm and crotch seams. The heavier the fabric, the longer the stitch length required. Your Pfaff creative 2134 has 19 needle positions that can be used for topstitching. No 14 The basting stitch can be sewn in up position the machine sews the stitch continuously with normal...
Owner's Manual
Page 68
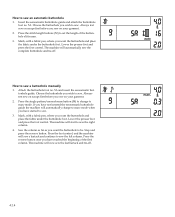
... have started to set the length of the first column. Lower the presser foot and press the foot control. Attach the buttonhole foot no . 5A. Press the single pattern/monochrome button (54) to change to man.-mode. Lower the presser foot and press the foot control. The machine will automatically change to man.-mode when you sew on your garment. 2. tonhole guide. If you have not inserted the sensormatic buttonhole guide the machine will automatically sew the complete buttonhole and...
... have started to set the length of the first column. Lower the presser foot and press the foot control. Attach the buttonhole foot no . 5A. Press the single pattern/monochrome button (54) to change to man.-mode. Lower the presser foot and press the foot control. The machine will automatically change to man.-mode when you sew on your garment. 2. tonhole guide. If you have not inserted the sensormatic buttonhole guide the machine will automatically sew the complete buttonhole and...
Owner's Manual
Page 70
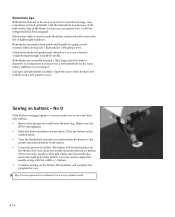
... position the button so the needle enters the left hole in place by the shank of the button. Cut open all buttonholes carefully. Open the curve of the fabric. buttons. • Continue sewing on Button Foot for you can easily sew on two and fourhole buttons. • Remove the presser foot and lower the feed dog. (Make sure the IDT is important to the right. Place the button on the same fabric/stabilizer as your fabric. Make...
... position the button so the needle enters the left hole in place by the shank of the button. Cut open all buttonholes carefully. Open the curve of the fabric. buttons. • Continue sewing on Button Foot for you can easily sew on two and fourhole buttons. • Remove the presser foot and lower the feed dog. (Make sure the IDT is important to the right. Place the button on the same fabric/stabilizer as your fabric. Make...

Owner's Manual
Page 79
... begin quilting, start quilting your Pfaff creative 2134 with safety pins - Starting from the middle of quilting. Tip 2: Use the optional narrow edge foot for the back. Stitching-in-the-Ditch means following the seams in the quilt blocks. • Set your piece. This will make sure your quilt and working out. Plan which seams you start sewing from the middle of the straight stitch to add interest to your quilt, using the Stitch-in-the...
... begin quilting, start quilting your Pfaff creative 2134 with safety pins - Starting from the middle of quilting. Tip 2: Use the optional narrow edge foot for the back. Stitching-in-the-Ditch means following the seams in the quilt blocks. • Set your piece. This will make sure your quilt and working out. Plan which seams you start sewing from the middle of the straight stitch to add interest to your quilt, using the Stitch-in-the...

Owner's Manual
Page 80
... your quilt. • Set your quilt. Prepare your stitching creates scrolls and swirls. Sewing with a Straight Stitch (1) and lower the feed dogs. Take a few stitches right next to one stitch and pull the bobbin thread to determine the stitch length. Now move the quilt in a more consistent way. Tip: Use the Free-motion guide grip to help to keep the stitches even. The Quilting table and Free-motion Quilt foot are lowered, you move the fabric to the top of your Pfaff creative 2134...
... your quilt. • Set your quilt. Prepare your stitching creates scrolls and swirls. Sewing with a Straight Stitch (1) and lower the feed dogs. Take a few stitches right next to one stitch and pull the bobbin thread to determine the stitch length. Now move the quilt in a more consistent way. Tip: Use the Free-motion guide grip to help to keep the stitches even. The Quilting table and Free-motion Quilt foot are lowered, you move the fabric to the top of your Pfaff creative 2134...

Owner's Manual
Page 82
... threads and sew along the first line of stitching. Use the recommended presser foot for normal Straight Stitch (1), stitch length 2.5 - 3.0, presser foot 2, IDT disengaged. • Thread the top and bobbin with thread matching the color of fabric. Set your Pfaff creative 2134, you will be easily pulled. Tip: For fine fabrics, place a lightweight tear away stabilizer under stitching. Remember to place one of the optional Pfaff Pintuck feet to reduce your speed while using...
... threads and sew along the first line of stitching. Use the recommended presser foot for normal Straight Stitch (1), stitch length 2.5 - 3.0, presser foot 2, IDT disengaged. • Thread the top and bobbin with thread matching the color of fabric. Set your Pfaff creative 2134, you will be easily pulled. Tip: For fine fabrics, place a lightweight tear away stabilizer under stitching. Remember to place one of the optional Pfaff Pintuck feet to reduce your speed while using...

Owner's Manual
Page 83
...foot" (optional accessory) for cross stitch sewing: • Always work . Decorative Sewing Cross Stitch No other sewing technique is possible to sew just as you would draw with a pencil, using the "sew slow" and "needle up/down" func- Top tension 2-3 Presser foot Darning foot, no 6 Feed dog Lowered Needle size 80- 90 Stitch Straight stitch/Zigzag • Thread your fabric tight as a drum into a round embroidery hoop. Tips for easier viewing when stitching. 5:11 Free-motion sewing With Free-motion Sewing you control the stitch length. With your Pfaff creative 2134...
...foot" (optional accessory) for cross stitch sewing: • Always work . Decorative Sewing Cross Stitch No other sewing technique is possible to sew just as you would draw with a pencil, using the "sew slow" and "needle up/down" func- Top tension 2-3 Presser foot Darning foot, no 6 Feed dog Lowered Needle size 80- 90 Stitch Straight stitch/Zigzag • Thread your fabric tight as a drum into a round embroidery hoop. Tips for easier viewing when stitching. 5:11 Free-motion sewing With Free-motion Sewing you control the stitch length. With your Pfaff creative 2134...

Owner's Manual
Page 84
... presser foot with the edges approxi- Lower thread tension to secure the gathering. It is important to use the bridging guide (special accessory). The small post on the bottom of the guide is available in the small hole at the beginning and end of the seam. • Sew 1 or 2 more rows of stitching, using the edge of the presser foot as a guide. • Gather the fabric by pulling the bobbin (bottom) threads...
... presser foot with the edges approxi- Lower thread tension to secure the gathering. It is important to use the bridging guide (special accessory). The small post on the bottom of the guide is available in the small hole at the beginning and end of the seam. • Sew 1 or 2 more rows of stitching, using the edge of the presser foot as a guide. • Gather the fabric by pulling the bobbin (bottom) threads...

Owner's Manual
Page 90
... needle fully upwards. Use a larger needle. Make sure you lower the presser foot before you are pulling or pushing the fabric The bobbin case is not properly inserted Insert new needle and push fully in. Check how the machine is securely in thread tension system. 6:4 This ensures that the needle thread is threaded. Needle thread breaks See reasons above . Check bobbin threading path. Change the needle. Insert different type of the thread to sew. Sewing problems and their solutions Problem/Cause The machine skips stitches The needle...
... needle fully upwards. Use a larger needle. Make sure you lower the presser foot before you are pulling or pushing the fabric The bobbin case is not properly inserted Insert new needle and push fully in. Check how the machine is securely in thread tension system. 6:4 This ensures that the needle thread is threaded. Needle thread breaks See reasons above . Check bobbin threading path. Change the needle. Insert different type of the thread to sew. Sewing problems and their solutions Problem/Cause The machine skips stitches The needle...

Owner's Manual
Page 91
Maintenence Problem/Cause The machine does not feed or feeds irregularly Sewing lint has collected between the feed dog teeth rows Feed dogs are lowered Remedy Remove needle plate, remove lint with difficulty There are thread remnants in embroidery mode Error messages There are any defect or damage caused by your Pfaff creative 2134 serviced regularly by use of card format is not supported The card information cannot be shown when you have chosen a design. The machine does not...
Maintenence Problem/Cause The machine does not feed or feeds irregularly Sewing lint has collected between the feed dog teeth rows Feed dogs are lowered Remedy Remove needle plate, remove lint with difficulty There are thread remnants in embroidery mode Error messages There are any defect or damage caused by your Pfaff creative 2134 serviced regularly by use of card format is not supported The card information cannot be shown when you have chosen a design. The machine does not...
Owner's Manual
Page 92
... Attaching the embroidery foot Attach the embroidery unit Attach the hoop on the embroidery unit Automatic buttonhole Automatic darning B Bartack Base panel Base plate Basting stitch Blindhem stitch Block Alphabet Bobbin door Bobbin winder Bobbin winding Bridging stitch Bringing up the bobbin thread Buttonholes Buttonhole foot Buttonhole mode button Buttonhole with gimp thread Buttons Button sewing program Sewing on C Carrying case Carrying handle Changing the light bulb Changing the needle Changing the needle plate Changing the pattern width Changing the presser foot Cleaning Closed overlock...
... Attaching the embroidery foot Attach the embroidery unit Attach the hoop on the embroidery unit Automatic buttonhole Automatic darning B Bartack Base panel Base plate Basting stitch Blindhem stitch Block Alphabet Bobbin door Bobbin winder Bobbin winding Bridging stitch Bringing up the bobbin thread Buttonholes Buttonhole foot Buttonhole mode button Buttonhole with gimp thread Buttons Button sewing program Sewing on C Carrying case Carrying handle Changing the light bulb Changing the needle Changing the needle plate Changing the pattern width Changing the presser foot Cleaning Closed overlock...
Owner's Manual
Page 93
...5:10 Hem stitches 1:10 Hole for second spool holder 1:13 Honeycomb stitch 1:8 Hooping the fabric 3:4 Hoop select button 3:6 I IDT/Integrated dual feed Inserting the bobbin and bobbin case 1:13, 2:5 2:11 Inserting the sensormatic buttonhole guide 4:13 Insert the embroidery smart card 3:11 Integrated Needle Threader 1:13, 2:13 KKeypad lock button 3:8, 4:3 L Lid Lightning stretch stitch Light bulb Linen buttonhole Lowering the feed dogs Lower the presser foot MMain switch Manual buttonhole Messages while embroidering Messages while sewing Mirror button Monochrome button 1:13...
...5:10 Hem stitches 1:10 Hole for second spool holder 1:13 Honeycomb stitch 1:8 Hooping the fabric 3:4 Hoop select button 3:6 I IDT/Integrated dual feed Inserting the bobbin and bobbin case 1:13, 2:5 2:11 Inserting the sensormatic buttonhole guide 4:13 Insert the embroidery smart card 3:11 Integrated Needle Threader 1:13, 2:13 KKeypad lock button 3:8, 4:3 L Lid Lightning stretch stitch Light bulb Linen buttonhole Lowering the feed dogs Lower the presser foot MMain switch Manual buttonhole Messages while embroidering Messages while sewing Mirror button Monochrome button 1:13...
Owner's Manual
Page 94
... 4:9 1:9 1:9 1:8, 4:11 1:9 T Take up lever 1:13 Threading slots 1:13 Threading the twin needle 2:15 Threading your creative 2134 2:12 Thread cutter 1:13, 2:14 Thread cutter for lowering the feed dogs Spool holder Start-stop/reverse button Stitch/design selection buttons Stitch chart Stitch-in-the-Ditch Stitch length Stitch sequences Stitch sewing sequence guide Stitch stepping Stitch width Straight stitch Stretch buttonhole Stretch knit overlock stitch Stretch triple straight stitch Stretch triple zigzag stitch 4:5 U Utility stitches 1:8 3:8, 4:2 5:13 4:3 V Voltage Switch...
... 4:9 1:9 1:9 1:8, 4:11 1:9 T Take up lever 1:13 Threading slots 1:13 Threading the twin needle 2:15 Threading your creative 2134 2:12 Thread cutter 1:13, 2:14 Thread cutter for lowering the feed dogs Spool holder Start-stop/reverse button Stitch/design selection buttons Stitch chart Stitch-in-the-Ditch Stitch length Stitch sequences Stitch sewing sequence guide Stitch stepping Stitch width Straight stitch Stretch buttonhole Stretch knit overlock stitch Stretch triple straight stitch Stretch triple zigzag stitch 4:5 U Utility stitches 1:8 3:8, 4:2 5:13 4:3 V Voltage Switch...


