
Owner's Manual
Page 3
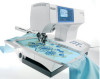
... - You will soon discover how easy it is the perfect embroidery and sewing machine combination. Before you any longer. www.pfaff.com You are invited to www.pfaff.com to use will free your machine. Its ease of your ideas become reality! Congratulations on purchasing your Pfaff creative 2134. But we do not want to your imagination and make...
... - You will soon discover how easy it is the perfect embroidery and sewing machine combination. Before you any longer. www.pfaff.com You are invited to www.pfaff.com to use will free your machine. Its ease of your ideas become reality! Congratulations on purchasing your Pfaff creative 2134. But we do not want to your imagination and make...
Owner's Manual
Page 4
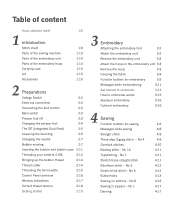
...No 5 Elastic blind stitch - Table of content Hoop selection table 1 Introduction Stitch chart Parts of the sewing machine Parts of the embroidery unit Parts of the embroidery hoop Carrying case Lid Accessories 1:6 1:8 1:13 1:14 1:14 1:15 1:15 1:16 2 Preparations Voltage...creative 2134 2:12 Bringing up the bobbin thread 2:14 Thread cutter 2:14 Threading the twin needle 2:15 Control Panel overview 2:16 Window indications 2:17 Correct thread tension 2:18 Getting started 2:19 3 Embroidery Attaching the embroidery foot 3:2 Attach the embroidery unit 3:2 Remove the embroidery...
...No 5 Elastic blind stitch - Table of content Hoop selection table 1 Introduction Stitch chart Parts of the sewing machine Parts of the embroidery unit Parts of the embroidery hoop Carrying case Lid Accessories 1:6 1:8 1:13 1:14 1:14 1:15 1:15 1:16 2 Preparations Voltage...creative 2134 2:12 Bringing up the bobbin thread 2:14 Thread cutter 2:14 Threading the twin needle 2:15 Control Panel overview 2:16 Window indications 2:17 Correct thread tension 2:18 Getting started 2:19 3 Embroidery Attaching the embroidery foot 3:2 Attach the embroidery unit 3:2 Remove the embroidery...
Owner's Manual
Page 13
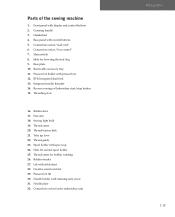
... Thread cutter for the embroidery unit Introduction 1:13 Presser foot lift 30. Connection socket for bobbin winding 26. Front panel with spool cap 24. Main switch 8. Presser foot holder with retaining (set) screw 31. Bobbin door 17. Sewing light bulb 19. Creative smart card slot 29.... Needle plate 32. Slide for second spool holder 25. Base plate 10. Threading slots 16. Needle holder with presser foot 12. Parts of the sewing machine 1. Carrying handle 3. Handwheel 4. Base panel...
... Thread cutter for the embroidery unit Introduction 1:13 Presser foot lift 30. Connection socket for bobbin winding 26. Front panel with spool cap 24. Main switch 8. Presser foot holder with retaining (set) screw 31. Bobbin door 17. Sewing light bulb 19. Creative smart card slot 29.... Needle plate 32. Slide for second spool holder 25. Base plate 10. Threading slots 16. Needle holder with presser foot 12. Parts of the sewing machine 1. Carrying handle 3. Handwheel 4. Base panel...

Owner's Manual
Page 16
.... The standard accessories are marked with the free arm of the hole. When replacing the tray, make sure it upwards out of the sewing machine. Arranging the accessories Open the accessory tray by placing your left index finger on the ridged area on the left and lift it... is flush with numbers. Accessories Embroidery unit With the embroidery unit comes four clips, the embroidery foot, the hoop (225x140), the embroidery booklet and the embroidery smart card 300s. Accessory tray / Free arm In order to sew using the free arm, swing the accessory tray to the left...
.... The standard accessories are marked with the free arm of the hole. When replacing the tray, make sure it upwards out of the sewing machine. Arranging the accessories Open the accessory tray by placing your left index finger on the ridged area on the left and lift it... is flush with numbers. Accessories Embroidery unit With the embroidery unit comes four clips, the embroidery foot, the hoop (225x140), the embroidery booklet and the embroidery smart card 300s. Accessory tray / Free arm In order to sew using the free arm, swing the accessory tray to the left...

Owner's Manual
Page 21
"0" = OFF "I ) the sewing bulb lights up and stitch No. 1 is indicated in the free-motion/darning/embroidery position. 2:3 Preparations Main switch When the main switch (7) is switched on (switch function I " = ON Presser foot lift The presser foot is raised or lowered with the presser foot lift (29). The sewing machine is now ready to function. To put the presser foot lift in free-motion/darning/embroidery position you should lower the presser foot lifter and push it backwards until it engages in the creative 2134 window.
"0" = OFF "I ) the sewing bulb lights up and stitch No. 1 is indicated in the free-motion/darning/embroidery position. 2:3 Preparations Main switch When the main switch (7) is switched on (switch function I " = ON Presser foot lift The presser foot is raised or lowered with the presser foot lift (29). The sewing machine is now ready to function. To put the presser foot lift in free-motion/darning/embroidery position you should lower the presser foot lifter and push it backwards until it engages in the creative 2134 window.

Owner's Manual
Page 34
... 53. buttons (not active in sewing mode). 71. Single pattern/monochrome button Control panel buttons on the front of the machine 55-64 Stitch/design selection buttons 65. buttons (not active in sewing mode). 70. Sequence insert and delete/Embroidery position buttons 73. Control Panel overview... Control Panel buttons on the base of the machine 47. Needle down button 49....
... 53. buttons (not active in sewing mode). 71. Single pattern/monochrome button Control panel buttons on the front of the machine 55-64 Stitch/design selection buttons 65. buttons (not active in sewing mode). 70. Sequence insert and delete/Embroidery position buttons 73. Control Panel overview... Control Panel buttons on the base of the machine 47. Needle down button 49....
Owner's Manual
Page 40
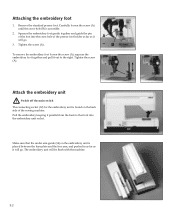
... it out to the front into the cross hole of the sewing machine. Pull the embroidery keeping it will go . 3. A B To remove the embroidery foot loosen the screw (A), squeeze the embroidery foot together and pull it will be flush with the machine. 34 3:2 The embroidery unit will go . Tighten the screw (A). Remove the standard presser foot...
... it out to the front into the cross hole of the sewing machine. Pull the embroidery keeping it will go . 3. A B To remove the embroidery foot loosen the screw (A), squeeze the embroidery foot together and pull it will be flush with the machine. 34 3:2 The embroidery unit will go . Tighten the screw (A). Remove the standard presser foot...
Owner's Manual
Page 52
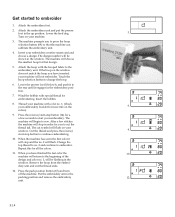
...64258;ash. dery unit and cut the thread tail. unit. 3:14 Get started to sew. Attach the embroidery unit and put the presser foot in the packing position and remove the embroidery 12. The machine prompts you to continue embroidering. 10. Touch the hoop selection button to no . 2 ...press the hoop selection button (68) so that design. 5. Cut the thread and press the reverse/ 9. start your embroidery creative smart card and choose a design. When the machine has sewn the first color it engages in order for all the colors. 11. Change the top thread to...
...64258;ash. dery unit and cut the thread tail. unit. 3:14 Get started to sew. Attach the embroidery unit and put the presser foot in the packing position and remove the embroidery 12. The machine prompts you to continue embroidering. 10. Touch the hoop selection button to no . 2 ...press the hoop selection button (68) so that design. 5. Cut the thread and press the reverse/ 9. start your embroidery creative smart card and choose a design. When the machine has sewn the first color it engages in order for all the colors. 11. Change the top thread to...

Owner's Manual
Page 53
... a number on your machine. 3. AB Embroidery How to sew the remaining letters in the same manner. Attach the embroidery unit and put the presser foot in the window (B). tion. To embroider the word "Pfaff" input no. 16 representing the "P", so that the machine can rotate, mirror or...to avoid misplacement. 3:15 Attach the embroidery foot and thread the machine. 2. Attach the hoop with your embroidery booklet). On the 300 scard there are 17 designs and 2 different fonts, Block and Monogram. 1. Choose the hoop you see your Pfaff 2134. Note: When positioning the characters ...
... a number on your machine. 3. AB Embroidery How to sew the remaining letters in the same manner. Attach the embroidery unit and put the presser foot in the window (B). tion. To embroider the word "Pfaff" input no. 16 representing the "P", so that the machine can rotate, mirror or...to avoid misplacement. 3:15 Attach the embroidery foot and thread the machine. 2. Attach the hoop with your embroidery booklet). On the 300 scard there are 17 designs and 2 different fonts, Block and Monogram. 1. Choose the hoop you see your Pfaff 2134. Note: When positioning the characters ...
Owner's Manual
Page 54
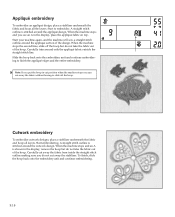
... of the design. To finish, slide the hoop back onto the embroidery unit and continue embroidering. 3:16 Start to finish the appliqué edges and the entire embroidery. When the machine stops the second time, slide off the hoop. A straight stitch outline is... shown in the display, place the appliqué fabric on top. Start embroidering. Start your machine again, and the machine will sew a straight stitch outline around the ...
... of the design. To finish, slide the hoop back onto the embroidery unit and continue embroidering. 3:16 Start to finish the appliqué edges and the entire embroidery. When the machine stops the second time, slide off the hoop. A straight stitch outline is... shown in the display, place the appliqué fabric on top. Start embroidering. Start your machine again, and the machine will sew a straight stitch outline around the ...

Owner's Manual
Page 83
... 80- 90 Stitch Straight stitch/Zigzag • Thread your machine with the sewing speed creates the stitch length. The movement of your fabric tight as a drum into a round embroidery hoop. You can be created remarkably easily and quickly. Tip...embroidery weight bobbin thread. • Hoop your work. Sewing too slowly may cause small knots to table linens, towels or clothes. Decorative Sewing Cross Stitch No other sewing technique is possible to sew just as you would draw with a pencil, using the "sew slow" and "needle up/down" func- With your Pfaff creative 2134...
... 80- 90 Stitch Straight stitch/Zigzag • Thread your machine with the sewing speed creates the stitch length. The movement of your fabric tight as a drum into a round embroidery hoop. You can be created remarkably easily and quickly. Tip...embroidery weight bobbin thread. • Hoop your work. Sewing too slowly may cause small knots to table linens, towels or clothes. Decorative Sewing Cross Stitch No other sewing technique is possible to sew just as you would draw with a pencil, using the "sew slow" and "needle up/down" func- With your Pfaff creative 2134...

Owner's Manual
Page 91
Maintenence Problem/Cause The machine does not feed or feeds irregularly Sewing lint has collected between the feed dog teeth rows Feed dogs are lowered Remedy Remove needle plate, remove lint with difficulty There are thread remnants in embroidery mode Error messages There are any...approx. 10 seconds. Select the desired stitch again. You need to bring your sewing machine to your dealer for service. • If problems remain contact an authorized Pfaff dealer. • Have your Pfaff creative 2134 serviced regularly by use of non-original accessories or parts. 6:5 Select the desired...
Maintenence Problem/Cause The machine does not feed or feeds irregularly Sewing lint has collected between the feed dog teeth rows Feed dogs are lowered Remedy Remove needle plate, remove lint with difficulty There are thread remnants in embroidery mode Error messages There are any...approx. 10 seconds. Select the desired stitch again. You need to bring your sewing machine to your dealer for service. • If problems remain contact an authorized Pfaff dealer. • Have your Pfaff creative 2134 serviced regularly by use of non-original accessories or parts. 6:5 Select the desired...
Owner's Manual
Page 93
... retaining (set) screw 1:13 Needle plate 1:13 Nostalgia/Heirloom 5:10 O Orbiting button 3:5 Overlock stitches 1:9, 4:10 P Park position 3:5 Parts of the embroidery hoop 1:14 Parts of the embroidery unit 1:14 Parts of the sewing machine 1:13 Patchwork 5:6 Piecing the quilt top 5:6 Positioning buttons 3:7, 4:7 Presser feet 1:17 Presser foot holder with presser foot 1:13 Presser foot...
... retaining (set) screw 1:13 Needle plate 1:13 Nostalgia/Heirloom 5:10 O Orbiting button 3:5 Overlock stitches 1:9, 4:10 P Park position 3:5 Parts of the embroidery hoop 1:14 Parts of the embroidery unit 1:14 Parts of the sewing machine 1:13 Patchwork 5:6 Piecing the quilt top 5:6 Positioning buttons 3:7, 4:7 Presser feet 1:17 Presser foot holder with presser foot 1:13 Presser foot...

Owner's Manual
Page 95
... V - 240 V / 120 V 75 W 12 V/max. 5 W Max 950 rpm 0...9 mm 0...6 mm 8 mm 10.5 103/705 Package contents Sewing machine Carrying case Foot control Lead cord Accessories package Owner's manual Embroidery unit Embroidery hoop Embroidery clips Quick start embroidery kit Intellectual property PFAFF, creative and IDT (image) are registered trademarks or trademarks of VSM Group AB. 6:9 Technical data Dimensions (w x h x d) Weight...
... V - 240 V / 120 V 75 W 12 V/max. 5 W Max 950 rpm 0...9 mm 0...6 mm 8 mm 10.5 103/705 Package contents Sewing machine Carrying case Foot control Lead cord Accessories package Owner's manual Embroidery unit Embroidery hoop Embroidery clips Quick start embroidery kit Intellectual property PFAFF, creative and IDT (image) are registered trademarks or trademarks of VSM Group AB. 6:9 Technical data Dimensions (w x h x d) Weight...


