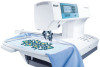
Owner's Manual
Page 2
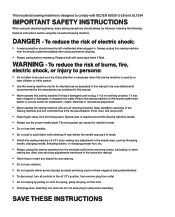
WARNING - To reduce the risk of electric shock: • A sewing machine should always be followed, including the following: Read all moving parts. Special care is used as contained in the instruction manual. • Never drop or insert any object into cord reel. It may deflect ...
WARNING - To reduce the risk of electric shock: • A sewing machine should always be followed, including the following: Read all moving parts. Special care is used as contained in the instruction manual. • Never drop or insert any object into cord reel. It may deflect ...
Owner's Manual
Page 4
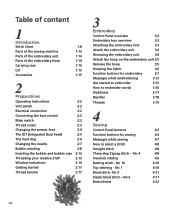
... blind stitch - No 10 4:10 Top stitching - Table of content 1 Introduction Stitch Chart 1:8 Parts of the sewing machine 1:13 Parts of the embroidery unit 1:14 Parts of the embroidery hoop 1:14 Carrying case 1:15 Lid 1:15 Accessories 1:15 2 Preparations Operating Instructions...) 2:5 The feed dog 2:6 Changing the needle 2:7 Bobbin winding 2:8 Inserting the bobbin and bobbin case 2:12 Threading your creative 2124 2:13 Window indications 2:16 Getting started 2:17 Thread tension 2:17 3 Embroidery Control Panel overview 3:2 Embroidery box overview 3:3 ...
... blind stitch - No 10 4:10 Top stitching - Table of content 1 Introduction Stitch Chart 1:8 Parts of the sewing machine 1:13 Parts of the embroidery unit 1:14 Parts of the embroidery hoop 1:14 Carrying case 1:15 Lid 1:15 Accessories 1:15 2 Preparations Operating Instructions...) 2:5 The feed dog 2:6 Changing the needle 2:7 Bobbin winding 2:8 Inserting the bobbin and bobbin case 2:12 Threading your creative 2124 2:13 Window indications 2:16 Getting started 2:17 Thread tension 2:17 3 Embroidery Control Panel overview 3:2 Embroidery box overview 3:3 ...
Owner's Manual
Page 13
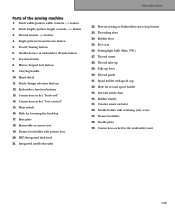
... feed dog 17. Lid with retaining (set) screw 37. Integrated needle threader 22. PInretrpoadruacttioionns Parts of the sewing machine 1. Presser foot holder with spool cap 32. Stitch width/pattern width controls, -/+ button 2. Embroidery function buttons 13. Creative smart card slot 36. Spool holder with presser foot 20. Removable accessory tray 19. Hand...
... feed dog 17. Lid with retaining (set) screw 37. Integrated needle threader 22. PInretrpoadruacttioionns Parts of the sewing machine 1. Presser foot holder with spool cap 32. Stitch width/pattern width controls, -/+ button 2. Embroidery function buttons 13. Creative smart card slot 36. Spool holder with presser foot 20. Removable accessory tray 19. Hand...
Owner's Manual
Page 14
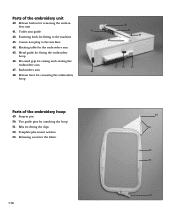
... for the fabric 49 50 51 52 53 1:14 Release lever for removing the embroidery hoop 48 45 47 46 44 41 42 43 40 Parts of the embroidery unit 40. Retaining screw for fitting the embroidery hoop 46. Connection plug to the machine 43. Recessed grip for the...pin 50. Template placement notches 53. Rotating table for raising and rotating the embroidery arm 47. Two guide pins for removing the embroidery unit 41. Parts of the embroidery hoop 49. Release button for attaching the hoop 51. Under arm guide 42. Fastening latch for fitting the clips 52. ...
... for the fabric 49 50 51 52 53 1:14 Release lever for removing the embroidery hoop 48 45 47 46 44 41 42 43 40 Parts of the embroidery unit 40. Retaining screw for fitting the embroidery hoop 46. Connection plug to the machine 43. Recessed grip for the...pin 50. Template placement notches 53. Rotating table for raising and rotating the embroidery arm 47. Two guide pins for removing the embroidery unit 41. Parts of the embroidery hoop 49. Release button for attaching the hoop 51. Under arm guide 42. Fastening latch for fitting the clips 52. ...
Owner's Manual
Page 16
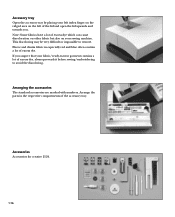
... on your sewing machine. Fleece and denim fabric in the respective compartments of the accessory tray. Arrange the parts in especially red and blue often contain a lot of excess dye. Accessories Accessories for creative 2124. 1:16 Arranging the accessories The standard accessories are marked with numbers. This discoloring may be very diffi...
... on your sewing machine. Fleece and denim fabric in the respective compartments of the accessory tray. Arrange the parts in especially red and blue often contain a lot of excess dye. Accessories Accessories for creative 2124. 1:16 Arranging the accessories The standard accessories are marked with numbers. This discoloring may be very diffi...
Owner's Manual
Page 22
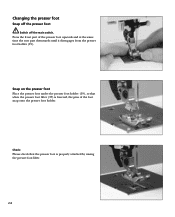
Check: Please check that when the presser foot lifter (37) is properly attached by raising the presser foot lifter. 2:4 Snap on the presser foot Place the presser foot under the presser foot holder (19), so that the presser foot is lowered, the pins of the presser foot upwards and at the same time the rear part downwards until it disengages from the presser foot holder (19). Changing the presser foot Snap off the presser foot Switch off the main switch. Press the front part of the foot snap onto the presser foot holder.
Check: Please check that when the presser foot lifter (37) is properly attached by raising the presser foot lifter. 2:4 Snap on the presser foot Place the presser foot under the presser foot holder (19), so that the presser foot is lowered, the pins of the presser foot upwards and at the same time the rear part downwards until it disengages from the presser foot holder (19). Changing the presser foot Snap off the presser foot Switch off the main switch. Press the front part of the foot snap onto the presser foot holder.
Owner's Manual
Page 68
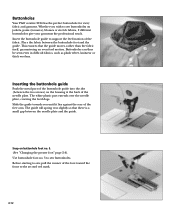
... of the foot toward the front to support the feed motion of the free arm. Inserting the buttonhole guide Push the metal part of the needle plate. Buttonholes Your Pfaff creative 2124 has the perfect buttonhole for every fabric and garment. Snap on the housing at the back of the buttonhole guide into the...
... of the foot toward the front to support the feed motion of the free arm. Inserting the buttonhole guide Push the metal part of the needle plate. Buttonholes Your Pfaff creative 2124 has the perfect buttonhole for every fabric and garment. Snap on the housing at the back of the buttonhole guide into the...
Owner's Manual
Page 79
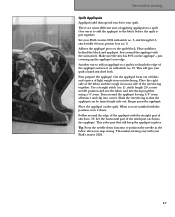
... curves. Trim around the appliqué leaving 1/8" seam allowance and clip into the appliqué. Slash the interfacing so that special touch for your Pfaff creative 2124. 5:7 One way is to add the appliqué to finish the edge of the appliqué with the satin stitch. just covering... . 19. Place stabilizer behind the block and appliqué. Make sure the stitch is to the block before the quilt is the part that will give your Pfaff creative 2124 with your quilt. Another way to add an appliqué to a quilt. Sew around the edge of the appliqué and...
... curves. Trim around the appliqué leaving 1/8" seam allowance and clip into the appliqué. Slash the interfacing so that special touch for your Pfaff creative 2124. 5:7 One way is to add the appliqué to finish the edge of the appliqué with the satin stitch. just covering... . 19. Place stabilizer behind the block and appliqué. Make sure the stitch is to the block before the quilt is the part that will give your Pfaff creative 2124 with your quilt. Another way to add an appliqué to a quilt. Sew around the edge of the appliqué and...
Owner's Manual
Page 92
...seconds and switch on completion of the design number. Remove the threads. Switch off the machine on again. No data found. Non-original Parts and Accessories The warranty does not cover any defect or damage caused by your dealer for a design. The machine does not find ...of the design number. The design does not fit in embroidery mode Error messages There are any designs to your Pfaff dealer. You need to bring your Pfaff creative 2124 serviced regularly by use of the design number. E4 is shown instead of the window may fail. Select the desired ...
...seconds and switch on completion of the design number. Remove the threads. Switch off the machine on again. No data found. Non-original Parts and Accessories The warranty does not cover any defect or damage caused by your dealer for a design. The machine does not find ...of the design number. The design does not fit in embroidery mode Error messages There are any designs to your Pfaff dealer. You need to bring your Pfaff creative 2124 serviced regularly by use of the design number. E4 is shown instead of the window may fail. Select the desired ...


