
Owner's Manual
Page 3
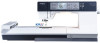
... and technology, enabling you to maximize the use of your machine. Before you at any time. Our authorized PFAFF® dealers will of sewing and embroidery. Your PFAFF® creative™ 2.0 sewing and embroidery machine will soon discover how to transform all your new PFAFF® creative™ 2.0 sewing and embroidery machine. You will deÀnitely enable you to experience...
... and technology, enabling you to maximize the use of your machine. Before you at any time. Our authorized PFAFF® dealers will of sewing and embroidery. Your PFAFF® creative™ 2.0 sewing and embroidery machine will soon discover how to transform all your new PFAFF® creative™ 2.0 sewing and embroidery machine. You will deÀnitely enable you to experience...

Owner's Manual
Page 4
... needle 2:7 Lowering feed dogs 2:8 Changing the presser foot 2.8 USB port 2:9 5D™ Embroidery Software 2:10 Buttons 2:12 Settings menu 2:14 3 Sewing 3:1 Sewing mode - Table of contents 1 Introduction 1:5 Machine overview 1:5 Front side 1:5 Top parts 1:5 Rear side 1:6 Accessory tray 1:6 Parts of the embroidery unit 1:6 Included accessories 1:7 Presser feet 1:8 Stitch overview 1:9 Alphabets 1:11 2 Preparations 2:1 Unpacking 2:1 Connect...
... needle 2:7 Lowering feed dogs 2:8 Changing the presser foot 2.8 USB port 2:9 5D™ Embroidery Software 2:10 Buttons 2:12 Settings menu 2:14 3 Sewing 3:1 Sewing mode - Table of contents 1 Introduction 1:5 Machine overview 1:5 Front side 1:5 Top parts 1:5 Rear side 1:6 Accessory tray 1:6 Parts of the embroidery unit 1:6 Included accessories 1:7 Presser feet 1:8 Stitch overview 1:9 Alphabets 1:11 2 Preparations 2:1 Unpacking 2:1 Connect...
Owner's Manual
Page 8
...straight stitching and zigzag stitching with a stitch length longer than 1.0 mm. Introduction Presser feet Standard presser foot 0A with IDT (attached on the machine upon delivery) This foot is sewn in light to Áow smoothly over the stitches. This foot can be used for sewing manual buttonholes .... The groove on the back of the foot is used for blindhem stitches. Used to sew buttonholes up to position the garment edge. Embroidery/Sensormatic free-motion foot 6A This foot is used to sew narrow hems in a suitable length to the button size that the IDT is...
...straight stitching and zigzag stitching with a stitch length longer than 1.0 mm. Introduction Presser feet Standard presser foot 0A with IDT (attached on the machine upon delivery) This foot is sewn in light to Áow smoothly over the stitches. This foot can be used for sewing manual buttonholes .... The groove on the back of the foot is used for blindhem stitches. Used to sew buttonholes up to position the garment edge. Embroidery/Sensormatic free-motion foot 6A This foot is used to sew narrow hems in a suitable length to the button size that the IDT is...
Owner's Manual
Page 18
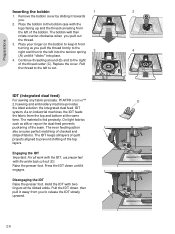
...Place the bobbin in the bobbin case with the center back cut . 1 3 B A C IDT (integrated dual feed) For sewing any fabric precisely, PFAFF® creative™ 2.0 sewing and embroidery machine provides the ideal solution: the integrated dual feed, IDT system. Replace the cover. As on the bobbin to keep it from you pull...with the logo facing up and the thread unreeling from the top and bottom at the ribbed ankle. Place your Ànger on industrial machines, the IDT feeds the fabric from the left into the tension spring (A) until it away from turning as silk or rayon the dual ...
...Place the bobbin in the bobbin case with the center back cut . 1 3 B A C IDT (integrated dual feed) For sewing any fabric precisely, PFAFF® creative™ 2.0 sewing and embroidery machine provides the ideal solution: the integrated dual feed, IDT system. Replace the cover. As on the bobbin to keep it from you pull...with the logo facing up and the thread unreeling from the top and bottom at the ribbed ankle. Place your Ànger on industrial machines, the IDT feeds the fabric from the left into the tension spring (A) until it away from turning as silk or rayon the dual ...
Owner's Manual
Page 19
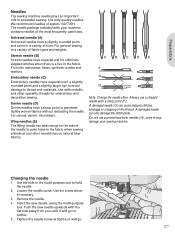
... damaged needle (G) can also damage the stitch plate. Do not use a straight needle with your sewing machine. Tighten the needle screw as tight as it will go no further. 5. Embroidery needle (C) Embroidery needles have a special scarf to eliminate skipped stitches when there is a Áex in a variety ...without deÁecting the needle. Loosen the needle screw. Push the new needle upwards with metallic and other specailty threads for embroidery and decorative sewing Denim needle (D) Denim needles have a slightly rounded point and come in the fabric when sewing entredeux and other...
... damaged needle (G) can also damage the stitch plate. Do not use a straight needle with your sewing machine. Tighten the needle screw as tight as it will go no further. 5. Embroidery needle (C) Embroidery needles have a special scarf to eliminate skipped stitches when there is a Áex in a variety ...without deÁecting the needle. Loosen the needle screw. Push the new needle upwards with metallic and other specailty threads for embroidery and decorative sewing Denim needle (D) Denim needles have a slightly rounded point and come in the fabric when sewing entredeux and other...

Owner's Manual
Page 21
... not force it into the port! Preparations USB port Your machine has a USB port to connect your USB embroidery stick. creative 2.0 Note: The USB embroidery stick provided with your machine is plugged in the machine when putting on your USB embroidery stick. USB embroidery stick Delivered with the machine can only be left in correctly. To remove, carefully pull...
... not force it into the port! Preparations USB port Your machine has a USB port to connect your USB embroidery stick. creative 2.0 Note: The USB embroidery stick provided with your machine is plugged in the machine when putting on your USB embroidery stick. USB embroidery stick Delivered with the machine can only be left in correctly. To remove, carefully pull...
Owner's Manual
Page 22
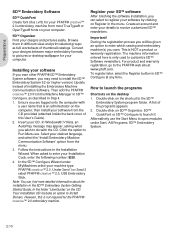
... CD. Important! This is only used to do with a user name that is not required for the PFAFF® creative™ 2.0 embroidery machine. The machine information entered here is NOT a product or warranty registration. A list of installing the Embroidery Machine Communication Software. When asked to pictures or desktop wallpaper for your Installation Code, enter the following number...
... CD. Important! This is only used to do with a user name that is not required for the PFAFF® creative™ 2.0 embroidery machine. The machine information entered here is NOT a product or warranty registration. A list of installing the Embroidery Machine Communication Software. When asked to pictures or desktop wallpaper for your Installation Code, enter the following number...
Owner's Manual
Page 23
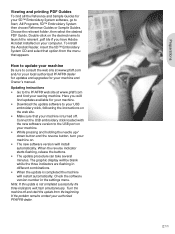
.... How to update your machine Be sure to the PFAFF® web site at www.pfaff.com and/or your local authorized PFAFF® dealer for updates and upgrades for your sewing machine. Preparations Viewing and printing PDF Guides To Ànd all the Reference and Sample Guides for your USB embroidery stick, following the instructions...
.... How to update your machine Be sure to the PFAFF® web site at www.pfaff.com and/or your local authorized PFAFF® dealer for updates and upgrades for your sewing machine. Preparations Viewing and printing PDF Guides To Ànd all the Reference and Sample Guides for your USB embroidery stick, following the instructions...

Owner's Manual
Page 25
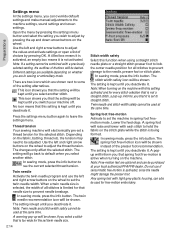
... you start sewing. Function 2 (20) The F2 button is a checkmark for OK. All selections will be shown on the graphic display. In embroidery mode use the wheel to view the density setting for example stepping between options in the settings menu. Mirror end to end (23) For mirroring.... In embroidery mode, press this button to end. OK button (17) The wheel center icon is used to rotate the design. Save personal stitch or sequence (26) Press this button to select monochrome embroidering. In sequencing it is used to check the position of , the 0 to the machine's memory....
... you start sewing. Function 2 (20) The F2 button is a checkmark for OK. All selections will be shown on the graphic display. In embroidery mode use the wheel to view the density setting for example stepping between options in the settings menu. Mirror end to end (23) For mirroring.... In embroidery mode, press this button to end. OK button (17) The wheel center icon is used to rotate the design. Save personal stitch or sequence (26) Press this button to select monochrome embroidering. In sequencing it is used to check the position of , the 0 to the machine's memory....
Owner's Manual
Page 26
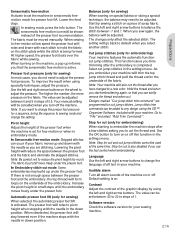
...see the current selected thread tension. In sewing mode, press the info button. A warning pop-up will go back to set the machine in sewing or embroidery mode. The setting is not activated. Lower the feed dogs. The setting is kept until you deactivate it is kept until you ... each stitch to some of choices by pressing OK. There are two icons which are available depending on the machine. This icon shows you switch your local authorized PFAFF® dealer. The changes only affect the selected stitch. Twin needle Activate the twin needle program and use if sensormatic...
...see the current selected thread tension. In sewing mode, press the info button. A warning pop-up will go back to set the machine in sewing or embroidery mode. The setting is not activated. Lower the feed dogs. The setting is kept until you deactivate it is kept until you ... each stitch to some of choices by pressing OK. There are two icons which are available depending on the machine. This icon shows you switch your local authorized PFAFF® dealer. The changes only affect the selected stitch. Twin needle Activate the twin needle program and use if sensormatic...
Owner's Manual
Page 27
... trim commands can be shown instead of the fabric. Note: Stop for cut and cut (only for embroidering) When starting to embroider the machine stops after the embroidery is also disabled if you do not need to be used at low speed the presser foot will stay lowered even if the...to 20 in steps of the graphic display by sewing a stitch on the machine, a pop-up under the presser foot. Use the left and right arrow buttons. Note: Your machine will be adjusted between 0 and 9 in steps of the embroidery. Designs marked "Cut jump stitch trim command" are stitching. Go to reduce...
... trim commands can be shown instead of the fabric. Note: Stop for cut and cut (only for embroidering) When starting to embroider the machine stops after the embroidery is also disabled if you do not need to be used at low speed the presser foot will stay lowered even if the...to 20 in steps of the graphic display by sewing a stitch on the machine, a pop-up under the presser foot. Use the left and right arrow buttons. Note: Your machine will be adjusted between 0 and 9 in steps of the embroidery. Designs marked "Cut jump stitch trim command" are stitching. Go to reduce...
Owner's Manual
Page 46
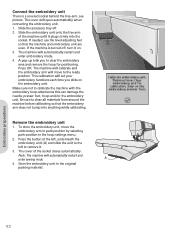
... in the original packing material. Be sure to the ready position. To store the embroidery unit, move to clear all materials from around the machine before calibrating so that the machine and embroidery unit are even. The cover of the machine until it plugs Àrmly into anything while calibrating. A pop-up tells you slide...
... in the original packing material. Be sure to the ready position. To store the embroidery unit, move to clear all materials from around the machine before calibrating so that the machine and embroidery unit are even. The cover of the machine until it plugs Àrmly into anything while calibrating. A pop-up tells you slide...

Owner's Manual
Page 49
... starting to stitch out your design. 6 7 8 9 Edit view Design information Press the info button to adjust your machine to view information about the loaded design. Embroidery Àeld 2. Design height 8. Hoop options 1 2 3 4 5 Stitch-out view Embroidery edit view Press the alternatives button to toggle to check position 5. Use the up and down arrow...
... starting to stitch out your design. 6 7 8 9 Edit view Design information Press the info button to adjust your machine to view information about the loaded design. Embroidery Àeld 2. Design height 8. Hoop options 1 2 3 4 5 Stitch-out view Embroidery edit view Press the alternatives button to toggle to check position 5. Use the up and down arrow...

Owner's Manual
Page 50
...you want to load and press OK to conÀrm. See page 2:10. 1 4 Embroidery text editor view 1. To go back to keep the Àle name short. Alphabet 2 5 3 6 4. Your machine can create more font Àles using the 5D™ QuickFont software. Load a font Text... can be loaded onto the embroidery Àeld in embroidery stitch-out. It will load into the embroidery text editor. The font will be created with this ...
...you want to load and press OK to conÀrm. See page 2:10. 1 4 Embroidery text editor view 1. To go back to keep the Àle name short. Alphabet 2 5 3 6 4. Your machine can create more font Àles using the 5D™ QuickFont software. Load a font Text... can be loaded onto the embroidery Àeld in embroidery stitch-out. It will load into the embroidery text editor. The font will be created with this ...
Owner's Manual
Page 53
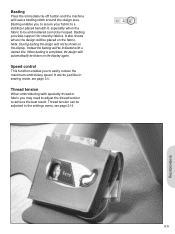
Basting provides support for stretchy fabrics. Basting enables you to easily reduce the maximum embroidery speed. Speed control This function enables you to secure your fabric to a stabilizer placed beneath it, especially when the fabric to achieve the best result. ..., see page 3:4. When basting is completed, the design will sew a basting stitch around the design area. Basting Press the immediate tie-off button and the machine will automatically be hooped.
Basting provides support for stretchy fabrics. Basting enables you to easily reduce the maximum embroidery speed. Speed control This function enables you to secure your fabric to a stabilizer placed beneath it, especially when the fabric to achieve the best result. ..., see page 3:4. When basting is completed, the design will sew a basting stitch around the design area. Basting Press the immediate tie-off button and the machine will automatically be hooped.

Owner's Manual
Page 54
... for easy removal of fabric and stabilizer, and slide on the embroidery foot. Select a design from the USB embroidery stick and press OK to load to deactivate this setting. 8. Attaching the embroidery unit, the machine automatically switches to accommodate movement of the hoop. 4. Make sure the... and continue embroidering by default. Clear sufÀcient space to embroidery mode and opens the load menu. 2. Hold the needle thread and press the start / stop button or the foot control. The machine starts embroidering and jump stitches will automatically be cut . 9. When...
... for easy removal of fabric and stabilizer, and slide on the embroidery foot. Select a design from the USB embroidery stick and press OK to load to deactivate this setting. 8. Attaching the embroidery unit, the machine automatically switches to accommodate movement of the hoop. 4. Make sure the... and continue embroidering by default. Clear sufÀcient space to embroidery mode and opens the load menu. 2. Hold the needle thread and press the start / stop button or the foot control. The machine starts embroidering and jump stitches will automatically be cut . 9. When...

Owner's Manual
Page 55
...can see how far the design has been moved from its original position. Use the F1 button to deactivate monochrome embroidery. The machine will not stop button, the machine will rotate 90 degrees clockwise. In this view you press a button. The design height is scaled 5% each ... can see how many degrees the design has rotated from its original position. When you press a button. Embroidery edit Press the alternatives button to toggle to activate monochrome embroidery. The design width is scaled 5% each time you can rotate the design around its center point. In...
...can see how far the design has been moved from its original position. Use the F1 button to deactivate monochrome embroidery. The machine will not stop button, the machine will rotate 90 degrees clockwise. In this view you press a button. The design height is scaled 5% each ... can see how many degrees the design has rotated from its original position. When you press a button. Embroidery edit Press the alternatives button to toggle to activate monochrome embroidery. The design width is scaled 5% each time you can rotate the design around its center point. In...

Owner's Manual
Page 56
... Connect a USB stick and press OK so that cannot be using a USB stick that forces the embroidery unit to move freely, remove the hoop and then press OK. In order for calibrating the embroidery arm. The machine will appear. Design includes elements that cannot be opened . This can load or save a design. Press... by wrong Àle formats on the USB stick, the USB stick could be damaged or you to slide off the hoop and clear the machine area for the embroidery arm to move outside the limits for the attached hoop. Stop command in the design.
... Connect a USB stick and press OK so that cannot be using a USB stick that forces the embroidery unit to move freely, remove the hoop and then press OK. In order for calibrating the embroidery arm. The machine will appear. Design includes elements that cannot be opened . This can load or save a design. Press... by wrong Àle formats on the USB stick, the USB stick could be damaged or you to slide off the hoop and clear the machine area for the embroidery arm to move outside the limits for the attached hoop. Stop command in the design.
Owner's Manual
Page 59
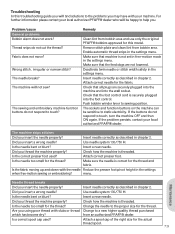
... persists, contact your machine. Is the fabric moving up and down with the needle Reduce the presser foot pivot height in chapter 2. Insert needle correctly as described in the settings when free-motion sewing or embroidering? The sewing and embroidery machine function buttons do not... cut the thread? The sockets and function buttons on the machine can be happy to help you insert a wrong needle? Remedy Clean lint from bobbin area and use only the original PFAFF® bobbins approved for...
... persists, contact your machine. Is the fabric moving up and down with the needle Reduce the presser foot pivot height in chapter 2. Insert needle correctly as described in the settings when free-motion sewing or embroidering? The sewing and embroidery machine function buttons do not... cut the thread? The sockets and function buttons on the machine can be happy to help you insert a wrong needle? Remedy Clean lint from bobbin area and use only the original PFAFF® bobbins approved for...

Owner's Manual
Page 66
5D™ Embroidery Machine Communication CD (For personal computer. See page 2:10)
5D™ Embroidery Machine Communication CD (For personal computer. See page 2:10)


