
Owner's Manual
Page 5
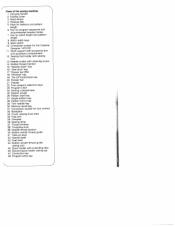
... 25 Bobbin winder 26 Pattern start key 27 Single pattern key 28 Pattern mirror key 29 Twin neddle key 30 Memory recall key 31 Connection socket for foot control 32 Baseplate 33 Cover, sewing hook area 34 Free arm 35 Threader 36 Sewing lamp 37 Thread trimmer 38 Threading slots 39 Needle thread tension 40 Bobbin winder thread guide 41 Take-up lever 42 Needle plate 43 Dual feed 44 Bobbin winder thread guide (swing-out) 45 Spool holder with unwinding disc 46 Second spool holder (swing...
... 25 Bobbin winder 26 Pattern start key 27 Single pattern key 28 Pattern mirror key 29 Twin neddle key 30 Memory recall key 31 Connection socket for foot control 32 Baseplate 33 Cover, sewing hook area 34 Free arm 35 Threader 36 Sewing lamp 37 Thread trimmer 38 Threading slots 39 Needle thread tension 40 Bobbin winder thread guide 41 Take-up lever 42 Needle plate 43 Dual feed 44 Bobbin winder thread guide (swing-out) 45 Spool holder with unwinding disc 46 Second spool holder (swing...

Owner's Manual
Page 29
... material plies. that the needle is adjusted correctly at the works. or bobbin thread tension is important to correct it is correct. In order to 5. Checking the needle The normal setting is for buttonhole sewing. 25 Sew a short seam. Range 3 is thread from 3 tension: to obtain good sewing results it , turn the adjusting screw by small amounts only. The higher the number, the tighter the thread tension. N Needle thread tension 39 A = setting mark Important!
... material plies. that the needle is adjusted correctly at the works. or bobbin thread tension is important to correct it is correct. In order to 5. Checking the needle The normal setting is for buttonhole sewing. 25 Sew a short seam. Range 3 is thread from 3 tension: to obtain good sewing results it , turn the adjusting screw by small amounts only. The higher the number, the tighter the thread tension. N Needle thread tension 39 A = setting mark Important!
Owner's Manual
Page 33
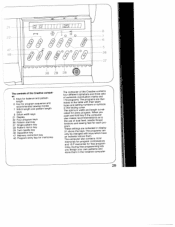
... balance and pattern length 6 Key for program sequence and recommended sewing modes 7 Stitch length and pattern length keys 8 Stitch width keys 21 Display 22 Four program keys 26 Pattern start key 27 Single pattern key 28 Pattern mirror key 29 Twin needle key 30 Repetition key 47 48 Memory correction key Program entry key for memories \ The computer of dual feed, needle thread tensions and sewing feet for combinations free program...
... balance and pattern length 6 Key for program sequence and recommended sewing modes 7 Stitch length and pattern length keys 8 Stitch width keys 21 Display 22 Four program keys 26 Pattern start key 27 Single pattern key 28 Pattern mirror key 29 Twin needle key 30 Repetition key 47 48 Memory correction key Program entry key for memories \ The computer of dual feed, needle thread tensions and sewing feet for combinations free program...
Owner's Manual
Page 36
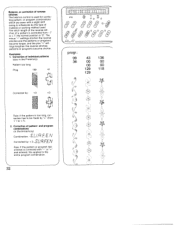
the normal position is too long, cor rection has to be made by "+" (from - 7 to + 7), 2. patterns or programs become longer, and the plus "+" set tings lengthen the reverse stitches; Correction of pattern- Balance, or correction of reverse stitches The balance control is used . I.I I I 1! The minus '-" settings shorten the reverse stitches and the patterns or programs become shorter. Examples: 1. Correction of individual patterns (also in the M-memory...
the normal position is too long, cor rection has to be made by "+" (from - 7 to + 7), 2. patterns or programs become longer, and the plus "+" set tings lengthen the reverse stitches; Correction of pattern- Balance, or correction of reverse stitches The balance control is used . I.I I I 1! The minus '-" settings shorten the reverse stitches and the patterns or programs become shorter. Examples: 1. Correction of individual patterns (also in the M-memory...

Owner's Manual
Page 46
... the light bulb towards B. Clean the feed dog and the parts in the sewing lamp. 42 Pull out the edge guide. Clean the bobbin thread monitor as shown in the illustration, every 15 to use only a 15-watt light bulb in the sewing hook area with a soft brush. Insert the new bulb so that , the machine is main tenance-free and must not be oiled. \ Changing the light bulb: • Disconnect the mains plug. 4 Cleaning and oiling...
... the light bulb towards B. Clean the feed dog and the parts in the sewing lamp. 42 Pull out the edge guide. Clean the bobbin thread monitor as shown in the illustration, every 15 to use only a 15-watt light bulb in the sewing hook area with a soft brush. Insert the new bulb so that , the machine is main tenance-free and must not be oiled. \ Changing the light bulb: • Disconnect the mains plug. 4 Cleaning and oiling...

Owner's Manual
Page 48
... I ------ Only stitches, needle For topstitching for basting Straight stitch foot with round needle hole Needle plate with tape -h---. Fringe sewing toot J 93-042 943-9 1 For sewing fringes and for straight position center. For single-needle cording For eyeletting fee - Appliqué toot --- - - -- 93 042 941-91 For appliqué work . They can only be employed for the intended purpose only. I 93-036917-91 For hemming edges J For sewing knitted fabrics 4 For sewing plastic...
... I ------ Only stitches, needle For topstitching for basting Straight stitch foot with round needle hole Needle plate with tape -h---. Fringe sewing toot J 93-042 943-9 1 For sewing fringes and for straight position center. For single-needle cording For eyeletting fee - Appliqué toot --- - - -- 93 042 941-91 For appliqué work . They can only be employed for the intended purpose only. I 93-036917-91 For hemming edges J For sewing knitted fabrics 4 For sewing plastic...
Owner's Manual
Page 50
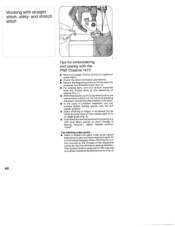
... stitching of edges is supported in sewing direction. Top-stitching collar points • Insert a thread into each collar point before beginning to interrupt work during sewing, e.g. Working with long fabric panels or upon change of sewing direction, select needle position "down". and stretch stitch Tips for the first stitches in this way and you obtain a beautifully stitched corner (Fig. 3). 46 with straight stitch, utility- The material feed is facilitated by pressing "tie-off/button...
... stitching of edges is supported in sewing direction. Top-stitching collar points • Insert a thread into each collar point before beginning to interrupt work during sewing, e.g. Working with long fabric panels or upon change of sewing direction, select needle position "down". and stretch stitch Tips for the first stitches in this way and you obtain a beautifully stitched corner (Fig. 3). 46 with straight stitch, utility- The material feed is facilitated by pressing "tie-off/button...
Owner's Manual
Page 53
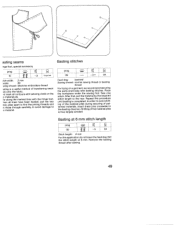
... the material by the required stitch length to the basting direction. Repeat this application do not lower the feed dog. Basting at 6 mm. hen all contours with tailoring chalk on a garment, we recommend securing the parts previously with the fringe foot. Remove the basting thread after sewing. 49 ) asting seams nge foot, special accessory 10 i_iL_L_z i itch-width: 2 mm 9edle: 80 wing thread: Machine embroidery thread sting a a useful method of the material...
... the material by the required stitch length to the basting direction. Repeat this application do not lower the feed dog. Basting at 6 mm. hen all contours with tailoring chalk on a garment, we recommend securing the parts previously with the fringe foot. Remove the basting thread after sewing. 49 ) asting seams nge foot, special accessory 10 i_iL_L_z i itch-width: 2 mm 9edle: 80 wing thread: Machine embroidery thread sting a a useful method of the material...
Owner's Manual
Page 55
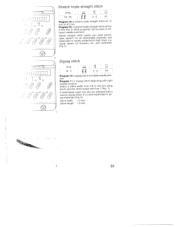
... /;) 4 /) I ro& Zigzag stitch prog -- 10 11 H 3- Program lOis zigzag stitch at 3 to 6 mm (Fig. 4). Stitch width 1.0 mm Stitch length: 1.5 mm 2 51 It is stretch triple straight stitch at 1.5 mm to 4.5 mm. Both programs can also be sewn in dif ferent needle positions. ___ 12?2 Stretch triple straight stitch prog 04 05 H 3-5 OA Program 04 is used especially for seams subjected to high strain, e.g. Elastic straight stitch seams you need (pressopen seams) for all...
... /;) 4 /) I ro& Zigzag stitch prog -- 10 11 H 3- Program lOis zigzag stitch at 3 to 6 mm (Fig. 4). Stitch width 1.0 mm Stitch length: 1.5 mm 2 51 It is stretch triple straight stitch at 1.5 mm to 4.5 mm. Both programs can also be sewn in dif ferent needle positions. ___ 12?2 Stretch triple straight stitch prog 04 05 H 3-5 OA Program 04 is used especially for seams subjected to high strain, e.g. Elastic straight stitch seams you need (pressopen seams) for all...
Owner's Manual
Page 56
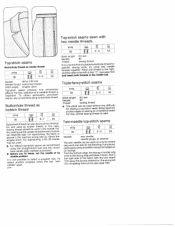
...: 6,0 mm Needle: 80 Thread: sewing thread Istafhpnyredoecuatihfdciecsanotnotshegoewetrtifhtnionegdrt.hawePsolluaerikfctta,eobfolterdnyiebsuctuth"tsCorine"na,ghd(oslettewoetophthareegnaeerdei1gdf0hol2ter,) and insert both threads in the needle eye. buttonhole thread Stitch length: longest stitch Top-stitch seams produce nice ornamental eismfefapemcotrsst,a. fit these, set the needle at its middle position. nwFteo. Sew o the right side of the fabric with two needle threads prog J Top-stitch seams Buttonhole thread as bobbin thread n--- Twin-needle top-stitch seams KK...
...: 6,0 mm Needle: 80 Thread: sewing thread Istafhpnyredoecuatihfdciecsanotnotshegoewetrtifhtnionegdrt.hawePsolluaerikfctta,eobfolterdnyiebsuctuth"tsCorine"na,ghd(oslettewoetophthareegnaeerdei1gdf0hol2ter,) and insert both threads in the needle eye. buttonhole thread Stitch length: longest stitch Top-stitch seams produce nice ornamental eismfefapemcotrsst,a. fit these, set the needle at its middle position. nwFteo. Sew o the right side of the fabric with two needle threads prog J Top-stitch seams Buttonhole thread as bobbin thread n--- Twin-needle top-stitch seams KK...

Owner's Manual
Page 69
... or easily fraying materials, use: • Program: 13, 21, or 22 (Fig. 3). Overcasting raw edges with the zigzag-stitch (J -r Stitch-width: as required Serge the raw edge with overlock foot For materials which contract during sewing. prog [ L1[z_z-zLrz ii 3 Stitch-width: as required Sewing thread: embroidery, darning, or sewing thread The stored zigzag-stitch is suitable for serging of needle position for the zig zag stitch. In this means...
... or easily fraying materials, use: • Program: 13, 21, or 22 (Fig. 3). Overcasting raw edges with the zigzag-stitch (J -r Stitch-width: as required Serge the raw edge with overlock foot For materials which contract during sewing. prog [ L1[z_z-zLrz ii 3 Stitch-width: as required Sewing thread: embroidery, darning, or sewing thread The stored zigzag-stitch is suitable for serging of needle position for the zig zag stitch. In this means...
Owner's Manual
Page 87
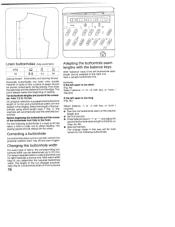
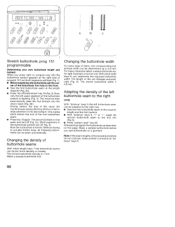
... buttonholes. Changing the buttonhole width For every type of the buttonhole foot fully to 16 mm. In spite of this way will automatically sew the selected but tonhole width can be adapted to affect feeding. With stitch width keys 8, you determine the required buttonhole width. L 18 -3+ J 5 A _ Sewing thread: Embroidery and darning thread Generally buttonholes are stored in the display. Ten buttonhole lengths are sewn onto double material. If the left seam...
... buttonholes. Changing the buttonhole width For every type of the buttonhole foot fully to 16 mm. In spite of this way will automatically sew the selected but tonhole width can be adapted to affect feeding. With stitch width keys 8, you determine the required buttonhole width. L 18 -3+ J 5 A _ Sewing thread: Embroidery and darning thread Generally buttonholes are stored in the display. Ten buttonhole lengths are sewn onto double material. If the left seam...

Owner's Manual
Page 93
... the cut changes automatically (Fig. 5). or more if required. The machine automatically sews the selected buttonhole. Changing the buttonhole width For every type of fabric the corresponding button hole width can set the required width. Example: If the left seam is too short (Fig. 4a) Select balance +1 to 44mm. The length of buttonhole with stitch-length keys 7 (Fig. 1). 1' I1 prog I r-Q 1 Stretch buttonhole, reinforced prog 151 -- -3+ 5A Sewing thread: embroidery and darning thread 18 buttonhole lengths are stored...
... the cut changes automatically (Fig. 5). or more if required. The machine automatically sews the selected buttonhole. Changing the buttonhole width For every type of fabric the corresponding button hole width can set the required width. Example: If the left seam is too short (Fig. 4a) Select balance +1 to 44mm. The length of buttonhole with stitch-length keys 7 (Fig. 1). 1' I1 prog I r-Q 1 Stretch buttonhole, reinforced prog 151 -- -3+ 5A Sewing thread: embroidery and darning thread 18 buttonhole lengths are stored...
Owner's Manual
Page 95
.... Changing the density of buttonhole seams With stitch-length keys 7 the buttonhole seams can be set more densely or loosely. The stored buttonhole density is stored Without having to the first one . you sew buttonholes on this page Make a sample buttonhole before you determine the required buttonholE width. Now, only the left buttonhole sean can be adapted to the right one With "balance" keys 5 the left upper...
.... Changing the density of buttonhole seams With stitch-length keys 7 the buttonhole seams can be set more densely or loosely. The stored buttonhole density is stored Without having to the first one . you sew buttonholes on this page Make a sample buttonhole before you determine the required buttonholE width. Now, only the left buttonhole sean can be adapted to the right one With "balance" keys 5 the left upper...

Owner's Manual
Page 97
... -2 with stitch-length keys 7 (Fig. 1). A buttonhole width of the buttonhole foot fully to 5.5 mm. the The sewing speed should always be mai, tamed for light keys 8, materials a narrow one . With balance keys 5, "+" or "-", adjust tl' second buttonhole seam length to affect feeding. The change made in order not to the first or (Figs. 3a, 3b) • Sew last bartack. For the fabric a following buttonholes. The length of buttonhole with...
... -2 with stitch-length keys 7 (Fig. 1). A buttonhole width of the buttonhole foot fully to 5.5 mm. the The sewing speed should always be mai, tamed for light keys 8, materials a narrow one . With balance keys 5, "+" or "-", adjust tl' second buttonhole seam length to affect feeding. The change made in order not to the first or (Figs. 3a, 3b) • Sew last bartack. For the fabric a following buttonholes. The length of buttonhole with...

Owner's Manual
Page 99
... button holes can be adapted to the first one . • Sew the first buttonhole seam at "balance" keys 5. Adapting the seam lengths of 5 mm is 1.5 mm. The length of buttonhole seams With stitch-length keys 7 the buttonhole seams can be sewn automatically. Note: If the buttonhole seams of the left buttonhole seam can be set more densely or loosely. Make a sample buttonhole before you determine the required buttonhole width. Adjusting the density of the cut changes...
... button holes can be adapted to the first one . • Sew the first buttonhole seam at "balance" keys 5. Adapting the seam lengths of 5 mm is 1.5 mm. The length of buttonhole seams With stitch-length keys 7 the buttonhole seams can be sewn automatically. Note: If the buttonhole seams of the left buttonhole seam can be set more densely or loosely. Make a sample buttonhole before you determine the required buttonhole width. Adjusting the density of the cut changes...
Owner's Manual
Page 103
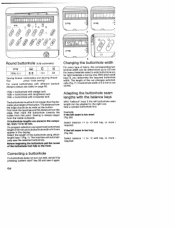
... the inside from 7.0 to -2 with key, or more i required. 4 I j:L 1 ':I 1 JJ Li prog () I • prog Round buttonhole (fully automatic) prog 153a, b, C 5A Sewing thread: embroidery and darning thread Key: press "slow sewing" For round buttonholes with different bartack designs please see table on page 92. 4 Changing the buttonhole width For every type of fabric, the corresponding but tonhole width can be determined up to the front...
... the inside from 7.0 to -2 with key, or more i required. 4 I j:L 1 ':I 1 JJ Li prog () I • prog Round buttonhole (fully automatic) prog 153a, b, C 5A Sewing thread: embroidery and darning thread Key: press "slow sewing" For round buttonholes with different bartack designs please see table on page 92. 4 Changing the buttonhole width For every type of fabric, the corresponding but tonhole width can be determined up to the front...
Owner's Manual
Page 129
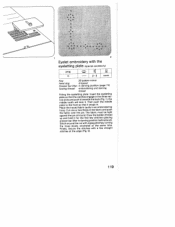
•a I . •, • 1 2 Eyelet embroidery with the eyeletting plate (special accessory) prog -- I L - 2-3 removed Key: 28 pattern mirror Feed dog: dropped Presser bar lifter: in darning position (page 74) Sewing thread: embroidering and darning thread Fitting the eyeletting plate: Insert the eyeletting plate so that it snaps in. Then push the needle plate to the front so that the catches engage in darning position beforehand). Finally, secure the stitches with zigzag stitches, turning the hoop slowly clockwise at the edge...
•a I . •, • 1 2 Eyelet embroidery with the eyeletting plate (special accessory) prog -- I L - 2-3 removed Key: 28 pattern mirror Feed dog: dropped Presser bar lifter: in darning position (page 74) Sewing thread: embroidering and darning thread Fitting the eyeletting plate: Insert the eyeletting plate so that it snaps in. Then push the needle plate to the front so that the catches engage in darning position beforehand). Finally, secure the stitches with zigzag stitches, turning the hoop slowly clockwise at the edge...
Owner's Manual
Page 178
... stitch Fancy stitch Fault finding Fringes 63 52 162, 163 115 G Gathering with elastic thread 59 Gathering with shirring foot 60 Gathering, straight stitch 58 H Hem-stitching Hemmer Hems, securing with twin-needle Honecomb stitch Hyphen or dash 116, 117 56 52, 68 68 145 and semi-automatic) Buttonholes, stretch reinforced programmable Buttonholes, stretch (fully- Index Sewing instructions A Alphabet, outline 142 Alphabets and numbers, programming 138 Appliqueing 104 B Balance Bartacks, width and length Basting Basting seams Binding attachment Binding edges Blind stitch...
... stitch Fancy stitch Fault finding Fringes 63 52 162, 163 115 G Gathering with elastic thread 59 Gathering with shirring foot 60 Gathering, straight stitch 58 H Hem-stitching Hemmer Hems, securing with twin-needle Honecomb stitch Hyphen or dash 116, 117 56 52, 68 68 145 and semi-automatic) Buttonholes, stretch reinforced programmable Buttonholes, stretch (fully- Index Sewing instructions A Alphabet, outline 142 Alphabets and numbers, programming 138 Appliqueing 104 B Balance Bartacks, width and length Basting Basting seams Binding attachment Binding edges Blind stitch...
Owner's Manual
Page 179
... with zigzag stitch and overlock foot 62 Sewing with twin-needle 52 Shell edging 114 Smocking with elastic threads 61 Spacing between two words 144 Spacing mark 144 Special marks 141 Stitch density 122, 128 Stitch length 126 Stitch length, changing 126 Stitch width 128 Stitch width, changing 128 Straight stitch 50, 51,52,53 Stretch triple straight stitch 51 Stretch triple zigzag stitch 63 Swan 156, 157 T T-shirt hems Texts, sewing Tips for embroidering and sewing Top-stitching seams Twin needle, fancy seams 68...
... with zigzag stitch and overlock foot 62 Sewing with twin-needle 52 Shell edging 114 Smocking with elastic threads 61 Spacing between two words 144 Spacing mark 144 Special marks 141 Stitch density 122, 128 Stitch length 126 Stitch length, changing 126 Stitch width 128 Stitch width, changing 128 Straight stitch 50, 51,52,53 Stretch triple straight stitch 51 Stretch triple zigzag stitch 63 Swan 156, 157 T T-shirt hems Texts, sewing Tips for embroidering and sewing Top-stitching seams Twin needle, fancy seams 68...


