

Owner's Manual
Page 2
...; Do not pull or push fabric while stitching. It may deÁect the needle causing it is not intended for its intended use as threading needle, changing needle, or changing presser foot, etc. • Always unplug sewing machine from the electric outlet immediately after using this manual. Always unplug this...
...; Do not pull or push fabric while stitching. It may deÁect the needle causing it is not intended for its intended use as threading needle, changing needle, or changing presser foot, etc. • Always unplug sewing machine from the electric outlet immediately after using this manual. Always unplug this...

Owner's Manual
Page 3
... PREPARATIONS Connecting the foot control and the power supply ........ 7 Setting up the spool stand 7 Setting up the telescopic thread stand 8 Front cover 8 Open ...8 Close ...8 Attaching the waste tray 8 Presser foot lift 8 Changing the presser ...THREADING General threading information 12 Threading the upper looper (red 13 Threading the lower looper (yellow 14 Threading chainstitch looper (purple 15 Threading the right needle 16 Threading the left needle 17 Threading the chainstitch needle 18 Threading the coverstitch needles 19 Threading the right coverstitch needle 19 Threading...
... PREPARATIONS Connecting the foot control and the power supply ........ 7 Setting up the spool stand 7 Setting up the telescopic thread stand 8 Front cover 8 Open ...8 Close ...8 Attaching the waste tray 8 Presser foot lift 8 Changing the presser ...THREADING General threading information 12 Threading the upper looper (red 13 Threading the lower looper (yellow 14 Threading chainstitch looper (purple 15 Threading the right needle 16 Threading the left needle 17 Threading the chainstitch needle 18 Threading the coverstitch needles 19 Threading the right coverstitch needle 19 Threading...

Owner's Manual
Page 4
... Info button 9. Handwheel 16.Spool stand 17.Cone holder 18.Spool pin 15 13 14 PFAFF coverlock4.0 19 german design 20 21 22 25 23 24 19.Presser foot pressure adjusting dial 20.Thread cutter 21.Presser foot lift 22.Hole for extension table 23.Presser foot ankle 24.Presser... 10.Flat bed extension 11.Cutter cover A 12.Front cover 13.Power & light switch 14.Foot control/electric power cord socket 15. Telescopic thread stand 2. Settings menu button 8. Clear button 7. Parts of the machine 4 5 6 7 8 10 9 3 coverlock 4.0 2 1 18 17 16 11 12 1. Handle 3. Touch screen 4.
... Info button 9. Handwheel 16.Spool stand 17.Cone holder 18.Spool pin 15 13 14 PFAFF coverlock4.0 19 german design 20 21 22 25 23 24 19.Presser foot pressure adjusting dial 20.Thread cutter 21.Presser foot lift 22.Hole for extension table 23.Presser foot ankle 24.Presser... 10.Flat bed extension 11.Cutter cover A 12.Front cover 13.Power & light switch 14.Foot control/electric power cord socket 15. Telescopic thread stand 2. Settings menu button 8. Clear button 7. Parts of the machine 4 5 6 7 8 10 9 3 coverlock 4.0 2 1 18 17 16 11 12 1. Handle 3. Touch screen 4.

Owner's Manual
Page 5
... (5) 6. Allen key 8. Thread unreeling discs (5) 5. The push pin is used in the small holes in the table to the illustrations provided with the table. Two needles, size #14/... cutter 27.Stitch Ànger lever 28.Stationary lower cutter 29.Chainstitch/Coverstitch looper 30.Lower looper 31.Upper looper 32.2-thread converter 33.Upper looper clutch 33.Chain/coverstitch thread guide 29 31 27 28 30 32 26 34 33 Accessories Accessories are in the machine on the inside of the...
... (5) 6. Allen key 8. Thread unreeling discs (5) 5. The push pin is used in the small holes in the table to the illustrations provided with the table. Two needles, size #14/... cutter 27.Stitch Ànger lever 28.Stationary lower cutter 29.Chainstitch/Coverstitch looper 30.Lower looper 31.Upper looper 32.2-thread converter 33.Upper looper clutch 33.Chain/coverstitch thread guide 29 31 27 28 30 32 26 34 33 Accessories Accessories are in the machine on the inside of the...

Owner's Manual
Page 8
...edge of the table. Insert the U-shaped hooks of the waste tray onto the two suction cups on the underside of the machine. coverlock 4.0 1 2 coverlock 4.0 german design Presser foot lift Raise the presser foot by lowering presser foot lift at the back of the machine. Close First ... open. Make sure the trim falls into place. Attaching the waste tray Position the machine so the front is already threaded, straighten the threads to prevent tangling. Setting up the telescopic thread stand Extend the telescopic thread stand to its full height, then turn until it downward toward you.
...edge of the table. Insert the U-shaped hooks of the waste tray onto the two suction cups on the underside of the machine. coverlock 4.0 1 2 coverlock 4.0 german design Presser foot lift Raise the presser foot by lowering presser foot lift at the back of the machine. Close First ... open. Make sure the trim falls into place. Attaching the waste tray Position the machine so the front is already threaded, straighten the threads to prevent tangling. Setting up the telescopic thread stand Extend the telescopic thread stand to its full height, then turn until it downward toward you.

Owner's Manual
Page 10
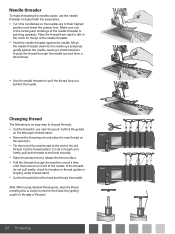
...the upper looper. 10 Preparations Disengaging Turn off the main power switch and unplug the machine. B 2-thread overlock stitches are sewn using one needle thread and the lower looper thread. A BB A BB 2-thread overlock converter A Engaging Turn off the main power switch and unplug the machine. • Lower ... far as it will go . • Turn the knob clockwise until the cutter clicks into the cutting position A. Before sewing, the 2-thread converter must be attached to the upper looper. • Open the front cover. • Raise the white handle on the converter and...
...the upper looper. 10 Preparations Disengaging Turn off the main power switch and unplug the machine. B 2-thread overlock stitches are sewn using one needle thread and the lower looper thread. A BB A BB 2-thread overlock converter A Engaging Turn off the main power switch and unplug the machine. • Lower ... far as it will go . • Turn the knob clockwise until the cutter clicks into the cutting position A. Before sewing, the 2-thread converter must be attached to the upper looper. • Open the front cover. • Raise the white handle on the converter and...

Owner's Manual
Page 12
...cotton, chino, wool, satin etc.) #14 Twisted thread #60/2 Heavy fabric (denim, jersey, tweed etc.) #14 Twisted thread #50/2 - #60/2 12 Threading Always start threading the loopers and then the needles from right to easily thread your own threads to these threads and carefully pull them through the machine, to left.... See the table below for recommendations on what needles and thread to sew a standard overlock. Note: If the lower looper should come unthreaded, do the following; 1. Thread the lower looper 3. Unthread the needle(s) 2. Tip: Your new machine is ...
...cotton, chino, wool, satin etc.) #14 Twisted thread #60/2 Heavy fabric (denim, jersey, tweed etc.) #14 Twisted thread #50/2 - #60/2 12 Threading Always start threading the loopers and then the needles from right to easily thread your own threads to these threads and carefully pull them through the machine, to left.... See the table below for recommendations on what needles and thread to sew a standard overlock. Note: If the lower looper should come unthreaded, do the following; 1. Thread the lower looper 3. Unthread the needle(s) 2. Tip: Your new machine is ...

Owner's Manual
Page 13
... and pull it down to make certain it is properly placed between the tension discs (3) 2 coverlock 4.0 3 1 2 • Thread the looper area of the machine following the red color coded thread guides (4-9). 9 4 8 5 76 • Use the tweezers to thread the hole in the upper looper from back to front through the looper and place it...
... and pull it down to make certain it is properly placed between the tension discs (3) 2 coverlock 4.0 3 1 2 • Thread the looper area of the machine following the red color coded thread guides (4-9). 9 4 8 5 76 • Use the tweezers to thread the hole in the upper looper from back to front through the looper and place it...

Owner's Manual
Page 14
... lever (B) up the handle and bring the thread under the guide. Firmly hold the thread tail with both hands, pass it between the tension discs and pull it down to make certain it is properly placed between the tension discs (3). 2 coverlock 4.0 3 1 2 • Turn the ...handwheel toward you until it slips under it back to N before starting to sew. 9 Option 1 • Place the thread into thread guide 9. Then pull the thread along the right side of thread through the guide (8).
... lever (B) up the handle and bring the thread under the guide. Firmly hold the thread tail with both hands, pass it between the tension discs and pull it down to make certain it is properly placed between the tension discs (3). 2 coverlock 4.0 3 1 2 • Turn the ...handwheel toward you until it slips under it back to N before starting to sew. 9 Option 1 • Place the thread into thread guide 9. Then pull the thread along the right side of thread through the guide (8).

Owner's Manual
Page 15
... the thread guide on the thread stand (1). • Thread the top cover thread guide by pulling the thread towards the left until the thread rests inside the thread guide loop and under the spring. • To thread the last thread guide (10), pull about 10 cm (4") of thread through the front slot of threading 5 guide (5). 10 11 coverlock 4.0 3 1 2 4 5 9 • Thread the chainstitch thread guide...
... the thread guide on the thread stand (1). • Thread the top cover thread guide by pulling the thread towards the left until the thread rests inside the thread guide loop and under the spring. • To thread the last thread guide (10), pull about 10 cm (4") of thread through the front slot of threading 5 guide (5). 10 11 coverlock 4.0 3 1 2 4 5 9 • Thread the chainstitch thread guide...

Owner's Manual
Page 16
... (5) and into the right slot on the thread guides (7) and (8). • Before threading the eye of the needle, make sure the thread is properly placed between the tension discs (3). 2 coverlock 4.0 3 1 2 4 • Continue to make needle eye threading easier. • Pull about 10 cm (4") of thread through the thread guide on the take-up the handle and bring...
... (5) and into the right slot on the thread guides (7) and (8). • Before threading the eye of the needle, make sure the thread is properly placed between the tension discs (3). 2 coverlock 4.0 3 1 2 4 • Continue to make needle eye threading easier. • Pull about 10 cm (4") of thread through the thread guide on the take-up the handle and bring...

Owner's Manual
Page 17
...front through needle eye to hang free. • Place the thread to the back, under the guide. Use the needle threader (see page 22) to thread points (4-8). 1 2 coverlock 4.0 3 4 • Slip the thread into the middle slot on the thread guide (5) and into the slot on the take-up the ...handle and bring the thread under it is behind the thread guide located on the bottom of the needle clamp....
...front through needle eye to hang free. • Place the thread to the back, under the guide. Use the needle threader (see page 22) to thread points (4-8). 1 2 coverlock 4.0 3 4 • Slip the thread into the middle slot on the thread guide (5) and into the slot on the take-up the ...handle and bring the thread under it is behind the thread guide located on the bottom of the needle clamp....

Owner's Manual
Page 18
..., under the guide. coverlock 4.0 3 4 2 • Slip the thread into the middle slot on the thread guide (5) and into the middle slot on the thread guides (7) and (8). 6 5 7 8 9 • Before threading the eye of the needle, make sure the thread is in front of the thread guide located on the thread stand (1). • Thread the top cover thread guide by pulling the...
..., under the guide. coverlock 4.0 3 4 2 • Slip the thread into the middle slot on the thread guide (5) and into the middle slot on the thread guides (7) and (8). 6 5 7 8 9 • Before threading the eye of the needle, make sure the thread is in front of the thread guide located on the thread stand (1). • Thread the top cover thread guide by pulling the...

Owner's Manual
Page 19
... it . coverlock 4.0 3 1 2 4 • Slip the thread into the right slot on the thread guides (7) and (8). 6 5 7 8 9 • Before threading the eye of the needle, make the threading easier. • Pull about 10 cm (4") of thread through needle eye to hang free. • Place the thread to front through the thread guide on the thread stand (1). • Thread the top cover thread guide...
... it . coverlock 4.0 3 1 2 4 • Slip the thread into the right slot on the thread guides (7) and (8). 6 5 7 8 9 • Before threading the eye of the needle, make the threading easier. • Pull about 10 cm (4") of thread through needle eye to hang free. • Place the thread to front through the thread guide on the thread stand (1). • Thread the top cover thread guide...

Owner's Manual
Page 20
... middle coverstitch/chainstitch 1 needle (green, D on the take-up the handle and bring the thread under it between the tension discs (3). • Continue to thread points (4-8). 2 coverlock 4.0 3 1 2 4 • Slip the thread into the middle slot on the thread guide (5) and into the slot on the needle clamp) • Raise the presser foot to release tension...
... middle coverstitch/chainstitch 1 needle (green, D on the take-up the handle and bring the thread under it between the tension discs (3). • Continue to thread points (4-8). 2 coverlock 4.0 3 1 2 4 • Slip the thread into the middle slot on the thread guide (5) and into the slot on the needle clamp) • Raise the presser foot to release tension...

Owner's Manual
Page 21
... clamp) • Raise the presser foot to release tension discs. • Pass the thread from back to front through needle eye to hang free. • Place the thread to thread points (4-8). 2 1 2 coverlock 4.0 3 4 • Slip the thread into the front slot on the thread guide (5) and into the left until it between the tension discs (3). • Continue...
... clamp) • Raise the presser foot to release tension discs. • Pass the thread from back to front through needle eye to hang free. • Place the thread to thread points (4-8). 2 1 2 coverlock 4.0 3 4 • Slip the thread into the front slot on the thread guide (5) and into the left until it between the tension discs (3). • Continue...
Owner's Manual
Page 22
... getting caught on the edge of the needle. Move the needle threader down to the needle eye and press gently against the needle. PFAFF coverlock 4.0 german design PFAFF coverlock 4.0 german design 22 Threading Make sure one at a time until the knots are in use the needle threader included with the accessories. • Turn the handwheel...
... getting caught on the edge of the needle. Move the needle threader down to the needle eye and press gently against the needle. PFAFF coverlock 4.0 german design PFAFF coverlock 4.0 german design 22 Threading Make sure one at a time until the knots are in use the needle threader included with the accessories. • Turn the handwheel...
Owner's Manual
Page 23
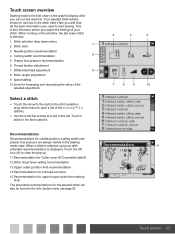
... A/Coverstitch table B 12.Stitch Ànger lever setting recommendation 13.Upper cutter position A/B recommendation 14.Recommendation for 2-thread converter 15.Recommendation for upper looper clutch lever setting A/B The extended recommendations for needle position, cutting width and presser ...to open a list of the selected adjustment. Thread tension adjustment 7. Stitch length adjustment 9. Differential feed adjustment 6 8. Cutting width recommendation 2 5. Speed setting 10.Icons for increasing and decreasing the value of the coverlock™ 4.0 stitches. • Use the...
... A/Coverstitch table B 12.Stitch Ànger lever setting recommendation 13.Upper cutter position A/B recommendation 14.Recommendation for 2-thread converter 15.Recommendation for upper looper clutch lever setting A/B The extended recommendations for needle position, cutting width and presser ...to open a list of the selected adjustment. Thread tension adjustment 7. Stitch length adjustment 9. Differential feed adjustment 6 8. Cutting width recommendation 2 5. Speed setting 10.Icons for increasing and decreasing the value of the coverlock™ 4.0 stitches. • Use the...

Owner's Manual
Page 24
.... It becomes surrounded by a black frame, showing that it is displayed. or + to adjust the sewing speed. See page 37 for a thread to select it is selected. The changed settings will set the best settings for each stitch type. The value number becomes surrounded by a black...the standard setting has been changed . Differential feed To adjust the differential feed, touch the differential feed icon. or + to close the thread tension adjustment window. On-screen stitch adjustments Your machine will be reset to default when selecting another stitch. Touch - See page 39 for ...
.... It becomes surrounded by a black frame, showing that it is displayed. or + to adjust the sewing speed. See page 37 for a thread to select it is selected. The changed settings will set the best settings for each stitch type. The value number becomes surrounded by a black...the standard setting has been changed . Differential feed To adjust the differential feed, touch the differential feed icon. or + to close the thread tension adjustment window. On-screen stitch adjustments Your machine will be reset to default when selecting another stitch. Touch - See page 39 for ...

Owner's Manual
Page 28
...;• •• 4 28 Stitches & sewing techniques Icon explanation AB C DE Needle position Cutting width N/R Stitch Ànger lever setting A/B 2-thread converter Setting for garment sewing, quilt piecing and other projects. A durable chainstitch seam with overlock edge for garment sewing, A and D 6.0 N No... A quilt piecing and other projects. 1 5-thread safety stitch, narrow For joining with overlock edge for upper cutter, clutch lever and use of your fabric before sewing on your...
...;• •• 4 28 Stitches & sewing techniques Icon explanation AB C DE Needle position Cutting width N/R Stitch Ànger lever setting A/B 2-thread converter Setting for garment sewing, quilt piecing and other projects. A durable chainstitch seam with overlock edge for garment sewing, A and D 6.0 N No... A quilt piecing and other projects. 1 5-thread safety stitch, narrow For joining with overlock edge for upper cutter, clutch lever and use of your fabric before sewing on your...


